Эта базовая настройка используется в некоторых других описаниях MikroTik на сайте PC360. Чтоб каждый раз не повторять описание, решено вынести его на отдельную страницу.
Альтернативный вариант – использовать настройки по умолчанию (Default setings).
Еще один альтернативный вариант – быстрая настрйка из меню Quick Set – в конце страницы под спойлером.
Освоить MikroTik Вы можете с помощью онлайн-куса
«Настройка оборудования MikroTik». Курс содержит все темы, которые изучаются на официальном курсе MTCNA. Автор курса – официальный тренер MikroTik. Подходит и тем, кто уже давно работает с микротиками, и тем, кто еще их не держал в руках. В курс входит 162 видеоурока, 45 лабораторных работ, вопросы для самопроверки и конспект.

Настройки протестированы на двух доступных моделях MikroTik: Rb750Gr3 и 951Ui 2HnD и так же подойдут для многих других моделей из-за единой операционной системы всех роутеров MikroTik – RouterOS.
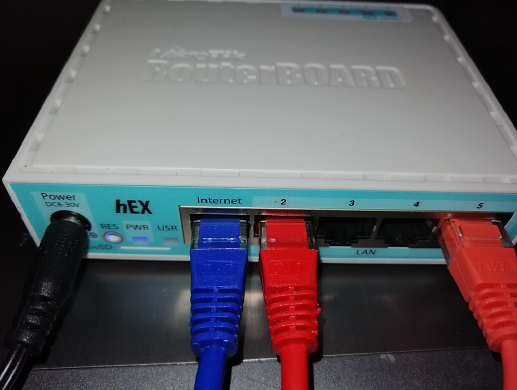
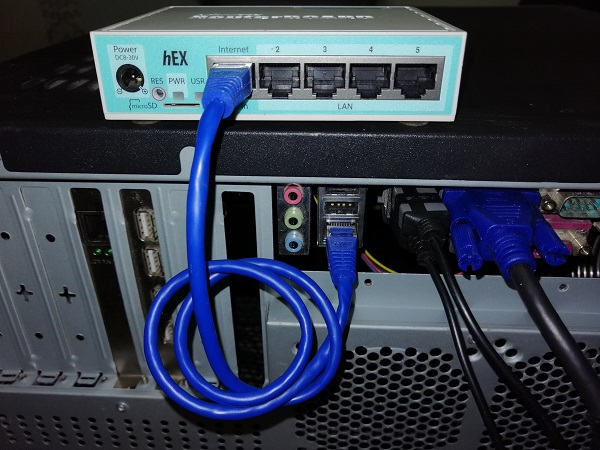
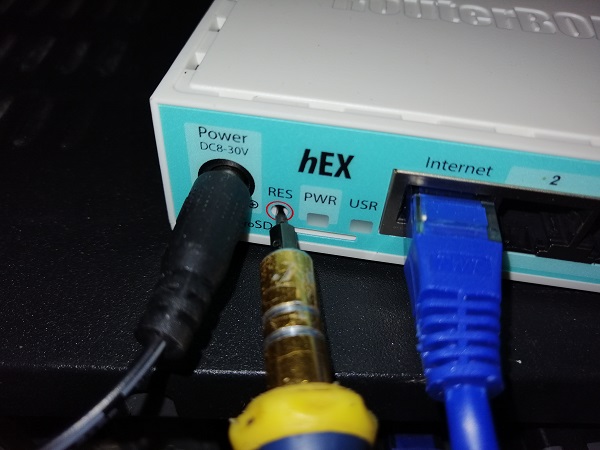
Настройка выполняется из ПК с ОС Windows10. Роутер и ПК соединены прямым патч-кордом. ПК подключен в пятый порт роутера. Настройка IP-адреса сетевого адаптера ПК автоматическая (по DHCP). Специально вводить стандартный для микротиков IP-адрес 192.168.88.xxx не требуется.
Назначение портов:
ether1 – для внешней сети (Интернет);
ether2 – для внутренней сети;
ether3 – для внутренней сети;
ether4 – для внутренней сети;
ether5 – для внутренней сети.
Перед выполнением настроек, рекомендуется обновить прошивку.
Все настройки выполняются через спец. ПО для Windows от разработчика — WinBox. Скачать его можно с официального сайта.
О других способах подключения к роутерам MikroTik тут
Выполнение каждой настройки представлено в графическом интерфейсе и в виде текстовой команды для терминала.
Чтоб ввести текстовую команду, в боковом меню RouterOS микротика нужно выбрать New Terminal и в открывшейся командной строке ввести команду.

Содержание.
1.Подключение через WinBox.
2.Сброс конфигурации.
3.Создание моста (bridge).
4.Добавление портов в мост.
5.Назначение IP-адрес для моста локальной сети.
6.DHCP сервер.
7.Получение внешнего IP-адреса.
8.DNS.
9.Создание правила NAT для доступа в Интернет.
10.Для роутеров с wi—fi активация точки доступа.
11.Правила фильтрации в Firewall.
12.Создание новой учетной записи администратора.
13.Удаление учетной записи admin.
14.Интерфейсы доступа.
15.Настройка даты и время.
16.Идентификатор роутера.
17.Резервная копия конфигурации.
18.Сброс в заводские настройки.
19.Настройка электронной почты.
20.Список команд – базовая настройка.
21.Настройка через Quick Set.
22.Настройка через файл скрипта.
23.Дополнительные полезности.
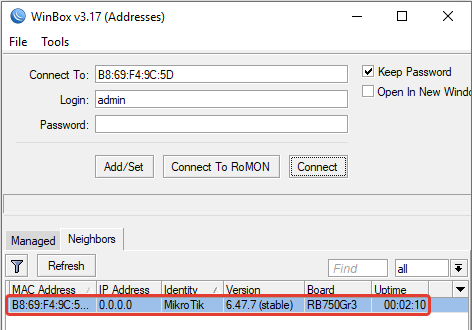
1.Подключение через WinBox.
1.Запускаем WinBox.
2.Нажимаем на вкладку Neighbors.
3 Кликаем на MAC-адрес нужного роутера.
4.Вводим логин-пароль (базовый логин admin, пароля нет).
5.Нажимаем кнопку «Connect».

2.Сброс конфигурации.
1.Нажимаем System в боковом меню.
2.Из выпадающего меню выбираем пунк Reset Configuration.
3.В открывшемся окне отмечаем галочкой No Dafault Configuration (для сброса дефолтной конфигурации).
4.Нажимаем кнопку Reset Configuration. 
Через командную строку терминала:
|
|
/system reset—configuration no—defaults=yes |
!!!Удаляя базовые настройки, удалятся параметры безопасности. Если роутер будет работать шлюзом в интернет необходимо настроить интерфейсы доступа, учетные записи, фильтры firewall и прочие настройки безопасности.
Переподключаемся.
3.Создание моста (bridge).
Мост нужен для организации коммутатора локальной сети.
1.В боковом меню выбираем Bridge.
2.В открывшемся окне нажимаем синий крест (плюс).
3.В окне New Interface нажимаем ОК (в настройках моста ничего не меняем). 
Через командную строку терминала:
|
|
/interface bridge add name=bridge1 |
4.Добавление портов в мост.
Добавляем в мост по очереди порты ether2-4.
1.В окне Bridge выбираем вкладку Ports.
2.Нажимаем синий крест (плюс).
3.В открывшемся окне New Bridge Port указываем интерфейс Interface: ether2
— проверяем строку Bridge: bridge1 (созданный ранее мост)
4.Нажимаем кнопку «ОК».
Другие настройки не изменяем.
Выполняем эти действия для четырех портов(ether2, ether3, ether4, ether5). 
В итоге получится 4 порта в мосте, как на картинке ниже.

Произойдет дисконект. Подключаемся в роутер еще раз.
Через командную строку терминала:
|
|
/interface bridge port add bridge=bridge1 interface=ether2 hw=yes /interface bridge port add bridge=bridge1 interface=ether3 hw=yes /interface bridge port add bridge=bridge1 interface=ether4 hw=yes /interface bridge port add bridge=bridge1 interface=ether5 hw=yes |
* Hardware Offload доступно начиная с прошивки 6.41. Активация этой настройки включает использование switch-чипа для передачи информации на втором уровне модели OSI через мост. Если hw отключено, то обработка информации осуществляется средствами RouterOS. Если прошивка роутера ниже 6.41, или в устройстве отсутствует нужный чип, то из строк команд надо убрать hw=yes. Поддерживаемые устройства.
Для роутера с wi-fi можно добавить интерфейс wlan в bridge.
Через командную строку терминала:
|
|
/interface bridge port add bridge=bridge1 interface=wlan1 |
5.Назначение IP-адрес для моста локальной сети.
1.В боковом меню выбираем IP.
2.В раскрывшемся меню выбираем Addresses.
3.В открывшемся окне Adress List нажимаем синий крест (плюс).
В открывшемся окне New Address вводим параметры:
4.Address: 192.168.100.1/24 (/24 – это маска 255.255.255.0);
-Network: — вводить не надо, появится автоматически;
5.Interface: bridge1
6.Нажимаем кнопку «ОК».

В окне Adress List можно увидеть назначенный адрес.
Через командную строку терминала:
|
|
/ip address add interface=bridge1 address=192.168.100.1/24 |
6.DHCP сервер.
Указание сети для работы DHCP.
1.В боковом меню выбираем IP.
2.В раскрывшемся меню выбираем DHCP Server.
3.Переходим на вкладку Networks.
4.Нажимае синий крест (плюс).
В открывшемся окне DHCP Network вводим параметры:
5.Address: 192.168.100.0/24
6.Gateway: 192.168.100.1
7.Нажимаем кнопку «ОК».
Другие настройки не изменяем.

Сеть появится в списке. 
Через командную строку терминала:
|
|
/ip dhcp—server network add address=192.168.100.0/24 gateway=192.168.100.1 |
Создание пула адресов для работы DHCP.
1.В боковом меню выбираем IP.
2.В раскрывшемся меню выбираем Pool.
3.В открывшемся окне IP Pool нажимаем синий крест (плюс).
В открывшемся окне NEW IP Pool вводим параметры:
4.Name: POOL1
5.Addresses: 192.168.100.10-192.168.100.254
6.Нажимаем кнопку «ОК».
Другие настройки не изменяем.

Через командную строку терминала:
|
|
/ip pool add name=POOL1 ranges=192.168.100.10—192.168.100.254 |
Создание DHCP сервера.
1.В боковом меню выбираем IP.
2.В раскрывшемся меню выбираем DHCP Server.
3.На вкладке DHCP нажимае синий крест (плюс).
В открывшемся окне DHCP Server вводим параметры:
4.Name: dhcp1
5.Interface: bridge1
6.Address Pool: POOL1
7.Нажимаем кнопку «ОК».
Другие настройки не изменяем.

Созданный DHCP сервер. 
Через командную строку терминала:
|
|
/ip dhcp—server add interface=bridge1 address—pool=POOL1 disabled=no |
7.Получение внешнего IP-адреса.
DHCP Client.
1.В боковом меню выбираем IP.
2.В раскрывшемся меню выбираем DHCP Client.
3.Переходим на вкладку DHCP Client.
4.Нажимаем синий крест (плюс).
В открывшемся окне New DHCP Client вводим параметры:
5.Interface: ether1
6.Нажимаем кнопку «ОК».
Другие настройки не изменяем.

Можно добавить описание, нажав кнопку Comment. Коментарии к настройкам лучше писать латинскими буквами.
Полученный IP адрес отобразится в списке. 
Через командную строку терминала:
|
|
/ip dhcp—client add interface=ether1 disabled=no |
СПОЙЛЕР Статический внешний IP-адрес.
IP-адрес, маску, шлюз и DNS должен предоставить провайдер.
1.В боковом меню выбираем IP.
2.В раскрывшемся меню выбираем Addresses.
3.В окнеAdress List нажимаем синий крест (плюс).
В открывшемся окне New Address вводим параметры:
4.Address: 192.168.0.2/24 (внешний IP-адрес и маска от провайдера)
5.Network: 192.168.0.0 (сеть провайдера)
6.Interface: ether1 (порт внешнего интерфейса)
7.Нажимаем кнопку «ОК».

Через командную строку терминала:
|
|
/ip address add address=192.168.0.2/24 network=192.168.0.0 interface=ether1 |
В списке адресов появится новый адрес внешней сети. 
Добавим шлюз (Gateway). Он указывается в списке статических маршрутов. 
Через командную строку терминала:
|
|
/ip route add gateway=192.168.0.1 distance=1 comment=GATEWAY |

Интернет появится после указания DNS и NAT.
СПОЙЛЕР PPPoE.
IP-адрес, маску, шлюз и DNS должен предоставить провайдер. В некоторых случаях возможно автоматическое получение этих параметров.
1.В боковом меню выбираем Interfaces.
2.В открывшемся окне Interface List на вкладке Interface нажимаем на маленький треугольник в кнопке синего креста.
3.В выпадающем меню выбираем пункт PPPoE Client. 
4.В открывшемся окне переходим на вкладку General.
5.Вводим Name: ByFly (любое понятное имя).
6.Указываем Interface: ether1 (интерфейс внешней сети). 
7.Переходим на вкладку Dial Out.
8.Вводим пользователя User: 1234567891011121@beltel.by (из договора с провайдером)
9.Вводим пароль Password: 11111 (из договора с провайдером)
10.Отмечаем галочкой Use Peer DNS.
11.Отмечаем галочкой Add Default Route.
12.Нажимаем кнопку ОК.
В списке появится новый интерфейс. 
Через командную строку терминала:
|
|
/interface pppoe—client add name=ByFly interface=ether1 user=1234567891011121@beltel.by password=11111 use—peer—dns=yes add—default—route=yes disabled=no |
Интернет появится после указания DNS и NAT.
8.DNS.
Статически DNS.
1.В боковом меню выбираем IP.
2.В раскрывшемся меню выбираем DNS.
3.В окне DNS Settings указываем Servers: 192.168.0.1
(можно указать DNS вышестоящего роутера провайдера, или гугла или еще какой-нибудь)
4.Отмечаем галочкой Allow Remote Requests.
5.Нажимаем кнопку ОК. 
Через командную строку терминала:
|
|
/ip dns set servers=192.168.0.1 allow—remote—requests=yes |
Автоматическое получение DNS.
При получении внешнего IP-адреса по DHCP, DNS настроится автоматически. Проверить это можно в меню IP >> DNS.

9.Создание правила NAT для доступа в Интернет.
NAT (Network Address Translation) выполняет замену IP-адресов локальной сети на IP-адрес внешней сети и обратно.
1.В боковом меню выбираем IP.
2.В раскрывшемся меню выбираем Firewall.
3.В открывшемся окне Firewall переходим на вкладку NAT.
4.Добавляем правило нажав синий крест (плюс).
В открывшемся окне NAT Rule вводим параметры:
На вкладке General:
5.Chain: srcnat
6.Out.Interface: ether1
7.Нажимаем кнопку «Apply».
8.Переходим на вкладку Action.

На вкладке Action:
9.Action: masquerade
10.Нажимаем кнопку «ОК».
Другие настройки не изменяем. 
В списке правил NAT появится новое правило.

Через командную строку терминала:
|
|
/ip firewall nat add action=masquerade chain=srcnat out—interface=ether1 |
После создания этого правила должен заработать Интернет.
10.Для роутеров с wi—fi активация точки доступа.
1.В боковом меню выбираем пункт Wireless.
2.В открывшемся окне Wireless Tables на вкладке Interfaces присутствует строчка неактивного профиля wlan1. Нажимаем на нее мышкой один раз.
3.Нажимаем синию галочку на панели выше для активации профиля.
4.Нажимаем дважды на строчку профиля wlan1и в открывшемся окне Interface wlan1 переходим на вкладку Wireless.
5.Указываем режим Mode: ap bridge
6.SSID: wi-fi PC360 (любое удобное имя латиницей для названия точки wi-fi)
7.Нажимаем кнопку «ОК» для сохранения настроек.

8.В окне Wireless Tables переходим на вкладку Security Profiles.
9.Дважды кликаем на профиль с названием default.
В открывшемся окне Security Profile выполняем настройки:
10.Mode: dynamic keys;
11.Authentication Types: отмечаем WPA PSK и WPA2 PSK;
12.Указываем пароли для:
WPA Pre-Shared Key: Password12345 (латинские цифры и буквы)
WPA2 PrShared Key: Password12345 (латинские цифры и буквы)
13. Нажимаем кнопку «ОК» для сохранения настроек. 
Через командную строку терминала:
|
|
/interface wireless set [ find default—name=wlan1 ] mode=ap—bridge band=2ghz—b/g/n channel—width=20/40mhz—Ce distance=indoors frequency=auto ssid=«Wi-fi PC360» wireless—protocol=802.11 disabled=no /interface wireless security—profiles set [ find default=yes ] authentication—types=wpa—psk,wpa2—psk eap—methods=«» mode=dynamic—keys supplicant—identity=MikroTik wpa—pre—shared—key=Password12345 wpa2—pre—shared—key= Password12345 |
Точка wi-fi начнет работать.
Включаем wi-fi в Windows10, нажав на значок сети в нижнем правом углу рабочего стола и активируем беспроводную сеть. Выбираем из списка созданную точку. Подключаемся, введя созданный ранее пароль.

11.Правила фильтрации в Firewall.
Правила необходимы для контроля трафика между внешней и внутренней сетями, а так же для ограничения нежелательного доступа в роутер.
Все правила с разным содержанием, но с одинаковым принципом добавления.
Для добавления любого правила в графическом интерфейсе нужно выполнить последовательность действий.
1.В боковом меню выбираем пункт IP.
2.В выпадающем меню выбираем Firewall.
3.В открывшемся окне переходим на вкладку Filter Rules.
4.Нажимаем синий крест (плюс).
5.В открывшемся окне вводим настройки, для каждого правила и назначения разные.

6.Переходим на вкладку «Action».
7.Указываем вид действия в поле «Action» (разное для разных правил).
8.Нажимаем кнопку «ОК» для сохранения правила. 
Добавить к правилу описание или коvментарий можно нажав кнопку «Comment».
Часто в правилах нужно указывать статус соединения для проверяемых пакетов. Сделать это можно в нижней части вкладки General. 
Для удаления правила нужно выбрать правило и нажать минус на вкладке Filter Rules. 
Ниже представлены правила, которые MikroTik предлагает в дефолтной настройке. 
Из этих правил убраны 3шт., правила №5,6 (ipsec) и 7 (fasttrack). Остальные вполне подходят для базовой настройки роутера.
Все правила представлены в виде текстовых команд для компактности.
Правила входящего (input) в роутер трафика.
1.Правило разрешает входящие пакеты от установленных и связанных (с ранее разрешенными) соединений.
|
|
/ip firewall filter add action=accept chain=input connection—state=established,related comment=«RULE 1 accept established,related» |
2.Правило отбрасывает неверные пакеты входящего трафика.
|
|
/ip firewall filter add action=drop chain=input connection—state=invalid comment=» RULE 2 drop invalid» |
3.Правило разрешает трафик ICMP протокола. Используется для Ping, Traceroute.
|
|
/ip firewall filter add action=accept chain=input protocol=icmp comment=» RULE 3 accept ICMP» |
*для запрета пинга из внешней сети в поле action нужно указать drop
4.Правило отбрасывает весь трафик, который идет не от интерфейсов локальной сети.
|
|
/ip firewall filter add action=drop chain=input in—interface=!bridge1 comment=» RULE 4 drop all not coming from LAN» |
Правила транзитного (forward) трафика.
5.Правило разрешает проходящий трафик для пакетов в соединениях established, related, untracked
|
|
/ip firewall filter add action=accept chain=forward connection—state=established,related,untracked comment=» RULE 5 accept established,related, untracked» |
6.Правило отбрасывает неверные пакеты проходящего трафика.
|
|
/ip firewall filter add action=drop chain=forward connection—state=invalid comment=» RULE 6 drop invalid» |
7.Правило отбрасывает проходной трафик из внешней сети не относящийся к NAT.
|
|
/ip firewall filter add action=drop chain=forward connection—nat—state=!dstnat connection—state=new in—interface=ether1 comment=» RULE 7 drop all from WAN not DSTNATed» |
В самой нижней строке нужно разместить правило, запрещающее все прочее по входу роутера.
|
|
/ip firewall filter add action=drop chain=input in—interface=ether1 comment=«FINAL RULE drop all input» |
Внимание! Если в роутере используется не только базовая настройка, а например VPN или какие-то другие внешние подключения, их необходимо указать в правилах выше последнего. Иначе неуказанные подключения перестанут работать.
При удаленной настройке роутера нужно сперва нажать кнопку Safe Mode.

Если какое-то правило отключит удаленный доступ, то при нажатой кнопке Safe Mode через 9 мин.(TCP timeout) произойдет отмена всех введенных настроек и можно снова подключаться.
12.Создание новой учетной записи администратора.
1.В боковом меню выбираем пункт System.
2.В выпадающем меню выбираем Users.
3.В открывшемся окне переходим на вкладку Users и нажимаем синий крест (плюс).
В открывшемся окне вводим:
4.Name: Kalsarikännit (имя для нового администратора, не использовать admin1 admin..xx, user1 user..xx и т.п.)
5.Group: full (все разрешено)
6.Password: Kfqnfvjhrtyyf!@# (новый сложный пароль)
Confirm Password: Kfqnfvjhrtyyf!@# (подтверждаем новый пароль)
(пароль должен быть с буквами и цифрами разного регистра и спец. символами)
7.Нажимаем кнопку OK.

Через командную строку терминала:
|
|
/user add name=Kalsarikannit password=Kfqnfvjhrtyyf!@# group=full |
13.Удаление учетной записи admin.
1.В боковом меню выбираем пункт System.
2.В выпадающем меню выбираем Users.
3.Отмечаем нужного пользователя (в данном случае admin).
4.Нажимаем красный минус.

Через командную строку терминала:
14.Интерфейсы доступа.
Интерфейсы доступа в MikroTik необходимо заблокировать в целях безопасности.
1.В боковом меню выбираем пункт IP.
2.В выпадающем меню выбираем Services.
3.В открывшемся окне IP Service List выбираем нужный сервис.
4.Нажимаем красный крестик на верхней панели окна.
Выполняем эти действия для всех не используемых сервисов.

В данном случае оставлен доступ через WinBox. Все остальные сервисы заблокированы.
Через командную строку терминала:
|
|
/ip service set telnet disabled=yes /ip service set ftp disabled=yes /ip service set www disabled=yes /ip service set ssh disabled=yes /ip service set api disabled=yes /ip service set api—ssl disabled=yes |
Способы подключения в MikroTik(Ссылка).
15.Настройка даты и время.
Вручную.
1.В боковом меню выбираем пункт System.
2.В выпадающем меню выбираем Clock.
3.Переходим на вкладку Time.
4.Выставляем актуальное время.
5.Выставляем актуальную дату.
6.Выставляем временную зону (в зависимости от расположения).
7.Нажимаем кнопку «ОК».

Через командную строку терминала:
|
|
/system clock set time=12:05:00 date=dec/01/2020 time—zone—name=Europe/Minsk time—zone—autodetect=yes |
(месяца jan, feb, mar, apr, may, jun, jul, aug, sep, oct, nov, dec)
Автоматически.
Указываем NTP сервер и часы будут синхронизироваться автоматически через Интернет. Сервера.
После нажатия кнопки Apply или OK режим поменяется на unicast, а вместо доменных имен появятся IP-адреса серверов. 
Можно проверить актуализацию времени в System >> Clock.
Установка NTP через командную строку терминала:
|
|
/system ntp client set enabled=yes primary—ntp=88.147.254.230 secondary—ntp=88.147.254.232 |
16.Идентификатор роутера.

Идентификатор так же отображается в WinBox при подключении к роутеру.
Через командную строку терминала:
|
|
/system identity set name=PC360 Wi—fi Router |
17.Резервная копия конфигурации.
После выполнения всех настроек необходимо сделать резервную копию конфигурации.
1.В боковом меню выбираем пункт Files.
2.В открывшемся окне нажимаем кнопку Backup.
В открывшемся окне вводим:
3.Name: Config_1 (любое понятное имя латинскими буквами)
4.Don’t Encrypt: отмечаем галочкой
5.Нажимаем кнопку Backup.

Через командную строку терминала:
|
|
/system backup save name=config1 |
Перетягиваем резервную копию в папку на компьютер для сохранения. 
Чтобы восстановит конфигурацию из резервной копии нужно выбрать резервную копию в списке и нажать кнопку Restore.
Каким-то любым удобным сбособом нужно отмечать какой логи-пароль относится к определенной резервной копии.
Были случаи на практике, когда после срочного восстановления конфигурации из резервной копии отсутстввали данные для авторизации. Приходилось сбрасывать роутер в заводские установки, подключаться под стандартным пользователем и выполнять настройки с самого начала.
18.Сброс в заводские настройки.
Если настройка не удалась и к меню роутера пропал доступ, можно выполнить сброс в заводские настройки кнопкой на корпусе. Как это сделать написано тут.
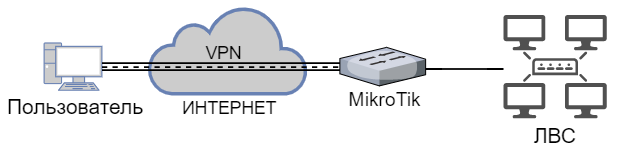
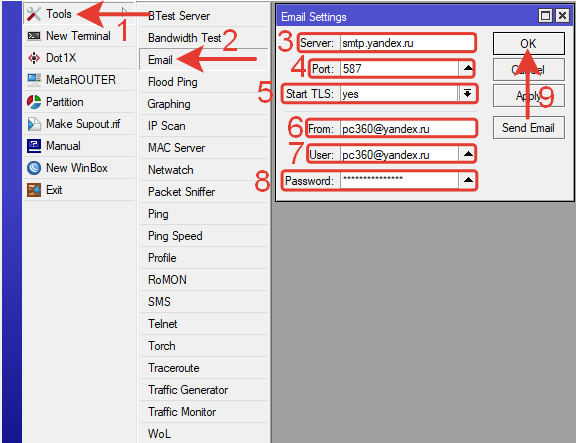
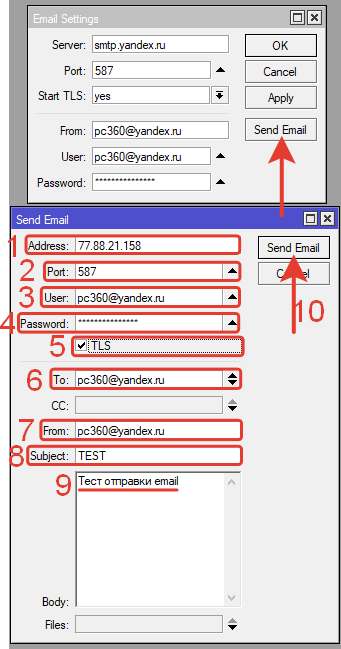
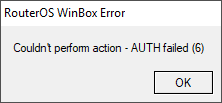
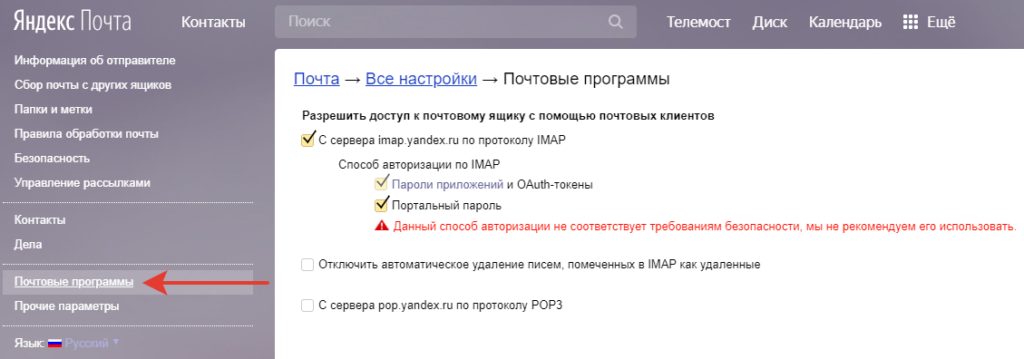
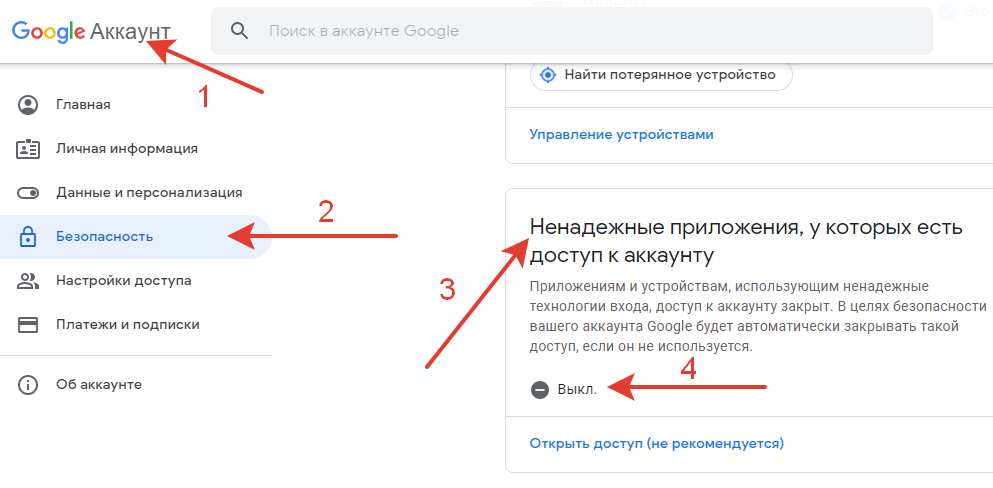
19.Настройка электронной почты.
На отдельной странице.
20.Списки команд для терминала.
СПОЙЛЕР Список команд – базовая настройка (без wi—fi)
*нужно изменить логин-пароль, идентификатор, внешний IP-адрес по DHCP (для прошивок 6.41 и выше)
1 2 3 4 5 6 7 8 9 10 11 12 13 14 15 16 17 18 19 20 21 22 23 24 25 26 27 28 29 30 31
|
/interface bridge add name=bridge1 /interface bridge port add bridge=bridge1 interface=ether2 hw=yes /interface bridge port add bridge=bridge1 interface=ether3 hw=yes /interface bridge port add bridge=bridge1 interface=ether4 hw=yes /interface bridge port add bridge=bridge1 interface=ether5 hw=yes /ip address add interface=bridge1 address=192.168.100.1/24 /ip dhcp—server network add address=192.168.100.0/24 gateway=192.168.100.1 /ip pool add name=POOL1 ranges=192.168.100.10—192.168.100.254 /ip dhcp—server add interface=bridge1 address—pool=POOL1 disabled=no /ip dhcp—client add interface=ether1 disabled=no /ip firewall nat add action=masquerade chain=srcnat out—interface=ether1 /ip firewall filter add action=accept chain=input connection—state=established,related comment=«RULE 1 accept established,related» /ip firewall filter add action=drop chain=input connection—state=invalid comment=» RULE 2 drop invalid» /ip firewall filter add action=accept chain=input protocol=icmp comment=» RULE 3 accept ICMP» /ip firewall filter add action=drop chain=input in—interface=!bridge1 comment=» RULE 4 drop all not coming from LAN» /ip firewall filter add action=accept chain=forward connection—state=established,related,untracked comment=» RULE 5 accept established,related, untracked» /ip firewall filter add action=drop chain=forward connection—state=invalid comment=» RULE 6 drop invalid» /ip firewall filter add action=drop chain=forward connection—nat—state=!dstnat connection—state=new in—interface=ether1 comment=» RULE 7 drop all from WAN not DSTNATed» /ip firewall filter add action=drop chain=input in—interface=ether1 comment=«FINAL RULE drop all input» /user add name=Kalsarikannit password=Password12345 group=full /user remove admin /ip service set telnet disabled=yes /ip service set ftp disabled=yes /ip service set www disabled=yes /ip service set ssh disabled=yes /ip service set api disabled=yes /ip service set api—ssl disabled=yes /system ntp client set enabled=yes primary—ntp=88.147.254.230 secondary—ntp=88.147.254.232 /system identity set name=«PC360 Router» /system backup save name=config1 / |
СПОЙЛЕР Список команд – базовая настройка (с wi-fi)
*нужно изменить логин-пароль, идентификатор, внешний IP-адрес по DHCP
1 2 3 4 5 6 7 8 9 10 11 12 13 14 15 16 17 18 19 20 21 22 23 24 25 26 27 28 29 30 31 32 33 34
|
/interface bridge add name=bridge1 /interface bridge port add bridge=bridge1 interface=ether2 hw=yes /interface bridge port add bridge=bridge1 interface=ether3 hw=yes /interface bridge port add bridge=bridge1 interface=ether4 hw=yes /interface bridge port add bridge=bridge1 interface=ether5 hw=yes /interface bridge port add bridge=bridge1 interface=wlan1 /ip address add interface=bridge1 address=192.168.100.1/24 /ip dhcp—server network add address=192.168.100.0/24 gateway=192.168.100.1 /ip pool add name=POOL1 ranges=192.168.100.10—192.168.100.254 /ip dhcp—server add interface=bridge1 address—pool=POOL1 disabled=no /ip dhcp—client add interface=ether1 disabled=no /interface wireless set [ find default—name=wlan1 ] mode=ap—bridge band=2ghz—b/g/n channel—width=20/40mhz—Ce distance=indoors frequency=auto ssid=«Wi-fi PC360» wireless—protocol=802.11 disabled=no /interface wireless security—profiles set [ find default=yes ] authentication—types=wpa—psk,wpa2—psk eap—methods=«» mode=dynamic—keys supplicant—identity=MikroTik wpa—pre—shared—key=Password12345 wpa2—pre—shared—key= Password12345 /ip firewall nat add action=masquerade chain=srcnat out—interface=ether1 /ip firewall filter add action=accept chain=input connection—state=established,related comment=«RULE 1 accept established,related» /ip firewall filter add action=drop chain=input connection—state=invalid comment=» RULE 2 drop invalid» /ip firewall filter add action=accept chain=input protocol=icmp comment=» RULE 3 accept ICMP» /ip firewall filter add action=drop chain=input in—interface=!bridge1 comment=» RULE 4 drop all not coming from LAN» /ip firewall filter add action=accept chain=forward connection—state=established,related,untracked comment=» RULE 5 accept established,related, untracked» /ip firewall filter add action=drop chain=forward connection—state=invalid comment=» RULE 6 drop invalid» /ip firewall filter add action=drop chain=forward connection—nat—state=!dstnat connection—state=new in—interface=ether1 comment=» RULE 7 drop all from WAN not DSTNATed» /ip firewall filter add action=drop chain=input in—interface=ether1 comment=«FINAL RULE drop all input» /user add name=Kalsarikannit password=Password12345 group=full /user remove admin /ip service set telnet disabled=yes /ip service set ftp disabled=yes /ip service set www disabled=yes /ip service set ssh disabled=yes /ip service set api disabled=yes /ip service set api—ssl disabled=yes /system ntp client set enabled=yes primary—ntp=88.147.254.230 secondary—ntp=88.147.254.232 /system identity set name=«PC360 Wi-fi Router» /system backup save name=config1 / |
21.Настройка через Quick Set
СПОЙЛЕР Настройка через Quick Set для роутера с wi-fi.
22.Настройка через файл скрипта.
СПОЙЛЕР Настройка через файл скрипта
1.Первоначальная настройка выполняется через графический интерфейс или текстовые команды в терминале.
2.Настройка экспортируется в файл скрипта.
3.Файл скрипта применяется при настройке роутера.
Выполнение.
1.Первый пункт выполнены выше — роутер настроен.
2.Экспортируем файл с настройками.
Открываем New Terminal и вводим команду:
(имя файла config2 может быть любое латинскими буквами, расширение .rsc)
Среди файлов появится экспортированный файл. 
3.Переходим в меню System >> Reset Configuration
В поле Run After Reset (Выполнить после сброса) указываем экспортированный файл скрипта.
Нажимаем кнопку «Reset Configuration». 
После сброса конфигурации и перезагрузки в настройках будет применена конфигурация из файла config2.rsc
Среди замеченных багов происходит сброс пользователя и пароль на стандартные admin-без пароля.
23.Дополнительные полезности.
СПОЙЛЕР Дополнительные полезности.
Просмотр всех введенных настроек в терминале.
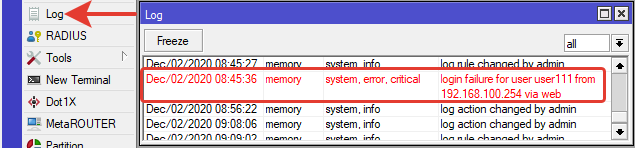
Логирование.
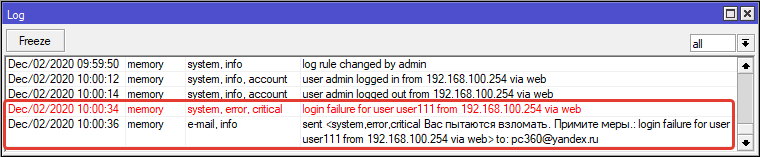
Обо всех происходящих в роутере событиях можно узнать в логах. В боковом меню выбираем Log. 
Любой конкретно указанный лог можно отслеживать в терминале.
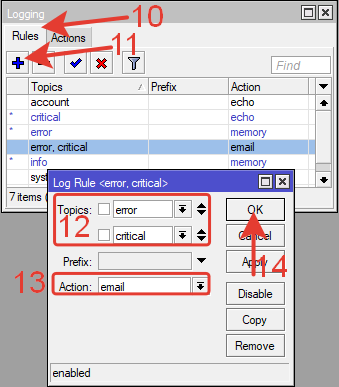
Переходим в меню System >> Logging
В открывшемся окне на вкладке Rules создаем новое правило.
В теме правила указываем событие, за которым хотим наблюдать, например system.
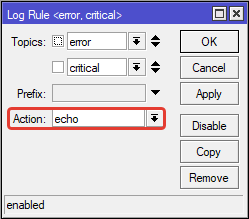
В поле Action выбираем echo.
Нажимаем ОК.

Теперь все события с тегом System отображаются в терминале.

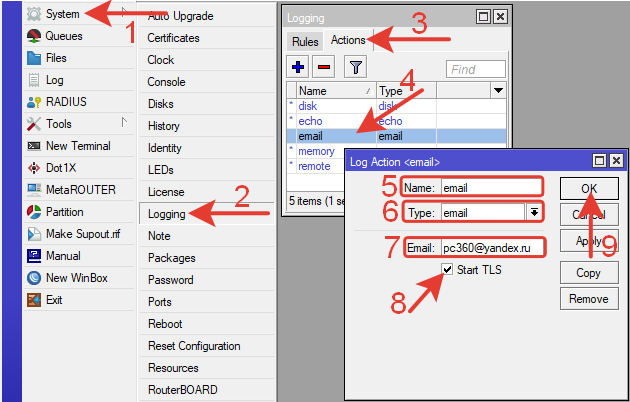
Так же информацию о выбранном событии можно отправлять по email.
Нагрузка на процессор.
System >> Resources 
Какая из служб больше всего загружает процессор можно узнать в Tool >> Profile.
Нажимаем Start и в графе Usage видим использование ресурсов. 
Освоить MikroTik Вы можете с помощью онлайн-куса
«Настройка оборудования MikroTik». Курс содержит все темы, которые изучаются на официальном курсе MTCNA. Автор курса – официальный тренер MikroTik. Подходит и тем, кто уже давно работает с микротиками, и тем, кто еще их не держал в руках. В курс входит 162 видеоурока, 45 лабораторных работ, вопросы для самопроверки и конспект.
2020-12-02T13:52:42
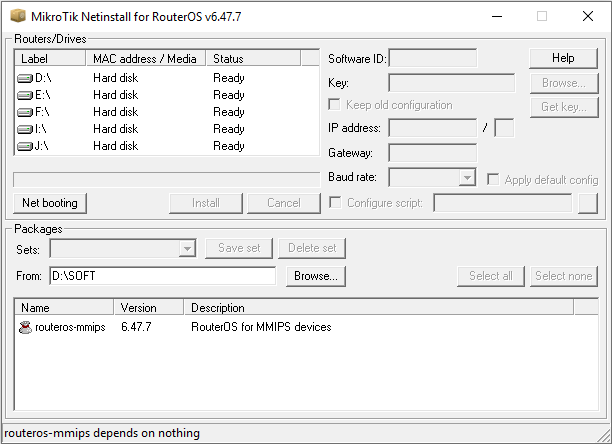
Настройка ПО