Архив метки: MikroTik Router Tutorials & Guides

WireGuard Site to Site VPN Between MikroTik RouterOS 7

WireGuard is a free, open source, secure and high-speed modern VPN solution. WireGuard is extremely easy to implement but utilizes state-of-the-art cryptography. WireGuard can be used as either Client-Server VPN technology or Site to Site VPN technology.


From the RouterOS 7, MikroTik introduces WireGuard VPN as their native package. So, who are using RouterOS 7 can use WireGuard VPN and can implement both client-server and site to site VPN with WireGuard free VPN server.


In my previous article, I discussed how to configure client-server free VPN server with WireGuard and how to connect windows client with WireGuard VPN. In this article, I am going to show how to setup a site-to-site WireGuard VPN between two MikroTik RouterOS 7.


Site to Site WireGuard VPN Network Diagram


In this article, we are going to implement a site-to-site VPN like the following image where two offices are connected over WireGuard site to site VPN service.


Site to Site Wiregurard VPN


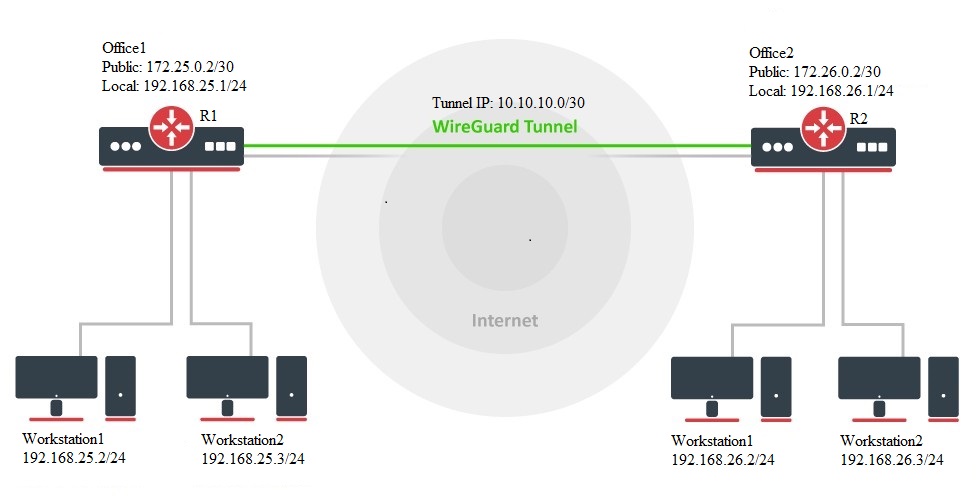
Note: in the above diagram, we are using private IP addresses in public interface for demo purpose. In live network, you should replace these IP Addresses with your public IP Addresses.


Site to Site WireGuard VPN Configuration in RouterOS 7


According to the above network diagram, we will now configure site to site WireGuard VPN in MikroTik RouterOS. But before going to start WireGuard VPN, you should have RouterOS 7 basic configuration which includes WAN, LAN, DNS, Gateway and Masquerade setup.


If you are new in MikroTik RouterOS, feel free to study another article about how to configure MikroTik RouterOS 7 first time and complete WAN, LAN, DNS and other Setup and then follow our WireGuard configuration steps.


If you have existing network and RouterOS 7 is running there, don’t forget to replace my demo IP information according to your existing one. You just follow my steps keeping your existing IP information.


We will now do configurations those are required for WireGuard configuration. For WireGuard configuration we need to do enabling WireGuard, Creating Peers, assigning IP address in WireGuard virtual interface and doing routing over virtual interface to communicate among LAN devices.


Enabling WireGuard in MikroTik RouterOS  


WireGuard package is installed by default in MikroTik RouterOS 7. So, you will get a WireGuard menu item in Winbox by default. To enable WireGuard in R1 Router, do the following steps.


  • Login to R1 Router of Office 1 with Winbox using full access user credentials.
  • Click on WireGuard menu item from Winbox menu bar. WireGuard window will appear.
  • Click on PLUS SIGN (+) to create a new WireGuard interface. New Interface window will appear.
  • Put an interface name in Name input field or you can keep the default name wireguard1.
  • Click Apply button. Public Key and Private Key will be generated as soon as you click the Apply button. The Public Key will be required when WireGuard Peer will be created in R2 Router (Office 2 Router).
  • Click OK button.


Similarly, enable WireGuard in R2 Router of Office 2 Router and create a new WireGuard interface. Your configurations will look like the following image.


Enabling WireGuard in RouterOS 7


Assigning IP Address on WireGuard Virtual Interface


After enabling WireGuard in RouterOS 7, a new virtual interface will be created in each Router. We will now assign IP address in each WireGuard interface so that both interfaces can communicate with each other after establishing WireGuard tunnel.


To assign IP address on WireGuard virtual interface in R1 Router, issue the following steps.


  • From Winbox, go to IP > Addresses menu item. Address List window will appear.
  • Click on PLUS SIGN (+) to add new address. New Address window will appear.
  • Put an IP address (in this article: 10.10.10.1/30) that you to assign for WireGuard VPN tunnel in Address input field.
  • Choose WireGuard interface (in this article: wireguard1) from Interface dropdown menu.
  • Click Apply and OK button.


Similarly, add the second IP address on the WireGuard virtual interface of R2 Router at office 2. According to the above diagram, the second router’s IP will be 10.10.10.2/30.


Creating WireGuard Peers Between Two RouterOS


After assigning IP addresses on WireGuard virtual interface, we will now configure peers in both Routers. To create peers in R1 Router of office1, issue the following steps.


  • From Winbox, click on WireGuard menu item and then click on Peers tab.
  • Click on PLUS SIGN (+). New WireGuard Peer window will appear.
  • Choose WireGuard interface (wireguard1) from Interface dropdown menu.
  • Put the Public Key that was generated at R2 Router when WireGuard was enabled, in Public Key input field.
  • Put the Public IP address (For demo purpose, in this article: 172.26.0.2) of R1 Router in Endpoint input field. 
  • If you don’t change the port number (default is 13231), no need to change the Endpoint Port but if you change, put the listen port of R1 Router in Endpoint Port input field.
  • Put the IP blocks (in this article: 10.10.10.0/30 for tunnel interface and 192.168.26.0/24 LAN IP Block of R2 Router) those will be passed over WireGuard VPN Tunnel in Allowed Address input field. If you want to allow all IP addresses, put 0.0.0.0/0 in this field.
  • In Persistent Keepalive input, put a time value in seconds (for 10 second: 00:00:10) when the tunnel will be checked and keep lived.
  • Click Apply and OK button.


Router1 Peer Configuration
Peer Configuration R1 Router


Similarly, create peer in R2 Router and information accordingly. Be careful to put Public Key, Endpoint and Endpoint Port of R1 Router. Also be careful to put IP block of R2 Router’s LAN block. The configuration should be like the following image.


Router 2 Peer Configuration
Peer Configuration in R2 Router


Static Routing Configuration Between RouterOS


At the last step of site-to-site WireGuard VPN configuration, we will configure static routing between R1 and R2 Router so that R1 Router’s LAN can access R2 Router’s LAN and vice versa.


To configure static routing in R1 Router, do the following steps.


  • From Winbox, go to IP > Routes menu item. Route List window will appear.
  • Click PLUS SIGN (+) to add new route. New Route window will appear.
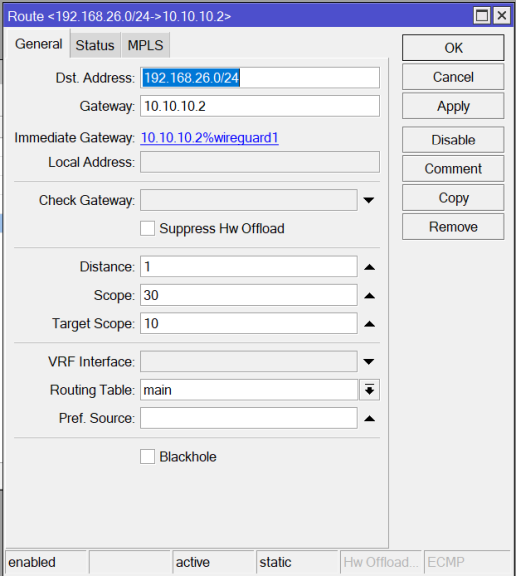
  • In Dst. Address input field, put the LAN IP block (in this article: 192.168.26.0/24) of R2 Router.
  • Put the IP address (10.10.10.2) assigned on WireGuard interface of R2 Router in Gateway input field.
  • Click Apply and OK button.


Static Routing Configuration in Router1
Static Routing Configuration in R1 Router


Similarly, configure static routing in R2 Router and put the LAN IP block (in this article: 192.168.25.0/24) of R1 Router and WireGuard interface IP address (10.10.10.1) of R1 Router.


How to configure site to site WireGuard VPN between two RouterOS has been discussed in this article. I hope, you will now be able to configure site to site WireGuard VPN in MikroTik RouterOS. However, if you face any issue to configure site to site WireGuard VPN in MikroTik RouterOS, feel free to discuss in comment or contact me from Contact page. I will try my best to stay with you.


2022-09-29T10:13:13
MikroTik Router Tutorials & Guides

WireGuard VPN Setup in MikroTik RouterOS7 with Windows OS

VPN (Virtual Private Network) is one of the most popular services in MikroTik RouterOS. A lot of VPN services (IPsec, EoIP, OpenVPN, PPTP, L2TP, IPIP etc.) are available in MikroTik RouterOS but in RouterOS7, a new VPN service named WireGuard has been introduced which is extremely simple yet first, secure and modern VPN. WireGuard uses cryptography to make it secure.


In RouterOS7, WireGuard can be used either Client-Server (Road Warrior) VPN tunnel or site to site VPN tunnel. Using Client-Server WireGuard VPN tunnel, a Windows, Mac, Linux, iOS or Android user can be connected to his remote network and can access servers and other network devices as if he/she has be seated in that network. On the other hand, using site to site WireGuard VPN tunnel, two remote offices can always be connected across public network and can comminate with each other over this VPN tunnel.


In my previous article, I discussed how to configure MikroTik RouterOS 7 first time with step-by-step guideline. In this article, I will discuss how to configure Road Warrior WireGuard VPN tunnel in MikroTik RouterOS7 and then I will also discuss how to configure WireGuard Client in Window 10/11.


WireGuard Configuration in MikroTik RouterOS 7 (Road Warrior)


 To configure Client-Server WireGuard VPN tunnel with Windows client, we will follow the following network diagram.


WireGuard VPN in MikroTik RouterOS 7


In the above diagram, WireGuard VPN Server is configured in the office network. So, WireGuard client configured in Windows or Linux or Android device can be connected to the office network creating a secure WireGuard VPN tunnel and can access remote servers and other network devices securely.


We will now configure such an office network where WireGuard VPN Server will be configured in a MikroTik RouterOS 7 and a Windows client will connect to this WireGuard VPN Server to access remote servers and other network devices.


WireGuard VPN Configuration in MikroTik RouterOS 7


 WireGuard package is enabled by default in MikroTik RouterOS7. So, we don’t need to install it manually. We just need to setup WireGuard service. To configure WireGuard VPN for a Client-Server (Road Warrior) tunnel, follow the following steps.


  • Login to MikroTik RouterOS using Winbox with full access user permission.
  • From menu item, click on WireGuard. WireGuard window will appear.
  • Click on PLUS SIGN(+) to create a new WireGuard interface. New Interface window will appear.
  • Put an interface name in Name input field or you can keep the default name wireguard1.
  • In Listen Port input field, put 443 because we want to use 443 port which is usually not blocked. In MikroTik RouterOS7, the default WireGuard Listen Port is 13231. WireGuard works on UDP protocol because UDP is faster. On the other hand, TCP packets follow over TCP VPN tunnel makes performance issue. So, TCP is not used in WireGuard VPN tunnel.
  • Click Apply button. Public Key and Private Key will be generated as soon as you click the Apply button. The Public Key will be required when WireGuard client will be configured.
  • Click OK button.


WireGuard VPN Server Configuration in RouterOS7


WireGuard VPN service is now enabled in MikroTik RouterOS7. Now we will assign IP address on newly created WireGuard interface. To assign IP address on WireGuard Interface, issue the following steps.


  • From Winbox, go to IP > Addresses menu item. Address List window will appear.
  • Click PLUS SIGN (+). New Address window will appear.
  • In Address input field, put an IP address which you want. According to the network diagram, I am assigning 10.10.105.1/24. WireGuard clients will get IP address from this IP block.
  • From Interface dropdown menu, choose the created WireGuard interface (wireguard1).
  • Click Apply and OK button.


Assigning IP Address on WireGuard Interface


WireGuard VPN Server configuration in RouterOS7 has been completed. We will now download and install WireGuard Client in Windows 10/11.


Downloading and Installing WireGuard in Windows Operating System


As we are going to connect Windows OS to WireGuard VPN Server, we need to download and install WireGuard’s Windows application from WireGuard’s website.  So, go to WireGuard installation page and download the installer for Windows Operating System. At the time of writing this article, the installation page of WireGuard looks like the following image.


Downloading WireGuard Windows Installer


Installing WireGuard Windows installer is as simple as installing other Windows applications. So, download the Windows installer and make a double click on it. The WireGuard installer will do the rest of the work for you. After installing WireGuard in your Windows Operating System, it will start WireGuard service and open a new WireGuard window like the following image where it will ask to provide configuration either manually or importing any configuration file.


WireGuard Client in Windows Operating System


We will configure WireGuard tunnel here manually because MikroTik RouterOS does not provide any configuration file. So, from this window, click on Add Tunnel dropdown menu and then choose Add empty tunnel… option. Create new tunnel window will appear where we will provide all the options required to create WireGuard Tunnel.


In Create new tunnel window, put a name (example: wg1) for the tunnel in Name input field and then click Save button. You will also find generated Public Key and Private Key in this window. Among these two keys, the Public Key will be required to configure peer between WireGuard Server and Client.


Creating New Tunnel in WireGuard Windows Client


Creating Peer Between WireGurad Server and Client


To create a VPN tunnel between Windows client and the RouterOS WireGuard Server, we need to configure WireGuard Peer. So, at first, we will configure peer in MikroTik RouterOS and then we will configure peer in WireGuard Windows client.


To configure WireGuard peer in MikroTik RouterOS, follow the following steps.


  • From WireGuard window, click on Peers tab and then click on PLUS SIGN (+). New WireGuard Peer window will appear.
  • In New WireGuard Peer window, choose WireGuard interface (wiregurad1) from Interface dropdown menu.
  • In Public Key input field, put the public key generated by the Windows client (with whom it will make peer).
  • In Allowed Address field, put the IP address (10.10.105.3/32) that will be assigned to the WireGuard Client.
  • Click Apply and OK button.


Peer configuration in MikroTik RouterOS has been completed. Now we will configure WireGuard Peer in Windows Client.


  • Open WireGuard client in Windows OS and select the WireGuard interface that was created before and then click on Edit button.
  • In Interface configuration, add two more properties (Address = 10.10.105.3/32 and DNS = 8.8.8.8). These two values will be assigned the WireGuard virtual interface. Change the IP values according to your network configuration.
  • Now add a new option named [Peer] and add these properties (PublicKey = y9uah2vvBg9nkBhovSA72Ji3C3LmMxoUab0dwhUwAy0= AllowedIPs = 0.0.0.0/0 Endpoint = 103.177.246.6:443 PersistentKeepalive = 10). Here, the Public Key is the Public Key of the RouterOS WireGuard, AllowedIPs will be the IPs those can access this client and by default it is 0.0.0.0/0 that means it can access any IP, the Endpoint property is very important and it will be the IP of the MikroTik RouterOS where WireGuard Server is enabled and the Port number, the PersistentKeepalive property keeps the tunnel active by checking the status of the tunnel every assigned time (seconds). 
  • Click the Save button to save the configuration.


WireGuard Peer Configuration between RouterOS and Windows Client App


Peer configuration between the WireGuard Server and Client has been completed. Now click the Activate button from the WireGuard client. If everything is OK, the tunnel will be created and you can access your remote servers and other network devices without any issue and the client window looks like the following image.


Connected WireGuard Client in Windows OS


If you face any confusion to follow the above steps, watch the following video for step by step guideline.