К подключению резервного интернет канала дома каждый приходит по своим причинам, но некоторые устройства в умном доме требуют постоянного подключения к сети интернет, оперативность получения важных уведомлений напрямую зависит от стабильности подключения к тому же, как же мы узнаем, что интернет пропал, не имея резервного канала 🙂
Какой тип подключения выбрать в качестве резервного зависит только от желания, финансовой и технической возможности. Требования к скорости не большие и зависит от того, каким устройствам необходим постоянный доступ к сети. Если не использовать постоянный доступ для торрент обмена, то в качестве резервного канала можно использовать USB LTE модем с лимитированным трафиком.
Входные данные
Имеется MikroTik RB4011 с настройками:
- Основной интернет канал 100МБит, внешний IP, интерфейс
ether1 - Резервный интернет канал 10МБит, интерфейс
ether2 - OpenVPN подключение к внешней VPS, интерфейс
vpn-ovpn - Туннель 6to4 для IPv6 трафика,
v6to4-tunnel
Необходимо при разрыве основного канала пустить весь трафик по резервному, переподключить VPN, погасить туннель 6to4 и прислать уведомление в телеграмм.
Настройка
Для удобства переименовываем названия портов ether1 и ether2 в ether1-wan-main и ether2-wan-reserv
/interface ethernet set ether1 name="ether1-wan-main"
/interface ethernet set ether2 name="ether2-wan-reserv"
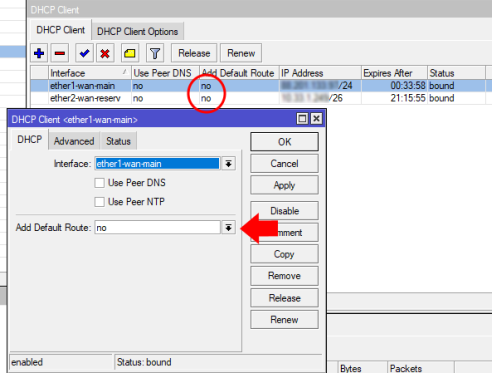
Если IP адреса для основного и/или резервного канала прилетают по DHCP, то в настройках DHCP Сlient’а необходимо для каждого интерфейса выставить параметр Add Default Route — no.
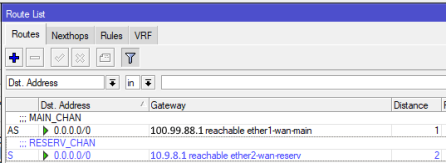
Добавляем маршруты по умолчанию, маршрут основного канала будет иметь дистанцию (distance) 1, резервного 2:
/ip route add dst-address=0.0.0.0/0 gateway=100.99.88.1 distance=1 comment="MAIN_CHAN"

/ip route add dst-address=0.0.0.0/0 gateway=10.9.8.1 distance=2 comment="RESERV_CHAN"
где: gateway=100.99.88.1 — шлюз для основного канала, gateway=10.9.8.1 — шлюз для резервного канала. Неактивный маршрут резервного канала будет выделен синим цветом.
Для мониторинга состояния каналов будет задействована утилита Netwatch (Tools -> Netwatch), в качестве хостов наблюдения будут использованы DNS сервера Яндекс, адрес 77.88.8.8 будет использоваться для проверки работоспособности основного канала, 77.88.8.1 — для резервного.
Добавляем отдельные маршруты для проверяемых адресов, что бы проверка шла четко по определенному интернет каналу не зависимо от того через какой канал идет маршрут по умолчанию.
/ip route add dst-address=77.88.8.8 gateway=100.99.88.1 distance=1 comment="Yandex  DNS  -  Check  main  internet  channel"

/ip route add dst-address=77.88.8.1 gateway=10.9.8.1 distance=1 comment="Yandex  DNS  -  Check reserv internet channel"

В Firewall (IP -> Firewall) добавляем запрещающие правила на прохождение пакетов к проверяемым адресам не через свой канал, на случай, если канал отсохнет, то маршрут использующий этот канал станет не активным и будет задействован текущий маршрут по умолчанию. Эти правила необходимо расположить выше правил разрешающих доступ в интернет.
/ip firewall filter add chain=output dst-address=77.88.8.1 out-interface=ether1-wan-main action=reject

/ip firewall filter add chain=output dst-address=77.88.8.8 out-interface=ether2-wan-reserv action=reject

Мониторинг и переключение каналов
Как говорилось выше, в качестве мониторинга будет использоваться утилита Netwatch. Настройка этой утилиты крайне проста, задается хост наблюдения и интервал через какое время необходимо выполнять проверку, при переходе наблюдаемого хоста из состояния Down в состояние Up выполняются скрипты с вкладки UP, при переходе из состояния Up в состояние Down выполняются скрипты с вкладки DOWN.
Для отправки уведомлений в Telegram ботом будет задействована утилита fetch. Как известно боту может быть отправлено сообщение через URL вида https://api.telegram.org/bot[API_KEY]/sendMessage?chat_id=[CHAT_ID]&text=[TEXT]. Подробнее как настроить бота в Telegram описано здесь.
- [API_KEY] — токен для доступа к HTTP API
- [CHAT_ID] — ID вашего с ботом чата
- [TEXT] — отправляемое сообщение
Для проверки основного канала в Netwatch добавляем (Tools -> Netwatch -> +).
Вкладка Host:
- Host: 77.88.8.8
- Interval: 00:01:00
- Timeout: 1000
Вкладка UP:
/ip route enable [find comment="MAIN_CHAN"]
/interface enable v6to4-tunnel
/ip dns cache flush
/interface disable vpn-ovpn
:delay 3s
/interface enable vpn-ovpn
:delay 5s
/tool fetch url="https://api.telegram.org/bot123456789:ABCDEFGHIJKLMNOPQRabcdefghijklmnopq/sendMessage?chat_id=12345678&text=RB4011_Main_channel_is_UP!"
/file remove "sendMessage?chat_id=12345678&text=RB4011_Main_channel_is_UP!";
Вкладка DOWN:
/ip route disable [find comment="MAIN_CHAN"]
/interface disable v6to4-tunnel
/ip dns cache flush
/interface disable vpn-ovpn
:delay 3s
/interface enable vpn-ovpn
:delay 5s
/tool fetch url="https://api.telegram.org/bot123456789:ABCDEFGHIJKLMNOPQRabcdefghijklmnopq/sendMessage?chat_id=12345678&text=RB4011_Main_channel_is_DOWN!"
/file remove "sendMessage?chat_id=12345678&text=RB4011_Main_channel_is_DOWN!";
Каждую минуту происходит проверка хоста с IP адресом 77.88.8.8, как только происходит смена состояния из доступен в недоступен, то начинается обработка скрипта, описанного на вкладке DOWN. Комментарии:
- В таблице маршрутизации отключается маршрут с комментарием
MAIN_CHAN, это наш основной маршрут сdistance=1. Т.к. основной маршрут отключен, то активным становится маршрут сdistance=2, у нас он отмечен комментариемRESERV_CHAN, весь трафик пойдет в резервный канал. - Отключается туннель 6to4 т.к. он завязан на внешний IP адрес основного канала.
- Сбрасывается DNS cache, т.к. помимо IPv4 трафика используется IPv6 канал и на какие-то ресурсы в кэше будут записи на IPv6 адреса.
- Отключается и через 3 секунды включается OpenVPN соединение, перезагрузка сделана на случай более быстрого переключения и избежания подвисаний.
- Отправка сообщения в Telegram
- После отправки в папке
Filesсоздается файл, удаляем его
Аналогичная ситуация происходит на вкладке UP при переходе хоста с IP адресом 77.88.8.8 из состояния Down в состояние Up.
Для проверки резервного канала в Netwatch добавляем (Tools -> Netwatch -> +).
Вкладка Host:
- Host: 77.88.8.1
- Interval: 00:01:00
- Timeout: 1000
Вкладка UP:
/ip route enable [find comment="RESERV_CHAN"]
/ip dns cache flush
/interface disable vpn-ovpn
:delay 3s
/interface enable vpn-ovpn
:delay 5s
/tool fetch url="https://api.telegram.org/bot123456789:ABCDEFGHIJKLMNOPQRabcdefghijklmnopq/sendMessage?chat_id=12345678&text=RB4011_Reserv_channel_is_UP!"
/file remove "sendMessage?chat_id=12345678&text=RB4011_Reserv_channel_is_UP!";
Вкладка DOWN:
/ip route disable [find comment="RESERV_CHAN"]
/ip dns cache flush
/interface disable vpn-ovpn
:delay 3s
/interface enable vpn-ovpn
:delay 5s
/tool fetch url="https://api.telegram.org/botbot123456789:ABCDEFGHIJKLMNOPQRabcdefghijklmnopq/sendMessage?chat_id=12345678&text=RB4011_Reserv_channel_is_DOWN!"
/file remove "sendMessage?chat_id=12345678&text=RB4011_Reserv_channel_is_DOWN!";
Действия в случае неполадок с резервным каналом аналогичные, как и для основного, не затрагивается только 6to4 туннель.
Источник: https://stupidhouse.info/node/18/