Access List is an amazing feature in MikroTik Wireless Router. This feature helps to allow only any specific MAC address in MikroTik WiFi AP. So, a MAC address filtering WiFi Access Point can easily be established with MikroTik Wireless Router. In my previous article I discussed how to configure basic WiFi AP in MikroTik Wireless Router. I also discussed how to configure virtual AP on a physical wireless interface. In this article, I will show how to filter device MAC address in MikroTik WiFi AP so that any unauthenticated device cannot be connected in your network although he/she knows your WiFi SSID and password.
Enabling MAC Filtering in MikroTik WiFi AP
Default Authentication is enabled by default in MikroTik WiFi. Anyone can be connected to Default Authentication enabled WiFi AP just knowing the WiFi SSID and Password. So, first we have to disable Default Authentication so that WiFi AP checks MAC address along with SSID and Password authentication. The following steps will show how to disable Default Authentication mode in MikroTik Wireless Router.
- Login to MikroTik Wireless Router using Winbox with full permission user.
- From Winbox, click on Wireless menu item. Wireless Tables window will appear.
- In WiFi Interfaces tab, you will find available wireless interfaces both Physical and Virtual interface where WiFi AP has been configured.
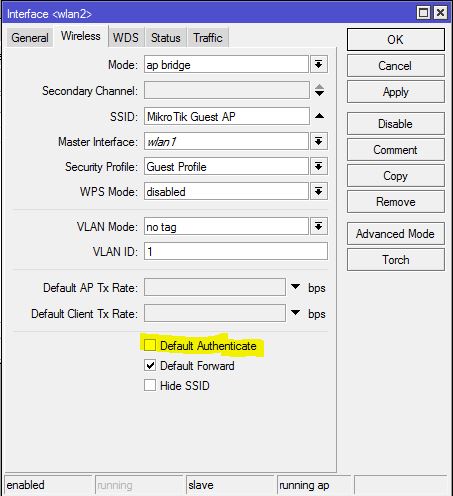
- Double click on a desired interface where WiFi AP has been configured and want to enable MAC Filtering. Interface window will appear.
- Click on Wireless tab and then uncheck Default Authenticate checkbox.
- Click Apply and OK button.
Doing the above steps MikroTik WiFi AP will turn into MAC address filtering WiFi AP. So, anyone cannot be connected to WiFi AP without providing MAC address although he/she knows SSID and Password.
In MAC address filtering WiFi AP, The AP will first check whether any device which is eager to connect is allowed in Access List or not. If the device is allowed in Access List, it will be able to connect to WiFi AP otherwise it will be denied.
So, if we want to allow any device, we have to put the device MAC address in Access List. The next part will show how to put device MAC address in MikroTik WiFi Access List.
Putting MAC Address in WiFi Access List
After disabling Default Authentication in MikroTik WiFi AP, we have to put any desired device MAC address in Access List otherwise the device cannot be connected to WiFi AP. The following steps will show how to add device MAC address in MikroTik WiFi Access List.
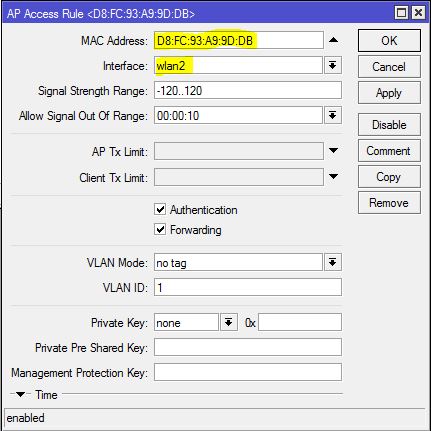
- From Wireless Tables window, click on Access List tab and then click on PLUS SIGN (+). New AP Access Rule window will appear.
- Put the device MAC address (example: D8:FC:93:A9:9D:DB) in MAC Address input field.
- Choose the wireless interface (example: wlan2) where MAC address filtering WiFi AP has been configured from Interface drop down menu.
- Optionally you can set a private password for any device in Private Pre Shared Key input box so that the device can be connected with this special password.
- Click Apply and OK button.
Similarly, we have to provide other devices MAC addresses which want to connect to WiFi AP.
If you face any confusion to follow the above steps, watch the following video on MAC Address Filtering in MikroTik WiFi Access Point. I hope it will reduce your any confusion.
How to Configure a MAC Address Filtering WiFi AP in MikroTik Wireless Router has been discussed in this article. I hope, you will now be able to configure a MAC address filtering WiFi AP with MikroTik Wireless Router. However, if you face any confusion to configure MAC filtering WiFi AP, feel free to discuss in comment or contact with me from Contact page. I will try my best to stay with you.