MikroTik Hotspot is an awesome service that can be customized widely. When MikroTik Hotspot is enabled on an interface, it adds dynamic destination NAT rules which will redirect all HTTP and HTTPS requests from unauthorized users to the Hotspot authentication proxy. So, no user can get internet access in Hotspot network without authentication. MikroTik Hotspot also uses one to one NAT providing an IP address from selected IP Pool and this IP address handles user’s data and limitation. Sometimes we may feel that this second IP address is completely IP wasting or sometimes we see that our network block has few IP addresses to serve new clients. So, in this article we will see how to solve this MikroTik Hotspot issue in our Hotspot network.
What is HotSpot One to One NAT?
In a Hotspot network, a client has to get an IP address to get Hotspot Login page because without authentication client will not be able to get internet access. The IP address may be set on the client statically or may be leased from a DHCP server. The DHCP server may provide ways of binding lent IP addresses to clients MAC addresses, if required. The HotSpot system does not care how client get an address before he/she gets to the HotSpot login page.
HotSpot server automatically and transparently assigns a new IP address for an authenticated client from unused address of IP pool selected in Hotspot user profile. The users will not notice the translation because there will not be any changes in the users’ network configuration but the router itself will see completely different source IP addresses on packets sent from the clients even the firewall mangle table will see the translated address. This technique is called Hotspot one-to-one NAT or Universal Hotspot NAT. It was also known as Universal Client in earlier RouterOS version. This one to one NAT technique is completely maintained by Hotspot Server.
How to Keep Same Host and Hotspot NAT IP Address
We usually configure Hotspot Server with Hotspot Setup wizard which will configure DHCP Server and Hotspot Server on same IP Pool and same network. So, when a client gets authenticated, he/she usually uses two IP addresses, one for Host IP address and another for Hotspot NAT IP address (Hotspot NAT IP address is denoted as to-address in MikroTik Hotspot). If we feel this is a waste of IP address, MikroTik Hotspot provides opportunity to set same Host and Hotspot NAT IP address.
The following steps will show how to setup same Host IP address and to-address in MikroTik Hotspot.
Login to MikroTik Router using Winbox software with full permission user.
Go to IP > Hotspot menu item. Hotspot window will appear.
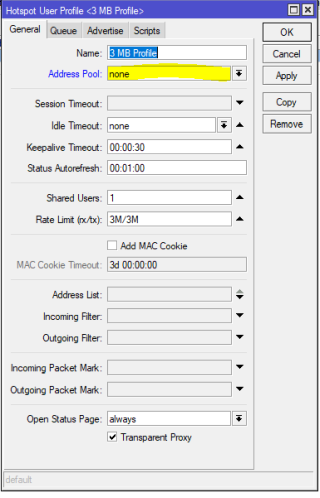
Click on User Profiles tab and then double click on any created user profile.
Under General tab, choose none from Address Pool drop down menu.
Click Apply and OK button.
Do this for all your created user profiles including default profile.
Mikrotik Hotsopt keeping same Host and to-address
As we have set no IP Pool for Hotspot user, Hotspot Server will assign same Hotspot NAT IP address (to address) that was assigned for the Host.
It is also possible to define separate IP network for both DHCP Server and Hotspot Server. In the next article we will see how to configure Hotspot Server with separate IP Network.
If you curious to know more about MikroTik Hotspot, search MikroTik Hotspot Server in System Zone search box and get your desired topics instantly.
What is Hotspot one to one NAT and how to keep same Host and to-address have been discussed in this article. I hope you are now able to customize Hotspot server yourself. However, if you face any confusion about MikroTik Hotspot one to one NAT, feel free to discuss in comment or contact me from Contact page. I will try my best to stay with you.
MikroTik Hotspot is an awesome service that can be customized according to any organization need. MikroTik Hotspot is able to authenticate and authorize network users so easily. Besides premium Hotspot service, it can also be used as a public Hotspot network. Although public network is a free network service, it can be a better source of income by serving ads. As no user can get internet access without visiting Hotspot login page, the login page is main space for serving ads. MikroTik Hotspot is nothing but a HTML page. So, knowing simple HTML, CSS and JavaScript, we can easily customize Hotspot login page according to our demand and can also put partner’s ads in login page to increase earning.
In my previous article, I discussed how to configure MikroTik Hotspot using Winbox. Default Hotspot configuration provides a login page that we may find boring and not so perfect for our organization. So, in this article I will discuss how to customize Hotspot Login page according to our demand so easily.
How to Customize Hotspot Login Page
3 Easy Steps to Customize MikroTik Hotspot Login Page
Customizing MikroTik Hotspot login page is not so difficult task. Knowing some basic HTML, CSS and JavaScript, we can easily customize login page according to our demand. So, if we wish to customize login page, we need to do the following three steps.
Downloading HTML login page from MikroTik Router
Editing login page with own HTML, CSS and JavaScript code
Uploading edited login page to MikroTik Router
Steps 1: Downloading HTML login page from MikroTik Router
When we setup Hotspot Server, it automatically creates necessary and basic files required to authenticate and authorize Hotspot users. These files including login page are kept in Files directory in MikroTik Router. So, at first we have to download the HTML login page from Files directory because there is no way to edit files keeping in MikroTik Router. The following steps will show how to download Hotspot login page from Files directory.
Login to MikroTik Router using Winbox software using full permission user credentials.
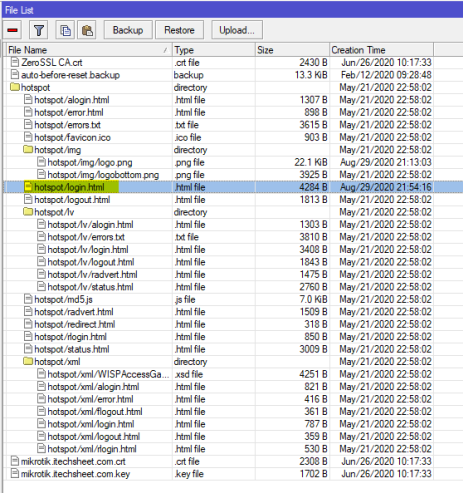
Click on Files menu. File List window will appear where you will find a lot of files created by Hotspot Server.
Search and find hotspot/login.html file and then drag and drop this file in your Desktop or in a directory where you prefer.
MikroTik Router File List
Step 2: Editing Login Page with own HTML, CSS and JavaScript Code
After downloading HTML login page, we will now edit the login file. So, open this file with any HTML editor. I personally use Notepad++ because it is free and easy to use. But if you have better editor, you can also use that.
Opening the login file, you will find basic HTML tags like html, head, title, body etc. are present there. You will also find CSS code in style tag and JavaScript code in script tag. Besides these, some logical codes written in MikroTik own language is present there.
We must always remember not to touch MikroTik Router’s logical code as well as JavaScript code written by MikroTik Router. But we are free to extend JavaScript according to our demand.
Hotspot login area is a HTML form which is aligned with static table element. If we wish we can remove the table element replacing with any suitable HTML tag for designing purpose but we must keep the form element and its action untouched as well as the input elements and its attributes. CSS selector like class and id can be applied to any HTML element for designing purpose.
Keeping the above restrictions in mind we are now free to customize the login page as our wish. I have rearranged the login page and applied some designs on it in my LAB Hotspot Server. The entire HTML, CSS and JavaScript code is given below for your reference.
The above code is written for a simple login page but it includes all required HTML, CSS and JavaScript code as example. So, if you have HTML, CSS and JavaScript experience, you can easily extend your login page functionality.
Note: if you have any image in login page, the image must upload in hotspot/img directory and add the image source as /img/logo.png where logo.png is an image file that representing company logo.
Step 3: Uploading Edited Login Page to MikroTik Router
After editing login page, we will now upload the edited file to MikroTik Router. The following steps will show how to upload the edited file in MikroTik Router.
Login to MikroTik Router again with Winbox software.
Click on Files menu item to open File List window.
Remove the old login page under hotspot directory.
Now drag and drop your edited file under hotspot directory.
Now refresh your login page and you will find the new login page designed by yourself. If you use my above code, the login page looks the following image.
Custom Hotspot Login Page
How to customize MikroTik Hotspot login page with HTML, CSS and JavaScript has been discussed in this article. I hope you will now be able to customize MikroTik Hotspot login page so easily. However, if you face any confusion to customize Hotspot login page with HTML, CSS and JavaScript code, feel free to discuss in comment or contact me from Contact page. I will try my best to stay with you.
MikroTik Hotspot is an awesome Hotspot internet solution. It has a lot of features to customize any Hotspot service. Sometimes we may require providing free trial internet in a Hotspot service. MikroTik Hotspot provides easy solution to provide free trial internet to the new user before going to paid version. In my previous article I discussed how to configure MikroTik Hotspot using Winbox. In this article I will discuss how to configure free trial internet in MikroTik Hotspot Server.
Hotspot Free Trial Connection
Free Trial Internet Configuration in MikroTik Hotspot
MikroTik Hotspot has a lot of user login methods. Trial login is one of them that provides facility to access internet without Hotspot authentication. The following steps will show how to configure trial login in MikroTik Hotspot Server.
Login MikroTik Router using Winbox with full permission user.
Go to IP > Hotspot menu item. Hotspot window will appear.
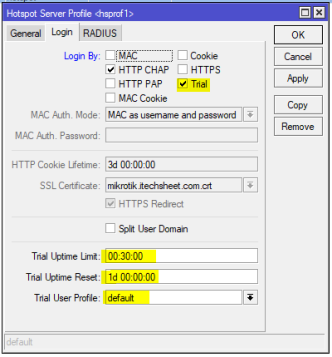
Click on Server Profiles tab and then double click on active server profile. Hotspot Server Profile window will appear.
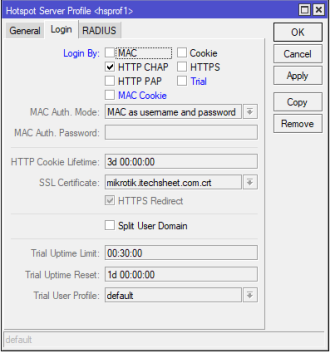
Click on Login tab and then click on Trial checkbox from Login By panel.
As soon as click on Trial checkbox, three options will be visible at bottom to customize trial connection.
The first option is Trial Uptime Limit. By default trial user uptime limit is 30 minute. If you want to increase or decrease user uptime limit, put the desired value in Trial Uptime Limit input box.
The second option is trial user uptime reset counter which indicates when the trial user will be able to connect next time if his uptime limit is over. By default trial user can use internet once in a day. If you wish you can change default value from Trial Uptime Reset input box.
The third option is trial user profile by which we can control trial user usage such as we can define user bandwidth and so on. Default profile is selected by default but if we wish we can change trial user profile from Trial User Profile dropdown menu.
Click Apply and OK button.
Enabling Trial Internet in MikroTik Hotspot
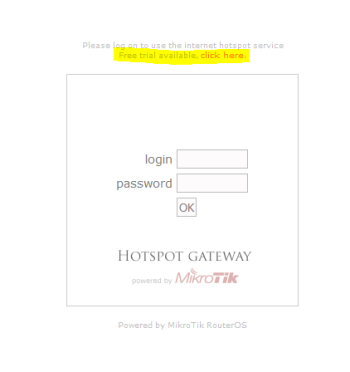
After enabling trial login if any user connects his device to Hotspot Server, he/she will find a Trial usage link in login page like the below image.
Hotspot Trial Login Page
Now clicking the click here link, any user can be able to get internet access until the uptime limit or data usage limit is not reach.
Limiting Trial User Bandwidth
MikroTik Hotspot allows limiting trial user bandwidth although we don’t want to limit trial user bandwidth. However, if we wish to limit trial user bandwidth, do the following steps properly.
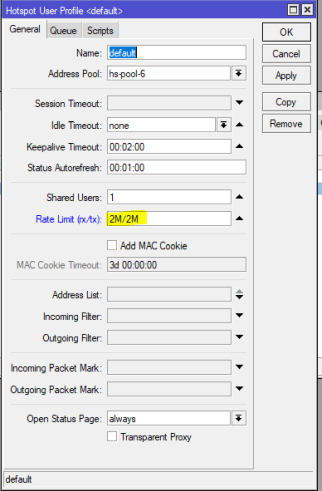
Click on User Profiles tab and then double click on trial user profile that we chose at the time of enabling trial login. Hotspot User Profile window will appear.
Choose trial user IP pool from Address Pool drop down menu.
Under General tab, click on Rate Limit input box and put desired upload and download speed that you wish to assign each connected trial user. For example, if we wish to assign 2Mb download and upload bandwidth per trial user, put the value as 2M/2M in Rate Limit input box.
Click Apply and OK button.
Limiting Trial User Bandwidth
Limiting Trial User Data Usage
MikroTik Hotspot also allows limiting trial user data usage. So, if data limitation is set and user reaches his data usage limit, he/she will be disconnected automatically. If we wish to limit trial user data usage, do the following steps properly.
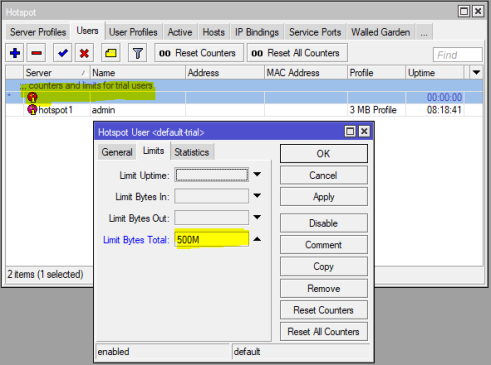
Click on Users tab and you will find a default trial user has been created commented as counters and limits for trial users.
Double click on this user. Hotspot User window will appear.
Put desired data limit (for example: 500M) in Limit Bytes Total input box.
Click Apply and OK button.
Limiting Trial User Data Limit
How to setup free trial internet with bandwidth and data limitation in MikroTik Hotspot has been discussed in this article. I hope you will now be able to setup free trial user in MikroTik Hotspot properly. However, if you face any confusion to configure trial internet connection in MikroTik Hotspot, feel free to discuss in comment or contact me from Contact page. I will try my best to stay with you.
MikroTik Hotspot uses various types of login methods. Among these login methods HTTP CHAP, HTTP PAP and HTTPS are basic and important login methods. So, a MikroTik system administrator should have proper understanding on Hotspot HTTP CHAP, HTTP PAP and HTTPS login methods. In my previous article I discussed how to configure MikroTik Hotspot using Winbox. In this article I will discuss how to use HTTP CHAP, HTTP PAP and HTTPS login methods properly in MikroTik Hotspot Server.
Hotspot Login by MAC Cookie
MikroTik Hotspot Login by HTTP CHAP
HTTP CHAP is a basic and default MikroTik Hotspot login method. So, when Hotspot will be configured in MikroTik Router, HTTP CHAP login method will be enabled automatically. HTTP CHAP includes CHAP challenge in the login page. The CHAP MD5 hash challenge is used together with the user’s password for computing the string which will be sent to the Hotspot gateway. The password hash result together with username is sent over network to Hotspot service. So, password is never sent in plain text over IP network with HTTP CHAP method. The downside of HTTP CHAP is that JavaScript applet is used to implement MD5 algorithm on the client side browser. So if a browser does not support JavaScript or it has JavaScript disabled, it will not be able to authenticate users.
How to Enable HTTP CHAP Login Method
HTTP CHAP is a secure Hotspot login method. So, we should use HTTP CHAP login method in Hotspot network. As HTTP CHAP is a default login method in MikroTik Hotspot, no action require to enable HTTP CHAP but make sure HTTP CHAP is enabled and working normally following the below steps.
Login MikroTik Router using Winbox with full permission user.
Go to IP > Hotspot menu item. Hotspot window will appear.
Click on Server Profiles tab and then double click on active server profile. Active server profile property window will appear.
Click on Login tab and make sure HTTP CHAP checkbox is selected from Login By panel. If not selected, click on HTTP CHAP checkbox to enable HTTP CHAP login method and click Apply and OK button.
Enabling HTTP CHAP in MikroTik Hotspot
MikroTik Hotspot Login by HTTP PAP
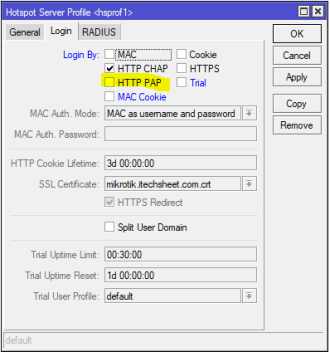
HTTP PAP sends plain text user name and password over network. So, HTTP PAP is not a secure and suitable for public network. But HTTP PAP is faster and can be used in private network where security is not so much concern.
How to Enable/Disable HTTP PAP Login Method
As there is always possibility to leak username and password using HTTP PAP login method, it is not recommended to use HTTP PAP in public hotspot network. But in private network, we may consider HTTP PAP as a faster login method. The following steps will show how to enable or disable HTTP PAP in Hotspot network.
Go to IP > Hotspot menu item. Hotspot window will appear.
Click on Server Profiles tab and then double click on active server profile. Active server profile property window will appear.
Click on Login tab and make sure HTTP PAP checkbox is not selected if you wish to disable HTTP PAP from Login By panel. By default HTTP PAP is kept disabled.
If you wish to keep HTTP PAP in Hotspot network, click on HTTP PAP checkbox to enable HTTP PAP login method and click Apply and OK button.
Disabling HTTP PAP in Hotspot Network
MikroTik Hotspot Login by HTTPS
HTTPS sends plain text username and password to Hotspot Server but it uses SSL protocol to encrypt transmission. So, although username and password are sent plain text, there is no need worry because transmission is always encrypted in HTTPS communication and there is no chance to leak username and password in public Hotspot network.
HTTPS is one of most secure Hotspot login methods and today there is no alternative of HTTPS login because most of the websites are now using https and without HTTPS login, HTTPS Redirect is not possible. So, HTTPS is now a strongly recommended Hotspot login method.
How to Enable HTTPS Login
HTTPS Login requires enabling HTTPS Server and HTTPS Server requires SSL certificate either self-signed certificate or public SSL certificate. I have another separate article where I discussed how to enable HTTPS Login and HTTPS Redirect with self-signed SSL certificate or public SSL certificate. So, follow that article to configure complete HTTPS Login and HTTPS Redirect.
MikroTik Hotspot Login by HTTP Cookie and MAC Cookie
HTTP Cookie and MAC Cookie are two extended login methods in MikroTik Hotspot. HTTP Cookie and MAC Cookie cannot be used as an individual login method rather we need to use HTTP Cookie and MAC Cookie with HTTP CHAP, HTTP PAP or HTTPS basic login method. By default user must provide username and password in login prompt every time he/she want to get internet access from Hotspot Server. But sometimes user gets annoyed putting username and password frequently. Considering this situation MikroTik introduces HTTP Cookie and MAC Cookie which keep user credential in cookie at first successful login and when the same use appears at second time, the user is verified against this saved cookie and allowed for internet access without asking login prompt.
How HTTP Cookie Works
After each successful login, a cookie is sent to the web browser and the same cookie is added to active HTTP cookie list. Next time the same user will try to log in, web browser will send the saved HTTP cookie. This cookie will be compared with the one stored on the Hotspot Server and only if source MAC address and randomly generated ID matches the ones stored on the Hotspot Server, user will be automatically logged in using the login information (username and password pair) that was used when the cookie was first generated. Otherwise, the user will be prompted to log in, and in the case authentication is successful, old cookie will be removed from the local Hotspot active cookie list and the new one with different random ID and expiration time will be added to the list and sent to the web browser.
How to Enable HTTP Cookie
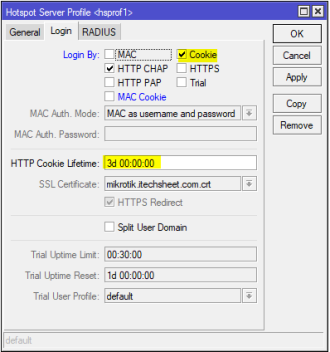
HTTP Cookie is enabled by default with Hotspot default configuration. But you can check whether HTTP Cookie is enabled or not following the below steps.
Go to IP > Hotspot menu item. Hotspot window will appear.
Click on Server Profiles tab and then double click on active server profile. Active server profile property window will appear.
Click on Login tab and make sure Cookie checkbox is checked if you wish to enable HTTP Cookie.
We can also set HTTP Cookie expiration time from HTTP Cookie Lifetime input box. By default Cookie lifetime is set to 3 days.
Enabling HTTP Cookie in Hotspot Server
How MAC Cookie Works
MAC Cookie is a newly introduced login method in MikroTik Hotspot. MAC Cookie improves accessibility for smartphones, laptops and other mobile devices. MAC Cookie keeps record of username and password for the MAC address if there is only one host with such MAC address. Unlike HTTP Cookie, Cookie is only saved in Hotspot Server at first successful login with MAC Cookie login method. When a new host appears, Hotspot checks if there is a MAC Cookie record for the MAC address and logs in host using recorded username and password.
How to Enable MAC Cookie
MAC Cookie should be enabled both Hotspot Server profile and Hotspot user profile otherwise MAC Cookie will not work. How to enable MAC Cookie has been discussed elaborately in another article. So, follow that article to enable MAC Cookie in Hotspot network properly.
How to enable and configure MikroTik Hotspot basic login methods (HTTP CHAP, HTTP PAP and HTTPS with HTTP Cookie and MAC Cookie) has been discussed in this article. I hope you will now be able to tune Hotspot network with proper login method. However, if you face any confusion to tune Hotspot login methods properly, feel free to discuss in comment or contact me from Contact page. I will try my best stay with you.
MAC Cookie is a newly introduced Hotspot feature in MikroTik Router. MAC Cookie is specially designed to improve accessibility for smartphones, laptop and other mobile devices. MAC Cookie is not a basic login method rather it is an extension of basic Hotspot login method such as HTTP CHAP, HTTP PAP and HTTPS. So, when MAC Cookie is used with these basic Hotspot login methods, it improves the Hotspot user accessibility. In my previous article, I discussed MikroTik Hotspot basic configuration using Winbox with default HTTP CHAP login method. In this article I will discuss how to configure MAC Cookie login in MikroTik Hotspot to improve Hotspot accessibility.
MAC Cookie MikroTik Hotspot
MikroTik Hotspot MAC Cookie
As MAC Cookie is not a basic login method, it should be used with other basic login methods (with HTTP CHAP, HTTP PAP and HTTPS). So, when MAC is enabled with other login methods, the following activities happen in MikroTik Hotspot.
MAC Cookie Keeps Cookie after First Successful Login
If MAC Cookie is used with basic login methods, it keeps the record of username and password for the MAC address after first successful login but username and password must be used from only one MAC address. Cookie will be kept in MikroTik Router until the cookie timeout period is expired.
Hotspot Checks MAC Cookie Record When New Host Appears
When a new Host appears in Hotspot, it checks MAC Cookie record for the MAC Address and logs the host using recorded username name and password if record is found for that MAC Address. If there is more than one host with the same MAC address, user will not be logged in and MAC cookie record for this MAC address will be deleted.
Cookie is removed with MAC Cookie Removal Activities
Cookie is kept in MikroTik Router until MAC Cookie timeout period is expired. But cookie can also be removed with the following activities.
After successful login, if user clicks on logout button, cookie will be removed from MikroTik Router.
If admin disconnects user manually from RADIUS Server or from Hotspot active menu.
If user limit reaches the maximum, cookie will be removed by the NAS-Request.
MAC Cookie Configuration in MikroTik Hotspot
Till now we know how MAC Cookie works in MikroTik Router. Now we will know how to configure MAC Cookie in MikroTik Hotspot. MAC Cookie has to be enabled in two places. So, MAC Cookie configuration can be divided into the following two parts.
Enabling MAC Cookie in Hotspot Server Profile.
Enabling MAC Cookie in User Profile.
Part 1: Enabling MAC Cookie in Hotspot Server Profile
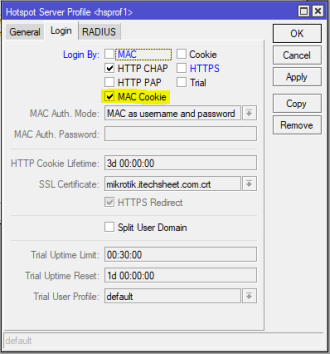
To use MAC Cookie feature in MikroTik Hotspot, we have to first enable MAC Cookie in Hotspot Server Profile. The following steps will show how to enable MAC Cookie in MikroTik Hotspot Server Profile.
Login MikroTik Router with Winbox using full permission user login credentials.
Go to IP > Hotspot menu item. Hotspot window will appear.
Click on Server Profiles tab and then double click on active server profile.
From active server profile windows, click on Login tab and then click on MAC Cookie checkbox.
Click Apply and OK button.
Enabling MAC Cookie in Hotspot Server
MAC Cookie is now enabled in Hotspot Server. Now we need to enable MAC Cookie in Hotspot User Profile, for those we want to enable MAC Cookie feature.
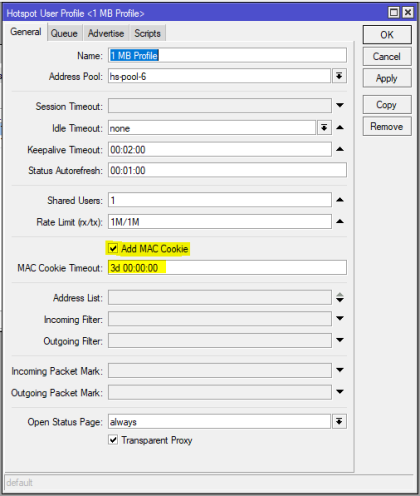
Part 2: Enabling MAC Cookie in Hotspot User Profile
MAC Cookie will not be enabled to user level (although we enable it in Hotspot Server) until we enable MAC Cookie in Hotspot User profile. The following steps will show how to enable MAC Cookie in Hotspot User Profile.
From Hotspot window, click on User Profiles tab and then double click on desired user profile for whose we want to enable MAC Cookie feature. Hotspot User Profile window will now appear.
From General tab, click on Add MAC Cookie checkbox.
Default MAC Cookie Timeout period is 3 days. If we want to change MAC Cookie Timeout period, put the timeout period in MAC Cookie Timeout input box.
Click Apply and OK button.
Enabling MAC Cookie in Hotspot User Profile
MAC Cookie feature is now enabled for this profile user. If we wish to enable MAC Cookie for more users, we can do that following the above steps.
Difference between MAC Cookie and HTTP Cookie in MikroTik Hotspot
Sometimes we may be confused about Hotspot MAC Cookie and HTTP Cookie method and we may think these are the same things. But MAC Cookie and HTTP Cookie are not some and they are two different Hotspot login mechanism. The following lists are their mechanistic differences.
HTTP Cookie is saved both in user browser and MikroTik Router after first successful login whereas MAC Cookie is only saved in MikroTik Router.
Cookie is sent by the user browser and matched with the local Cookie. If match, user can automatically login otherwise login window is prompted. In MAC Cookie, new host MAC address is matched with the local MAC Cookie record.
In HTTP Cookie, user browser must be involved but in MAC Cookie browser has no role.
So, HTTP Cookie and MAC Cookie are different in nature and should be enabled separately in MikroTik Hotspot.
How to configure MAC Cookie in MikroTik Hotspot has been discussed in this article. I hope you will now be able to configure MAC Cookie in your Hotspot Server properly. However, if you face any confusion to configure MAC Cookie in MikroTik Hotspot, feel free to discuss in comment or Contact me from Contact page. I will try my best to stay with you.
Hotspot is an awesome service in MikroTik Router. MikroTik Hotspot is popularly used in ISP, Hotel, Airport, Coffee Shop, Enterprise office and many other organizations. By default MikroTik Hotspot uses HTTP CHAP login method where user must provide username and password to get internet service. Sometimes we may face that some users are not eager to provide username and password to get internet service or we cannot ask some users to put username and password to get internet due to his respect. In this case sometimes we need to allow some users to get internet without Hotspot login page. To overcome this situation MikroTik introduces automatic Hotspot login using MAC address. In my previous article I discussed on MikroTik Hotspot basic configuration using Winbox. In this article I will discuss how to enable Hotspot login by MAC method so that we can allow some users auto login in Hotspot Service.
Auto Login by MAC Address
Configuring MikroTik Hotspot Auto Login with MAC Address
Login by MAC method in MikroTik Hotspot allows user to get internet access without login page. So, if we allow any user login by MAC address, he/she will get internet access automatically without authenticating from Hotspot login page. To allow auto login by MAC in MikroTik Hotspot, we have to do the following steps in Hotspot configuration.
Enabling Login by MAC in MikroTik Hotspot
Creating Hotspot User with Device MAC Address
Enabling Login by MAC in MikroTik Hotspot
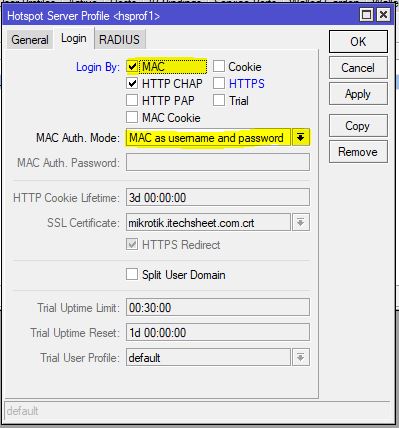
Login by MAC method is disabled by default in MikroTik Hotspot. So, if we wish to allow MAC authentication in MikroTik Hotspot, we have to enable login by MAC method in Hotspot Server profile. The following steps will show how to enable login by MAC method in MikroTik Hotspot profile.
Login MikroTik Router with Winbox using full permission user login credentials.
Go to IP > Hotspot menu item. Hotspot window will appear.
Click on Server Profiles tab and then click on active server profile.
From active server profile windows, click on Login tab and then click on MAC checkbox.
From MAC authentication mode we can choose either MAC as username or MAC as username and password. MikroTik Hotspot authentication engine and MikroTik Userman RADIUS Server authentication allow MAC authentication without password but many RADIUS Servers don’t allow authentication without password. So, it will be safe to choose MAC authentication mode both username and password and I will also prefer this method. If you wish to keep MAC as both username and password, choose MAC as username and password from MAC Auth. Mode drop down menu.
It is also possible to use MAC as username and a common password for all users so that any RADIUS Server does not deny authentication. If you wish to keep this option, choose MAC as username from MAC Auth. Mode drop down menu and put your common password in MAC Auth. Password input field. In this case MikroTik will send MAC as username and the common password to any user authentication engine.
Click Apply and OK button.
Login by MAC Method in MikroTik Hotspot
Login by MAC address is now enabled in Hotspot Service. Now 1we need to create user with authenticated device MAC address either in MikroTik Hotspot local user database or RADIUS Server user database. In this article we will see how to create user in MikroTik Hotspot local user database for authenticating device by MAC address.
Creating Hotspot User with Device MAC Address
After enabling auto login by MAC address, we will now configure user in MikroTik Hotspot with device MAC address. The following steps will show how to create user with MAC address in MikroTik Hotspot local user database.
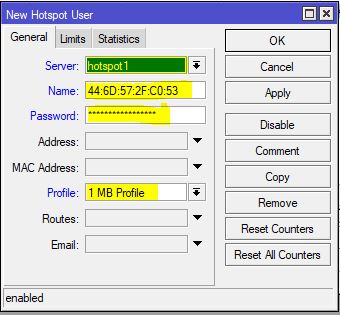
From Hotspot window click on Users tab and then click on PLUS SIGN (+). New Hotspot User window will appear.
Choose Hotspot active server from Server drop down menu.
Collect allowed device MAC address and put in Name input field.
As we have decided to put MAC as username and password, put the MAC address in Password input field also.
Choose created profile that you want to apply on this MAC address from Profile drop down menu.
Click Apply and OK button.
Creating User in Hotspot Local User Database
We can create as many as users as we need following the above steps. Now browse any site from the allowed device. If everything is OK, you will find that the device can get internet without authenticating from Hotspot login page. So, auto login by MAC address in MikroTik Hotspot is now working and bypassing Hotspot login page for the allowed device.
If you face any confusion to follow the above steps, watch the following video on Hotspot auto login by MAC address configuration. I hope it will reduce your any confusion.
How to configure MikroTik Hotspot auto login by MAC address has been discussed in this article. I hope you will now be able to configure automatic login by MAC address in MikroTik Hotspot. However, if you face any confusion to configure Hotspot Login by MAC method, feel free to discuss in comment or Contact me from Contact page. I will try my best to stay with you.