Архив метки: MikroTik Hotspot Tutorials & Guides

MikroTik Hotspot Configuration in RouterOS 7

MikroTik Hotspot is an awesome service to run a captive portal network. You can run a public Wi-Fi network, Hotel Network, Airport network, CAMP Wi-Fi network, Shopping Mall Network and so on using MikroTik Hotspot and even can monetize your network for earning if you use Hotspot Billing Software like GalaxyRAD which is specially designed for MikroTik Hotspot network.


GalaxyRAD helps to monetize your any network providing online payment gateway as well as integrating voucher-based system. It also helps to automate your Hotspot/Captive Portal System. GalaxyRAD is a cloud-based RADIUS application and there is no need to have public IP address in your MikroTik Router if you want to integrate your Hotspot Server with GalaxyRAD. So, it is possible to integrate any network with GalaxyRAD Billing Software.  


MikroTik Hotspot configuration in RouterOS 7 is so easy. Following some easy steps, we can build a captive portal network with MikroTik Hotspot Server. In my previous article, I discussed how to configure MikroTik RouterOS 7 from the very beginning. In this article, I am going to show how to configure MikroTik Hotspot in RouterOS 7.


Network Diagram for MikroTik Hotspot Network


We will configure MikroTik Hotspot Server according to the following network diagram where the MikroTik Router is acting as a Hotspot Server and an AP is being used to connect wireless devices to this Hotspot Server.
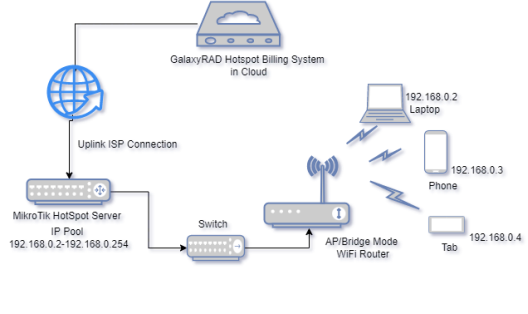


MikroTik Hotspot with GalaxyRAD


When a wireless device will be connected to this Hotspot network using network SSID, it will be redirected to the hotspot login page for authentication. Using username and password, a device can be authenticated and can get internet. 


In this network, I have also shown the position of a GalaxyRAD cloud-based application. If we use GalaxyRAD Billing Software, the connected device will be redirected to the portal login page where a user can put his voucher/card number for authentication or even he/she can buy a package using online payment gateway and can use internet service automatically. 


Configuring MikroTik Hotspot in RouterOS 7


Before start to configure Hotspot Server, we must have WAN configured so that MikroTik Router has internet accessibility. If you are new to MikroTik Router configuration, feel free to study MikroTik Router first time configuration guide line and then follow this article.


I hope, you have also configured your LAN gateway and LAN block. For simplicity, I am assuming the LAN gateway – 192.168.0.1/24 and the LAN interface – ether2. Hence, the LAN block will be 192.168.0.0/24.


To configure Hotspot in MikroTik RouterOS, follow the following steps.


  • From Winbox, go to IP > Hotspot and then click Hotspot Setup button.


  • Follow the instructions shown in the window by clicking Next button.
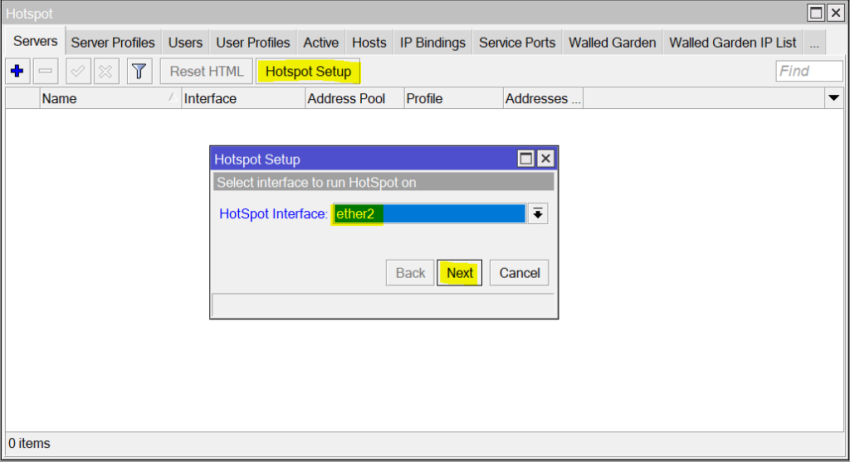


Hotspot Setup
Hotspot Setup


Choose the interface on which you want to setup Hotspot Server. We can install Hotspot Server on each interface of MikroTik Router. For our demo configuration, we are using ether2 port. So, choose your desired ether port and then click Next button.
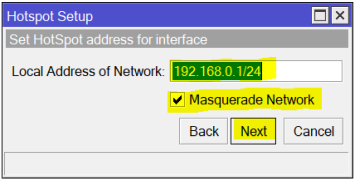


Choosing Hotspot Network Gateway
Choosing the Hotspot Network Gateway


It will now ask to provide the Gateway of the Hotspot network. By default, the provided LAN gateway will be assigned and we want to keep it. So, there is no need to change. It will also keep checked the Masquerade Network. If you have not yet masqueraded this network, keep checked it otherwise uncheck it and click Next button.
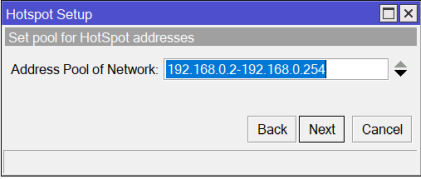


Choosing Address Pool of the Network


It will now ask to provide Address Pool from where users of the network will get IP address. By default, it will assign all the addresses in your LAN block without the LAN gateway. If require, can change the IP range according to your demand. Click the Next button. 
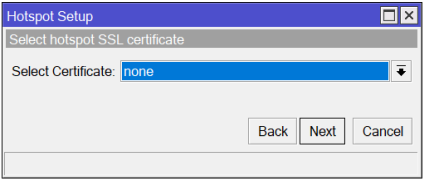


Choosing SSL Certificate


It will now ask to provide SSL certificate for your DNS Name that will be assigned in the upcoming step. For the production network, we should have an SSL certificate for our DNS Name otherwise there will arise a lot of issues. But for demo network, we can skip this step. So, click the Next button.
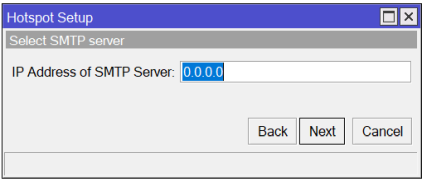


SMTP Server for Hotspot Server


We will use no SMTP server for our Hotspot Network even we can skip this step in the production network. So, click the Next button.
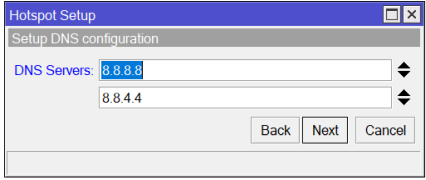


Providing DNS Servers for Hotspot User


We can now provide one or more DNS Servers for our Hotspot Network. Here, we are using Google’s DNS Server for simplicity. If you have own DNS Server, can use that here. Click the Next Button.
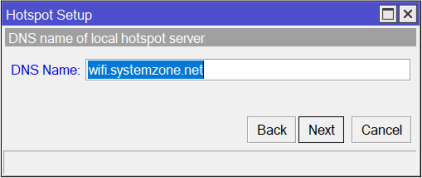


Providing DNS Name for the Hotspot Network


Now it is time to provide DNS Name. For a professional Hotspot network, we should provide a valid DNS Name and should have an SSL Certificate for this DNS Name. For this demo network, I am using wifi.systemzone.net. It is my valid domain name. So, I can generate an SSL certificate for this DNS Name if a I require. Providing your DNS Name, click the Next button.
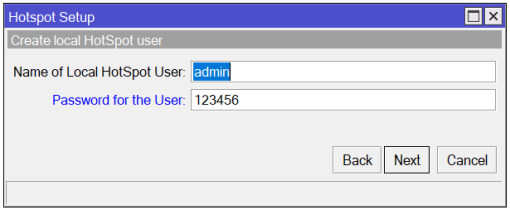


Creating First Hotspot User


It will now ask to create the first Hotspot User that can be used to authenticate any device. For simplicity, I am providing admin and a simple password. Click the Next button.
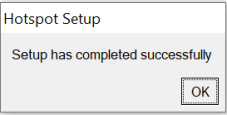


Hotspot Setup has been Completed


Hotspot Setup will now be completed and you will find a successful message like the above image.


After completing Hotspot Setup, connect any device to the LAN network with RJ45 cable or connect any AP and setup SSID and then connect a Wi-Fi device. If everything is OK, you will now get the hotspot login page like the below image. If the login page does not appear automatically, browse any website without Google, Facebook and YouTube or type wifi.systemzone.net from the Browser’s URL bar.   
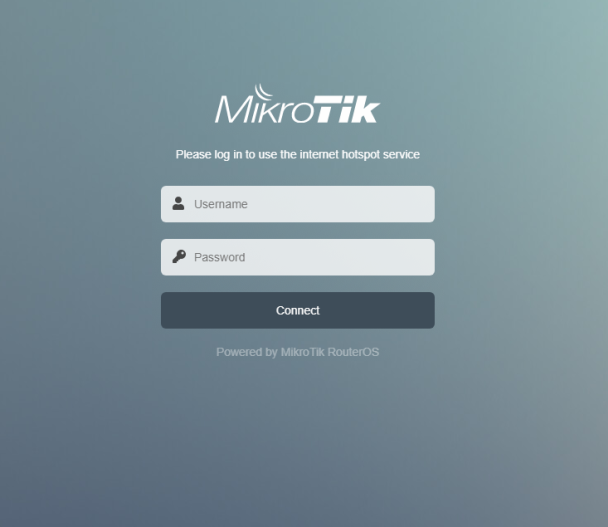


Hotspot Default Login Page


Now if we provide the admin user credentials that we created while setting up Hotspot Server, the admin user will be authenticated and can get internet access. As soon as the user will be connected, a status page will be shown showing user details like the below image.
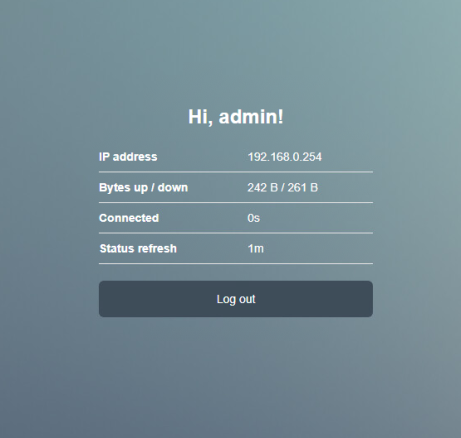


Hotspot Status Page
Hotspot Status Page


If we see the Hotspot Hosts list, we can see that the Host has been connected and an active flag will be shown at the beginning of the Host list.
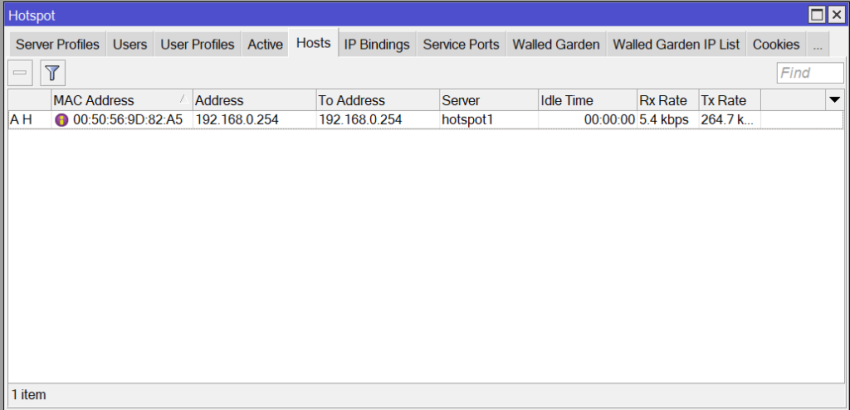


Hotspot Host Window
Hotspot Host Window


So, our Hotspot configuration is done. Now create any user from Users tab and let it connect. Your desired user will now be connected and can access internet through your Hotspot Server.


This is the beginning of MikroTik Hotspot Journey. Now you can change the login template according to your business, you can apply voucher-based authentication system or even you can apply online gateway payment system to automate your Hotspot system and revenue using a powerful RADIUS based application like GalaxyRAD – WISP Automation and Billing Software.


How to configure MikroTik Hotspot Server in RouterOS 7 has been discussed in this article. I hope, you will now be able to configure MikroTik Hotspot Server for your network and can run a smooth Captive Portal System. However, if you face any confusion, feel free to discuss in comment or contact me from Contact page. I will try my best to stay with you.


2023-04-25T12:12:06
MikroTik Hotspot Tutorials & Guides

MikroTik Hotspot Customized Login Template

MikroTik Hotspot is a popular service which is being used to manage ISP, Hotel, Restaurant, Airport, Public WiFi and even Enterprise office network. User management with MikroTik Hotspot captive portal is so easy and secure. Besides manageable network, Hotspot also provides facility to advertise your brand.


MikroTik Hotspot offers a login page for user authentication whenever any device connects with it. So, this login page is a vital source for promoting your brands. The default login template provided by MikroTik Hotspot is a simple template to fulfill your branding requirements. But it is possible to customize the login template according to your requirement.


So, it is time to customize the Hotspot template according to your Branding. We have an experienced and dynamic team who can help you to customize your MikroTik Hotspot login template.


HotSpot Login Template


Features of Our Customized Hotspot Login Template


Our customized Hotspot template meets all the requirements those are require to run a smooth captive portal with MikroTik Hotspot. The key features of our customized Hotspot template are given in the following list.


  • Compatible with MikroTik Hotspot Service.
  • Responsive template.
  • Compatible with voucher/card based or username and password based system.
  • Eye catching design.
  • Light weight. Only few kilobytes.
  • Faster loading.
  • All pages are customized besides login page.
  • Hassle free uploading in MikroTik Hotspot.
  • Highly customizable according to network requirement.
  • Can be customized for advertisement.


Customized MikroTik Hotspot Template Demo


We have some predesigned Hotspot login templates those are being used in many countries. These templates were designed according to our valuable customer’s instructions. Some of them are shown in the following section.


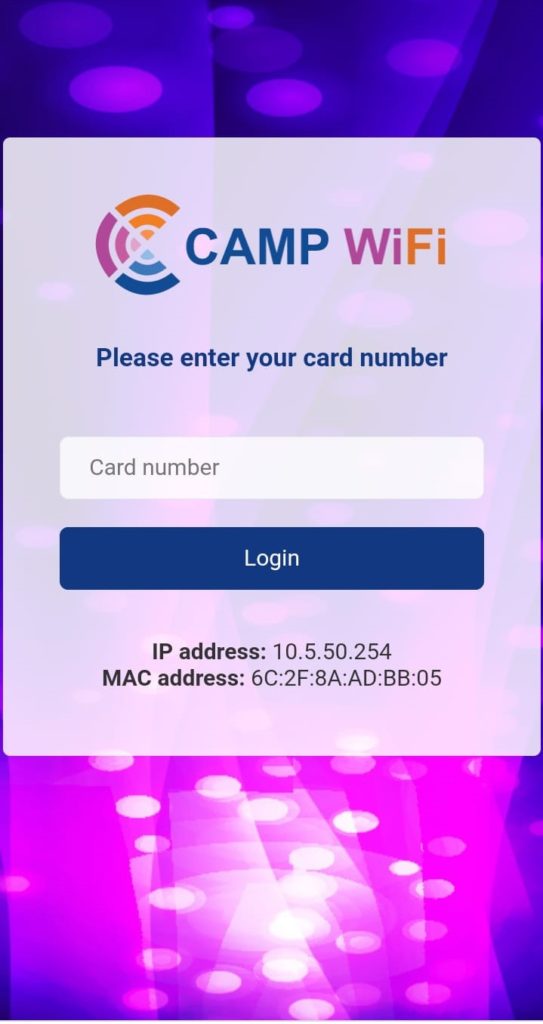
Template Name: CAMP WiFi


The CAMP WiFi template has been designed for one of our truested clients who is running a smooth Hotspot network for more then 600 users. He sells voucher card and the users use the card number to get internet access. If your network is like CAMP WiFi network or wish to establish a network like CAMP WiFi, the following template will be perfect for you.


You can use this template just replacing your brand logo and background according to your need. We will replace your logo and background and provide your ready to use template within 24 hours.


CAMP WiFi Mobile View


CAMPWiFi Desktop View


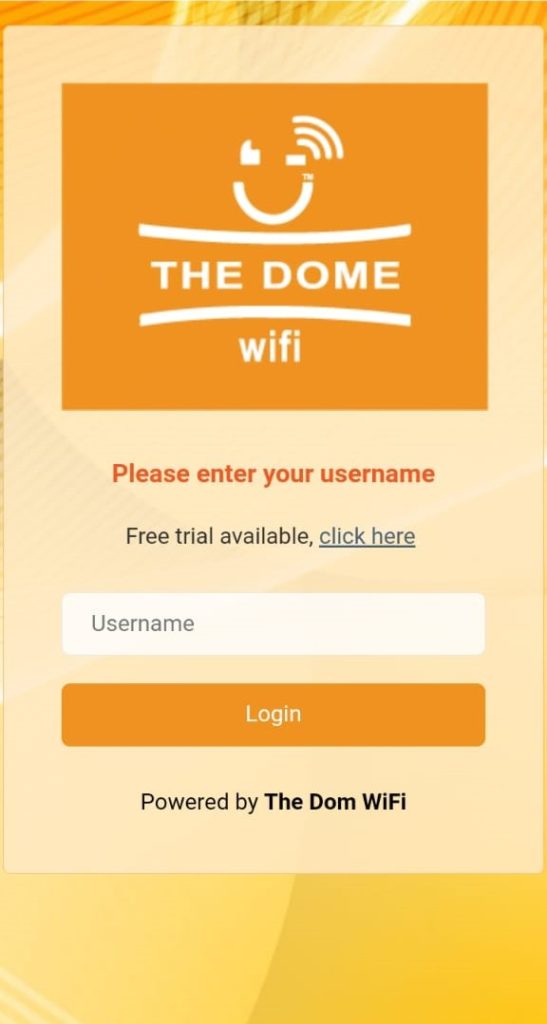
Template Name: The Doom WiFi


The Doom WiFi network uses username to allow internet for their clients. They also offer Trial login. So, we made a login template like the follwoing images.


If your network has similar requirement, you can get the following template just replacing the band logo and background.


TheDomWiFi Mobile View


TheDomWiFi Desktop View


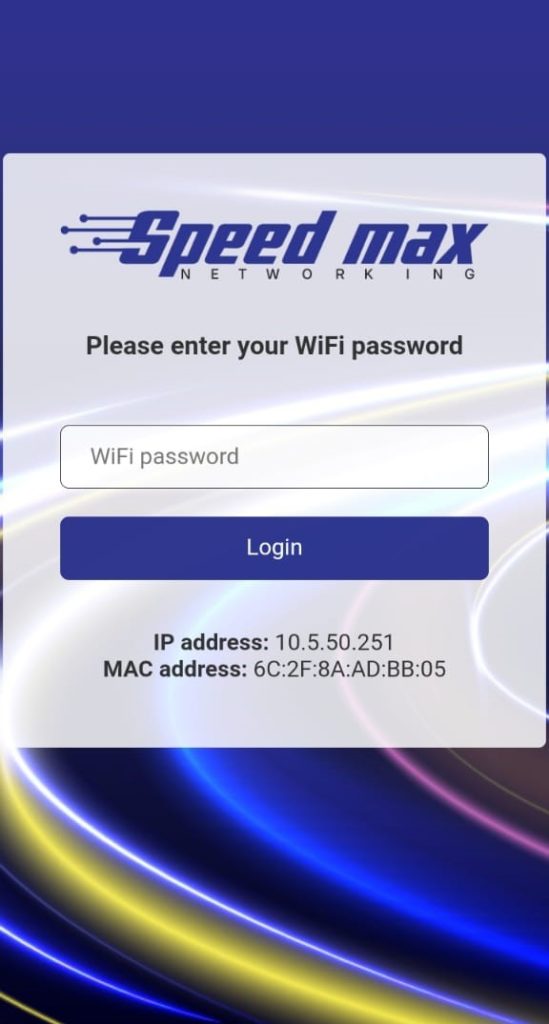
Template Name: Speed Max


Speed max network uses voucher card to allow inter access for their cleints but they shows voucher as wifi password as their clients are familiar to call it as WiFi Password. So, we have changed their login template according to their client need.


SpeedMax_Mobile View


SpeedMax Desktop View


Template Name: ShreeHariHotspot


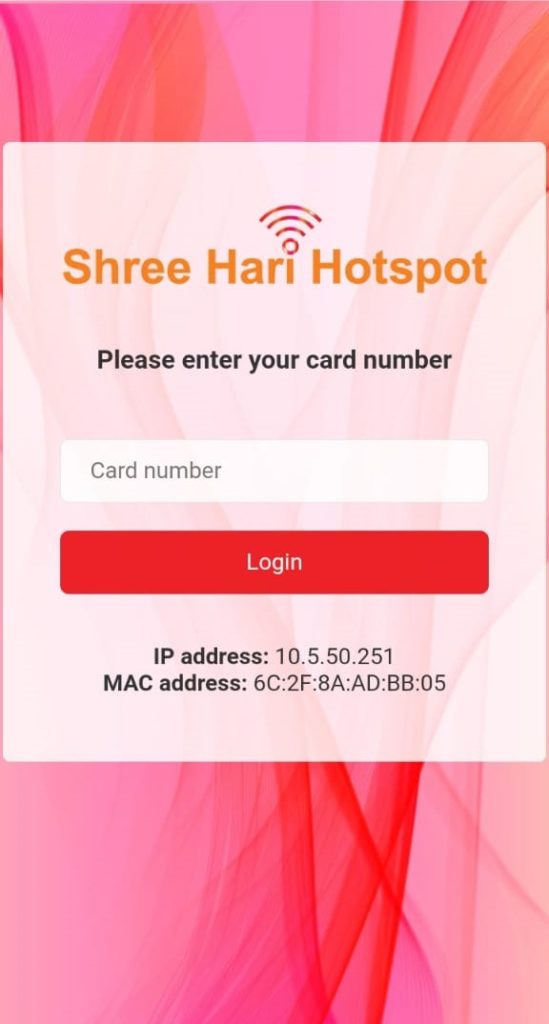
Shree Hari Hotspot netowork has similiar requirment as our first client who sells voucher card and allow their client’s internet access providng card number. So, we have just changed their logo and background according to their demand.


ShreeHariHotspot_Mobile View


ShreeHariHotspot Desktop View


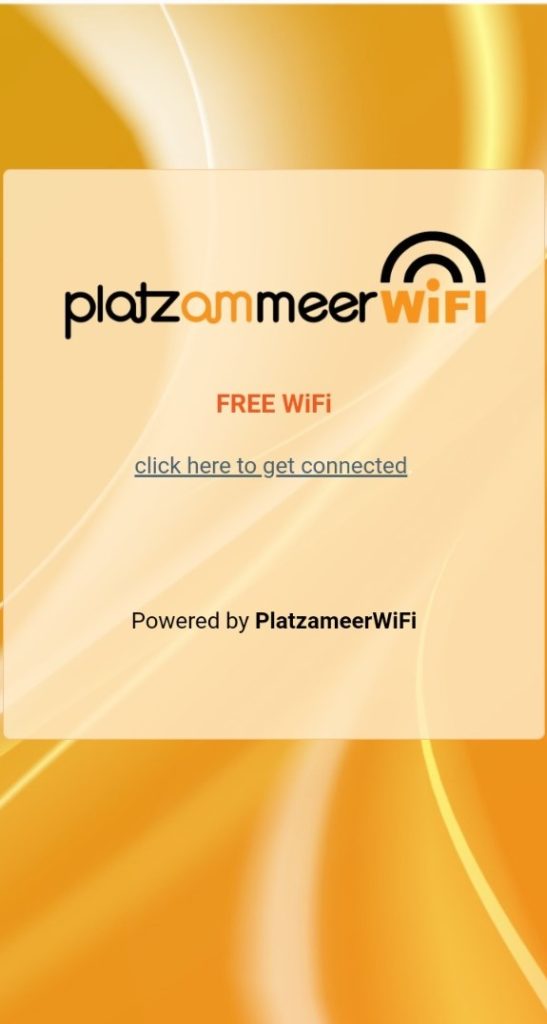
Template Name: PlatzammeerWiFi


Platzammeer WiFi Network offers free wifi but they want to advertize their Brand. So, we have designed a nice template for them where user can get internet access clicking a button but they have to view internet provider’s branding.


PlatzammeerWiFi Mobile View


PlatzammeerWiFi Desktop View


Template Name: Star Network


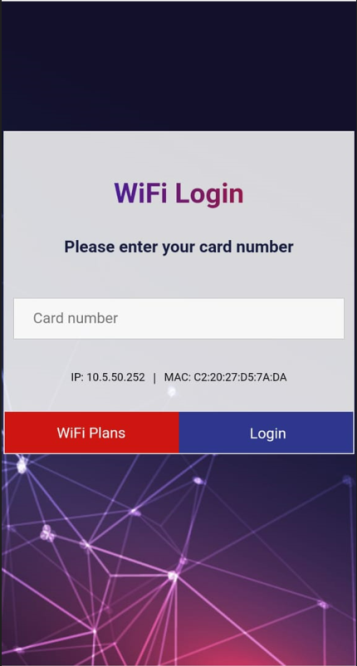
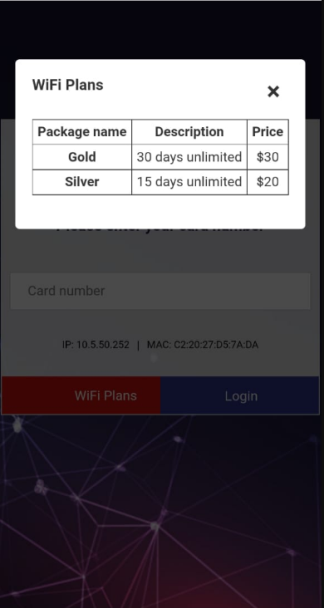
Star Network is an awesome template which offers to view WiFi Plans. Before entering voucher card, customer can view WiFi Plans/Package information clickng the WiFi Plans button.


Mobile View
Mobile View


Plan View on Mobile Devices


Desktop View
Desktop View


WiFi Plan Appearance on Desktop View


Template Price


Predefined templates and similar design templates are only $25. More customized design than predefined template will be priced as per discussion. 


Customer Feedback


Those who are using the above Hotspot templates are so much satisfied for our work. Some of their valuable feedbacks are given below.


  • Thank you! Great work!” – Robert Opperman (The Doom WiFi & PlatzammeerWiFi)
  • Nice work. Worked smoothly in my network” – Sabbir Ahmed, Qatar (Speed Max & ShreeHariHotspot)


How to Order for Hotspot Login Template


If you are interested to customize Hotspot login template from us, simply follow the following steps to contact us.


  • Choose any template from the Demo or describe your customization details to sayeedsezan@gmail.com.
  • Send your Brand logo also.
  • We will send a demo of your customized login page for confirmation.
  • After confirmation and payment, we will send the complete template to you. 


How to Pay for Customized Hotspot Login Template


We usually use the following two methods for payment.


Method 1: BuyMeACoffee


You can easily pay us by buying coffee from Buymeacoffe that supports a lot of payment methods available in your country.


Method 2: Payoneer


If you have Payoneer account, you can easily pay us from Payoneer or we can also send you payment request from Payoneer so that you can pay us from your local bank transfer.  


So, don’t be late. Customize your Hotspot Login Template according to your Brand and make a gorgeous and smooth MikroTik Hotspot Network.


If you have further query, contact me: sayeedsezan@gmail.com, WhataApp: +88 01737325759


2022-04-14T15:54:12
MikroTik Hotspot Tutorials & Guides

MikroTik Hotspot Configuration with ECMP Load Balancing

MikroTik Hotspot is one of the most popular services in MikroTik RouterOS and day be day the demand of Hotspot service is increasing. MikroTik Hotspot can be used in any Airport, Hotel, Restaurant, Campus, Camp, Office or any ISP network. It is also possible to establish a WiFi Broadband Network with the MikroTik Hotspot service. How to configure MikroTik Hotspot was discussed in one of my previous articles. Although MikroTik Hotspot configuration is not so difficult but sometimes we face difficulties to configure MikroTik Hotspot with load balancing. So, in this article we are going to see how to configure MikroTik Hotspot Server with ECMP load balancing and link redundancy technique.


ECMP Load Balancing and Link Redundancy Configuration


ECMP is a so easy but stable load balancing and link redundancy technique in MikroTik RouterOS. ECMP can be configured for both equal or unequal bandwidth link. For this article configuration, we assume that we have equal bandwidth uplink connections which are named as ISP1 and ISP2. We have also a LAN interface (either bridge or physical interface) named as LAN where Hotspot will be configured.


So, at first we will assign IP address on ISP1, ISP2 and LAN interfaces. Issue the following commands to assign IP addresses on these interfaces. Don’t forget to replace IP information according to your network.


/ip address

add address=192.168.10.10/24 interface=ISP1 network=192.168.10.0

add address=172.22.2.2/24 interface=ISP2 network=172.22.2.0

add address=10.10.0.1/23 interface=LAN network=10.10.0.0


Now we will assign DNS IP so that our Router can communicate to public domain. Issue the following command to assign DNS IP addresses.


/ip dns

set servers=8.8.8.8,8.8.4.4


We will now configure NAT so that Hotspot users can get internet access. Issue the following command to configure firewall NAT.


/ip firewall nat

add action=masquerade chain=srcnat out-interface=ISP1

add action=masquerade chain=srcnat out-interface=ISP2


We will now configure route according to ECMP load balancing technique. Issue the following commands to configure route for ECMP load balancing.


/ip route

add check-gateway=ping distance=1 gateway=172.22.2.1,192.168.10.1


ECMP load balancing and link redundancy configuration is now complete. But we have a little issue here. If we want to access MikroTik Router from public area, the connection will be failed because any connection that was established from ISP1 interface can be routed over ISP2 interface.


To overcome this issue, we need to tell if any connection established from ISP1 should be routed over ISP1 interface and vice versa. For this, we will create some mangle rules to mark connection and routing. Issue the commands to mark ISP1 and ISP2 connections and routing.


/ip firewall mangle
add action=mark-connection chain=input in-interface=ISP1 new-connection-mark=isp1_conn passthrough=no
add action=mark-connection chain=input in-interface=ISP2 new-connection-mark=isp2_conn passthrough=no
add action=mark-routing chain=output connection-mark=isp1_conn new-routing-mark=to_isp1 passthrough=no
add action=mark-routing chain=output connection-mark=isp2_conn new-routing-mark=to_isp2 passthrough=no


Now run the following commands to route these marked packets properly through ISP1 and ISP2 interfaces.


/ip route
add check-gateway=ping distance=1 gateway=192.168.10.1 routing-mark=to_isp1
add check-gateway=ping distance=1 gateway=172.22.2.1 routing-mark=to_isp2


ECMP load balancing and link redundancy configuration has been completed. We will now configure MikroTik Hotspot that will use this ECMP load balancing.


Hotspot Configuration with ECMP Load Balancing Network


MikroTik Hotspot can easily be configured with Winbox. So, we will now configure MikroTik Hotspot using Winbox. Login to MikroTik Router with Winbox software and follow the following steps to configure Hotspot with Winbox.


  • From Winbox, go to IP > Hotspot menu item. Hotspot window will appear now.
  • Click on Servers tab and then click on Hotspot Setup button. Hotspot Setup window will appear now.
  • Choose LAN interface from Hotspot Interface drop-down menu. If you have bridge interface created before and want to setup Hotspot Server on bridge interface, choose the bridge interface from drop-down menu. Now click Next button.
  • By default LAN Gateway IP will be assigned on Local Address of Network input field. Masquerade Network checkbox must be unchecked. Click Next button.
  • Choose address pool for Hotspot Server from where IP address will be assigned to clients. Normally, it will show network IP range without gateway IP. We can change default range as we wish or can keep the default range. Click Next button.
  • If you have SSL certificate, you can import by choosing import other certificate option. But Select none as we do not have any SSL certificate now. Click Next button.
  • If you have SMTP server, you can put SMTP Server address in IP Address of SMTP Server input box. As we have no SMTP Server, keep it blank. Click Next button.
  • DNS servers that we have provided in basic configuration will automatically be assigned in DNS Servers input field. So, nothing to do just click Next button.
  • Now it is time to put DNS name and it is a mandatory field. DNS name will be used to get Hotspot login page. So, put a standard DNS name such as systemzone.mk or systemzone.net etc. and click Next button.
  • Now put a local Hotspot User. By default it is admin. We can keep this user or change as our wish. Also put password in Password field for the User. Click Next button.
  • Hotspot Server setup has been completed and you will get a successful message now.


Hotspot Server with ECMP load balancing and link redundancy is now ready. You can now create Hotspot user profile and user and can use Hotspot service smoothly.


MikroTik Hotspot Server with ECMP Load Balancing
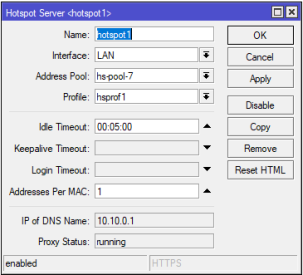
MikroTik Hotspot Server


How to configure MikroTik Hotspot with ECMP load balancing has been discussed in this article. I hope, you will now be able to configure MikroTik Hotspot with ECMP load balancing. However, if you face any confusion, feel free to discuss in comment or contact me from Contact page. I will try my best to stay with you.


2021-09-04T16:35:51
MikroTik Hotspot Tutorials & Guides

How to Prevent Simultaneous User Login in MikroTik Hotspot

MikroTik Hotspot is a user based internet access system. Most of the user authentication and authorization can be controlled with MikroTik Hotspot. But sometimes some users misuse user based authentication system. Misusing simultaneous login is one of them. Usually we provide one username and password for a user and we expect he/she will use this username and password from only one device at a time. But it is also possible to use same username and password in multiple devices at a time if we don’t do proper hotspot configuration. So, in this article we will see how to tune MikroTik Hotspot to prevent simultaneous user login.


Preventing Concurrent User Login in MikroTik Hotspot


MikroTik Hotspot user profile provides a lot of options to tune user authentication and authorization. So, using user profile we can also tune user simultaneous login and prevent misuse of internet access in MikroTik Hotspot. The following steps will show how to tune Hotspot user profile to prevent concurrent user login in MikroTik Hotspot.


  • Login MikroTik Router using Winbox with full permission user.
  • Go to IP > Hotspot menu item. Hotspot Window will appear.
  • Click on User Profiles tab and all active user profiles can be found here.
  • Click on a user profile where you want to tune simultaneous user login. Hotspot User Profile window will appear now.
  • Put idle timeout value (Example: 00:00:30 for thirty seconds) for this profile users in Idle Timeout input box. Bear in mind to keep this value as less as possible so that user can switch one device to another device without any error login message. If we keep this time high, user cannot switch to another device until this idle time is over. Remember we only want to prevent concurrent login but we also want that user are free to use this username and password as much devices as he/she wants.  
  • Now we will tune shared users value that refers how many users can connect at a time. By default hotspot keeps it one (1) and make sure Shared Users value is given only one because we want only one user can be logged in at a time.   
  • Click Apply and OK button.


Preventing concurrent user login in MikroTik Hotspot


Now users of this profile will not be able to connect from multiple devices at a time. But if he/she wants, can be switched to any other device after the idle timeout expired.


I have showed how to prevent simultaneous user login for a Hotspot user profile. Similarly, we can tune concurrent login for other user profiles where we want to apply.


How to prevent simultaneous user login in MikroTik Hotspot has been discussed in this article. I hope you will now be able to tune Hotspot user profile to prevent concurrent user login properly. However, if you face any confusion to apply this technique, feel free to discuss in comment or contact me from Contact page. I will try my best to stay with you.


2020-11-10T00:01:43
MikroTik Hotspot Tutorials & Guides

How to Bind Hotspot User to MAC and Static IP in MikroTik

MikroTik Hotspot is usually a user based Hotspot access controlling system. Internet access and bandwidth can easily be maintained with Hotspot user based system. But sometimes we may require more control on Hotspot system which is not possible only username based system. So, we may need to bind hotspot user to MAC and static IP address. If we can bind hotspot user to static IP address, it is easy to control Hotspot users with MikroTik Router and Firewall. So, in this article we will see how to bind hotspot user to MAC address and static IP address in MikroTik Router.


Hotspot User to Static IP and MAC Binding


Binding Hotspot User to MAC Address and Static IP Address


Hotspot usually provides dynamic IP address when a user is authenticated. So, we cannot apply firewall blocking rule as well as other access control rules on a Hotspot user. But if we bind hotspot user to a static one to one NAT IP address, we can apply any access or blocking rule to that Hotspot user. Besides, if we bind Hotspot user to MAC address multiple logins with same username and password can also be prevented.


The following steps will show how to bind hotspot user to MAC address and static one to one NAT IP address properly.


  • Login MikroTik Router using Winbox with full permission user.
  • Go to IP > Hotspot menu item. Hotspot window will appear.
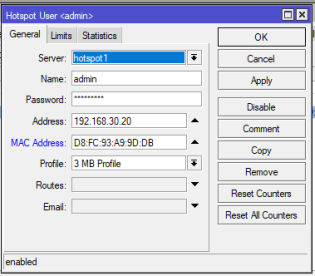
  • From Hotspot window, click on User tab and then double click on the user on which MAC and IP binding will be applied. Hotspot User window will appear.
  • Put IP address (example: 192.168.30.10) that you want to assign for this user in Address input field. So, whenever the user will be connected, this IP address will be assigned as one to one NAT IP address for this user and we can apply any control such as bandwidth, firewall and other rules on this IP address and these controlling rules will be applied on this user.
  • Collect user MAC address and put that MAC address (example: D8:FC:93:A9:9D:DB) in MAC address input field. So, this user cannot be logged in without this MAC addressed device. If you don’t want to apply this restriction, you can skip this step.
  • Click Apply and OK button.


Hotspot User to Static IP Binding


Static IP address and MAC address binding has been applied on a Hotspot user. Similarly, you can apply MAC address and IP address binding for the other users that you wish.


How to bind Hotspot user to static IP address and MAC address has been discussed in this article. I hope you will now be able to apply MAC address and IP address binding to any Hotspot user easily. However, if you face any confusion to apply user to MAC and IP binding in MikroTik Hotspot, feel free to discuss in comment or contact me from Contact page. I will try my best to stay with you.    


2020-11-06T20:29:28
MikroTik Hotspot Tutorials & Guides

How to Separate MikroTik Hotspot and DHCP IP Pool

MikroTik default Hotspot Setup comes with a DHCP Server (which uses same IP Pool of Hotspot Server) to provide IP address and other network information to a connected device. Using this automatic IP address connected device can access Hotspot login page. After successfully login, a one to one NAT IP address is also assigned for the device and this process happens internally in Hotspot Server. User device cannot know this one to one NAT IP assigning. However, Hotspot Server actually occupies two IP address for a successfully logged in user. For this, sometimes Hotspot IP Pool gets congested and new user cannot be able to connect to Hotspot network and hence Hotspot network get hampered. To overcome this situation we can configure DHCP IP Pool and Hotspot IP Pool separately. If we do so, DHCP will provide IP address from its own IP pool and Hotspot will also assign one to NAT IP address from its own IP Pool. For using two different IP Pools, there will be no IP shortage and Hotspot network can run smoothly.  To configure separate IP Pool for DHCP and Hotspot network, we need to apply some tricks and in this article I will discuss how to configure Hotspot and DHCP servers’ IP Pool separately using Winbox.


Configuring Separate IP Pool for Hotspot and DHCP Server  


MikroTik Hotspot Server has some complex configuration and doing any mistake on default configuration can shutdown Hotspot network. So, we have to be careful before doing any new configuration. Following the below three steps we can easily separate Hotspot and DHCP Server IP Pool.


  • Assigning a new gateway for Hotspot
  • Creating a new IP Pool for Hotspot
  • Assigning new IP Pool in Hotspot user profile
  • Creating new NAT rule for the New IP Block.


Step 1: Assigning a new gateway on Hotspot Interface


MikroTik Hotspot default setup configures same gateway IP address for both DHCP Server and Hotspot Server. So, at first we have to set different gateway for Hotspot Server. The following steps will show how to assign different gateway IP for Hotspot Server.


  • Login MikroTik Router with Winbox software using full permission user.
  • Go to IP > Addresses menu item. Address List window will appear.
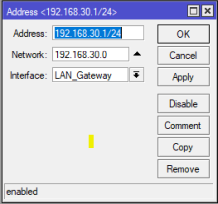
  • Click on PLUS SIGN (+) to add a new gateway IP address. New Address window will appear.
  • Put new gateway IP address (example: 192.168.30.1/24) in Address input field.
  • Choose interface (example: ether2) on which Hotspot Server was installed from Interface dropdown menu.
  • Click Apply and OK button.


New IP Assigning for Hotspot Server


Step 2: Creating a New IP Pool for Hotspot


After creating a new gateway, we will now create a new IP Pool for Hotspot. Hotspot one to one NAT IP will be assigned from this IP Pool. The following steps will show how to create a new IP Pool for Hotspot Server.


  • Go to IP > Pool menu item. IP Pool window will appear.
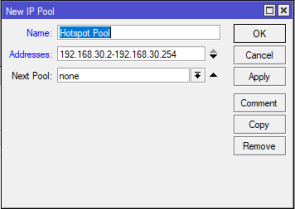
  • Click on PLUS SIGN (+). New IP Pool window will appear.
  • Put a Pool name (example: Hotspot Pool) in Name input field.
  • Now put IP range (example: 192.168.30.2-192.168.30.254) in Addresses input field.  
  • Click Apply and OK button.


New IP Pool for Hotspot Server


Step 3: Assigning Created IP Pool in Hotspot User Profile


After creating new IP Pool for Hotspot Server, we will now assign this pool in Hotspot user profile so that connected user can get one to one NAT IP from this IP Pool. The following steps will show how to assign IP Pool in Hotspot user profile.


  • Go to IP > Hotspot menu item. Hotspot window will appear now.
  • Click on User Profiles tab and then click on a created user profile where you want to assign this new IP Pool. Hotspot User Profile edit window will appear.
  • Under General tab, choose newly created IP Pool from Address Pool drop down menu.
  • Click Apply and OK button.
  • Do the above steps to all your remaining user profiles.


Assigning Hotspot Users' one to one NAT IP Pool.PNG
Assigning Hotspot Users’ one to one NAT IP Pool


Now one to one NAT IP will be assigned from this IP Pool. But at this moment user will not get internet because we have not yet configured NAT for this IP Block. So, in the next section we will do NATing for this IP Block.


Step 4: Creating New NAT Rule for the New IP Block


At last stage we enable NATing for this new IP Block so that these IP addresses can be NATed and user can get internet access. The following steps will show how to create new NAT rule in MikroTik Firewall.


  • Go to IP > Firewall menu item. Firewall window will appear.
  • Click on NAT tab and then click on PLUS SIGN (+). New NAT Rule window will appear.
  • Under General tab, choose srcnat from Chain dropdown menu.
  • Put new IP block (example: 192.168.30.0/24) in Src. Address input filed.
  • Now click on Action tab and choose masquerade from Action dropdown menu.
  • Click Apply and OK button.


New NAT Rule Hotspot IP Block


Our Hotspot and DHCP Server IP block is now separated and we have plenty of IP addresses to assign new Hotspot user. If we wish we can setup more IP Blocks (following the above steps) for our Hotspot Server also.


How to separate Hotspot and DHCP server IP Block has been discussed in this article. I hope you will now be able to create new IP Block for your Hotspot Server. However, if you face any confusion, feel free to discuss in comment or contact me from Contact page. I will try my best to stay with you. 


2020-10-09T19:59:29
MikroTik Hotspot Tutorials & Guides