Вступление
С ростом потребностей компании в развитии возникает необходимость открывать удалённые филиалы или подразделения, которые зачастую могут находиться в другой части страны или мира. При этом потребность в едином информационном пространстве для них крайне важна и актуальна, о чём говорит значительно возросший интерес к оборудованию и программному обеспечению реализующему такие возможности.
Так как, зачастую, связь между филиалами не подразумевает использования больших скоростей, то основными факторами при выборе оборудования являются надёжность, стоимость владения, возможности .
Многие уже не раз успели убедиться, что программная платформа Mikrotik за невысокой ценой и крайне скромными размерами таит в себе все вышеописанные характеристики. Список поддерживаемых ею технологий не оставит равнодушным ни одного администратора, которому когда-либо придётся столкнуться с описываемой нами проблеме.
Возможности
Ниже представлен список возможностей, которые предлагает RouterOS Mikrotik для построения корпоративных сетей:
- поддержка PPTP;
- поддержка L2TP;
- поддержка IPSec;
- поддержка PPPOE;
- поддержка IP2IP.
- поддержка EoIP;
- поддержка 802.1Q VLAN.
Использование в качестве сокрытия информации протоколов инкапсулирующих пакеты верхних уровней с последующим шифрованием содержимого позволяет добиться высокой криптоустойчивости и надёжности. Даже если злоумышленники перехватят часть зашифрованного трафика, им придётся потратить слишком много времени для его расшифровки и весьма вероятно, что им этого не удастся. Таким образом использование вышеописанных технологий и применение их комбинаций даёт крайне высокий уровень шифрования и защиты передаваемой информации, о чём мы с вами поговорим ниже.
Тестовый стенд
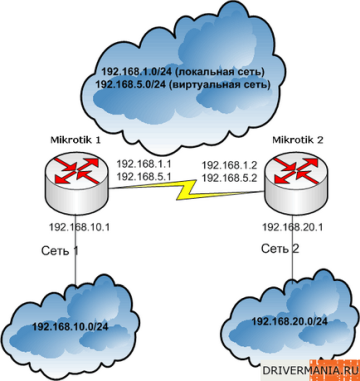
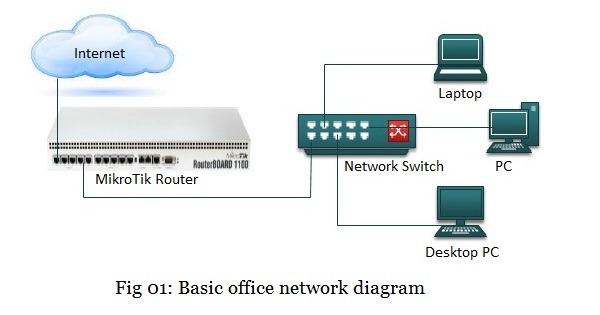
Тренироваться мы с вами будем на следующей схеме:

Mikrotik 1 и Mikrotik 2 расположены разных сетях и являются граничными маршрутизаторами. Схема предусматривает, что они имеют внешние IP-адреса или имеют любой другой способ подключения друг кдругу. Сеть 192.168.5.0, адреса 192.168.5.1 и 192.168.5.2 являются виртуальными, т.е. созданными в результате поднятия туннеля между маршрутизаторами.
Обращайтесь к этой схеме во время просмотра каждой главы, в этом случае вы легко поймёте весь материал.
Описание технологии PPTP
PPTP (Point to Point Tunnel Protocol) переводится как “туннельный межточечный протокол”. PPTP достаточно распространённая технология, которая применяется для создания частных сетей поверх открытых. Высокая производительность, достаточные опции шифрования и аутентификации, реализация на большинстве сетевых программных платформ сделали его одним из самых популярных на рынке.
Протокол PPTP обычно используется в следующих случаях:
- создание безопасных туннелей между маршрутизаторами через Интернет;
- объединение локальных сетей поверх открытых;
- создание корпоративных сетей связи с возможностью доступа в локальную сеть предприятия с удалённых компьютеров или мобильных устройств;
Реализация PPTP в Mikrotik позволяет выбрать следующие способы авторизации:
- mschap2;
- mschap1;
- chap;
- pap.
Стоит отметить, что на практике чаще всего используется mschap2, который более безопасен чем существующие аналоги.
Рассказывая о PPTP стоит упомянуть о протоколе EoIP (EthernetOverIP), который очень часто встречается при создании корпоративных сетей и обычно используется поверх уже созданного виртуального туннеля. EoIP позволяет создать прозрачную сетевую среду, эмулирующую прямое Ethernet подключение между сетями. Использование сказанного средства лишает администраторов головной боли по поводу видимости или не видимости объединённых сетей в “Сетевом окружении” и проблем пробрасывания широковещательного трафика в удаленные подсети.
Рассмотрим пример создания шифрованного PPTP туннеля между двумя территориально удалёнными офисами, которые используют RouterOS Mikrotik в качестве маршрутизаторов.
На одном из маршрутизаторов необходимо включить PPTP Server
/interface pptp-server server set enabled=yes
Сейчас создадим на этом сервере профиль для нового подключения и новый аккаунт
/ppp profile add name=filial only-one=yes use-compression=yes use-encryption=yes use-vj-compression=yes

/ppp secret add name=newuser password=newpassword local-address=192.168.5.1 profile=filial remote-address=192.168.5.2 service=pptp
Для правильной идентификации подключившегося клиента целесообразно создать для него “собственный PPTP сервер”
/interface pptp-server add name=filial user=newuser
Сейчас на втором маршрутизаторе добавляем новый интерфейс для подключения к нашему второму маршрутизатору:
/interface pptp-client add name=filial_connection connect-to=192.168.1.1 user=newuser password=newpassword allow=mschap2 disabled=no
Далее, если вам необходим обычный туннель или вы хотите самостоятельно прописать нужные маршруты, в вашем распоряжении весь необходимый инструментарий. В самом минимальном случае вам необходимо прописать на клиентах в обоих сетях шлюзом По-умолчанию внутренние интерфейсы маршрутизаторов, а на самих маршрутизаторах указать на каких интерфейсах находятся нужные сети.
К примеру, на первом маршрутизаторе выполним:
/ip route add dst-address=192.168.20.0/24 gateway=192.168.5.1 pref-src=192.168.5.2
А на втором:
/ip route add dst-address=192.168.10.0/24 gateway=192.168.5.2 pref-src=192.168.5.1
В результате мы получим возможность получить доступ из одной сети в другую, пользуясь маршрутизацией пакетов L3.
Сейчас вы увидите, как можно сделать то же самое, но на втором уровне OSI, применив EoIP и создав прозрачный мост между сетями.
Предположим, что у нас маршрутизаторы удачно создали PPTP туннель и мы хотим сэмулировать работу обычного моста не трогая маршрутизацию третьего уровня.
Для этого создадим EoIP туннели не обоих маршрутизаторах.
На первом:
/interface eoip add name=filial_EoIP remote-address=192.168.5.1 disabled=no
На втором:
/interface eoip add name=filial_EoIP remote-address=192.168.5.2 disabled=no
Теперь необходимо создать мост между внутренним интерфейсом и EoIP на каждом маршрутизаторе.
На первом выполним:
/interface bridge add

/interface bridge port add bridge=bridge1 interface=ether1

/interface bridge port add bridge=bridge1 interface=filial_EoIP
И на втором:
/interface bridge add

/interface bridge port add bridge=bridge1 interface=ether1

/interface bridge port add bridge=bridge1 interface=filial_EoIP
В описываемом случае мы создали прозрачный туннель между двумя сетями с разными диапазонами адресов, поэтому нужно или расширить сетевую маску у всех адресов или настроить маршрутизацию пакетов.
Описание технологии L2TP
Протокол L2TP похож на PPTP, однако обладает рядом важных преимуществ. В частности L2TP туннели более устойчивы к сбоям и предлагают высокий уровень защищённости передаваемых данных в сочетании с IPSec.
Обычно L2TP используется в следующих случаях:
- создание защищённых туннелей между маршрутизаторами через открытые сети;
- объединение локальных сетей поверх открытых;
- создание гибких схем аутентификации;
- доступ в корпоративную сеть с удалённых компьютеров.
Как и в случае с PPTP, L2TP подразумевает использование клиент-серверной схемы.
Реализация протокола L2TP доступна в большинстве операционных систем, однако его распространённость несколько ниже других подобных протоколов. В основном это связано с некоторыми различиями в понимании принципов его работы производителями и не всегда качественному взаимодействию разных систем. В случае с одинаковыми системами таких проблем не возникнет.
Рассмотрим пример использования протокола L2TP на практике.
На одном из маршрутизаторов необходимо включить L2TP Server
/interface l2tp-server server set enabled=yes
Сейчас создадим на этом сервере профиль для нового подключения и новый аккаунт:
/ppp profile add name=filial only-one=yes use-compression=yes use-encryption=yes use-vj-compression=yes

/ppp secret add name=newuser password=newpassword local-address=192.168.5.1 remote-address=192.168.5.2 service=l2tp profile=filial
Для правильной идентификации подключившегося клиента целесообразно создать для него “собственный PPTP сервер”:
/interface l2tp-server add name=filial user=newuser
Сейчас на втором маршрутизаторе добавляем новый интерфейс для подключения к нашему второму маршрутизатору:
/interface l2tp-client add name=filial_connection connect-to=192.168.1.1 user=newuser password=newpassword allow=mschap2 disabled=no
Описание IP2IP
Протокол IP-IP является самым простым из всех рассматриваемых нами. Принцип его работы основывается на инкапсуляции IP пакетов в IPпакеты. На практике это означает что нужные нам данные в виде IPпакетов будут передаваться по сети упакованные в блоки данных DATA передающихся пакетов. Таким образом достигается некоторое сокрытие информации без её шифрования путём создания подключений точка-точка и инкапсуляции пакетов. На практике IP2IP чаще всего используется для создания туннелей между роутерами через сеть Интернет и в целях обмена информацией между маршрутизаторами. Использование IP2IPв чистом виде не рекомендуется, если присутствует какая-либо возможность перехвата данных, поэтому чаще всего данный туннельный протокол работает как основа для IPSec.
Во многих системах наподобие Cisco IOS и некоторых других присутствуют средства для работы с данной технологией.
Приведем пример из практики, позволяющий увидеть принципы создания подключений точка-точка с помощью протокола IPIP.
Создание IPIP туннеля состоит из двух частей: создание самого подключения и назначения ему IP-адреса.
Первый маршрутизатор:
/interface ipip add name=tunnel1 local-address=192.168.1.1 remote-address=192.168.1.2 disabled=no

/ip address add address=192.168.5.1/24 interface=tunnel1 disabled=no
Второй маршрутизатор:
/interface ipip add name=tunnel1 local-address=192.168.1.2 remote-address=192.168.1.1 disabled=no

/ip address add address=192.168.5.2/24 interface=tunnel1 disabled=no
Поверх этого туннеля можно также поднять EoIP точно так же как было сказано выше.
Описание PPPOE
Протокол PPPOE является частным случаем протокола PPP и является одной из самых распространённых туннельных технологий. Его распространению обязаны провайдеры, которые достаточно часто предлагают услуги широкополосного доступа в интернет, применяя при этом PPPOE. Выбор этой технологии обусловлен её высокой стабильностью, доступностью, масштабируемостью и отсутствию необходимости назначения IP адресов конечным устройствам для создания PPPOE туннеля. Проще говоря протокол PPPOE разрабатывался так, чтобы позволить связать удаленные точки через различные гетерогенные среды, сохраняя при этом доступность, производительность и стабильность.
Использование PPPOE вместо ресурсоёмкого PPTP позволяет значительно снизить нагрузку на сервер, однако если используемые скорости не велики и это не coreмаршрутизатор крупной организации, то особой разницы вы не заметите.
Реализация PPPOE на Mikrotik позволяет воспользоваться следующими типами шифрования трафика:
- No encryption;
- MPPE 40bit RSA;
- MPPE 128bit RSA.
Перед нами стоит задача шифровать трафик, передаваемый через беспроводную среду. В интерфейс маршрутизатора включен беспроводной мост, который обеспечивает прозрачный канал связи с другим беспроводным мостом. Стоит отметить, что обычного шифрования беспроводного трафика в большинстве случаев не достаточно в связи с появлением огромного количества утилит для его перехвата и расшифровки.
Приведем пример использования PPPOE для создания туннеля между маршрутизаторами.
На втором маршрутизаторе создадим PPPOE сервер:
/ppp profile add name=filial only-one=yes use-compression=yes use-encryption=yes

/interface pppoe-server server add interface=ether1 service-name=filial1one-session-per-host=yes default-profile=filial disabled=no use-vj-compression=yes

/ppp secret add name=newuser password=newpassword local-address=192.168.5.1 remote-address=192.168.5.2 service=pppoe
На первом:
/interface pppoe-client add name=filial_connection service-name=filial1 user=newuser password=newpassword allow=mschap2 disabled=no
Описание VLAN
Технология VLAN позволяет организовать виртуальные каналы между узлами связи на 2 уровне модели OSI. Стандарт 802.1Q описывает принципы построения виртуальных сетей на одном физическом Ethernet интерфейсе. Большинство современных маршрутизаторов и коммутаторов умеют работать с этой технологией, которая достаточно часто встречается в современной практике.
Реализация VLAN в RouterOS Mikrotik разрешает использовать до 4095 виртуальных интерфейсов и предоставляет надёжный транспорт для других протоколов высших уровней.
Использование VLAN даёт ряд преимуществ перед туннельными протоколами третьего уровня, предоставляя логические высокоскоростные защищённые интерфейсы, которые ничем не отличаются в принципах работы от обычных физических.
Ниже представлен список сетевых адаптеров, которые корректно работают с 802.1Q
- Realtek 8139;
- Intel PRO/100;
- Intel PRO1000 server adapter;
- National Semiconductor DP83816 based cards (RouterBOARD200 onboard Ethernet, RouterBOARD 24 card);
- National Semiconductor DP83815 (Soekris onboard Ethernet);
- VIA VT6105M based cards (RouterBOARD 44 card);
- VIA VT6105;
- VIA VT6102 (VIA EPIA onboard Ethernet).
Следующие сетевые адаптеры работают с 802.1Q в ограниченном режиме функциональности и не рекомендуются для использования:
- 3Com 3c59x PCI;
- DEC 21140 (tulip).
Приведём пример конфигурирования двух маршрутизаторов, использующих VLAN для связи друг с другом.
Первый маршрутизатор:
/interface vlan add name=vlan1 vlan-id=10 interface=ether1

/ip address add address=192.168.5.1/24 interface=vlan1
Второй маршрутизатор:
/interface vlan add name=vlan1 vlan-id=10 interface=ether1

/ip address add address=192.168.5.2/24 interface=vlan1
После того в статусной строке каждого VLAN интерфейса появилось слово running, попробуйте попингуйте созданные адреса:
ping 192.168.5.1

192.168.5.1 64 byte pong: ttl=255 time=1 ms

192.168.5.1 64 byte pong: ttl=255 time=3 ms
и
ping 192.168.5.2

192.168.5.2 64 byte pong: ttl=255 time=3 ms

192.168.5.2 64 byte pong: ttl=255 time=2 ms
Описание IPSec
Набор протоколов IPSec был разработан специально для сокрытия информации, передаваемой чрез открытые сети. Принципы их реализации значительно повлияли на подход к созданию IPv6 и развитие систем передачи данных промышленных стандартов.
Все протоколы IPSec делятся на два типа:
- протоколы шифрования и формирования шифрованного потока;
- протоколы обмена ключами.
К протоколам первого типа относятся ESP (Encapsulating Security Payload — инкапсуляция зашифрованных данных) и АН (Authentication Header — аутентифицирующий заголовок). Стоит отметить, что AH не подразумевает обеспечения конфиденциальности передаваемых данных и отвечает только за проверку их целостности.
К протоколам второго типа относится только один существующий на данный момент – IKE (Internet Key Exchange). Данный протокол обычно используется в двух случаях:
- передаваемый трафик попал под какое-либо правило, по которому он должен быть зашифрован и у клиента нет данных для его шифрования (Security Associations SA). В этом случае он отправляет запрос на получение ключа своему оппоненту;
- клиент получил запрос на получение ключа и должен ответить вызывающей стороне.
Протоколы IPSec, отвечающие за передачу зашифрованных данных, могут работать в двух режимах: транспортном (создание зашифрованного туннеля между маршрутизаторами) и туннельном (создание подключения между сетями и построение виртуальных частных сетей).
Транспортный режим подразумевает шифрование только блока транспортных данных IP пакета.
Туннельный режим обязывает шифровать пакет полностью и инкапсулировать его в другой UDP пакет, чем обеспечивается его беспроблемная маршрутизация. Также не никак не влияет на маршрутизацию шифрование только поля данных IP-пакетов.
В ситуации когда IPSec пакеты сгенерированы с использованием AH (Authentification Header) не достаточно применения технологии NAT. Структура IP пакета, подверженного обработке IPSec протоколом меняется, что делает невозможным его правильное распознавание. Для устранения этой проблемы прибегают к технологии NAT-Traversal, которая инкапсулирует IPSec трафик в UDP пакеты и передаёт их по сети в виде привычного маршрутизируемого сетевого трафика. На принимающей стороне от пакета отбрасывается UDP заголовок и концевик и на стек протокола IPSec поступают полученные данные.
RouterOS Mikrotik имеет следующие средства для работы с IPSec: создание политик для шифрования правил, автоматическую генерацию ключей, ручное создание правил для шифрования трафика, работу как в транспортном режиме, так и в режиме туннелирования, средства мониторинга. Кроме того, в файерволе системы предусмотрен механизм NAT-T, о котором было рассказано выше.
Для создания простейшего транспортного IPSec подключения между двумя маршрутизаторами нужно:
на первом маршрутизаторе выполнить:
/ip ipsec policy add sa-src-address=192.168.1.1 sa-dst-address=192.168.1.2 action=encrypt

/ip ipsec peer add address=192.168.1.2/24 secret="drivermania.ru" generate-policy=yes
на втором маршрутизаторе выполнить:
/ip ipsec policy add sa-src-address=192.168.1.2 sa-dst-address=192.168.1.1 action=encrypt

/ip ipsec peer add address=192.168.1.1 secret="drivermania.ru"
Также на обоих маршрутизаторах необходимо разрешить используемые протоколами IPSec порты:
/ip firewall filter add chain=input protocol=udp dst-port=500 action=accept comment="Allow IKE" disabled=no

/ip firewall filter add chain=input protocol=ipsec-esp action=accept comment="Allow IPSec-esp" disabled=no

/ip firewall filter add chain=input protocol=ipsec-ah action=accept comment="Allow IPSec-ah" disabled=no
Если у вас не возникло никаких трудностей с вышеописанным, откройте статистику и посмотрите шифруются ли пакеты
ip ipsec> counters print

out-accept: 7

out-accept-isakmp: 0

out-drop: 0

out-encrypt: 8

in-accept: 16

in-accept-isakmp: 0

in-drop: 0

in-decrypted: 7

in-drop-encrypted-expected: 0
В случае использования IPSec в туннельном режиме для объединения сетей с адресами 192.168.10.0/24 и 192.168.20.0/24 правила будут выглядеть следующим образом.
/ip firewall nat add chain=srcnat src-address=192.168.10.0/24 dst-address=192.168.20.0/24 out-interface=public action=masquerade

/ip ipsec policy add src-address=192.168.10.0/24 dst-address=192.168.20.0/24 action=encrypt tunnel=yes sa-src-address=192.168.1.1 sa-dst-address=192.168.1.2

/ip ipsec peer add address=192.168.1.2 exchange-mode=aggressive secret="drivermania.ru"
и
/ip firewall nat add chain=srcnat src-address=192.168.20.0/24 dst-address=192.168.10.0/24 out-interface=public action=masquerade

/ip ipsec policy add src-address=192.168.20.0/24 dst-address=192.168.10.0/24 action=encrypt tunnel=yes sa-src-address=192.168.1.2 sa-dst-address=192.168.1.1

/ip ipsec peer add address=192.168.1.1 exchange-mode=aggressive secret="drivermania.ru"

В результате маршрутизаторы 192.168.1.1 и 192.168.1.2 будут обмениваться ключами и создадут безопасный шифрованный туннель между сетями 192.168.20.0 и 192.168.10.0.
Как вы уже могли заметить, в показанных выше примерах мы оперировали двумя типами правил: правилами для указания политик шифрования (policy) и правилами для указания источников ключей (peer). На них стоит остановиться поподробнее и разъяснить некоторые параметры, однако для начала рассмотрим ещё два типа правил, касающихся IPSec, это Proposals и ManualSAs. Создание Proposals можно сравнить с созданием профилей шифрования. Среди доступных опций предусмотрены:
- алгоритмы генерации данных для аутентификации, которые могут принимать значения: md5, sha1, null;
- алгоритмы генерации данных для шифрования со значениями: des, 3des, aes-128, aes-192, aes-256, null.
Также возможно указать время жизни профиля в секундах или байтах и способ генерации материала для шифрования из списка предложенного ниже:
- modp768;
- modp1024;
- modp1536;
- none.
Профили Proposals используются в качестве опции при создании политик (Policy)
ManualSAs
Данный пункт предназначен для ручного создания Security Associations. Этот способ обычно используется для повышения сложности декодирования перехваченных данных и будет приемлем для ускорения работы протокола за счёт ненадобности генерировать и создавать SAна обоих хостах.
Приведём пример создания шифрованного туннельного подключения двух роутеров при помощи ручного задания SA:
/ip ipsec manual-sa add name=ah-sa1 ah-spi=0x101/0x100 ah-key=drivermania.ru

/ip ipsec policy add src-address=192.168.10.0/24 dst-address=192.168.20.0/24 action=encrypt ipsec-protocols=ah tunnel=yes sa-src=192.168.1.1 sa-dst=192.168.1.2 manual-sa=ah-sa1
и
/ip ipsec manual-sa add name=ah-sa1 ah-spi=0x101/0x100 ah-key=drivermania.ru

/ip ipsec policy add src-address=192.168.20.0/24 dst-address=192.168.10.0/24 action=encrypt ipsec-protocols=ah tunnel=yes sa-src=192.168.1.2 sa-dst=192.168.1.1 manual-sa=ah-sa1
Как видите, необходимость задавать Peers отсутствует, так как данные для шифрования/дешифрования заданы вручную при помощи ManualSAs и алгоритм IKE не используется..
Протоколы IPSec являются самыми совершенными и криптозащищёнными среди всех описанных нами, поэтому если вам необходим крайне высокий уровень защиты передаваемых данных, то это ваш выбор.
Вывод
Итак, вы познакомились с самыми популярными способами создания туннелей между удалёнными сетями.. Если необходимость максимально засекретить передаваемую информацию ваша главная прерогатива, то несомненно выбор должен пасть на IPSec, если вам необходим простой и быстрый туннель с шифрованием трафика, то стоит обратить внимание на PPTP/L2TP. Если вы не хотите оперировать IP адресами и таким образом засекретить передаваемые данные, то стоит обратить внимание на PPPOE и VLAN. Если же вам нужен простой, но быстрый туннель между удалёнными маршрутизаторами- ваш выбор IPIP. Ну и ,несомненно, в случае необходимости прозрачного объединения сетей самым оптимальным будет использование протокола EoIP поверх уже созданных виртуальных каналов.
Каждый раз перед выбором одной из представленных технологий вы должны чётко понимать что требуется получить и что позволит решить задачу максимально надёжно и безопасно, а для понимания всего этого нужен банальный опыт. Так что побольше экспериментируйте и у вас всё получится!
23 июль 2007 Автор: Александр Кузьмицкий Оригинал статьи: http://www.drivermania.ru/articles/obedinjaem-ofisi-s-pomoshhju-mikrotik.html

