Представьте задачу: необходимо обеспечить стабильным интернетом и покрыть бесшовным Wi-Fi здание площадью 300 м2 с возможной расчетной нагрузкой до 100 человек. На первый взгляд, “вроде изян”. Но стоит добавить пару деталей, и задача усложняется:
- здание стоит в лесопарковой зоне, где нет оптики, так что наш вариант – мобильная связь;
- нужно обеспечить регулярные видеотрансляции, то есть добиться стабильного интернета при единственном GSM-провайдере;
- бюджет ограничен.
Итого: потери и отвалы от базовой станции подкрадываются в самое неподходящее время.
Такие проблемы я встречал у колл-центров без выделенных каналов связи, передвижных репортерских комплексов, критически важных удаленных систем. Трудности могут возникнуть не только в случае с VoIP и стримингом видео, но и с любым запросом на гарантированный канал доставки чувствительного к потерям трафика. К сожалению, не всегда есть возможность подвести оптику и закупить дорогостоящее оборудование.
В статье покажу, как в одном проекте я решил эти задачи “дешево и сердито” – такой вариант подойдет малому бизнесу. В конце предложу варианты решения для менее скромного бюджета – для крупных заказчиков.
Схема решения вкратце
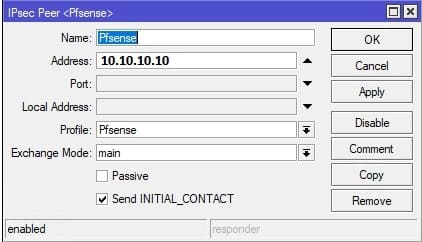
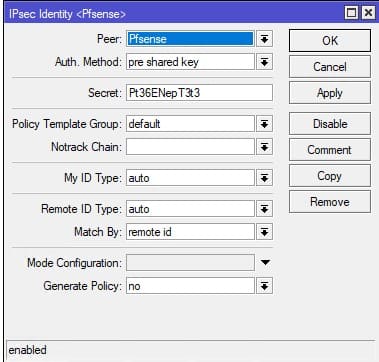
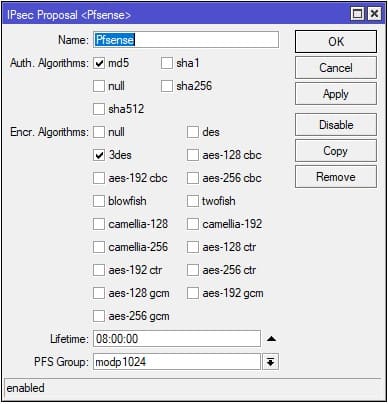
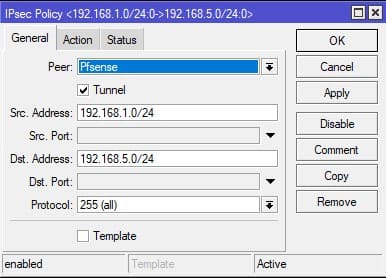
Итак, при первом столкновении с проблемой отвалов я начал с агрегации частот и убедился, что это не поможет. Смена категории LTE-модема с Cat4 на Cat6 или – еще круче – Cat12 давала преимущество в скорости, но в потерях и отвалах – нет. Пришел к выводу, что нужен второй LTE-провайдер. При этом при переключении не должен потеряться ни один кадр и трансляция не должна отвалиться.
На помощь пришла такая связка: агрегация, она же bonding, и TCP-OpenVPN-туннель поверх этого.
- в облаке создал “сервер агрегации” – виртуалку с CLOUD HOSTED ROUTER (CHR) на базе Router OS;
- на ней поднял L2TP-сервер с включенным шифрованием IPsec;
- поверх L2TP over IPsec создал два EoIP-туннеля;
- EoIP-туннели агрегированы bonding-интерфейсом;
- вишенка на торте – TCP-шный OpenVPN-туннель.
Итоговая схема:

Вместо виртуальной машины в дата-центре в качестве R1 может выступать любая железка с достаточной производительностью. Например, тот же MikroTik серии CCR, компьютер, размещенный где угодно. Главное – позаботиться о производительности и стабильных каналах связи, использовать схемы активного резервирования (VRRP в помощь).
Поддержка OpenVPN UDP реализована только в 7-й версии RouterOS, поэтому в этой конфигурации безальтернативно используется протокол TCP.
Сейчас схема стабильно работает, но нет предела совершенству. Для надежности можно добавить еще LTE-провайдеров или проводные каналы связи, когда такая возможность появится.
Теперь расскажу подробнее о строительстве схемы. Начнем с R1 (облачного маршрутизатора) и – далее – R2 (филиального).
Маршрутизатор R1
- Сначала берем второй белый IP в дата-центре. У меня CHR находился за Edge в облаке VMware, так что обязательно пробрасываем порты на Edge UDP 1701, 500 и 4500 NAT-T – IPSec Network Address Translator Traversal. Также делаем разрешающее правило в межсетевом экране Edge.
- Добавляем в таблицу firewall filter разрешающее правило доступа к маршрутизатору извне для портов UDP 1701, 500 и 4500. Если у вас белые IP непосредственно на маршрутизаторе без пробросов через Edge, галочку NAT Traversal НУЖНО СНЯТЬ!Проверяем дефолтный IPsec-профиль:
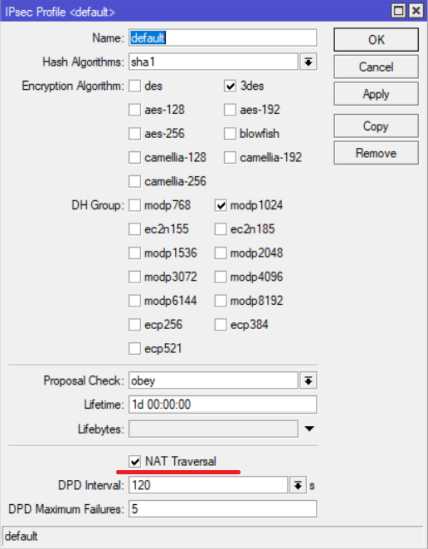
/ip ipsec profile
set [ find default=yes ] dh-group=modp1024 enc-algorithm=3de
- Создаем профиль для L2TP-туннелей:

/ppp profile
add change-tcp-mss=no name=profile01 use-compression=no use-encryption=no use-mpls=no use
и настраиваем учетные записи:

/ppp secret
add local-address=172.16.0.1 name=l2tp_R1-R2_ISP1 password=ros7.elements.forever profile=profile01 remote-address=172.16.0.2 service=l2tp
add local-address=172.16.0.5 name=l2tp_R1-R2_ISP2 password=ros7.elements.forever profile=profile01 remote-address=172.16.0.6 service=l2tp
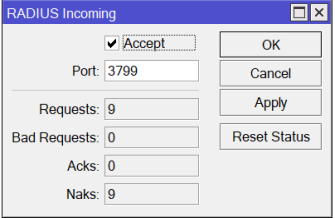
- Активируем L2TP-сервер и включаем шифрование IPsec:
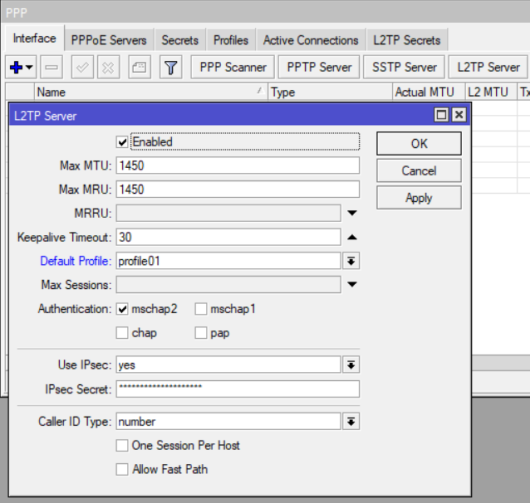
/interface l2tp-server server
set authentication=mschap2 caller-id-type=number default-profile=profile01 enabled=yes ipsec-secret=ВАШ КРУТОЙ ПАРОЛЬ use-ipsec=yes
- Поднимаем два EoIP-туннеля поверх L2TP/IPsec-туннелей:
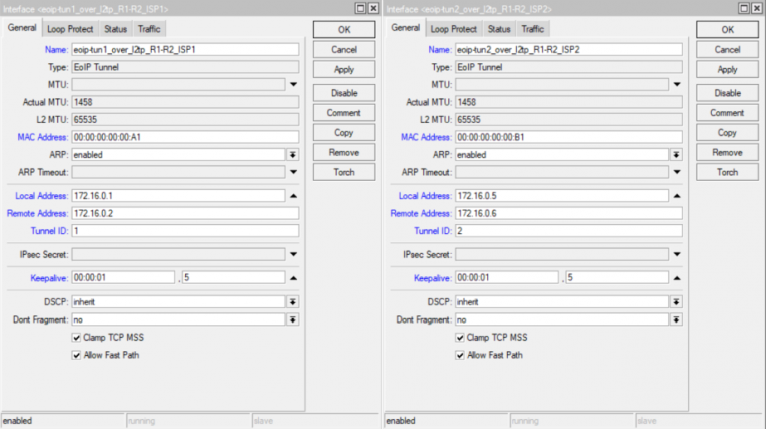
/interface eoip
add keepalive=1s,5 local-address=172.16.0.1 mac-address=00:00:00:00:00:A1 name=eoip-tun1_over_l2tp_R1-R2_ISP1 remote-address=172.16.0.2 tunnel-id=1
add keepalive=1s,5 local-address=172.16.0.5 mac-address=00:00:00:00:00:B1 name=eoip-tun2_over_l2tp_R1-R2_ISP2 remote-address=172.16.0.6 tunnel-id=2
Обязательно указываем минимальный keepalive timeout равным 1 секунде и для каждого EoIP-туннеля указываем уникальный ID.
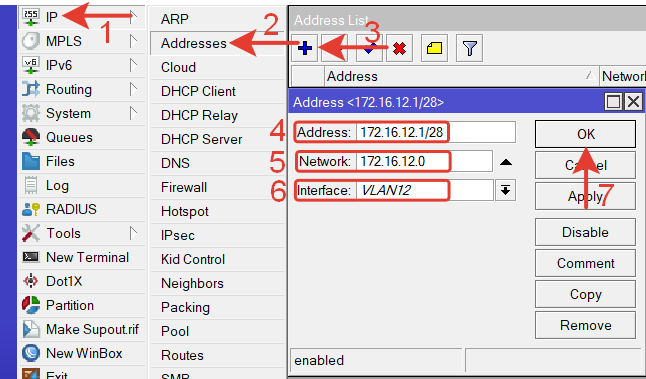
- Настраиваем bonding и назначаем на него IP-адрес:

/interface bonding
add lacp-rate=1sec mii-interval=1ms mode=broadcast name=bonding1 slaves=eoip-tun1_over_l2tp_R1-R2_ISP1,eoip-tun2_over_l2tp_R1-R2_ISP2
/ip address
add address=172.16.1.1/30 interface=bonding1
Тут важно заметить, что в поле mode (режим работы bonding-интерфейса) я указал broadcast, чтобы пакеты отправлялись сразу по двум тоннелям. Таким образом потеря пакета на любом из двух интерфейсов не приведет к потере пакета на bonding-интерфейсе. Остальные значения устанавливаем, как на картинке.
Активируем OpenVPN-сервер
Так как у меня OpenVPN использовался еще и для внешних подключений, то я предварительно сгенерировал сертификаты и импортировал их в CHR. На этом останавливаться подробно не буду.
Создаем /ppp profile и /ppp secret для OpenVPN:


/ppp profile
add change-tcp-mss=no name=profile02 use-compression=no use-encryption=no use-mpls=no use
/ppp secret
add local-address=172.16.2.1 name=ovpn_over_bonding1 password=ros7.elements.forever profile=profile02 remote-address=172.16.2.2 service=ovpn
/interface ovpn-server server
set auth=sha1 certificate=server.crt_0 cipher=aes256 default-profile=profile02 enabled=yes keepalive-timeout=30 port=1194 require-client-certificate=yes
Обязательно прописываем в nat-таблицу межсетевого экрана правило для нашей серой филиальной сети за маршрутизатором R2, чтобы трафик выходил наружу через R1:

/ip firewall nat
add action=masquerade chain=srcnat out-interface-list=WAN src-address=192.168.1.0/24
Обратный маршрут до серой сети за маршрутизатором R2 указываем через OpenVPN-туннель:

/ip route
add check-gateway=ping distance=1 dst-address=192.168.1.0/24 gateway=172.16.2.2
Маршрутизатор R2
- Первым делом прописываем маршруты от одного интерфейса LTE-модема до одного белого IP-адреса дата-центра. Запрещаем в настройках межсетевого экрана в цепочке output прохождение пакетов с другого интерфейса:
/ip route
add distance=1 dst-address= 198.51.100.10/32 gateway=lte1
add distance=1 dst-address= 198.51.100.20/32 gateway=lte2
/ip firewall filter
add action=drop chain=output dst-address= 198.51.100.10 out-interface=lte2
add action=drop chain=output dst-address= 198.51.100.20 out-interface=lte1
- Приводим в соответствие с R1 дефолтный конфиг /ip ipsec profile:
/ip ipsec profile
set [ find default=yes ] dh-group=modp1024 enc-algorithm=3de
- Создаем /ppp profile:

и два L2TP/IPsec-подключения к дата-центру для каждого из провайдеров:

/ppp profile
add change-tcp-mss=no name=profile01 use-compression=no use-encryption=no use-mpls=no use
/interface l2tp-client
add allow=mschap2 connect-to= 198.51.100.10 disabled=no ipsec-secret= ros7.elements.forever keepalive-timeout=30 name=l2tp_to_R1_over_ISP1 password=ros7.elements.forever
    profile=profile01 use-ipsec=yes user=l2tp_R1-R2_ISP1
add allow=mschap2 connect-to= 198.51.100.20 disabled=no ipsec-secret= ros7.elements.forever keepalive-timeout=30 name=l2tp_to_R1_over_ISP2 password=ros7.elements.forever
    profile=profile01 use-ipsec=yes user=l2tp_R1-R2_ISP2
- Создаем EoIP-туннели по аналогии с R1, только меняем местами local и remote IP L2TP/IPsec-линков маршрутизатора R2. Bonding-интерфейс такой же, как на R1:

/interface eoip
add keepalive=1s,5 local-address=172.16.0.2 mac-address=00:00:00:00:00:A2 name=eoip-tun1_over_l2tp_R1-R2_ISP1 remote-address=172.16.0.1 tunnel-id=1
add keepalive=1s,5 local-address=172.16.0.6 mac-address=00:00:00:00:00:B2 name=eoip-tun2_over_l2tp_R1-R2_ISP2 remote-address=172.16.0.5 tunnel-id=2
/interface bonding
add lacp-rate=1sec mii-interval=1ms mode=broadcast name=bonding1 slaves=eoip-tun1_over_l2tp_R1-R2_ISP1,eoip-tun2_over_l2tp_R1-R2_ISP2
/ip address
add address=172.16.1.2/30 interface=bonding1
- Также импортируем сертификаты, создаем профиль:


Настраиваем OpenVPN-клиента на R2:
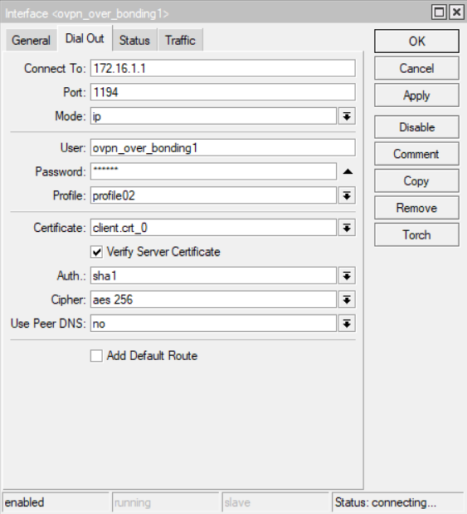
/ppp profile
add change-tcp-mss=no name=profile02 use-compression=no use-encryption=no use-ipv6=no use-mpls=no use-upnp=no
/interface ovpn-client
add certificate=client.crt_0 cipher=aes256 connect-to=172.16.1.1 mac-address=00:00:00:00:00:C2 name=ovpn_over_bonding1 password=ВАШ КРУТОЙ ПАРОЛЬ profile=profile02 use-peer-dns=no user="ovpn_over_bonding1 " verify-server-certificate=yes
- Туннели загорелись волшебной буквой R, а EoIP – еще и RS. OpenVPN тоже завелся. Теперь можно направлять трафик с компьютера трансляций в наш слоеный бутерброд – в OpenVPN-туннель. Для этого создаем правило /ip firewall mangle и прописываем сразу новую таблицу маршрутизации:

/ip firewall mangle
add action=mark-routing chain=prerouting dst-address-list=google_sites dst-port=1935 new-routing-mark=pc_to_stream-youtube_over_R1 passthrough=yes protocol=tcp src-address=192.168.1.1
- Создаем маршрут через наш OpenVPN-туннель с данной таблицей маршрутизации:
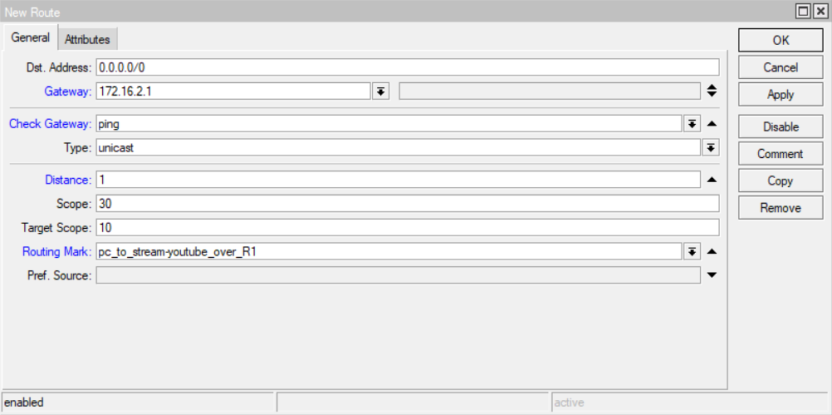
/ip route
add check-gateway=ping distance=1 gateway=172.16.2.1 routing-mark=pc_to_stream-youtube_over_R1
И готово!
Траблшутинг
- При развертывании конфигурации на действующем железе нужно обязательно переключить прямой и обратный маршруты с туннелей L2TP на OpenVPN-туннель. Если, например, переключить только прямой маршрут, а обратный оставить на L2TP вместо OpenVPN, агрегация полностью работать не будет и пакеты все равно будут теряться.
- Утилиты RouterOS в разделе /tools очень полезны при траблшутинге. Еще неплохо работает связка /tools Packet Sniffer + Wireshark.
- Не забудьте “поиграться с mtu”, чтобы достичь лучшей производительности туннелей.
- Качество сигнала никто не отменял. RSRP, RSRQ и SINR покажут, насколько все хорошо. При большом удалении от базовой станции и плохом сигнале помогут внешние направленные антенны.
- Важно! Если провайдер фильтрует трафик и идет блокировка L2TP, то можно поднять другие туннели в качестве основы для EoIP, например: OpenVPN или SSTP.
- Чтобы проверить все в деле, можно сымитировать сбой. Отключаем любой из LTE-интерфейсов или создаем потери искусственно: добавляем в межсетевой экран правило частичной блокировки пакетов и указываем при создании нового правила значение в поле random.
Что еще можно улучшить и оптимизировать
- Не рекомендую заворачивать весь интернет-трафик, так как это вызовет повышенные накладные расходы (утилизация процессоров, каналов и др.). Лучше пользоваться маркировкой для гарантированной доставки действительно необходимого трафика, а все остальное отправлять на LTE-провайдеров. К примеру, я так делал с загрузкой видеофайлов на облачный диск.
- QOS – хорошая штука, особенно на каналах LTE, и особенно с VoIP. Не забываем про это, чтобы остальной трафик не забил и так не слишком широкий канал.
- Можно усилить безопасность, если ограничить подключение извне к портам для L2TP и IPsec маршрутизатора R1. Указываем белый IP LTE-провайдера с помощью firewall и адресных листов. Хоть адрес и из NAT и на нем висит не один клиент, все равно будет лучше. Так как IP динамический, то нужно включить на MikroTik функцию ip – cloud, чтобы DNS-сервера всегда знали актуальный IP, технология DDNS.
Конечно же, у схемы есть коммерческие аналоги с возможностями работы из коробки, например: peplink MAX HD4 LTE и тому подобное оборудование, – агрегирующие соединения. Тут бизнес сам оценивает их стоимость для себя.
Источник: https://uni.dtln.ru/digest/na-kolenke-agregaciya-vpn-ili-nadezhnaya-svyaz-na-nenadezhnyh-kanalah


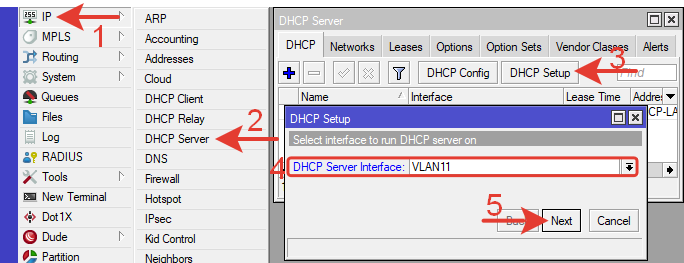
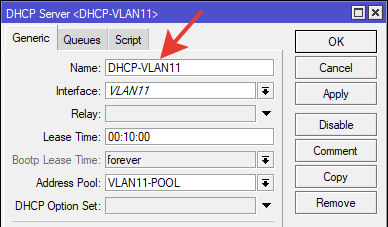
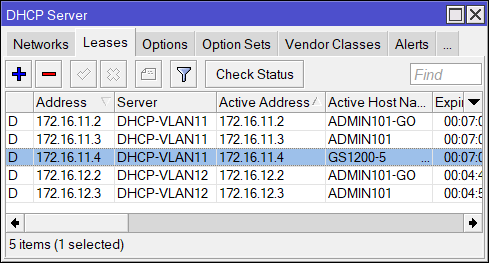
 DHCP-сервер создан.
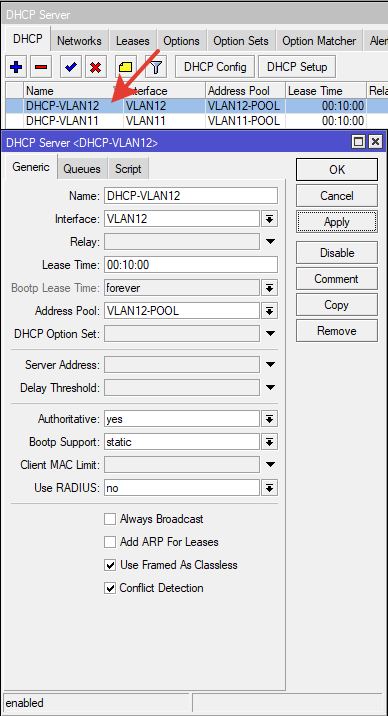
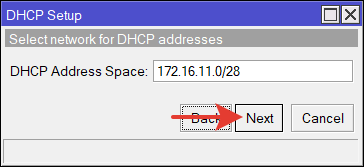
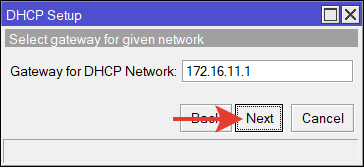