MikroTik is one of the most popular routers in computer networking. It is said that no office or ISP company cannot go a single day without MikroTik router. MikroTik router is also a popular router to any network administrator because MikroTik router is easily maintainable with graphical user interface software named winbox than other routers. A lot of services are available in MikroTik router to run a network smoothly. Among these services, Bandwidth Management Service is the most popular service in MikroTik Router. It is said that MikroTik Router is mostly used because of its Bandwidth Management service. As most of the offices or ISP companies are now using MikroTik router for their user bandwidth management, it will be so beneficial for you to know the proper bandwidth management system with MikroTik router. So, this article is designed to show you the proper and simple way to manage internet bandwidth of any office or ISP company with MikroTik router.
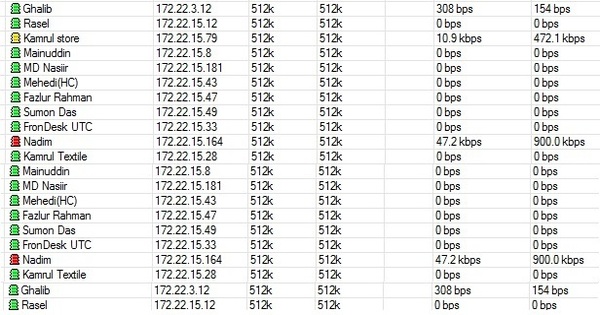
The module or service which is used to manage bandwidth in MikroTik Router is Queues. Maximum bandwidth can be controlled with Queues but it is not always possible to provide fixed bandwidth to the users because bandwidth is always shared. For example, you have assigned 1 Mbps bandwidth to a user. It means, the user will get maximum 1 Mbps upload and download speed if bandwidth is available otherwise he/she will get less than 1 Mbps speed. But he/she will never get grater than 1 Mbps upload or download speed although bandwidth is available more than 1 Mbps. A simple screenshot of a simple queues of a MikroTik router is given below.
MikroTik Router Simple Queues
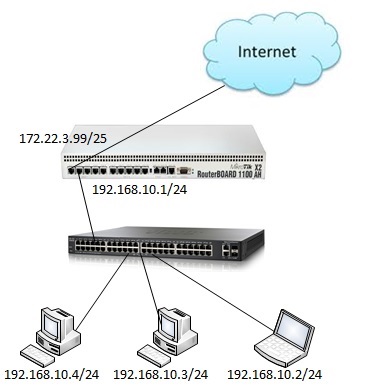
MikroTik router basic configuration was shown in my previous article. In that article, I have configured a simple office network with MikroTik router. The office network diagram which was shown in my previous article is given below again because I will configure MikroTik simple queues for managing users bandwidth according to the basic configuration of my previous article.
Simple Office Network Diagram
In this network diagram, there are there users who are connected to MikroTik router for accessing internet through a network switch. MikroTik router is working as a NATing devices in this network that means it is translating private IP address to public address for accessing internet. Basic configuration for this MikroTik router for working as a NATing devices was explained in my previous article. If you are a new MikroTik user, visit to my previous article about MikroTik router basic configuration using winbox and the keep reading the rest of this article to know how to manage user bandwidth with MikroTik router simple queues.
Bandwidth Management with MikroTik Simple Queue
There are various queue services in MikroTik router for managing user bandwidth. Among these, simple queue service is mostly used for managing an office internet bandwidth and PCQ service is used for managing ISP client bandwidth. As I have configured a simple office network in my previous article, today I will show you how to manage an office bandwidth with MikroTik simple queue service. If you have already configured the basic steps (WAN and LAN IP assign and NAT configuration) of your MikroTik router according to my last article (about MikroTik router basic configuration), follow my below steps to manage your user bandwidth with MikroTik simple queue service.
Login to your MikroTik router using winbox and then click on Queues menu from left menu panel. Queue List window will appear but there will be no list because we have not added any list yet. So, click on add new button (PLUS Sign) to add a new list. New Simple Queue window will appear now. If you face any confusion to find the add new button, please watch my below video carefully which will show you proper guide to open New Simple Queue window successfully.
In general tab of New Simple Queue window, type user name in Name input field and user IP address in Target Address input field. Now choose Target Upload and Target Download from Max limit drop-down list or type your desired upload and download speed. This is the maximum upload and download speed for your desired user.
Now from Advanced tab, choose Limit At value for Target Upload and Target Download speed. If you set this value, MikroTik will try to provide at least this upload and download speed to the user when bandwidth will be congested. You can also choose Priority for any user. Normally, MikroTik bandwidth is assigned sequentially if they are in same priority. That means, the user who is top position of Queue list will get first priority to assign bandwidth and then the second positioned user and then the next positioned user. Priority can be selected 1 to 8. 1 is high priority and 8 is less priority. High priority user will get bandwidth first and then less priority user. Choose your desired priority for this user and click Apply and then OK to save this configuration.
You have now assigned bandwidth on a user IP successfully. Do the above steps repeatedly for all your network users for assigning their bandwidth. Now check your assigned bandwidth to any user with free internet speed test tool. I hope, you will get your desired result from bandwidth test.
Proper steps to assign bandwidth to any user IP with MikroTik simple queue service has been show above. I hope, you are able to assign your user bandwidth by following above steps. However, if you face any problem to assign user bandwidth with above steps, please watch my below video tutorial about MikroTik Router Bandwidth Management with Simple Queues. I hope, it will guide your properly to assign a user bandwidth MikroTik router simple queue.
MikroTik Router Bandwidth Management with simple queue has been explained step by step in this article. A video tutorial has also been uploaded so that you can do the above steps successfully. However, if you face any difficulty, feel free to discuss in comment or contact with me from Contact page. I will try my best to stay with you.
MikroTik is one of the most popular routers. MikroTik Router has a lot of networking services that help to build a stable and smooth network so easily. It is said that any ISP Company or any Enterprise Office cannot go a single day without MikroTik Router. So, system administrators who are not using MikroTik Router yet, they will soon start using MikroTik Router, I think. As a system administrator, I am also using MikroTik Router about 5 years in my network and really I have got a very stable and smooth network. MikroTik Router is mainly famous for bandwidth control service and packet filtering functionalities as well as cheap price. MikroTik Router is also favorite to any system administrator because of having graphical user interface (GUI) software named Winbox which helps to manage MikroTik Router so easily. As the usage of MikroTik Router is growing rapidly, this article is designed to show the basic configuration of a MikroTik Router from very beginning using Winbox software so that a new MikroTik Router user can easily configure his/her router from very starting and can operate his network smoothly.
Prerequisites to Configure a MikroTik Router
Before going to start basic configuration of a MikroTik Router you should have below the information.
PC with windows operating system installed and RJ45 cables.
If you have the above requirements properly, you are now ready to start MikroTik router basic configuration. The rest of this article will show the step by step guide to configure a MikroTik Router from very beginning.
4 Easy Steps to Configure a MikroTik Router
MikroTik Router basic configuration includes assigning IP addresses, configuring default gateway and enabling NAT for accessing internet. MikroTik Router basic configuration can be divided into 4 steps.
Assigning WAN and LAN IP addresses
Gateway configuration
NAT configuration and
DNS configuration
Among the above 4 steps, first three steps are mandatory for accessing internet trough your MikroTik router and step 4 is optional but it must be done for proper MikroTik Router configuration.
To configure a MikroTik Router properly according to the above 4 steps, I am using the following information and a simple office network diagram where three users are connected to MikroTik Router through a network switch and the first interface of the router is connected to internet for accessing internet information.
MikroTik RouterBoard 1100 AHX2
WAN IP: 172.22.3.99/25 (ISP provided)
Gateway: 172.22.3.1 (ISP provided)
Public DNS: 8.8.8.8 and 8.8.4.4
LAN IP Network: 192.168.10.0/24 (Private IP block chosen by me)
Simple Office Network
According to our simple office network diagram, first interface (ether1 port) is connected to ISP internet and this interface is our WAN port. We will set our WAN IP (provided by ISP) in this interface. Second interface (ether2 port) is our LAN interface and we will set our LAN Gateway in this interface. The users of this network will be connected to MikroTik Router trough a switch for accessing internet. In practical, your network will not be so simple like this network diagram. You may have to maintain a large network where there may have hundred or thousand of users. But the basic configuration is same for all networks. However, we will now start our MikroTik Router basic configuration according to the above 4 steps and following our simple office network diagram.
Step 1: Assigning WAN and LAN IP Addresses
The first step to configure a MikroTik Router is to assign WAN and LAN IP addresses in WAN and LAN interface accordingly. The following steps will show how to assign WAN and LAN IP addresses in a new MikroTik Router.
Connect your PC with MikroTik Router by a RJ45 cable.
Open winbox software in your operating system and click on Neighbors tab. Connected Ethernet’s MAC will appear in this tab. If you don’t find MAC Address, click on Refresh button. MAC address will appear soon. Click on the appeared MAC address and selected MAC address will be appeared in Connect To input box.
MikroTik Router default username is admin and password is blank. So, type admin in the login input box and password field left blank and then click on Connect button. MikroTik graphical user interface (GUI) will appear now.
Now click on Remove Configuration button if prompted or from Winbox go to System > Reset Configuration and click No Default Configuration and then click on Reset Configuration button to reset RouterOS. Router will be rebooted and login again and then you will find a zero configuration RouterOS.
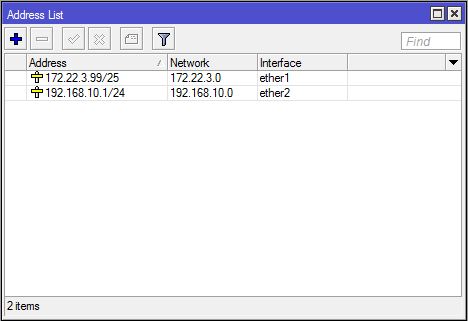
Go to IP > Addresses menu item. Address List window will appear now. Click on PLUS SIGN (+). New Address window will appear. Put your WAN IP address (In this article: 172.22.3.99/25) which is provided by your ISP in Address input box and then select WAN interface (in this article: ether1) from the Interface drop-down menu and click Apply and then OK button.
Click PLUS SIGN (+) again and put LAN Gateway IP address (in this article: 192.168.10.1/24) in Address input box and choose LAN interface (in this article: ether2) from Interface drop-down menu and click Apply and OK button.
Assigning WAN and LAN IP Addresses
Assigning WAN and LAN IP addresses has been completed. We will assign MikroTik gateway which is provided by ISP so that MikroTik Router can communicate to internet through this gateway.
Step 2: Gateway Configuration
After completing WAN and LAN IP setup, we will now assign MikroTik default gateway which is provided by ISP. The following steps will show how to assign default gateway in MikroTik Router.
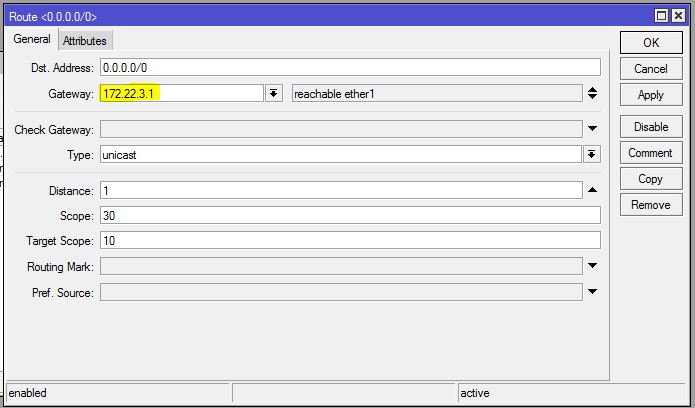
From Winbox, go to IP > Routes menu item. Route List window will appear now. You can see two dynamic routes are already added in this Route List. Click on PLUS SIGN (+). New Route window will appear. Now put gateway address (in this article: 172.22.3.1) which is provided by your ISP in Gateway input field.
Now click Apply and OK button.
Assigning Default Gateway IP
MikroTik default gateway configuration has been completed. Now we will create NAT rule so that MikroTik Router can masquerade our LAN user IP to access internet.
Step 3: NAT Configuration
After completing gateway configuration, you have to create a NAT firewall rule to masquerade LAN IPs. Otherwise, LAN user cannot access internet through MikroTik Router. The following steps will show how to create masquerade firewall rule in MikroTik Router.
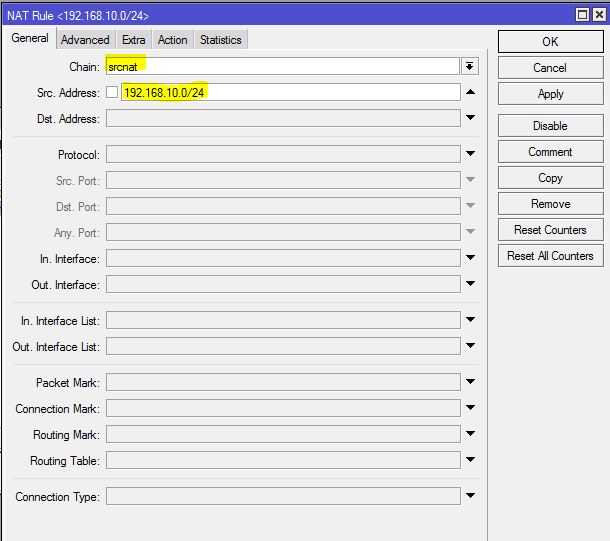
Go to IP > Firewall menu item and click on NAT tab and then click on PLUS SIGN (+) button. New NAT Rule window will appear.
From General tab, choose srcnat from Chain drop down menu and put LAN IP Block (in this article: 192.168.10.0/24) in Src. Address input box.
From Action tab, choose masquerade from Action drop down menu and then click Apply and OK button.
NAT Configuration in MikroTik RouterOS
NAT configuration in MikroTik Router has been completed. if you do not create this NAT rule, your LAN user cannot access internet through MikroTik Router.
Three mandatory steps for configuring a new MikroTik RouterOS to access internet has been completed. LAN users are now able to access internet through Mikrotik Router if they use custom DNS server IP. But we will now configure DNS in MikroTik Router so that it can resolve DNS request as well as it can work as a DNS server.
Step 4: MikroTik DNS Configuration
After completing three mandatory configuration, we need to configure DNS in MikroTik Router so that it can resolve DNS request from the LAN user as well as itself. The following steps will show how to configure DNS in MikroTik RouterOS.
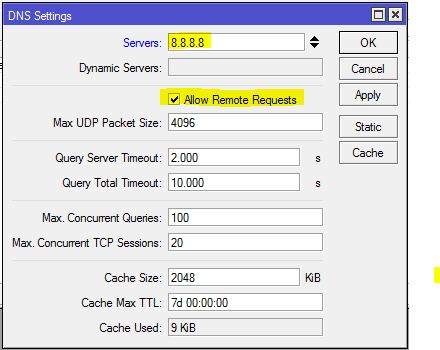
Go to IP > DNS menu item. DNS Settings window will appear. In this window, put DNS server address that you have got from ISP company or you can put Google public DNS IP (8.8.8.8) in Servers input box. You can put secondary DNS server IP by clicking add new value button (drop down button) located after the Servers input box. Optionally, you can turn MikroTik router as a DNS server. Turning MikroTik router as a DNS server is a better idea, I think. Because if you use public DNS server in your network, every DNS request of your user will consume your paid bandwidth. But if you turn MikroTik router as a DNS sever, your user will get DNS solution from MikroTik Router without consuming paid bandwidth. So, if you want to turn MikroTik into a DNS server, click the Allow Remote Requests check box and click Apply and OK button.
If you turn MikroTik Router into a DNS server, all MikroTik IP addresses can be used as a DNS server IP including WAN IP which is a public IP and problem will arise here. If anyone outside of your LAN use WAN IP as a DNS IP, your MikroTik will be happy by serving him/her DNS solution consuming your paid bandwidth. So, you must stop DNS request from outside of your LAN. For stopping DNS request from outside of your LAN, you should apply firewall rules which will drop all DNS requests coming from your WAN interface (in this article: ether1). For this, go to IP > Firewall menu item and click on Filter Rules tab and then click on PLUS SIGN (+). New Firewall Rule window will appear. From General tab, choose input from Chain drop down menu, choose udp from Protocol drop down menu, Put Dst. Port 53 and choose ether1 from In. Interface drop down menu. Now click on Action tab and choose drop from Action drop menu and then click Apply and OK button. You must create another similar rule for TCP connection. For this, click on PLUS SIGN (+) again and choose tcp from Protocol drop down menu, Put Dst. Port 53 and choose ether1 from In. Interface drop down menu and then click on Action tab and choose drop from Action drop menu and click Apply and OK button. Now your MikroTik DNS server is safe from outside of your LAN.
DNS Configuration in MikroTik Router
DNS configuration in your MikroTik Router has been completed. Now your MikroTik Router is able to resolve DNS request for the LAN user as well as itself.
MikroTik Router is now completely ready if you follow the above 4 steps properly. Connect a switch to MikroTik LAN interface with RJ45 cable and connect all PCs to this switch. Also connect ISP cable to WAN interface. Now assign IP to all your LAN PC according to your LAN IP network series. If you face any problem to set IP address in windows PC, follow my another article about how to assign static IP address in windows operating system which will guide you the proper way to assign IP address in any windows PC. Now browse any website or ping google.com from your LAN PC. If your ISP is OK, you will now be able to browse any website successfully.
You should follow the above 4 steps so carefully to configure your new MikroTik Router successfully. If you miss any step, your configuration will be wrong and your LAN users will not be able to access internet through MikroTik Router. If you face any confusion to do the above 4 steps, watch the following video tutorial on MikroTik Router Basic Configuration using Winbox. I hope, it will help you enough to configure new MikroTik Router.
MikroTik Router basic configuration is not so enough to maintain a real network. If you need to maintain an office network, it will be better to use MikroTik DHCP Server. Managing DHCP Server with Radius Server will provide you more faster and smart solution.
MikroTik Router Basic Configuration has been explained step by step in this article. I hope, you will now be able to configure a new MikroTik Router successfully from very beginning. However, if you face any confusion to configure your MikroTik Router, feel free to discuss in comment or contact with me from Contact page. I will try my best to stay with you.
Проблемы с Интернетом — это то, с чем время от времени сталкивается каждый. Не редко проблемы с Интернетом сопровождаются сообщением о том, что сетевой кабель не подключен. В таких ситуациях пользователи задают вполне резонный вопрос: кто виноват и что делать?
Если вы также столкнулись с подобной проблемой, то данный материал должен вам помочь. Сейчас мы рассмотрим ряд причин, которые могут приводить к возникновению данной проблемы. Читать →
Часто после покупки своего первого телевизора со SmartTV пользователи задаются вопросом, как подключить телевизор Интернету через кабель. Данный вопрос особенно актуальный для недорогих телевизоров, которые не оснащаются модулем Wi-Fi. Читать →