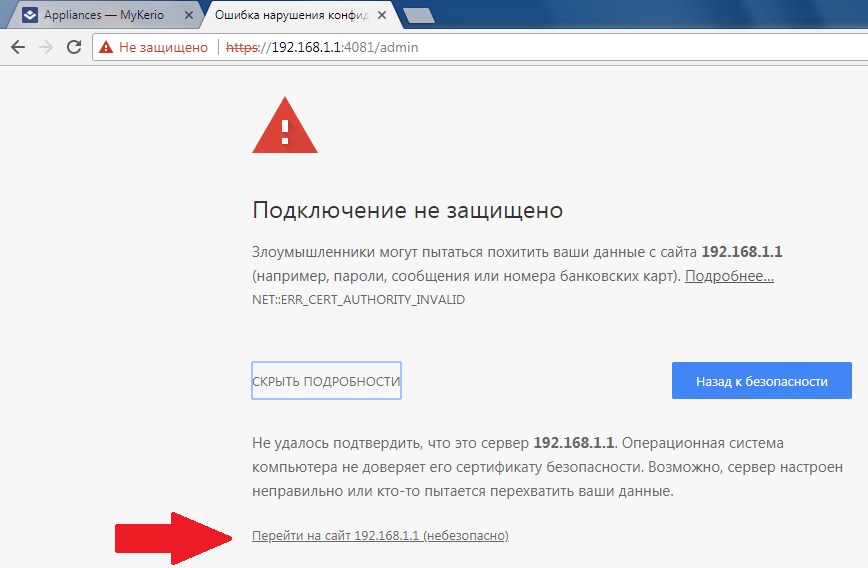
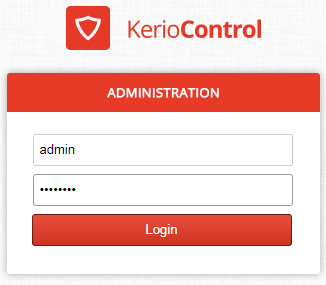
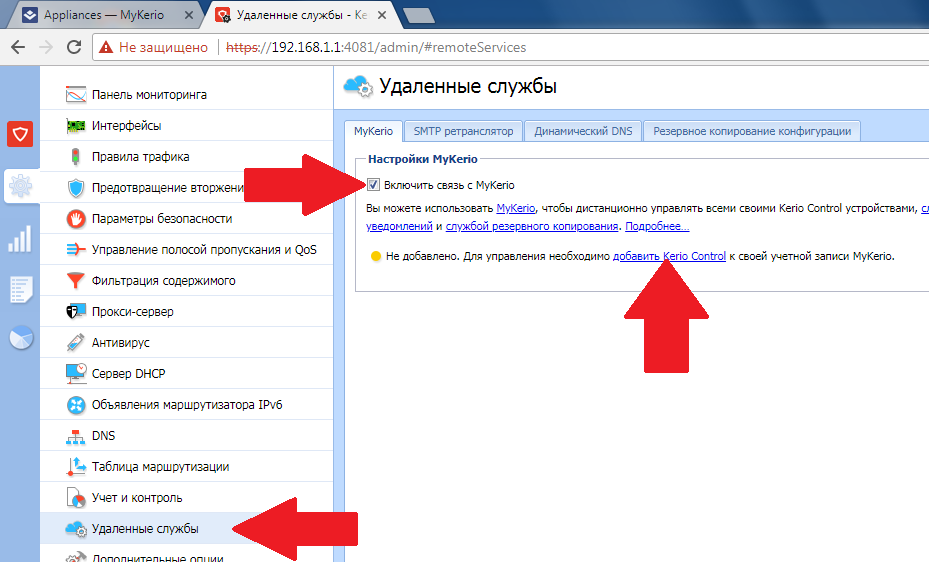
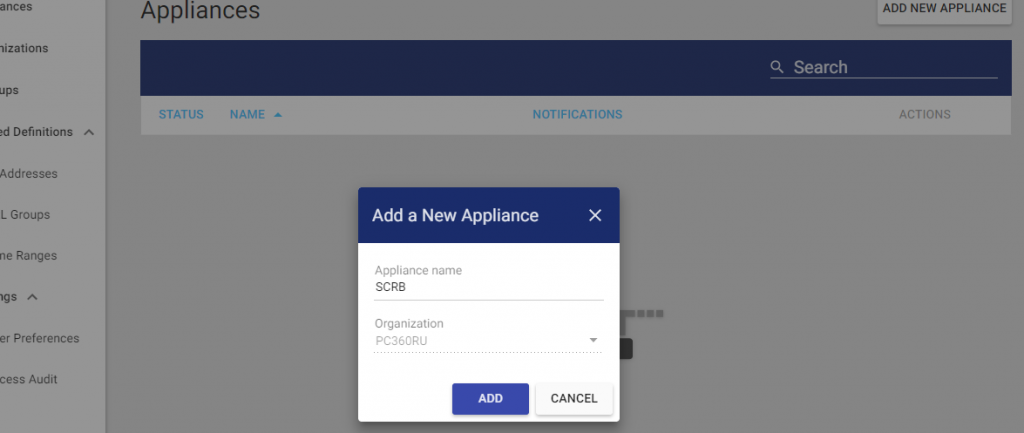
¯_(ツ)_/¯
Примечание: Информация для исследования, обучения или проведения аудита. Применение в корыстных целях карается законодательством РФ.
¯_(ツ)_/¯
Примечание: Информация для исследования, обучения или проведения аудита. Применение в корыстных целях карается законодательством РФ.
XML-RPC — это протокол удаленных процедур, который позволяет удаленно взаимодействовать с вашим сайтом WordPress. Другими словами, это способ управлять сайтом без необходимости входа в систему вручную через стандартную страницу «wp-login.php». Он широко используется плагинами, наиболее известным из собственного плагина Jetpack от Automattic. Однако в эти дни слово «XML-RPC» получило плохое имя. В этой статьи мы объясним, что такое XML-RPC в WordPress и как остановить атаку XML-RPC на вашем веб-сайте WordPress.
Быстрый способ проверить, является ли ваш сайт уязвимым, — это посетить следующий URL-адрес из браузера:
yoursite.ru/xmlrpc.php
Если он включен, вы должны получить ответ, в котором говорится, что «сервер XML-RPC принимает только запросы POST».
В сообществе безопасности WordPress было много вопросов о XML-RPC. В основном есть две проблемы:
По крайней мере, это было возможно. С тех пор WordPress подключил лазейки (https://core.trac.wordpress.org/ticket/34336) , которые позволили людям одновременно попробовать сотни имен пользователей и паролей. Начиная с версии 4.4, она была улучшена. Теперь WordPress будет молча выполнять все последующие попытки входа в систему, как только один вызов XML-RPC завершился неудачно. Большой!
Тем не менее, есть те, кто по-прежнему обеспокоен легкостью, в то время как удаленные вызовы процедур, подобные этому, могут быть сделаны. Итак, вот несколько способов защитить ваш сайт от XML-RPC — начиная с самого легкого способа, до самого тяжелого.
Это процесс, который использует ваш сервер в качестве невольного участника в атаке на другой сервер. В основном, кто-то говорит вашему сайту «Эй, этот URL-адрес, связанный с вашим блогом!», А затем ваш сайт отвечает «pingback» на этот URL. Кроме того, нет никакой проверки, что URL на самом деле сделал ссылку на вас. Сделайте это с сотнями уязвимых сайтов WordPress, и у вас есть DDoS-атака на ваших руках! Самый простой способ запретить использование вашего сайта таким образом — добавить следующий код в функции functions.php вашей темы:
function stop_pings ($vectors) {
unset( $vectors['pingback.ping'] );
return $vectors;
}
add_filter( 'xmlrpc_methods', 'stop_pings');
Этот второй метод определяет, хотите ли вы разрешать методы XML-RPC, которые аутентифицируют пользователей. Возьмем, к примеру, публикацию блога по электронной почте. Сайт получит ваше электронное письмо, проверит вас через XML-RPC, а затем опубликует его, если совпадают учетные данные.
Многим людям неудобно, когда XML-RPC может просто принимать случайные вызовы, подобные этому. Это привело к попыткам сотен или тысяч попыток аутентификации. Несмотря на то, что WordPress с тех пор обращался к этой конкретной форме взлома, есть те, кто рекомендует просто отключить ее.
Для этого введите этот код в functions.php:
add_filter('xmlrpc_enabled','__return_false');
Важно отметить, что это не то же самое, что и первый метод. Этот код только отключает методы проверки подлинности и оставляет все остальные нетронутыми — например, pingbacks.
Это самый экстремальный метод, который полностью отключает все функции XML-RPC. Он требует, чтобы вы редактировали файл .htaccess в корневом каталоге вашего WordPress. Добавьте следующий код вверху:
<files xmlrpc.php> Order allow,deny Deny from all </files>
# BEGIN WordPress
<IfModule mod_rewrite.c>
RewriteEngine On
RewriteBase /
RewriteRule ^index.php$ - [L]
RewriteCond %{REQUEST_FILENAME} !-f
RewriteCond %{REQUEST_FILENAME} !-d
RewriteRule . /index.php [L]
</IfModule>
# END WordPress
Теперь, когда действуют выше правила отказа, попытка доступа к xmlrpc.php будет выполняться со следующей страницей:

И это все, что нужно. Вы успешно отключили XML-RPC на своем сайте WordPress.
Hi geek, you are here because you are finding a complete MikroTik Dual WAN PCC Load balancing and Link Redundancy solution with PPPoE Server because you have managed two ISP connections and want to provide an uninterrupted internet connection to your clients. You also want to manage your LAN clients with PPPoE Server because it provides a hassle free network administration.
MikroTik PCC provides 100% reliable Load Balancing and Link Redundancy network and in my previous article I discussed how MikroTik PCC work and how to configure a basic MikroTik PCC Load Balancing and Link Redundancy network. In this article I will show how to configure a complete Dual WAN PCC Load Balancing and Link Redundancy network with MikroTik PPPoE Server.
Core Devices and IP Information
To configure a PCC load balancing and link redundancy network with PPPoE Server, I am using MikroTik RouterOS v6.38.1 which has two ISP connections available. IP information that I am using for this network configuration are given below.
This IP information is just for my RND purpose. Change this information according to your network requirements.
Network Diagram
To configure a Load Balancing and Link Redundancy network with MikroTik RouterOS, I am following a network diagram like below image.

In this network, MikroTik Router’s 1st Interface (ether1) is connected to ISP1 having IP Address 192.168.30.2/30 and 2nd Interface (ether2) is connected to ISP2 having IP Address 192.168.60.2/30. In real network these IP Addresses should replace with your ISP given public IP Address. Again, 3rd Interface (ether3) is our LAN interface where PPPoE server will be installed and PPPoE network will be 10.10.70.0/24.
We will configure Dual WAN PCC Load Balancing and Link Redundancy in this MikroTik Router and after PCC configuration MikroTik will pass LAN traffic through both ISP equally and if any ISP is disconnected, other ISP will be used to pass all traffic until the disconnected ISP becomes alive. If disconnected ISP becomes alive, both ISP will be used to pass LAN traffic again automatically.
We will now configure PCC Load Balancing network with PPPoE Server according to our above network diagram. Complete configuration can be divided into two parts.
In first part, we will do PCC Load Balancing and Link Redundancy configuration. Complete PCC load balancing configuration includes assigning WAN IP, creating mangle rule, policy based routing configuration and NAT configuration. We will now perform these tasks in our MikroTik Router.
Assigning WAN IP
We have two WAN IPs given from ISP1 and ISP2. We will now assign this WAN IPs in our MikroTik Router’s WAN interface. The following steps will show how to assign WAN IP in your MikroTik Router.
Alternatively, you can run below command from MikroTik CLI.
/interfaceset “ether1″ name=”ISP1”
set “ether2″ name=”ISP2”
set “ether3″ name=”LAN”
/ ip address
add address=192.168.30.2/30 interface=ISP1
add address=192.168.60.2/30 interface=ISP2
Assigning WAN IP in MikroTik Router has been completed. Now we will create Mangle rule to mark connection and routing.
Creating Mangle Rule
Mangle rule is used to mark packet for proper routing. In this part we will create various mangle rules that will help to mark connection and routing and pass different network traffics to different WAN connections. Go to IP > Firewall menu item and click on Mangle tab and create the following 10 rules as indicated.
Alternatively, you can run below command from MikroTik CLI.
/ ip firewall mangleadd chain=prerouting dst-address=192.168.30.0/30 action=accept in-interface=LAN
add chain=prerouting dst-address=192.168.60.0/30 action=accept in-interface=LAN
add chain=prerouting in-interface=ISP1 connection-mark=no-mark action=mark-connection
new-connection-mark=ISP1_conn
add chain=prerouting in-interface=ISP2 connection-mark=no-mark action=mark-connection
new-connection-mark=ISP2_conn
add chain=prerouting in-interface=LAN connection-mark=no-mark dst-address-type=!local
per-connection-classifier=both-addresses:2/0 action=mark-connection new-connection-mark=ISP1_conn
add chain=prerouting in-interface=LAN connection-mark=no-mark dst-address-type=!local
per-connection-classifier=both-addresses:2/1 action=mark-connection new-connection-mark=ISP2_conn
add chain=prerouting connection-mark=ISP1_conn in-interface=LAN action=mark-routing
new-routing-mark=to_ISP1
add chain=prerouting connection-mark=ISP2_conn in-interface=LAN action=mark-routing
new-routing-mark=to_ISP2
add chain=output connection-mark=ISP1_conn action=mark-routing new-routing-mark=to_ISP1
add chain=output connection-mark=ISP2_conn action=mark-routing new-routing-mark=to_ISP2
Your Mangle list window looks like below image.

Mangle rules for matching and marking packets has been created successfully. Now we will configure policy based routing so that marked packet can be routed properly through appropriate ISP connection.
Policy Based Routing Configuration
Mangle rules that we have created will mark connection but do not do anything in routing. To pass marked connection to appropriate ISP connection, we need to configure policy based routing. The following steps will show how to configure policy based routing for the marked connection.
Alternatively, you can run below command from MikroTik CLI.
/ ip routeadd dst-address=0.0.0.0/0 gateway=192.168.30.1 routing-mark=to_ISP1 check-gateway=ping
add dst-address=0.0.0.0/0 gateway=192.168.60.1 routing-mark=to_ISP2 check-gateway=ping
add dst-address=0.0.0.0/0 gateway=192.168.30.1 distance=1 check-gateway=ping
add dst-address=0.0.0.0/0 gateway=192.168.60.1 distance=2 check-gateway=ping
Your Routes window looks like the below image.

Routing configuration for selecting proper ISP has been completed. Now we need to configure NATing so that LAN traffic can reach to internet.
NAT Configuration
We will now configure NATing so that LAN user can reach to internet through MikroTik Router. The following steps will guide how to configure NAT in MikroTik Router for a specific ISP connection.
Alternatively, you can run below command from MikroTik CLI.
/ ip firewall natadd chain=srcnat out-interface=ISP1 action=masquerade
add chain=srcnat out-interface=ISP2 action=masquerade
NAT configuration as well as PCC Load Balancing and Link Redundancy configuration has been completed. Now we will configure PPPoE server in MikroTik Router to manage our LAN users easily.
PPPoE provides extensive user management and network management benefits to network administrators. So it is always better to use PPPoE server for managing LAN user. Complete PPPoE Server configuration can be divided into the following four steps.
IP Pool Configuration
IP Pool is IP range from where IP will be assigned to user computer after user authentication. The following steps will show how to create IP Pool in your MikroTik Router.
IP Pool configuration has been completed. Now we will enable PPPoE Server in MikroTik Router.
Enabling PPPoE Server
We will now enable PPPoE Server in our MikroTik Router. The following steps will show how to enable PPPoE Server in MikroTik Router.
PPPoE Server configuration in MikroTik router has been completed. Now we will create user profile so that we can apply user limitation and other user settings easily.
User Profile Configuration
User profile gives benefits to apply user settings and user limitation such as user bandwidth and number of user connection limitation. User profile also gives facility to categorize your LAN users. The following steps will show how to create user profile for your PPPoE users.
User profile configuration has been completed. Now we will create user secret (username and password) so that they can connect to our PPPoE server with this secret.
User Secret Configuration
Now we will create user secret that will be used to connect to PPPoE Server. The following steps will show how to create user secret in your MikroTik Router.
User secret configuration has been completed as well as all the steps for configuring a PPPoE service in MikroTik router has been completed. Now it is time to show how to configure PPPoE client in any operating system.
We have completely configured PPPoE Server in MikroTik Router. Now your MikroTik is ready to accept PPPoE client. A number of PPPoE clients are present now a day. Among them, now I will show how to configure PPPoE client in windows 7 operating system. All other versions of windows operating system follow almost the same procedure. So, you don’t face any difficulty, I think. However, if you feel any problem to configure PPPoE client of any operating platform, I recommend you to go Google and search how to configure PPPoE client of that specific operating platform.
Steps to Create PPPoE dial Up Connection in Windows 7
Microsoft PC dialer is used to connect remote PPPoE Server in window 7 to get access to the internet. So, you have to configure Microsoft PC dialer in windows 7 PC to get access to the internet through your MikroTik Router. Follow my bellow steps to create PPPoE connection in windows 7 with built in PPPoE wizard.
You are now connected to the internet with PPPoE dialer. Browse any site. I hope, you will be successful to browse any site now.
If you face any confusion to follow above steps properly, follow my video tutorial about PCC Load Balancing configuration with PPPoE Server. I hope, it will reduce your any confusion.
MikroTik Dual WAN Load Balancing with PPPoE Server has been discussed in this article. I hope you are now able to configure your Load Balancing network with PPPoE Server in MikroTik Router. However, if you face any confusion, feel free to discuss in comment or contact with me from Contact page. I will try my best to stay with you.
Вы защитили свою систему Ubuntu от физических атак, раздражаемых сетевых хакеров и изолированных потенциально вредоносных приложений.
Теперь следующие логические шаги по блокировке вашей ОС включают в себя тщательный аудит Ubuntu для слабых мест, использование антивирусного программного обеспечения, которое учитывает вашу конфиденциальность, и мониторинг системных журналов.
Это заключительная часть нашей мини-серии по укреплению вашей основной системы Ubuntu.
Вы узнаете об упрочении слабых мест в ОС, используя хорошо зарекомендовавший себя инструмент аудита с открытым исходным кодом.
Помимо этого, мы проверим ClamAV, антивирусное программное обеспечение, которое не отправит ваши конфиденциальные файлы на коммерческие серверы компаний.
Кроме того, вы увидите, как разрешить или запретить доступ в Интернет для всех приложений на вашем компьютере.
И когда я говорю «журналы мониторинга системы», я говорю о каталоге / var / log /.
Lynis, созданный CISOfy, представляет собой инструмент аудита безопасности для операционных систем на базе Linux и UNIX, который помогает тестировщикам на проникновение с такими стандартами обеспечения безопасности и защиты информации, как ISO27001, HIPAA и PCI DSS.
Хотя Lynis предназначен для компаний и организаций, его можно использовать для аудита обычных установок Ubuntu с высокой степенью определения и экспертизы.
Lynis доступен на GitHub и может быть загружен с помощью команды sudo wget ‘github.com/CISOfy/lynis/archive/master.zip’, как показано здесь:
sudo wget 'https://github.com/CISOfy/lynis/archive/master.zip' ---- https://github.com/CISOfy/lynis/archive/master.zip Resolving github.com (github.com)... 192.30.253.112 Connecting to github.com (github.com)|192.30.253.112|:443... connected. HTTP request sent, awaiting response... 302 Found Location: https://codeload.github.com/CISOfy/lynis/zip/master [following] ---- https://codeload.github.com/CISOfy/lynis/zip/master Resolving codeload.github.com (codeload.github.com)... 192.30.253.120 Connecting to codeload.github.com (codeload.github.com)|192.30.253.120|:443... connected. HTTP request sent, awaiting response... 200 OK Length: 345734 (338K) [application/zip] Saving to: ‘master.zip’ master.zip 100%[===================================================================>] 337.63K 237KB/s in 1.4s (237 KB/s) - ‘master.zip’ saved [345734/345734]
Я использую sudo для команд Lynis, потому что инструмент и его каталоги требуют привилегированного доступа к определенным областям операционной системы Ubuntu, чтобы правильно проверять все.
Как правило, небезопасно хранить и использовать двоичные файлы и приложения таким образом, но мы будем удалять Lynis сразу же после его использования.
Используйте sudo unzip master.zip для распаковки архива.
sudo unzip master.zip Archive: master.zip 6e0ac57b68bfd39dd7d464e93ec85203ee683313 creating: lynis-master/ extracting: lynis-master/.gitignore inflating: lynis-master/.travis.yml inflating: lynis-master/CHANGELOG.md inflating: lynis-master/CODE_OF_CONDUCT.md inflating: lynis-master/CONTRIBUTING.md inflating: lynis-master/CONTRIBUTORS.md inflating: lynis-master/FAQ inflating: lynis-master/INSTALL inflating: lynis-master/LICENSE inflating: lynis-master/README inflating: lynis-master/README.md creating: lynis-master/db/ inflating: lynis-master/db/fileperms.db inflating: lynis-master/db/hints.db extracting: lynis-master/db/integrity.db creating: lynis-master/db/languages/ inflating: lynis-master/db/languages/az linking: lynis-master/db/languages/br -> pt inflating: lynis-master/db/languages/cn inflating: lynis-master/db/languages/de inflating: lynis-master/db/languages/en linking: lynis-master/db/languages/en-GB -> en linking: lynis-master/db/languages/en-US -> en inflating: lynis-master/db/languages/es inflating: lynis-master/db/languages/fi inflating: lynis-master/db/languages/fr inflating: lynis-master/db/languages/gr inflating: lynis-master/db/languages/he inflating: lynis-master/db/languages/hu inflating: lynis-master/db/languages/it inflating: lynis-master/db/languages/ja inflating: lynis-master/db/languages/nb-NO inflating: lynis-master/db/languages/nl linking: lynis-master/db/languages/nl-BE -> nl linking: lynis-master/db/languages/nl-NL -> nl inflating: lynis-master/db/languages/pl inflating: lynis-master/db/languages/pt inflating: lynis-master/db/languages/ru inflating: lynis-master/db/languages/se inflating: lynis-master/db/languages/tr inflating: lynis-master/db/malware-susp.db inflating: lynis-master/db/malware.db extracting: lynis-master/db/sbl.db inflating: lynis-master/db/tests.db inflating: lynis-master/default.prf inflating: lynis-master/developer.prf creating: lynis-master/extras/ inflating: lynis-master/extras/README creating: lynis-master/extras/bash_completion.d/ inflating: lynis-master/extras/bash_completion.d/lynis inflating: lynis-master/extras/build-lynis.sh inflating: lynis-master/extras/check-lynis.sh inflating: lynis-master/extras/files.dat inflating: lynis-master/extras/lynis.spec creating: lynis-master/extras/openbsd/ inflating: lynis-master/extras/openbsd/+CONTENTS creating: lynis-master/extras/systemd/ inflating: lynis-master/extras/systemd/lynis.service inflating: lynis-master/extras/systemd/lynis.timer creating: lynis-master/extras/travis-ci/ extracting: lynis-master/extras/travis-ci/before_script.sh creating: lynis-master/include/ inflating: lynis-master/include/binaries inflating: lynis-master/include/consts inflating: lynis-master/include/data_upload inflating: lynis-master/include/functions inflating: lynis-master/include/helper_audit_dockerfile inflating: lynis-master/include/helper_configure inflating: lynis-master/include/helper_show inflating: lynis-master/include/helper_system_remote_scan inflating: lynis-master/include/helper_update inflating: lynis-master/include/osdetection inflating: lynis-master/include/parameters inflating: lynis-master/include/profiles inflating: lynis-master/include/report inflating: lynis-master/include/tests_accounting inflating: lynis-master/include/tests_authentication inflating: lynis-master/include/tests_banners inflating: lynis-master/include/tests_boot_services inflating: lynis-master/include/tests_containers inflating: lynis-master/include/tests_crypto inflating: lynis-master/include/tests_custom.template inflating: lynis-master/include/tests_databases inflating: lynis-master/include/tests_dns inflating: lynis-master/include/tests_file_integrity inflating: lynis-master/include/tests_file_permissions inflating: lynis-master/include/tests_filesystems inflating: lynis-master/include/tests_firewalls inflating: lynis-master/include/tests_hardening inflating: lynis-master/include/tests_homedirs inflating: lynis-master/include/tests_insecure_services inflating: lynis-master/include/tests_kernel inflating: lynis-master/include/tests_kernel_hardening inflating: lynis-master/include/tests_ldap inflating: lynis-master/include/tests_logging inflating: lynis-master/include/tests_mac_frameworks inflating: lynis-master/include/tests_mail_messaging inflating: lynis-master/include/tests_malware inflating: lynis-master/include/tests_memory_processes inflating: lynis-master/include/tests_nameservices inflating: lynis-master/include/tests_networking inflating: lynis-master/include/tests_php inflating: lynis-master/include/tests_ports_packages inflating: lynis-master/include/tests_printers_spools inflating: lynis-master/include/tests_scheduling inflating: lynis-master/include/tests_shells inflating: lynis-master/include/t
Затем измените папку (cd) во вновь созданный каталог lynis-master /:
cd lynis-master
Бинарник Lynis должен иметь разрешения на выполнение на вашем компьютере, но в случае, если это не так, используйте команду sudo chmod + x lynis.
sudo chmod +x lynis
Чтобы проверить Lynis и просмотреть доступные параметры, используйте команду help (-h), то есть sudo ./lynis -h.
sudo ./lynis -h [ Lynis 2.6.5 ] ################################################################################ Lynis comes with ABSOLUTELY NO WARRANTY. This is free software, and you are welcome to redistribute it under the terms of the GNU General Public License. See the LICENSE file for details about using this software. 2007-2018, CISOfy - https://cisofy.com/lynis/ Enterprise support available (compliance, plugins, interface and tools) ################################################################################ [+] Initializing program ------------------------------------ Usage: lynis command [options] Command: audit audit system : Perform local security scan audit system remote <host> : Remote security scan audit dockerfile <file> : Analyze Dockerfile show show : Show all commands show version : Show Lynis version show help : Show help update update info : Show update details Options: --no-log : Don't create a log file --pentest : Non-privileged scan (useful for pentest) --profile <profile> : Scan the system with the given profile file --quick (-Q) : Quick mode, don't wait for user input Layout options --no-colors : Don't use colors in output --quiet (-q) : No output --reverse-colors : Optimize color display for light backgrounds Misc options --debug : Debug logging to screen --view-manpage (--man) : View man page --verbose : Show more details on screen --version (-V) : Display version number and quit Enterprise options --plugindir <path> : Define path of available plugins --upload : Upload data to central node More options available. Run './lynis show options', or use the man page.
Чтобы начать аудит операционной системы, используйте аргументы системы аудита, такие как система аудита sudo ./lynis.
sudo ./lynis audit system [ Lynis 2.6.5 ] [+] Initializing program ------------------------------------ - Detecting OS... [ DONE ] - Checking profiles... [ DONE ] --------------------------------------------------- Program version: 2.6.5 Operating system: Linux Operating system name: Ubuntu Linux Operating system version: 18.04 Kernel version: 4.15.0 Hardware platform: x86_64 Hostname: nullbyte --------------------------------------------------- Profiles: /home/tokyoneon/Desktop/lynis-master/default.prf Log file: /var/log/lynis.log Report file: /var/log/lynis-report.dat Report version: 1.0 Plugin directory: ./plugins --------------------------------------------------- Auditor: [Not Specified] Language: en Test category: all Test group: all --------------------------------------------------- - Program update status... [ UNKNOWN ] ================================================================================ -[ Lynis 2.6.5 Results ]- Great, no warnings Suggestions (25): ---------------------------- * Set a password on GRUB bootloader to prevent altering boot configuration (e.g. boot in single user mode without password) [BOOT-5122] https://cisofy.com/controls/BOOT-5122/ * Install a PAM module for password strength testing like pam_cracklib or pam_passwdqc [AUTH-9262] https://cisofy.com/controls/AUTH-9262/ * Configure minimum password age in /etc/login.defs [AUTH-9286] https://cisofy.com/controls/AUTH-9286/ * Configure maximum password age in /etc/login.defs [AUTH-9286] https://cisofy.com/controls/AUTH-9286/ * Default umask in /etc/login.defs could be more strict like 027 [AUTH-9328] https://cisofy.com/controls/AUTH-9328/ * To decrease the impact of a full /home file system, place /home on a separated partition [FILE-6310] https://cisofy.com/controls/FILE-6310/ * To decrease the impact of a full /tmp file system, place /tmp on a separated partition [FILE-6310] https://cisofy.com/controls/FILE-6310/ * To decrease the impact of a full /var file system, place /var on a separated partition [FILE-6310] https://cisofy.com/controls/FILE-6310/ * Disable drivers like USB storage when not used, to prevent unauthorized storage or data theft [STRG-1840] https://cisofy.com/controls/STRG-1840/ * Check DNS configuration for the dns domain name [NAME-4028] https://cisofy.com/controls/NAME-4028/ * Install debsums utility for the verification of packages with known good database. [PKGS-7370] https://cisofy.com/controls/PKGS-7370/ * Install package apt-show-versions for patch management purposes [PKGS-7394] https://cisofy.com/controls/PKGS-7394/ * Consider running ARP monitoring software (arpwatch,arpon) [NETW-3032] https://cisofy.com/controls/NETW-3032/ * Check iptables rules to see which rules are currently not used [FIRE-4513] https://cisofy.com/controls/FIRE-4513/ * Check what deleted files are still in use and why. [LOGG-2190] https://cisofy.com/controls/LOGG-2190/ * Add a legal banner to /etc/issue, to warn unauthorized users [BANN-7126] https://cisofy.com/controls/BANN-7126/ * Add legal banner to /etc/issue.net, to warn unauthorized users [BANN-7130] https://cisofy.com/controls/BANN-7130/ * Enable process accounting [ACCT-9622] https://cisofy.com/controls/ACCT-9622/ * Enable sysstat to collect accounting (no results) [ACCT-9626] https://cisofy.com/controls/ACCT-9626/ * Enable auditd to collect audit information [ACCT-9628] https://cisofy.com/controls/ACCT-9628/ * Install a file integrity tool to monitor changes to critical and sensitive files [FINT-4350] https://cisofy.com/controls/FINT-4350/ * Determine if automation tools are present for system management [TOOL-5002] https://cisofy.com/controls/TOOL-5002/ * One or more sysctl values differ from the scan profile and could be tweaked [KRNL-6000] - Solution : Change sysctl value or disable test (skip-test=KRNL-6000:<sysctl-key>) https://cisofy.com/controls/KRNL-6000/ * Harden compilers like restricting access to root user only [HRDN-7222] https://cisofy.com/controls/HRDN-7222/ * Harden the system by installing at least one malware scanner, to perform periodic file system scans [HRDN-7230] - Solution : Install a tool like rkhunter, chkrootkit, OSSEC https://cisofy.com/controls/HRDN-7230/ ================================================================================ Lynis security scan details: Hardening index : 67 [############# ] Tests performed : 223 Plugins enabled : Components: - Firewall [V] - Malware scanner [X] Lynis Modules: - Compliance Status [?] - Security Audit [V] - Vulnerability Scan [V] Files: - Test and debug information : /var/log/lynis.log - Report data : /var/log/lynis-report.dat ================================================================================
После выполнения более 200 тестов вывод Lynis может занять довольно много времени.
Я пропустил большую часть журнала, но сохранил раздел application.
Я думаю, что это одна из самых сильных сторон Lynis.
Он предлагает несколько полезных отправных точек для пользователей, заинтересованных в восстановлении.
Например, Lynis рекомендует «Закрепить систему, установив хотя бы один сканер вредоносного ПО».
Это можно легко решить, выполнив следующий шаг в этом руководстве и установив антивирусное программное обеспечение.
Когда вы полностью проведете аудит вашей установки Ubuntu, вы можете удалить Lynis, используя приведенные ниже команды rm.
sudo rm -rf /path/to/lynis-master/ sudo rm -rf /path/to/master.zip
ClamAV – это антивирусная система с открытым исходным кодом, используемая в различных ситуациях, включая сканирование электронной почты, веб-сканирование и защиту конечных точек.
Он предоставляет ряд функций, которые пользователи Ubuntu могут оценить:
В отличие от Avast, популярной антивирусной компании, которая регулярно экспортирует личные пользовательские документы на серверы Avast, ClamAV сканирует файловые системы для сигнатур вредоносных программ локально.
Это действительно все, что он делает.
Он ни в коем случае не обеспечивает пуленепробиваемую защиту от высокотехнологичных атак, а также обычные вредоносные сигнатуры, найденные в природе.
Было сказано, что операционным системам Linux не требуется антивирусное программное обеспечение.
Я в основном согласен с этим утверждением.
Однако ClamAV является отличным проектом с открытым исходным кодом и может обеспечить некоторый комфорт для пользователей, которые предпочитают знать, что их ОС безопасно анализируется на наличие вредоносных программ несколько раз в день.
ClamAV доступен в репозиториях Ubuntu и может быть установлен с помощью команды sudo apt-get install clamav.
sudo apt-get install clamav Reading package lists... Done Building dependency tree Reading state information... Done The following package was automatically installed and is no longer required: menu Use 'sudo apt autoremove' to remove it. The following additional packages will be installed: clamav-base clamav-freshclam libclamav7 libllvm3.9 libmspack0 libtfm1 Suggested packages: clamav-docs libclamunrar7 The following NEW packages will be installed: clamav clamav-base clamav-freshclam libclamav7 libllvm3.9 libmspack0 libtfm1 0 upgraded, 7 newly installed, 0 to remove and 0 not upgraded. Need to get 12.5 MB of archives. After this operation, 50.3 MB of additional disk space will be used. Do you want to continue? [Y/n] <h3>Сканирование каталогов с помощью ClamAV</h3> Базы данных ClamAV будут обновляться, как только он будет установлен, и несколько раз в день после этого. Команда clamscan -help может использоваться для просмотра доступных вариантов сканирования. clamscan --help Clam AntiVirus Scanner 0.99.4 By The ClamAV Team: http://www.clamav.net/about.html#credits (C) 2007-2018 Cisco Systems, Inc. --help -h Print this help screen --version -V Print version number --verbose -v Be verbose --archive-verbose -a Show filenames inside scanned archives --debug Enable libclamav's debug messages --quiet Only output error messages --stdout Write to stdout instead of stderr --no-summary Disable summary at end of scanning --infected -i Only print infected files --suppress-ok-results -o Skip printing OK files --bell Sound bell on virus detection --tempdir=DIRECTORY Create temporary files in DIRECTORY --leave-temps[=yes/no(*)] Do not remove temporary files --database=FILE/DIR -d FILE/DIR Load virus database from FILE or load all supported db files from DIR --official-db-only[=yes/no(*)] Only load official signatures --log=FILE -l FILE Save scan report to FILE --recursive[=yes/no(*)] -r Scan subdirectories recursively --allmatch[=yes/no(*)] -z Continue scanning within file after finding a match --cross-fs[=yes(*)/no] Scan files and directories on other filesystems --follow-dir-symlinks[=0/1(*)/2] Follow directory symlinks (0 = never, 1 = direct, 2 = always) --follow-file-symlinks[=0/1(*)/2] Follow file symlinks (0 = never, 1 = direct, 2 = always) --file-list=FILE -f FILE Scan files from FILE --remove[=yes/no(*)] Remove infected files. Be careful! --move=DIRECTORY Move infected files into DIRECTORY --copy=DIRECTORY Copy infected files into DIRECTORY --exclude=REGEX Don't scan file names matching REGEX --exclude-dir=REGEX Don't scan directories matching REGEX --include=REGEX Only scan file names matching REGEX --include-dir=REGEX Only scan directories matching REGEX --bytecode[=yes(*)/no] Load bytecode from the database --bytecode-unsigned[=yes/no(*)] Load unsigned bytecode --bytecode-timeout=N Set bytecode timeout (in milliseconds) --statistics[=none(*)/bytecode/pcre] Collect and print execution statistics --detect-pua[=yes/no(*)] Detect Possibly Unwanted Applications --exclude-pua=CAT Skip PUA sigs of category CAT --include-pua=CAT Load PUA sigs of category CAT --detect-structured[=yes/no(*)] Detect structured data (SSN, Credit Card) --structured-ssn-format=X SSN format (0=normal,1=stripped,2=both) --structured-ssn-count=N Min SSN count to generate a detect --structured-cc-count=N Min CC count to generate a detect --scan-mail[=yes(*)/no] Scan mail files --phishing-sigs[=yes(*)/no] Signature-based phishing detection --phishing-scan-urls[=yes(*)/no] URL-based phishing detection --heuristic-scan-precedence[=yes/no(*)] Stop scanning as soon as a heuristic match is found --phishing-ssl[=yes/no(*)] Always block SSL mismatches in URLs (phishing module) --phishing-cloak[=yes/no(*)] Always block cloaked URLs (phishing module) --partition-intersection[=yes/no(*)] Detect partition intersections in raw disk images using heuristics. --algorithmic-detection[=yes(*)/no] Algorithmic detection --scan-pe[=yes(*)/no] Scan PE files --scan-elf[=yes(*)/no] Scan ELF files --scan-ole2[=yes(*)/no] Scan OLE2 containers --scan-pdf[=yes(*)/no] Scan PDF files --scan-swf[=yes(*)/no] Scan SWF files --scan-html[=yes(*)/no] Scan HTML files --scan-xmldocs[=yes(*)/no] Scan xml-based document files --scan-hwp3[=yes(*)/no] Scan HWP3 files --scan-archive[=yes(*)/no] Scan archive files (supported by libclamav) --detect-broken[=yes/no(*)] Try to detect broken executable files --block-encrypted[=yes/no(*)] Block encrypted archives --block-macros[=yes/no(*)] Block OLE2 files with VBA macros --nocerts Disable authenticode certificate chain verification in PE files --dumpcerts Dump authenticode certificate chain in PE files --max-filesize=#n Files larger than this will be skipped and assumed clean --max-
Для сканирования каждого файла и каталога используйте следующую команду.
sudo clamscan -r / --log=/tmp/clamav_report.log
Это команда сканера в простейшей форме.
Clamscan рекурсивно (-r) сканирует все (/) и сохраняет отчет проверки (-log) в каталоге / tmp.
Запуск такого сканирования может занять значительное количество времени, если вы сканируете терабайты данных.
Рекомендуется проводить такие сканы на ночь и просматривать результаты утром.
В качестве быстрой демонстрации этой статьи я загрузил вредоносный репозиторий из GitHub и запустил clamscan в каталог, содержащий вредоносное ПО.
sudo clamscan -ir malware-master/ malware-master/Zeus/output/builder/bot.exe.txt: Win.Spyware.Zbot-1275 FOUND malware-master/Zeus/output/builder/zsb.exe: Win.Trojan.Zbot-62846 FOUND malware-master/Zeus/output/server/zsbcs.exe: Win.Trojan.Botnet-6 FOUND malware-master/Zeus/output/client32.bin: Win.Spyware.Zbot-1275 FOUND malware-master/Alina/Panel/gate1.php: Php.Malware.ProPOS-2 FOUND malware-master/mirai/loader/bins/dlr.mpsl: Unix.Malware.Agent-1753181 FOUND malware-master/mirai/loader/bins/dlr.spc: Unix.Malware.Agent-1753190 FOUND malware-master/mirai/loader/bins/dlr.arm7: Unix.Malware.Agent-1753196 FOUND malware-master/mirai/loader/bins/dlr.x86: Unix.Malware.Agent-1753191 FOUND malware-master/mirai/loader/bins/dlr.sh4: Unix.Malware.Agent-1753186 FOUND malware-master/mirai/loader/bins/dlr.ppc: Unix.Malware.Agent-1753179 FOUND malware-master/mirai/loader/bins/dlr.arm: Unix.Malware.Agent-1768364 FOUND malware-master/mirai/loader/bins/dlr.m68k: Unix.Malware.Agent-1753197 FOUND malware-master/mirai/loader/bins/dlr.mips: Unix.Malware.Agent-1753182 FOUND malware-master/mirai/dlr/release/dlr.mpsl: Unix.Malware.Agent-1753187 FOUND malware-master/mirai/dlr/release/dlr.spc: Unix.Malware.Agent-1753199 FOUND malware-master/mirai/dlr/release/dlr.arm7: Unix.Malware.Agent-1753512 FOUND malware-master/mirai/dlr/release/dlr.sh4: Unix.Malware.Agent-1753174 FOUND malware-master/mirai/dlr/release/dlr.ppc: Unix.Malware.Agent-1753492 FOUND malware-master/mirai/dlr/release/dlr.arm: Unix.Malware.Agent-1753516 FOUND malware-master/mirai/dlr/release/dlr.m68k: Unix.Malware.Agent-1753177 FOUND malware-master/mirai/dlr/release/dlr.mips: Unix.Malware.Agent-1753194 FOUND malware-master/Grum/builder+bin/out.exe: Win.Trojan.Vilsel-2129 FOUND ----------- SCAN SUMMARY ----------- Known viruses: 6556187 Engine version: 0.99.4 Scanned directories: 1594 Scanned files: 17195 Infected files: 23 Data scanned: 366.88 MB Data read: 294.26 MB (ratio 1.25:1) Time: 71.994 sec (1 m 11 s)
В моей команде я включил аргумент -i, который сообщает clamscan выводить только файлы, обнаруженные сканером.
Мы можем увидеть, что было проверено 17 195 файлов, обнаружено 23 инфекции, и для завершения этого процесса потребовалось 71 секунда.
Для получения дополнительной информации о ClamAV ознакомьтесь с официальной документацией.
OpenSnitch — это версия для Linux популярного брандмауэра приложений macOS, Little Snitch.
OpenSnitch предоставит пользователям несколько секунд, чтобы разрешить или запретить подключения по мере их возникновения.
Ниже приведен пример приглашения OpenSnitch.
Интерфейс статистики сети OpenSnitch предоставляет обзор всех ранее разрешенных и запрещенных соединений.
К сожалению, это все, что может предложить интерфейс. Более поздние выпуски OpenSnitch, без сомнения, будут содержать больше возможностей и контроль над тем, как эта информация управляется.
Хотя OpenSnitch все еще очень в зачаточном состоянии, я решил включить его в эту статью.
Пользователи Windows 10, которые более удобны с графическими приложениями (GUI), могут найти OpenSnitch полезным для мониторинга трафика, исходящего из установленных приложений.
Энтузиасты командной строки, заинтересованные в необработанном, нефильтрованном анализе пакетов, могут предпочесть использовать Tshark для отслеживания трафика.
Используйте команду ниже для установки зависимостей, необходимых для запуска OpenSnitch.
sudo apt-get install protobuf-compiler libpcap-dev libnetfilter-queue-dev python3-pip golang git go-dep Reading package lists... Done Building dependency tree Reading state information... Done The following additional packages will be installed: dh-python golang-1.10 golang-1.10-doc golang-1.10-go golang-1.10-race-detector-runtime golang-1.10-src golang-doc golang-go golang-race-detector-runtime golang-src libexpat1-dev libnetfilter-queue1 libnfnetlink-dev libpcap0.8-dev libprotoc10 libpython3-dev libpython3.6-dev pkg-config python-pip-whl python3-dev python3-distutils python3-lib2to3 python3-setuptools python3-wheel python3.6-dev Suggested packages: bzr git mercurial subversion python-setuptools-doc The following NEW packages will be installed: dh-python golang golang-1.10 golang-1.10-doc golang-1.10-go golang-1.10-race-detector-runtime golang-1.10-src golang-doc golang-go golang-race-detector-runtime golang-src libexpat1-dev libnetfilter-queue-dev libnetfilter-queue1 libnfnetlink-dev libpcap-dev libpcap0.8-dev libprotoc10 libpython3-dev libpython3.6-dev pkg-config protobuf-compiler python-pip-whl python3-dev python3-distutils python3-lib2to3 python3-pip python3-setuptools python3-wheel python3.6-dev 0 upgraded, 30 newly installed, 0 to remove and 0 not upgraded. Need to get 52.1 MB of archives. After this operation, 280 MB of additional disk space will be used. Do you want to continue? [Y/n] y
Используйте go, чтобы клонировать репозиторий.
Эта команда не будет выводить вывод в терминал.
go get github.com/golang/protobuf/protoc-gen-go
Затем используйте pip Python3 для установки инструментов gRPC и других зависимостей.
python3 -m pip install --user grpcio-tools Collecting grpcio-tools Downloading https://files.pythonhosted.org/packages/fb/8f/fc0c7cf8a5ed2aea405afb8712ea4181bbcf9510d731b7cd929427916f97/grpcio_tools-1.12.1-cp36-cp36m-manylinux1_x86_64.whl (22.2MB) 100% |████████████████████████████████| 22.2MB 53kB/s Collecting grpcio>=1.12.1 (from grpcio-tools) Downloading https://files.pythonhosted.org/packages/1f/ea/664c589ec41b9e9ac6e20cc1fe9016f3913332d0dc5498a5d7771e2835af/grpcio-1.12.1-cp36-cp36m-manylinux1_x86_64.whl (9.0MB) 100% |████████████████████████████████| 9.0MB 133kB/s Collecting protobuf>=3.5.0.post1 (from grpcio-tools) Downloading https://files.pythonhosted.org/packages/fc/f0/db040681187496d10ac50ad167a8fd5f953d115b16a7085e19193a6abfd2/protobuf-3.6.0-cp36-cp36m-manylinux1_x86_64.whl (7.1MB) 100% |████████████████████████████████| 7.1MB 136kB/s Collecting six>=1.5.2 (from grpcio>=1.12.1->grpcio-tools) Downloading https://files.pythonhosted.org/packages/67/4b/141a581104b1f6397bfa78ac9d43d8ad29a7ca43ea90a2d863fe3056e86a/six-1.11.0-py2.py3-none-any.whl Collecting setuptools (from protobuf>=3.5.0.post1->grpcio-tools) Downloading https://files.pythonhosted.org/packages/7f/e1/820d941153923aac1d49d7fc37e17b6e73bfbd2904959fffbad77900cf92/setuptools-39.2.0-py2.py3-none-any.whl (567kB) 100% |████████████████████████████████| 573kB 419kB/s Installing collected packages: six, grpcio, setuptools, protobuf, grpcio-tools Successfully installed grpcio-1.12.1 grpcio-tools-1.12.1 protobuf-3.6.0 setuptools-39.2.0 six-1.11.0
Используйте go github.com/evilsocket/opensnitch для клонирования хранилища OpenSnitch GitHub.
go get github.com/evilsocket/opensnitch package github.com/evilsocket/opensnitch: no Go files in /home/tokyoneon/go/src/github.com/evilsocket/opensnitch
Обновите PATH Golang в терминале, используя команду ниже.
Это позволит будущим терминальным сеансам знать, где хранятся исходные файлы и проекты Go.
echo 'export GOPATH=$HOME/go' >> ~/.bashrc
Затем используйте команду source, чтобы обновить текущий Golang PATH.
Это позволит выполнить предыдущие команды правильно.
source ~/.bashrc
Используйте make, утилиту, которая автоматически определит, какие части OpenSnitch необходимо перекомпилировать.
make make[1]: Entering directory '/home/tokyoneon/go/src/github.com/evilsocket/opensnitch/proto' python3 -m grpc_tools.protoc -I. --python_out=../ui/opensnitch/ --grpc_python_out=../ui/opensnitch/ ui.proto make[1]: Leaving directory '/home/tokyoneon/go/src/github.com/evilsocket/opensnitch/proto' make[1]: Entering directory '/home/tokyoneon/go/src/github.com/evilsocket/opensnitch/daemon' dep: WARNING: Unknown field in manifest: prune make[1]: Leaving directory '/home/tokyoneon/go/src/github.com/evilsocket/opensnitch/daemon' make[1]: Entering directory '/home/tokyoneon/go/src/github.com/evilsocket/opensnitch/ui' The directory '/home/tokyoneon/.cache/pip/http' or its parent directory is not owned by the current user and the cache has been disabled. Please check the permissions and owner of that directory. If executing pip with sudo, you may want sudo's -H flag. The directory '/home/tokyoneon/.cache/pip' or its parent directory is not owned by the current user and caching wheels has been disabled. check the permissions and owner of that directory. If executing pip with sudo, you may want sudo's -H flag. Collecting grpcio==1.0.0 (from -r requirements.txt (line 1)) Downloading https://files.pythonhosted.org/packages/ba/f7/2138b9148b2d68431ebb05d4871e2fc60deacb4ee282384171083b522823/grpcio-1.0.0.tar.gz (5.3MB) 100% |████████████████████████████████| 5.3MB 181kB/s Collecting grpcio-tools==1.10.1 (from -r requirements.txt (line 2)) Downloading https://files.pythonhosted.org/packages/f0/f4/1e5a56b1c0ec2d802113c7f793fcb40ba4e9387b073c310e27ef8653b441/grpcio_tools-1.10.1-cp36-cp36m-manylinux1_x86_64.whl (22.2MB) 100% |████████████████████████████████| 22.2MB 55kB/s Collecting pyinotify==0.9.6 (from -r requirements.txt (line 3)) Downloading https://files.pythonhosted.org/packages/e3/c0/fd5b18dde17c1249658521f69598f3252f11d9d7a980c5be8619970646e1/pyinotify-0.9.6.tar.gz (60kB) 100% |████████████████████████████████| 61kB 81kB/s Collecting unicode_slugify==0.1.3 (from -r requirements.txt (line 4)) Downloading https://files.pythonhosted.org/packages/8c/ba/1a05f61c7fd72df85ae4dc1c7967a3e5a4b6c61f016e794bc7f09b2597c0/unicode-slugify-0.1.3.tar.gz Collecting pyqt5==5.10.1 (from -r requirements.txt (line 5)) Downloading https://files.pythonhosted.org/packages/e4/15/4e2e49f64884edbab6f833c6fd3add24d7938f2429aec1f2883e645d4d8f/PyQt5-5.10.1-5.10.1-cp35.cp36.cp37.cp38-abi3-manylinux1_x86_64.whl (107.8MB) 100% |████████████████████████████████| 107.8MB 13kB/s Collecting configparser==3.5.0 (from -r requirements.txt (line 6)) Downloading https://files.pythonhosted.org/packages/7c/69/c2ce7e91c89dc073eb1aa74c0621c3eefbffe8216b3f9af9d3885265c01c/configparser-3.5.0.tar.gz Requirement already satisfied: six>=1.5.2 in /home/tokyoneon/.local/lib/python3.6/site-packages (from grpcio==1.0.0->-r requirements.txt (line 1)) Collecting enum34>=1.0.4 (from grpcio==1.0.0->-r requirements.txt (line 1)) Downloading https://files.pythonhosted.org/packages/af/42/cb9355df32c69b553e72a2e28daee25d1611d2c0d9c272aa1d34204205b2/enum34-1.1.6-py3-none-any.whl Collecting futures>=2.2.0 (from grpcio==1.0.0->-r requirements.txt (line 1)) Downloading https://files.pythonhosted.org/packages/cc/26/b61e3a4eb50653e8a7339d84eeaa46d1e93b92951978873c220ae64d0733/futures-3.1.1.tar.gz Requirement already satisfied: protobuf>=3.0.0 in /home/tokyoneon/.local/lib/python3.6/site-packages (from grpcio==1.0.0->-r requirements.txt (line 1)) Collecting unidecode (from unicode_slugify==0.1.3->-r requirements.txt (line 4)) Downloading https://files.pythonhosted.org/packages/59/ef/67085e30e8bbcdd76e2f0a4ad8151c13a2c5bce77c85f8cad6e1f16fb141/Unidecode-1.0.22-py2.py3-none-any.whl (235kB) 100% |████████████████████████████████| 235kB 142kB/s Collecting sip<4.20,>=4.19.4 (from pyqt5==5.10.1->-r requirements.txt (line 5)) Downloading https://files.pythonhosted.org/packages/8a/ea/d317ce5696dda4df7c156cd60447cda22833b38106c98250eae1451f03ec/sip-4.19.8-cp36-cp36m-manylinux1_x86_64.whl (66kB) 100% |████████████████████████████████| 71kB 80kB/s Requirement already satisfied: setuptools in /home/tokyoneon/.local/lib/python3.6/site-packages (from protobuf>=3.0.0->grpcio==1.0.0->-r requirements.txt (line 1)) Installing collected packages: enum34, futures, grpcio, grpcio-tools, pyinotify, unidecode, unicode-slugify, sip, pyqt5, configparser Running setup.py install for futures ... done Found existing installation: grpcio 1.12.1 Uninstalling grpcio-1.12.1: Successfully uninstalled grpcio-1.12.1 Running setup.py install for grpcio ... done Found existing installation: grpcio-tools 1.12.1 Uninstalling grpcio-tools-1.12.1: Successfully uninstalled grpcio-tools-1.12.1 Running setup.py install for pyinotify ... done Running setup.py install for unicode-slugify ... done Running setup.py install for configparser ... done Successfully installed configparser-3.5.0 enum34-1.1.6 futures-3.1.1 grpcio-1.0.0 grpcio-tools-1.10.1 pyinoti
Для завершения установки используйте команду make install с sudo.
sudo make install make[1]: Entering directory '/home/tokyoneon/go/src/github.com/evilsocket/opensnitch/daemon' make[1]: Leaving directory '/home/tokyoneon/go/src/github.com/evilsocket/opensnitch/daemon' make[1]: Entering directory '/home/tokyoneon/go/src/github.com/evilsocket/opensnitch/ui' The directory '/home/tokyoneon/.cache/pip/http' or its parent directory is not owned by the current user and the cache has been disabled. Please check the permissions and owner of that directory. If executing pip with sudo, you may want sudo's -H flag. The directory '/home/tokyoneon/.cache/pip' or its parent directory is not owned by the current user and caching wheels has been disabled. check the permissions and owner of that directory. If executing pip with sudo, you may want sudo's -H flag. Processing /home/tokyoneon/go/src/github.com/evilsocket/opensnitch/ui Installing collected packages: opensnitch-ui Running setup.py install for opensnitch-ui ... done Successfully installed opensnitch-ui-1.0.0b0 make[1]: Leaving directory '/home/tokyoneon/go/src/github.com/evilsocket/opensnitch/ui'
Чтобы запустить OpenSnitch при каждой загрузке, используйте команду systemctl с аргументом enable.
sudo systemctl enable opensnitchd Created symlink /etc/systemd/system/multi-user.target.wants/opensnitchd.service → /etc/systemd/system/opensnitchd.service.
Перезагрузите, чтобы изменения вступили в силу.
OpenSnitch можно найти в панели значков.
Нажмите кнопку «statistics», чтобы открыть интерфейс пользователя.
Когда приложения пытаются получить доступ к Интернету, OpenSnitch предложит вам разрешить или запретить это действие.

Файлы журнала Linux хранятся в каталоге /var/log/.
Эти файлы отслеживают активность системы, фоновые демоны, сообщения ядра, журналы приложений и серверов, журналы проверки подлинности, журналы брандмауэра, журналы AppArmor и многое другое.
Для мониторинга журналов в реальном времени используйте командуfind . -type f ( -name «*.log» ) -exec tail -f «$file» {} +
find . -type f ( -name "*.log" ) -exec tail -f "$file" {} +
==> /var/log/ufw.log <== kernel: [ 3488.126537] [UFW BLOCK] IN= OUT=enp0s8 SRC=192.168.1.44 DST=52.84.13.246 LEN=60 TOS=0x00 PREC=0x00 TTL=64 ID=14998 DF PROTO=TCP SPT=51778 DPT=80 WINDOW=29200 RES=0x00 SYN URGP=0 kernel: [ 3489.152073] [UFW BLOCK] IN= OUT=enp0s8 SRC=192.168.1.44 DST=52.84.13.246 LEN=60 TOS=0x00 PREC=0x00 TTL=64 ID=14999 DF PROTO=TCP SPT=51778 DPT=80 WINDOW=29200 RES=0x00 SYN URGP=0 kernel: [ 3491.168057] [UFW BLOCK] IN= OUT=enp0s8 SRC=192.168.1.44 DST=52.84.13.246 LEN=60 TOS=0x00 PREC=0x00 TTL=64 ID=15000 DF PROTO=TCP SPT=51778 DPT=80 WINDOW=29200 RES=0x00 SYN URGP=0 kernel: [ 3495.392064] [UFW BLOCK] IN= OUT=enp0s8 SRC=192.168.1.44 DST=52.84.13.246 LEN=60 TOS=0x00 PREC=0x00 TTL=64 ID=15001 DF PROTO=TCP SPT=51778 DPT=80 WINDOW=29200 RES=0x00 SYN URGP=0 kernel: [ 3503.584187] [UFW BLOCK] IN= OUT=enp0s8 SRC=192.168.1.44 DST=52.84.13.246 LEN=60 TOS=0x00 PREC=0x00 TTL=64 ID=15002 DF PROTO=TCP SPT=51778 DPT=80 WINDOW=29200 RES=0x00 SYN URGP=0 kernel: [ 3519.712123] [UFW BLOCK] IN= OUT=enp0s8 SRC=192.168.1.44 DST=52.84.13.246 LEN=60 TOS=0x00 PREC=0x00 TTL=64 ID=15003 DF PROTO=TCP SPT=51778 DPT=80 WINDOW=29200 RES=0x00 SYN URGP=0 kernel: [ 3900.250931] [UFW BLOCK] IN= OUT=enp0s8 SRC=192.168.1.44 DST=104.193.19.59 LEN=60 TOS=0x00 PREC=0x00 TTL=64 ID=47090 DF PROTO=TCP SPT=35944 DPT=9999 WINDOW=29200 RES=0x00 SYN URGP=0 kernel: [ 3901.280089] [UFW BLOCK] IN= OUT=enp0s8 SRC=192.168.1.44 DST=104.193.19.59 LEN=60 TOS=0x00 PREC=0x00 TTL=64 ID=47091 DF PROTO=TCP SPT=35944 DPT=9999 WINDOW=29200 RES=0x00 SYN URGP=0 kernel: [ 4201.573248] [UFW BLOCK] IN= OUT=enp0s8 SRC=192.168.1.44 DST=91.189.91.157 LEN=76 TOS=0x10 PREC=0x00 TTL=64 ID=17312 DF PROTO=UDP SPT=43425 DPT=123 LEN=56 ==> /var/log/kern.log <== kernel: [ 3488.126537] [UFW BLOCK] IN= OUT=enp0s8 SRC=192.168.1.44 DST=52.84.13.246 LEN=60 TOS=0x00 PREC=0x00 TTL=64 ID=14998 DF PROTO=TCP SPT=51778 DPT=80 WINDOW=29200 RES=0x00 SYN URGP=0 kernel: [ 3489.152073] [UFW BLOCK] IN= OUT=enp0s8 SRC=192.168.1.44 DST=52.84.13.246 LEN=60 TOS=0x00 PREC=0x00 TTL=64 ID=14999 DF PROTO=TCP SPT=51778 DPT=80 WINDOW=29200 RES=0x00 SYN URGP=0 kernel: [ 3491.168057] [UFW BLOCK] IN= OUT=enp0s8 SRC=192.168.1.44 DST=52.84.13.246 LEN=60 TOS=0x00 PREC=0x00 TTL=64 ID=15000 DF PROTO=TCP SPT=51778 DPT=80 WINDOW=29200 RES=0x00 SYN URGP=0 kernel: [ 3495.392064] [UFW BLOCK] IN= OUT=enp0s8 SRC=192.168.1.44 DST=52.84.13.246 LEN=60 TOS=0x00 PREC=0x00 TTL=64 ID=15001 DF PROTO=TCP SPT=51778 DPT=80 WINDOW=29200 RES=0x00 SYN URGP=0 kernel: [ 3503.584187] [UFW BLOCK] IN= OUT=enp0s8 SRC=192.168.1.44 DST=52.84.13.246 LEN=60 TOS=0x00 PREC=0x00 TTL=64 ID=15002 DF PROTO=TCP SPT=51778 DPT=80 WINDOW=29200 RES=0x00 SYN URGP=0 kernel: [ 3519.712123] [UFW BLOCK] IN= OUT=enp0s8 SRC=192.168.1.44 DST=52.84.13.246 LEN=60 TOS=0x00 PREC=0x00 TTL=64 ID=15003 DF PROTO=TCP SPT=51778 DPT=80 WINDOW=29200 RES=0x00 SYN URGP=0 kernel: [ 3900.250931] [UFW BLOCK] IN= OUT=enp0s8 SRC=192.168.1.44 DST=104.193.19.59 LEN=60 TOS=0x00 PREC=0x00 TTL=64 ID=47090 DF PROTO=TCP SPT=35944 DPT=9999 WINDOW=29200 RES=0x00 SYN URGP=0 kernel: [ 3901.280089] [UFW BLOCK] IN= OUT=enp0s8 SRC=192.168.1.44 DST=104.193.19.59 LEN=60 TOS=0x00 PREC=0x00 TTL=64 ID=47091 DF PROTO=TCP SPT=35944 DPT=9999 WINDOW=29200 RES=0x00 SYN URGP=0 kernel: [ 4201.573248] [UFW BLOCK] IN= OUT=enp0s8 SRC=192.168.1.44 DST=91.189.91.157 LEN=76 TOS=0x10 PREC=0x00 TTL=64 ID=17312 DF PROTO=UDP SPT=43425 DPT=123 LEN=56 ==> /var/log/alternatives.log <== update-alternatives 2018-06-26 21:01:54: run with --install /usr/bin/identify-im6 identify-im6 /usr/bin/identify-im6.q16 10000 --slave /usr/share/man/man1/identify-im6.1.gz identify-im6.1.gz /usr/share/man/man1/identify-im6.q16.1.gz update-alternatives 2018-06-26 21:01:54: run with --install /usr/bin/stream stream /usr/bin/stream-im6.q16 10000 --slave /usr/share/man/man1/stream.1.gz stream.1.gz /usr/share/man/man1/stream-im6.q16.1.gz update-alternatives 2018-06-26 21:01:54: run with --install /usr/bin/stream-im6 stream-im6 /usr/bin/stream-im6.q16 10000 --slave /usr/share/man/man1/stream-im6.1.gz stream-im6.1.gz /usr/share/man/man1/stream-im6.q16.1.gz update-alternatives 2018-06-26 21:01:54: run with --install /usr/bin/display display /usr/bin/display-im6.q16 10000 --slave /usr/share/man/man1/display.1.gz display.1.gz /usr/share/man/man1/display-im6.q16.1.gz update-alternatives 2018-06-26 21:01:54: run with --install /usr/bin/display-im6 display-im6 /usr/bin/display-im6.q16 10000 --slave /usr/share/man/man1/display-im6.1.gz display-im6.1.gz /usr/share/man/man1/display-im6.q16.1.gz update-alternatives 2018-06-26 21:01:54: run with --install /usr/bin/montage montage /usr/bin/montage-im6.q16 10000 --slave /usr/share/man/man1/montage.1.gz montage.1.gz /usr/share/man/man1/montage-im6.q16.1.gz update-alternatives 2018-06-26 21:01:54: run with --install /usr/bin/montage-im6 montage-im6 /usr/bin/montage-im6.q16 10000 --slave /usr/share/man/man1/montage-im6.1.gz
Эта команда найдет любой файл (-type f) с расширением .log ( (-name «* .log» )) в каталоге / var / log и использует tail для вывода обновлений в файлах по мере их появления (- е).
Каждый файл журнала будет заключен в циклы ascii (==> filename.log <==).
Любой, кто ищет обнаруженные аномалии в своей системе, найдет это полезным.
В этом учебном пособии показано, как вы можете контролировать свой Linux-сервер с помощью инструмента Bijk – с оповещениями по электронной почте и SMS.
Bijk – приложение с открытым исходным кодом для создания живых графиков и предупреждений, таким образом контролируя производительность вашего сервера.
С базовой версией Bijk вы можете легко настроить оповещения по электронной почте для мониторинга почти всего на своем сервере (системная перегрузка, использование дискового пространства, проблемы Apache, MySQL и т. д.).
Чтобы установить Bijk на ваш Linux-сервер, зайдите на страницу http://www.bijk.com, зарегистрируйтесь, загрузите и добавьте его на свой сервер за несколько простых шагов.
Сначала вы можете попробовать theOnline Demo.
Bijk готов для Debian, Ubuntu, CentOS и RedHat, и вам нужно всего около трех минут, чтобы установить Bijk на сервер.
Создание предупреждений о статусе вашего сервера не могло быть проще.
Примерная настройка наиболее часто используемых предупреждений приведена в коротком видео ниже.
Вот описание видео в наиболее важных шагах:
1) Перейдите на страницу настройки предупреждений и найдите функцию, которую вы хотите контролировать.
2) Выберите адрес электронной почты или SMS, в котором вы хотите получить оповещение.
3) Bijk автоматически выбирает критический диапазон для мониторинга, поэтому вы только изменяете это, если хотите.
Как вы можете видеть, вы просто добавляете контрольные проверки для PING, URL, LOAD, использования памяти, использования ЦП, использования диска и многого другого.
Все настройки предупреждений настраиваются из вашего браузера, вам не нужно редактировать какие-либо файлы конфигурации на вашем сервере.
Log Killer – это инструмент для [Linux / Windows] серверов.
Этот инструмент удалит все ваши журналы, просто загрузите инструмент и запустите его на сервере, если ваша серверная ОС – это Windows, загрузите пакетный файл, но если ваш сервер Linux вам следует запустить php-скрипт.
Windows (bash файл):


Linux :


Видео :