Это часто путающий и неприятный момент, когда вы подключены к Wi-Fi, но не к Интернету. За последние несколько лет мы все столкнулись с ошибкой «WiFi, но не с Интернетом», но, к сожалению, нет единого решения для ее устранения. Во многих случаях это связано с изменениями в настройках вашей операционной системы или маршрутизатора, но причина может быть не всегда очевидной. Это означает, что вам нужно попробовать разные исправления, чтобы определить правильный. Ниже приведены некоторые проверенные параметры, которые исправят Wi-Fi, но не интернет-ошибку.
Чтобы определить проблемы с маршрутизатором, подключите к Wi-Fi другим устройствам, таким как ваш мобильный телефон, и посмотрите, работает ли он. Если Интернет отлично работает на других устройствах, проблема связана с устройством и адаптером WiFi. С другой стороны, если Интернет не работает и на других устройствах, проблема, скорее всего, связана с маршрутизатором или самим подключением к Интернету.
Один хороший способ исправить маршрутизатор — это перезапустить его. Хотя это может показаться глупым, перезапуск очищает кеши и устраняет многие связанные с ним проблемы с сетью и программным обеспечением.
Если ваш маршрутизатор и модем являются отдельными, перезагрузите оба.
- Выключите оба из них
- Подождите 30 секунд
- Включите модем и через минуту включите маршрутизатор.
- Подождите несколько минут и проверьте.
Это простое решение позволит исправить множество мелких проблем в вашем маршрутизаторе.
Проблема с подключением к Интернету
Иногда Wi-Fi-соединение, но не интернет-ошибка, может быть связано с подключением к Интернету, а не с каким-либо устройством. Это может быть из-за сломанных кабелей, сбоев в обслуживании или всего остального, что не под вашим контролем.
Тем не менее, важно знать, существует ли проблема с вашим интернет-провайдером. Для этого проверьте, работает ли «Интернет» на модеме. В идеале необходимо включить питание и освещение DSL. Кроме того, убедитесь, что нет ничего необычного, например, постоянное мерцание огней.
Если индикаторы не горит, или если вы видите мерцающие огни, немедленно обратитесь к вашему интернет-провайдеру.
Проблема с вашим устройством
Когда другие устройства имеют доступ к Интернету через ваш WiFi, проблема связана с устройством и адаптером WiFi.
В качестве первого шага перезагрузите устройство и проверьте, не устраняет проблему. Как и в случае с маршрутизатором, сетевые и программные проблемы часто исправляются автоматически с помощью простого перезапуска.
Если это не исправить вашу проблему, вот что вы можете сделать.
- Щелкните правой кнопкой мыши значок сети в панели задач в правом нижнем углу. Нажмите «Устранение неполадок».
- Windows попытается автоматически диагностировать проблему и попытается исправить ее для вас.
- Если Windows не сможет исправить вашу проблему, она в некоторых случаях сообщит вам, в чем проблема.
- Вы можете найти решение этой проблемы в Интернете или вы можете попросить экспертов.
Конфликт кэша DNS
Кэш DNS хранит все последние посещения веб-сайтов, поэтому он может быстро загрузить веб-страницы для вас.
Обычно, когда вы вводите URL-адрес своего браузера, операционная система перехватывает этот URL-адрес и ищет в кэше DNS. Если ваш запрос соответствует страницам, доступным в кеше, операционная система берет эти страницы из кеша вместо загрузки из Интернета.
Иногда этот кеш DNS повреждается из-за технических сбоев или когда неавторизованные имена доменов вставляются сторонним программным обеспечением, таким как вирусы. Реклама и баннеры на некоторых сайтах также отправляют вредоносный код, чтобы испортить кеш DNS.
Этот поврежденный DNS-кеш не позволяет вам подключаться к Интернету, поскольку в IP-адресе есть несоответствие. Чтобы исправить это, вы должны очистить кеш DNS.
Чтобы сделать это:
- Нажмите Windows + R и введите «cmd». Это откроет командную строку.
- Введите следующую команду и нажмите enter:
ipconfig /flushdns
Устаревшие беспроводные режимы
Беспроводной режим и стандарт, используемые вашим маршрутизатором, имеют отношение к скорости и охвату Интернета. Обычно вы можете видеть такие стандарты, как 802.11g, 802.11n, 802.11b и 802.11ac. Эти стандарты определены организацией IEEE, и это делается для обеспечения единообразия во всех моделях маршрутизаторов.
Из них 802.11b является самым старым и самым медленным, а 802.11ac является самым последним и самым быстрым. Итак, скажем теперь, у вас есть старое устройство, которое может подключаться только к 802.11b или 802.11g, в то время как ваш маршрутизатор основан на последнем 802.11ac. Это создает конфликт, поскольку устройство не может подключиться к новому стандарту.
Первым шагом для решения этой проблемы является определение деталей вашего маршрутизатора. Откройте командную строку и введите « ipconfig» . Это информация, которую вы должны увидеть.
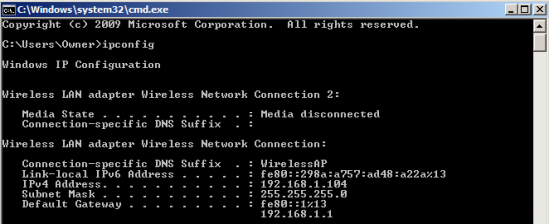
Шлюзом по умолчанию является IP-адрес вашего маршрутизатора.
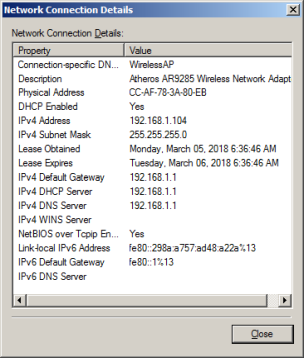
Вы также можете получить эти данные через свой графический интерфейс.
- Перейдите в Центр управления сетью и общим доступом
- Выберите маршрутизатор и дважды щелкните по нему.
- Нажмите кнопку «Детали»
Чтобы устранить этот конфликт, перейдите в командную строку и введите следующую команду и нажмите enter:
ipconfig /release
DHCP-сервер назначит новый IP-адрес для вашего компьютера.
Если это не работает:
- Нажмите Windows + R и введите «ncpa.cpl» в диалоговом окне. Это откроет все сетевые подключения.
- Выберите свою сеть, щелкните ее правой кнопкой мыши и выберите «свойства»
- Выберите Интернет-протокол 4 (IPv4) и нажмите кнопку «Свойства» под ним.

- В следующем диалоговом окне выберите «получить IP-адрес автоматически» и «автоматически получить адрес DNS-сервера»

Это должно разрешить подключение WiFi, но не интернет-ошибка. Если это не так, перезапустите маршрутизатор и посмотрите, работает ли это.
Если это не работает, это может означать, что ваш маршрутизатор имеет неисправный DHCP-сервер. Обратитесь к производителю вашего маршрутизатора и обновите прошивку.
Устаревший сетевой драйвер
Иногда старый, устаревший или поврежденный сетевой драйвер может быть причиной подключения Wi-Fi, но не интернет-ошибка. Во многих случаях небольшая желтая метка в названии вашего сетевого устройства или в сетевом адаптере может указывать на проблему. Если ни одно из вышеперечисленных исправлений не работает, эти шаги стоит попробовать, даже если вы не видите желтую метку.
Исправление:
- Нажмите Windows + R и введите «devmgmt.msc». Откроется диспетчер устройств.
- Перейдите к «сетевым адаптерам» и щелкните правой кнопкой мыши по сети
- Выберите «Обновить сетевой драйвер». Вы получите два варианта, и здесь, выберите «автоматически искать обновленное программное обеспечение драйвера»

Windows попытается автоматически исправить сетевой драйвер для вас.