Абоненты компаний-поставщиков интернета ежедневно пользуются глобальной сетью, не вдаваясь в подробности настроек подключения своего оборудования к ней. Потребность в такого рода знаниях появляется в случае покупки более современного маршрутизатора или модема, а также при полном обрушении системных настроек Windows. Настройка параметров подключения к интернету не представляет большой сложности, и выполнить её, не прибегая к помощи специалистов, под силу практически любому пользователю. В то же время правильная настройка оборудования является определяющим фактором при выходе пользователя во Всемирную паутину и при последующей работе в ней.
ArchLabs – это дистрибутив, основанный на Arch Linux, и имеющий отличные перспективы в грядущем 2018-м году. Помимо собственного авторского дизайна, дистрибутив имеет пак оригинальных обоев, а также упрощенный графический установщик.
Разработчики утверждают, что при создании ArchLabs они вдохновлялись небезызвестным проектом BunsenLabs. Точно также проект следует идеям стильного минимализма и простоты. Вишенкой на торте являются графические оболочки и оконные менеджеры, используемые в этой системе. Все они отличаются легкостью и скоростью, и при этом, они не выглядят как что-то, вылезшее прямиком из 90-х. Читайте также: “Как установить ArchLabs Linux”.
Релиз ArchLabs 2017.12
Собственно, вот и причина того, почему я решил написать сегодняшний материал. Релиз 2017.12 увидел свет совсем недавно, и при этом, надо сказать, улучшения и изменения, предполагаемые в нем, выглядят достаточно интересно. Как уже можно было догадаться, данный выпуск является финальным в уходящем году. Он привносит очень серьезные изменения. Одним из таких является удаление установщика Calamares, которому разработчики отдавали предпочтение весьма длительное время. Теперь же в ArchLabs будет использоваться другой инсталятор – ABIS. Лучше ли он или же хуже – решать только вам.
Стоит отметить, что ABIS, по заверениям разработчиков, достаточно прост в использовании. Более того, если у пользователей ArchLabs все же возникнут сложности с ним, на форуме будет доступна полная и подробная инструкция по установке ArchLabs через ABIS.
Изменения 2017.12 по сравнению с предыдущими версиями
Начать, пожалуй, стоит с изменений в составе команды ArchLabs. Теперь над данным дистрибутивом будут трудиться еще два человека, что, опять же, радует. Мы можем надеяться на высококлассные выпуски и отличную поддержку. Что же, неплохо.
Сам дистрибутив также потерпел улучшения. К примеру, теперь сам образ весит чуть меньше; из него были убраны некоторые лишние компоненты, что, в свою очередь, еще и улучшает производительность самой системы. Обо всем этом более подробно вы можете узнать в официальном анонсе к релизу. А чтобы перейти на страницу загрузки, воспользуйтесь этой кнопкой:
Весь мир следит за развитием криптовалюты, журнал GitJournal подготовил для вас интересный материал на данную тему. Это будет скорее лайфхак, который поможет вам пополнить счет на бирже криптовалюты Exmo, используя сервис Яндекс.Деньги. Подобный материал может понадобиться людям, которые заинтересованы в инвестициях и торговле криптовалютами. Наверняка вы уже слышали о перспективном Ripple. Если же нет, то обратите внимание на материал “Во что вложиться в 2018-м году – новый биткоин“. Что же, не будем более томить, представляем вам статью, которая расскажет о том, как пополнить Exmo-кошелек через Яндекс.Деньги.
Пополнить Exmo через ЯД не так уж и сложно
И хоть в данной схеме присутствуют еще 2 обменника (Payeer и XChange) пополнить EXMO-кошелек вы сможете, что называется, за несколько кликов. Кстати говоря, насчет того, что Payeer – обменник, я погорячился. Обменником он выступает только в нашей схеме. А так, это полнофункциональный электронный кошелек, который вполне себе можно использовать на постоянной основе.
Схема: Яндекс-деньги – XChange – Payeer – Exmo
Всего 4 этапа, не очень много. Но да ладно. Для начала нам нужно создать аккаунт на Payeer (предполагается, что аккаунты в Яндекс.Деньгах и EXMO у вас уже есть). Чтобы сделать это, переходим на Payeer.com, где видим большую зеленую кнопку “Создать кошелек”.
Как только мы на нее кликнем, нас перебросит на страницу, где нужно будет ввести адрес электронной почты, а также капчу. После этого мы “соглашаемся” с правилами и жмем “Продолжить”.
Далее нас попросят ввести код, который был отправлен на указанный нами Email. С этим, думаю, проблем не возникнет, как и с вводом пароля, который вам надо придумать.
Входим в аккаунт Payeer
Сразу после входа в аккаунт, вы увидите множество различных кнопок, надписей и пояснений. Надо сказать, дизайн здесь выглядит достаточно интересно. Находиться в личном кабинете Payeer даже уютно.
Личный кабинет Payeer
Обратите внимание на номер счета в верхней части, а также на меню слева. Они нам понадобятся для дальнейших манипуляций. Ну а пока сверимся с нашей схемой: значит мы должны пополнить Payeer кошелек через Яндекс. Деньги, чтобы в дальнейшем через Payeer пополнить кошелек на бирже EXMO. Итак, клацаем на “Пополнить”, вводим сумму и выбираем валюту USD (это важно), после этого переходим на страницу с информацией.
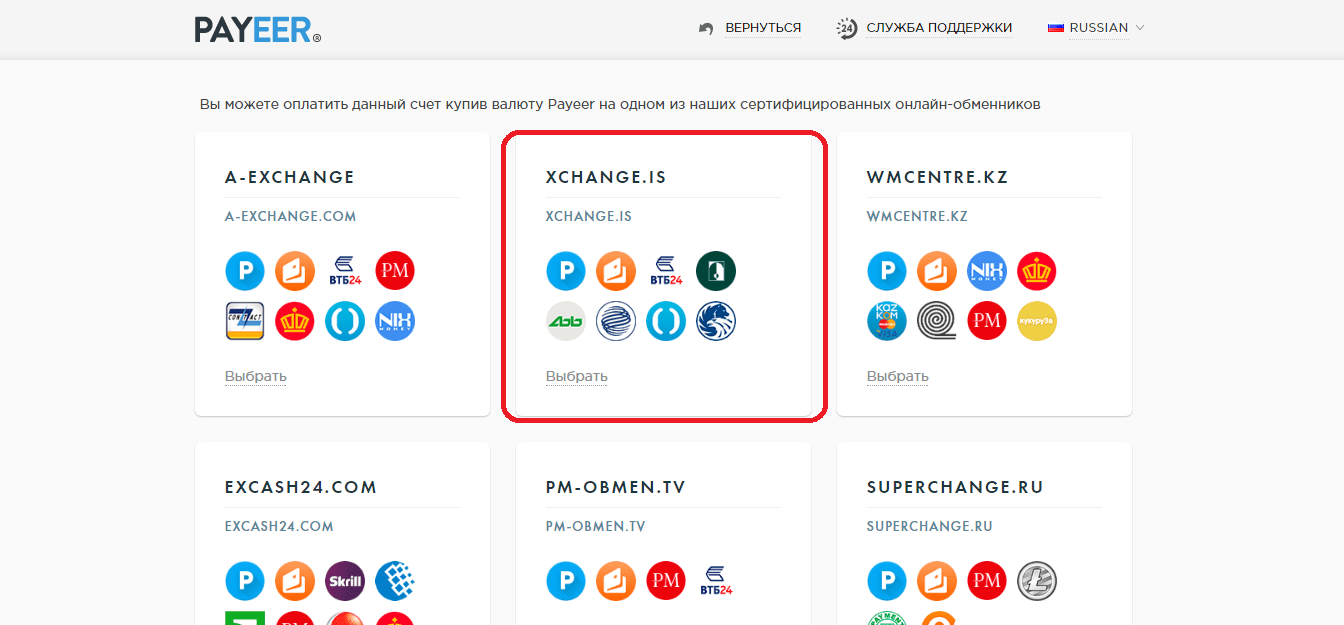
Чуть прокрутив вниз, мы видим пункт “Через обменники”, а в нем красуется известный нам логотип Яндекса. Нажимаем на него. Нас перекидывает на страницу, где будут перечислены все партнерские онлайн-обменники Payeer. Именно через них мы будем осуществлять перевод.
В данной статье мы будем рассматривать онлайн-обменник Xchange, как мне кажется, он является одним из лучших в представленном перечне. Вы, конечно же, можете попробовать сделать все через другие сервисы.
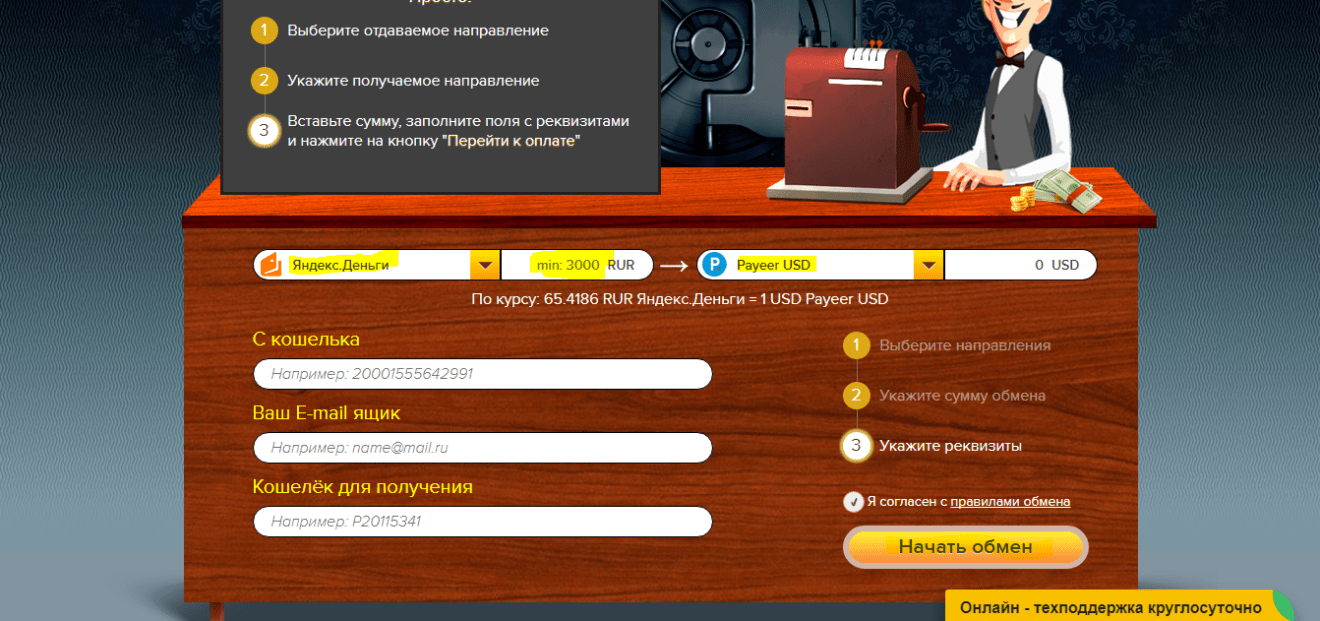
Нажимаем “Выбрать”, после чего нас перекинет на сам сайт, который выглядит вот так:
Для осуществления обмена достаточно ввести номера Яндекс и Payeer кошельков, а также Email-адрес (будет создан аккаунт, пароль пришлют по почте), после чего кликнуть на кнопку “Начать обмен”. Далее нас попросят согласиться с правилами во всплывающем окошке, потом перебросят на еще одну страничку, где будет доступна кнопка “Оплатить”. При нажатии нас перекидывает в сервис Яндекс.Деньги, в котором необходимо подтвердить свои намерения с помощью SMS (или же нет, зависит от настроек).
Обычно средства поступают на Payeer-кошелек в течение 5-10 минут после подтверждения оплаты на стороне Яндекса. Важный момент, вам на почту пришлют пароль, с его помощью вы сможете залогиниться на xchange.cash, чтобы отслеживать состояние заявки.
Пополняем кошелек EXMO через Payeer
Что же, теперь дело остается за малым. На Payeer мы видим, что средства поступили на счет (в долларах), и готовы к использованию. Нам необходимо перейти на EXMO, войти в аккаунт, после чего открыть страницу “Кошелек”.
В длинном списке валют ищем “USD”, и нажимаем “Пополнить”.
Нас перекинет на страницу выбора способа пополнения. Естественно, там мы сразу ищем Payeer, вводим сумму и подтверждаем намерения.
Остается лишь подтвердить оплату на стороне Payeer (как правило, один-два клика), и готово. Деньги поступят на счет EXMO, где далее вы сможете распоряжаться ими как захотите.
Подведем итоги
Итак, в данной статье мы рассмотрели способ пополнения EXMO-кошелька через Яндекс.Деньги. Естественно, помимо него, есть и другие, возможно даже более удобные варианты. Но не стоит гнаться с этим, и тратить время на бессмысленные испытания (если, конечно, вы потом не хотите написать статью об этом :)). Конечно же это все шутки, и вы можете поэкспериментировать, если есть желание. Кстати говоря, вы можете создать аккаунты на Payeer и Xchange заранее. На ресурсах, помимо всего прочего, доступна полезная и актуальная информация о криптовалюте и биржах. Рекомендую ознакомиться, т.к это может оказаться интересным.
В последнее время на GitJournal все чаще публикуются различные топы. В основном это что-то вроде “Топ 5 лучших дистрибутивов Linux за прошедший 2017 год” или же “Топ 5 приложений для редактирования кода”. Что печально, за все время существования проекта (уже почти два месяца), я так и не написал ни одного материала про Windows. Были, конечно, некоторые статьи, которые имели точки соприкосновения с этой замечательной операционной системой, но это явно не то. Я долго думал насчет рубрики, которая бы отлично подошла для первой пробы. Что же, представляем вам Топ 5 самых красивых тем для Windows 10.
Сам я прекрасно понимаю, что на вкус и цвет… Однако я старался выбирать опираясь не только на свой вкус, но и на отзывы других пользователей. Кстати говоря, я сам использую Windows 10, и сразу после установки, первое, что я сделал – так это грамотно настроил оформление. Работать и находиться в системе должно быть комфортно, поэтому это достаточно немаловажный факт.
Топ самых красивых тем для Windows 10
Arc
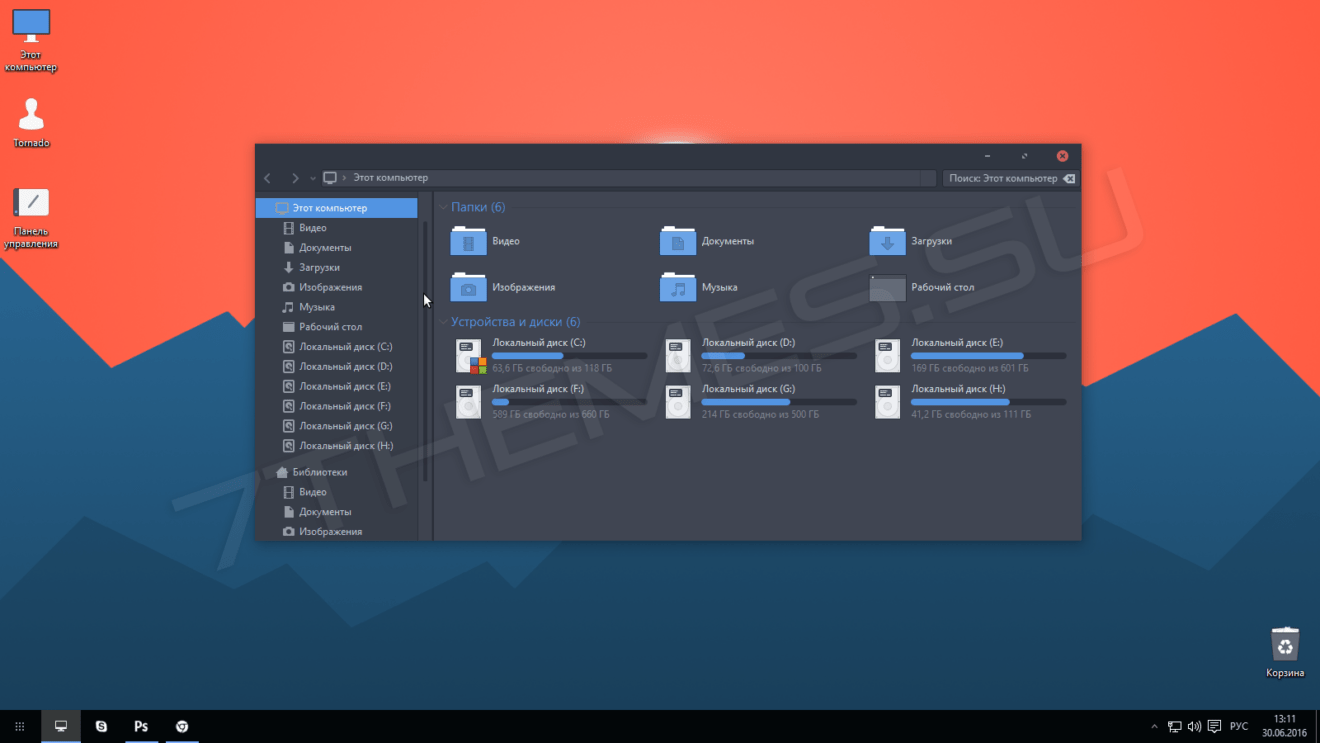
Да-да, линуксоиды, данная тема доступна и для Windows. Не уж то вы думали, что все самое вкусное только вам? Но да ладно, оставим все эти сравнения, ведь тема действительно выглядит очень круто. Я использую ее в качестве основной темы оформления уже достаточно долгое время, и менять ее на что-то другое даже не тянет.
Arc выполнена в достаточно приятных темно-синих тонах. Окна и все прочие элементы интерфейса выглядят достаточно приятно и никак не напрягают зрение. Гармоничное расположение кнопок, приятный глазу шрифт, а также стилистически грамотное оформление заставят выглядеть вашу Windows 10 очень круто и элегантно.
Найти и скачать тему вы можете в интернете, думаю, проблем с этим возникнуть не должно. Но, чтобы вам долго не искать, я приготовил для вас эту кнопочку:
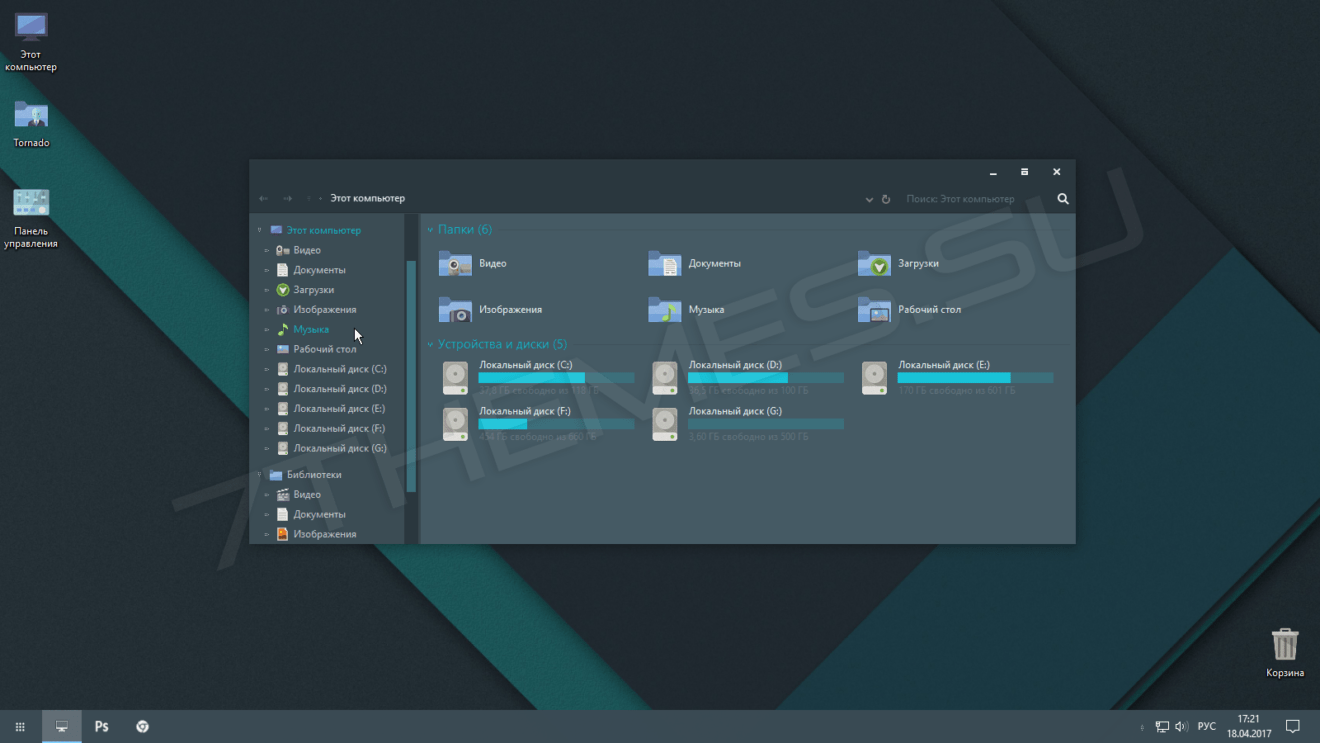
Минималистическая полупрозрачная тема Adapta, которая, к слову, как и Arc выполнена во flat-стиле, украсит вашу Windows 10 как нельзя лучше. Вы только посмотрите как превосходно и стильно она выглядит. Вместе с кастомными ярлыками вы превратите свою операционную систему в самое настоящее произведение искусства.
Тема опять же выполнена в темно-синих тонах, и, как и в предыдущем случае, не напрягает глаза. Вы можете загрузить Adapta, используя эту кнопку:
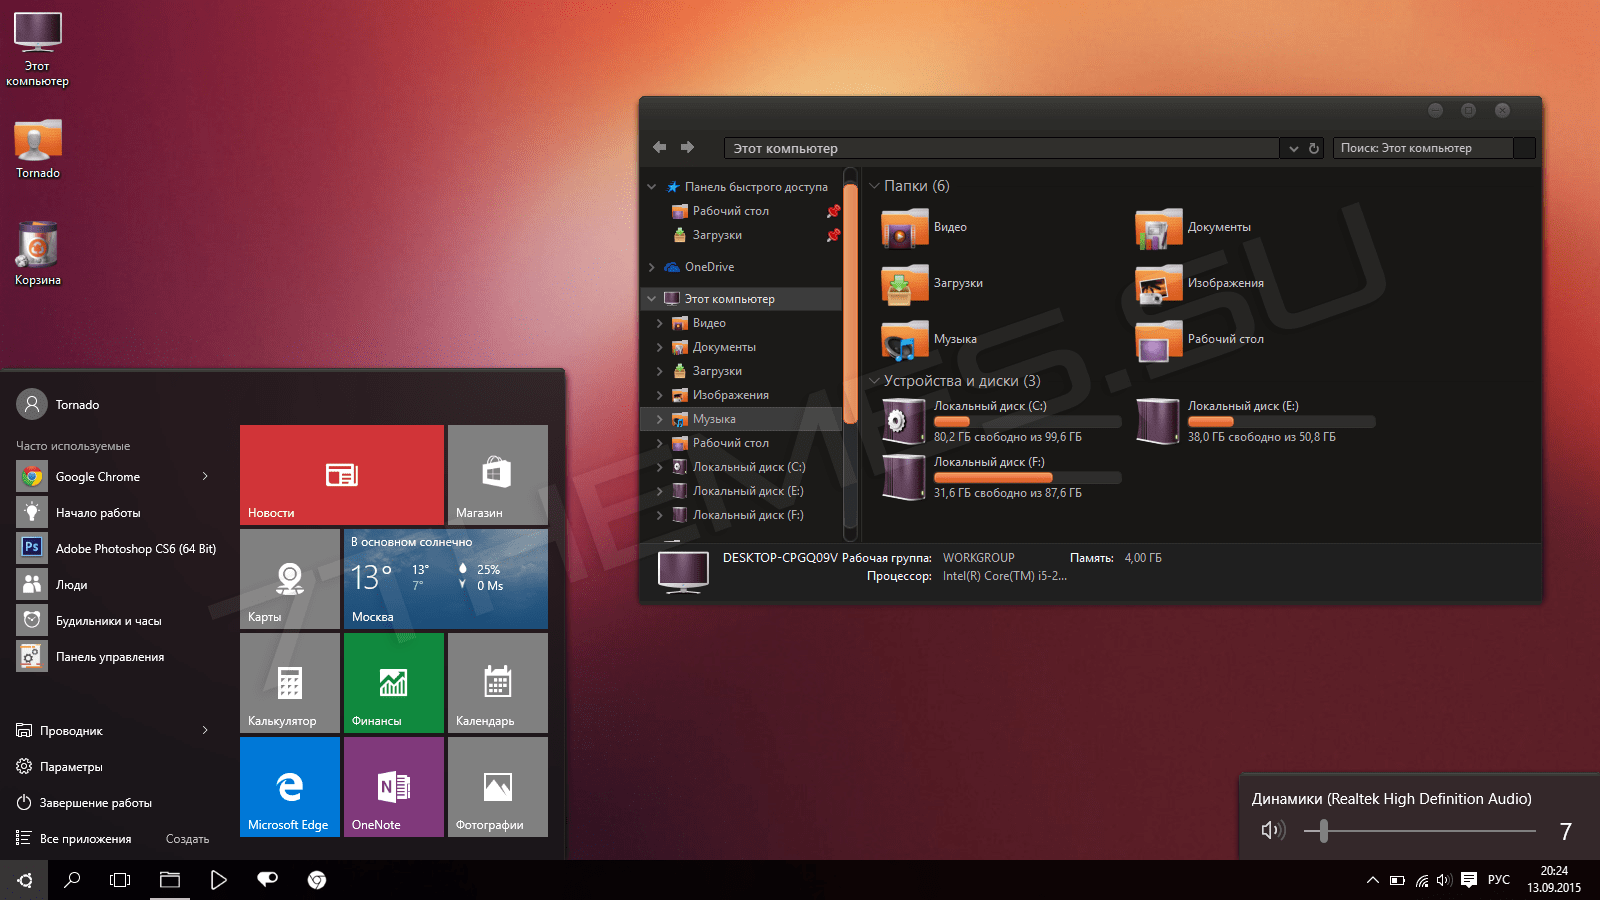
И снова Linux-тема, ну что это за топ такой!? Именно так воскликнут некоторые наши читатели, завидев этот пункт. Но что поделать, тема выглядит действительно красиво. Стиль Ubuntu отлично вписывается в операционную систему Windows 10, и кто бы что ни говорил, мне она пришлась по вкусу.
Безусловно, оранжевый стиль придется по вкусу в первую очередь людям, уже имевшим дело с оригинальной Ubuntu Linux. Но это не значит, что среди вас не найдется человек, которому бы просто (как и мне) нравился данный стиль интерфейса. Вместе с тематическими ярлыками вы сможете придать Windows достаточно интересный, специфический вид. Возможно даже, с помощью данного оформления вы сможете подготовить себя к дальнейшему переходу на Ubuntu, кто знает 🙂
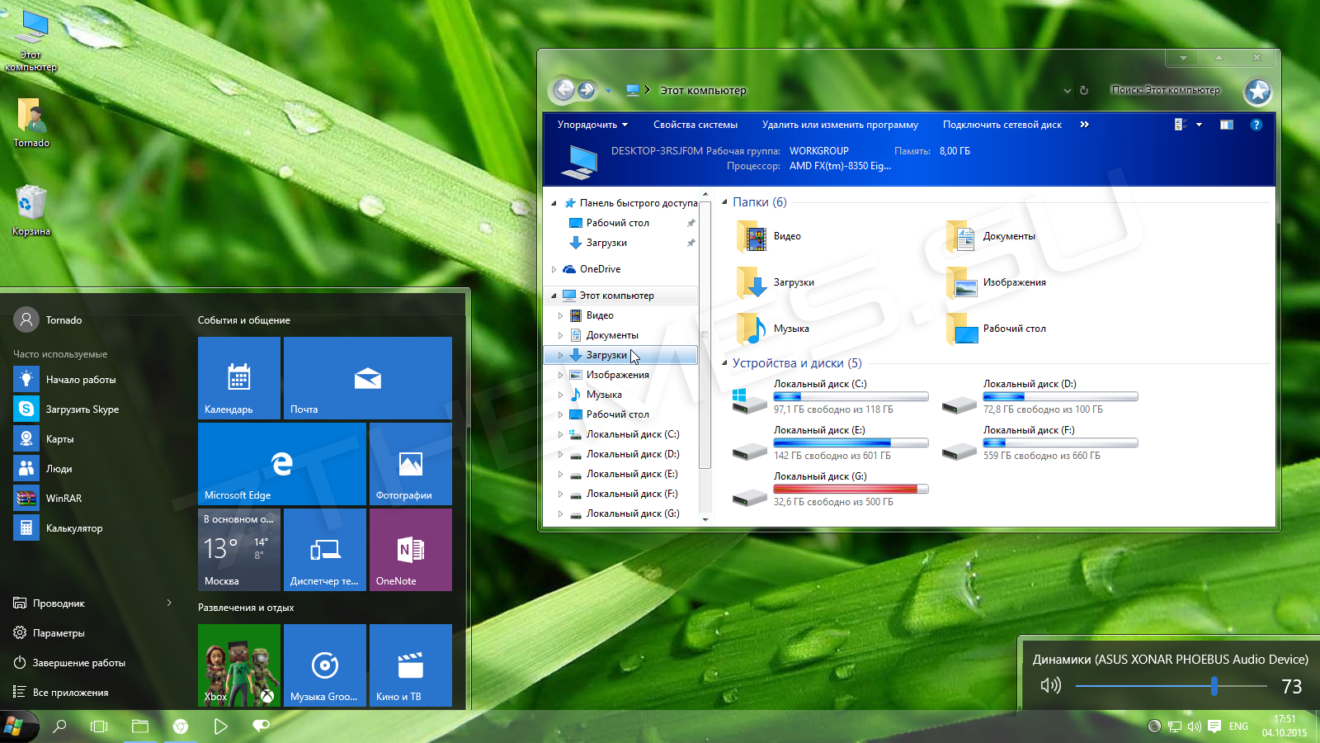
Что же, пришло время и для Aero-темы, которая выполнена в стиле Transparent. Прозрачные и полупрозрачные элементы создают отличное впечатление. Великолепный вид дополняется привычными цветами Windows, а также другими мелкими нюансами.
В общем-то, данное решение придется по вкусу всем любителям Aero-эффектов и более старого (такого как в Windows 7 и Windows Vista) интерфейса.
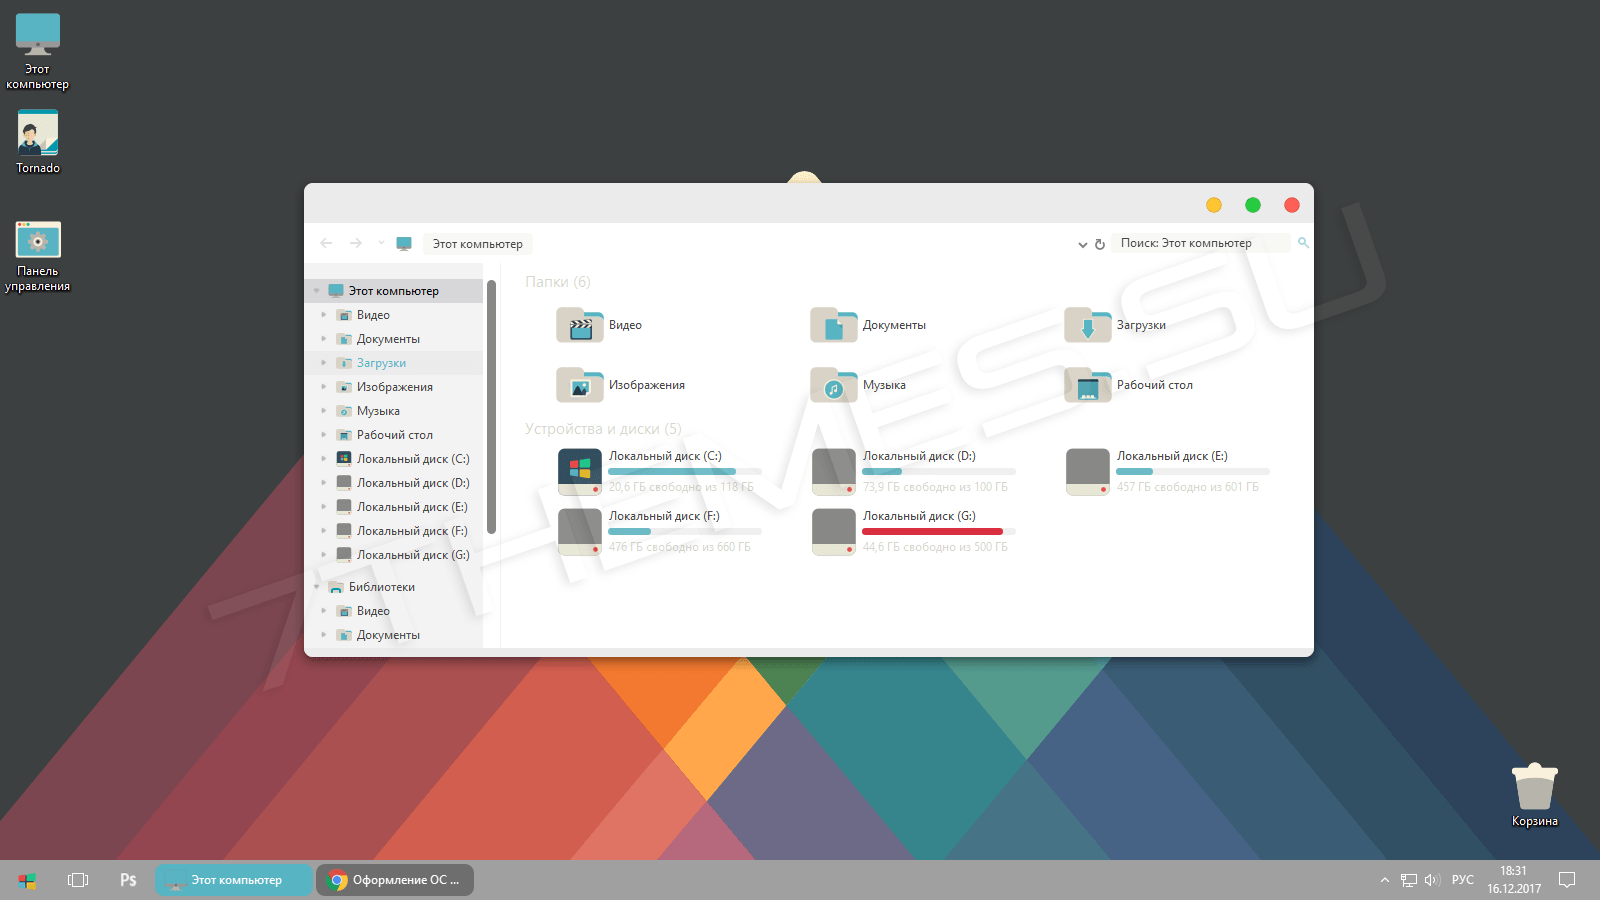
Я долго думал насчет последнего места, решая какая же все-таки тема достойна быть завершающей в этом топе. Ну что же, если в топе есть тема в Linux-стиле, то почему бы не добавить сюда тему в стиле Mac OS? Тем более, что она выглядит необычайно красиво и стильно.
Чего только стоят эти закругленные углы окон и элементов панели задач. Такое встретишь не часто, и именно поэтому iConadams считается одной из самых нетипичных, но в то же время приятных глазу тем оформления.
Кстати говоря, для данной темы оформления специально были разработаны кастомные ярлыки. Правда, распространяются они на платной основе и стоят что-то около 3 евро. Сама же тема доступна для загрузки абсолютно бесплатно, и вы можете уже сейчас сделать это, нажав на кнопку ниже:
Итак, вы пролистали (или прочитали) этот топ из 5 самых красивых тем для Windows 10. Надеюсь, что данная подборка вам понравилась. В будущем будут еще интересные подборки с темами для Windows. Следите за новостями на GitJournal.
MikroTik PPPoE Server is popularly used in ISP Companies to maintain user connection. Along with MikroTik PPPoE Service it is a better idea to make a prepaid billing system with Radius Server. MikroTik User Manager Radius Server is a user authentication and accounting application that gives the ISP Company ability to manage PPPoE user’s connection with proper bandwidth management as well as their prepaid billing system with scratch card. So, any ISP Company can turn a smart network system with MikroTik PPPoE Service and User Manager prepaid billing system. This article is designed to show how to setup an ISP network with MikroTik PPPoE Server and User Manager prepaid billing system.
Purpose of this Article
The purpose of this article is to setup an ISP network which will have
MikroTik PPPoE Server for user connection.
MikroTik User Manager Radius Server for user authentication and bandwidth package management.
User Manager prepaid billing system with scratch card.
Network Diagram
For the configuration of this article I am going to establish a network like below network diagram.
MikroTik PPPoE Server with Radius Server
This is a simple and basic network diagram. In a real situation, your network may be larger than this network but the basic diagram will remain same. In this network, the WAN Distribution Switch is connected to internet gateway. MikroTik Router’s WAN interface, MikroTik User Manager Radius Server and our Admin PC is also connected to this WAN Distribution Switch. PPPoE users will be connected to core MikroTik Router through LAN Switch and will get internet access.
Core Devices and IP Information
To setup an ISP network according to above network diagram, I have installed and completed initial configuration of MikroTik User Manager Radius Server Package in a dedicated physical server where MikroTik RouterOS is running. I have also a physical MikroTik RouterOS (MikroTik RouterBOARD 1100AHX2) which is the core router in this network. IP information that I am using for this network configuration are given below.
Radius Server IP: 192.168.110.10/28
MikroTik RouterOS WAN IP: 192.168.110.2/28
Admin PC IP: 192.168.110.5/28
LAN IP Blocks: 192.168.10.0/24, 192.168.20.0/24 and 192.168.30.0/24
PPPoE Server IP: 192.168.10.1
This IP information is just for my RND purpose. Change this information according to your network requirements.
ISP Setup with MikroTik PPPoE Server and User Manager Radius Server
We are now going to start our ISP network configuration according to above network diagram. Complete configuration to build an ISP network with MikroTik PPPoE Server and User Manager Radius Server prepaid billing system can be divided into two parts.
Part 1: MikroTik Router Configuration (Core Router)
Part 2: MikroTik User Manager Radius Server Configuration
Part 1: MikroTik Router Configuration (Core Router)
In this part, we will configure our core MikroTik Router so that it can turn a PPPoE Server and can communicate with Radius Server to authenticate users. Complete configuration can be divided into below topics.
Basic MikroTik RouterOS Configuration
PPPoE Server Configuration
Radius Client Configuration
Basic MikroTik RouterOS Configuration
MikroTik Router basic configuration includes WAN IP Assign, DNS IP Assign, Default Gateway Configuration and NAT Configuration. The following steps will show how to perform these topics in your MikroTik RouterOS.
Login to your MikroTik Router using Winbox with full permission user such as admin user.
Go to IP > Addresses menu item. Address List window will appear. Click on PLUS SIGN (+) to add a new IP address. New Address window will appear.
Put RouterOS WAN IP (RouterOS WAN IP: 192.168.110.2/28) in Address input field and choose WAN interface from Interface dropdown menu and then click Apply and OK
Now go to IP > DNS. DNS Settings window will appear. Put your DNS server IP (Public DNS IP: 8.8.8.8 or 8.8.4.4) in Servers input field and then click Apply and OK
Go to IP > Routes. Route List window will appear. Click on PLUS SIGN (+). New Route window will appear. Click on Gateway input box and put your internet gateway IP (in this network: 192.168.110.1) in this input field. Click on Apply and OK
Go to IP > Firewall and click on NAT Now click on PLUS SIGN (+). New NAT Rule window will appear. Under General tab, choose srcnat from Chain dropdown menu. Put your first LAN IP block (for LAN 1 network: 192.168.10.0/24) in Src. Address input box. Under Action tab choose masquerade from Action dropdown menu. Click on Apply and OK button. Similarly create two more rules for 192.168.20.0/24 and 192.168.30.0/24 IP Blocks.
Now go to IP > Pool. IP Pool window will appear. Under Pools tab click on PLUS SIGN (+). New IP Pool window will appear. Put an IP Pool name in Name input field. For this configuration I am providing first–ip-pool. This IP Pool name is important and has to provide when User Manager Profile limitation will be configured. Put IP ranges for first-ip-pool users in Addresses input field. For this configuration I am providing 192.168.10.2-192.168.10.254. Click Apply and OK
First IP Pool has been created. Similarly create two more IP Pools for 192.168.20.0/24 and 192.168.30.0/24 IP block.
MikroTik Router basic configuration has been completed. Now we will configure PPPoE Server in our MikroTik RouterOS.
PPPoE Server Configuration in MikroTik RouterOS
After completing basic RouterOS configuration, we will now configure PPPoE server in our MikroTik RouterOS. The following steps will show you how to configure PPPoE server in MikroTik Router.
Click on PPP menu item from Winbox left menu bar. PPP window will appear now.
Click on Interface tab and then click on PLUS SIGN (+) dropdown menu. Choose PPPoE Server or PPPoE Server Binding dropdown menu option. New Interface window will appear. Under General tab, put PPPoE Server Interface name what you want or you can keep default name. Click Apply and OK
Click on PPPoE Servers tab and then click on PLUS SIGN (+). New PPPoE Serivce window will appear.
Put your PPPoE Server name in Service Name input box and then choose interface on which you want to setup PPPoE Server (in this article I am selecting ether2) from Interface dropdown menu. Click Apply and OK
Click on Profiles tab and then double click on default Click on Local Address input field and put PPPoE Server’s IP Address (in this article: 192.168.10.1) in this text field. Click Apply and OK button.
Now click on Secrets tab and then click on PPP Authentication and AccountingPPP Authentication and Accounting window will appear. Click on Use Radius check box and then click on Apply and OK button.
PPPoE Server that will use Radius Server for user authentication has been configured. Now we will configure Radius Client so that MikroTik RouterOS can be able to authenticate users from Radius Server.
Radius Client Configuration in MikroTik RouterOS
The following steps will show you how to configure Radius client in MikroTik RouterOS.
Click on Radius menu item from left menu bar. Radius window will appear now.
Click on PLUS SIGN (+). New Radius Server window will appear now.
Click on ppp checkbox from Service
Put Radius Server IP address (in this article: 192.168.110.10) in Address input field.
Provide a password in Shared Secret input field. This password is important and has to provide when client router will be configured in User Manager Radius Server.
Click Apply and OK
Now click on IncomingRadius Incoming window will appear.
Click on Accept checkbox and put 1700 in Port input box and then click Apply and OK
Radius client configuration has been completed. Now MikroTik RouterOS is able to communicate with Radius Server to authenticate PPPoE users.
Part 2: MikroTik User Manager Radius Server Configuration
MikroTik User Manager Radius Server installation and initial configuration has been discussed in my previous article. If you don’t have enough introduction with User Manager Radius Server installation and initial configuration, first spend some time to study that article and complete your Radius Server installation and initial configuration and then continue my below section. In this section, I will complete below topics in our Radius Server for PPPoE user authentication.
Add client router in Radius Server Router list
User profile configuration in Radius Server
Create Voucher Template
Add user in Radius Server
How to access Radius user page
Add Client Router in Radius Server Router list
The following steps will show you how to add client router in User Manager Radius Server.
Click on Routers button from left button panel and then click on Add > New menu item from top menu bar. Router Details window will appear now.
In Main panel, put a meaningful name for your client router in Name input field. Also choose owner from Owner dropdown menu.
Put your client router IP address (RouterOS IP: 192.168.110.2) in IP address input field.
Now put shared secret password that you have provided at Radius client configuration in MikroTik RouterOS Shared secret input field.
In Radius incoming panel, click on CoA support check box and put 1700 in CoA port input box.
Click on Add button to add this router in Radius Server Router list.
MikroTik RouterOS has been added in User Manager Radius Server as a client router. Now User Manager will reply any query that will ask by our MikroTik RouterOS.
User Profile Configuration in Radius Server
Normally ISP Company maintains different bandwidth packages for their users. These bandwidth packages can easily be maintained with Radius Server user profile. So, we will now create three bandwidth packages (512kbps package, 1Mbps package and 2Mbps package) in User Manager Radius Server for our ISP users. The following steps will show how to create different ISP bandwidth packages in User Manager Radius Server.
Click on Profiles button from left button panel and then click on Limitations
Click on Add > New menu item from top menu bar. Limitation details window will appear now.
In Main panel, put your package name what you want in Name input field. As I am creating my first 512kbps package, I am providing 512kbps Package in name field. Also choose owner from Owner dropdown menu.
In Rate limits panel, put your bandwidth limitation parameter. For a 512kbps package, I am providing below information.
Parameter name
Rx
Tx
Rate limit
512k
512k
Burst rate
1M
1M
Burst threshold
512k
512k
Burst time
60
60
Min rate
32k
32k
Also choose priority from Priority dropdown menu. For my configuration I am choosing 8 that mean lowest priority.
In Constraints panel, put IP Pool name that you have provided for 512kbps Package at basic MikroTik Router configuration (I provided: first–ip-pool) in IP pool input box.
Click Save button to save this limitation package.
Similarly, create 1Mbps and 2Mbps package limitations. Just change Rate limits parameter according to your package requirements.
Now click on Profiles tab and click on PLUS SIGN (+). Create profile window will appear now. Put profile name what you want in Name input field. For my configuration, I am providing 512kbps users as name. Click on Create
First profile will be created and shown in Profiles dropdown menu.
Select your package from Profiles dropdown menu and then put your package validity value in Validity input box. For example, if you want 30 days validity, put 4w2d in Validity input field.
Choose package starting time At first logon from Starts dropdown menu.
Put price of this package in Price input box.
Keep Shared users value 1 so that only one user can login at a time with a username and password.
Click Save profile button to save your information.
At the bottom of this profile, you will find Unlimited profile that mean there is no limitation for this profile. So, click on Add new limitationProfile part window will appear now.
You will find your limitation packages that you have created in Limits Click on your desired package (512kbps package for 512kbps users) and click on Add button to add this limitation for this profile.
First profile has been created successfully. Similarly create 1Mbps and 2Mbps user profile and then follow below section to create scratch card or voucher template.
Create Voucher Template
Now we are going to create scratch card template so that after creating users we can print scratch card according to this template. The following steps will show how to create scratch card or voucher template in User Manager Radius Server.
Click on Settings button from left button panel and then click on Templates
In Row textarea, put below HTML and CSS code. <div class="box"> <h2>System Zone - Internet Card $%u_moneyPaid%</h2> <div class="txtbox"> How to use this card? <br> Create PPPoE client in your operating system <br> Put the <b>UsreName</b> & <b>Password</b> in required field and click <b>Connect </b> button.</b> </br> </div> <p align="left"> UserName: <h3>%u_username%</h3> </p> <p align="left"> Password: <h3>%u_password%</h3></p> <h5 style="margin-top: -70px; margin-left: 230px; font: bold 30px Arial; color: #fff; text-shadow: black 0.1em 0.1em 0.6em;">%u_timeLeft%</h5> <p style="margin-top: -40px; margin-left: 250px;"> Price: $%u_moneyPaid%</p> <h4>Contact for more info. sayeedsezan@gmail.com</h4> </div>
Click Save button to save this voucher template.
You can change this card design if you have a little HTML and CSS idea. Card text can also be changed without having knowledge on HTML and CSS. In Row textarea, you just change card text according to your requirement.
Add User in User Manager Radius Server
The following steps will show how to add users in User Manager Radius Server.
Click on Users button from left button panel. Now click on Add > Batch menu item from top menu bar. User details window will appear.
In Main panel, choose owner from Owner dropdown menu and provide number of users you want to create at a time. You can also provide username prefix as well as username and password length in this panel.
Choose your desired profile package for these users from Assign profile dropdown menu and then click on Add button to add these users. All the created users will be available in Users
Now click on all the users checkbox for whom you want to create scratch card.
Click on Generate menu and then choose VouchersVouchers window will appear.
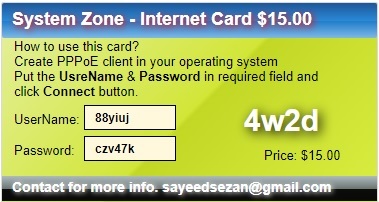
Now click on Generate button and you will find your entire scratch cards in a HTML page like below image.
MikroTik User Manager Scratch Card
Now sell these cards to your nearest shop and get auto revenue. Your users just need to create or configure PPPoE client in their operating system and then provide printed username and password to connect your PPPoE Server. If everything is OK, your user will be connected to your network according to your desired time period.
How to Access Radius User Page
Radius Server offers a user page where user can login their profile page and can show their account status as well as can change their account information and password. The following steps will show how to access Radius user page.
Type https://radius_server_ip_address/user to get user login page if you have only one subscriber or customer in your Radius Server. But if you have more than one customer or subscribe, you have to type https://radius_server_ip_address/user/public_id where public_id is Public ID of the customer or subscriber. This Public ID must provide when customer or subscriber is created.
Type username and password of your desired user in Login and Password input field and then hit login button.
Now user can show his account status, profile, sessions and payment option from this page. Also he can change his password from Settings
How to Create or Configure PPPoE Client
In an ISP network, PPPoE client is mainly configured in a wireless router or in a PC. In a wireless router PPPoE client is already configured and you just need to provide username and password to connect to a PPPoE Server. Most of the ISP users generally use windows operating system. So, in this article I am going to show how to configure PPPoE client in Windows 7 Operating System. All other versions of windows operating system follow almost the same procedure. So, you will not face any difficulty, I think. However, if you feel any problem to configure PPPoE client of any operating platform, I recommend you to do Google and learn how to configure PPPoE client of that specific operating platform.
Steps to Create PPPoE Dial Up Connection in Windows 7
Microsoft PC dialer is used to connect remote PPPoE server in window 7 to get access to internet. So, you have to configure Microsoft PC dialer in windows 7 PC to get access to internet through your MikroTik router. The following steps will show you how to create PPPoE dial up connection in windows 7 operating system with built in PPPoE wizard.
Connect an Ethernet cable to windows 7 PC from your network switch.
Open Network and Sharing Centerfrom Control Panel.
Now click on Setup a new connection or networklink under Change your networking settings area.Set Up a Connection or Network window will appear.
In this window, click on Connect to the internetoption and click on NextConnect to the Internet window will appear.
Click on Broadband (PPPoE)option from this window and put username and password that you have created in User Manager Radius Server. Optionally, you can change connection name from Connection name input field and you can also click on Remember this password option otherwise you have to provide password every time you start your PC. Now click on Connect If you provide correct username and password, The connection to the Internet is ready to use message will be shown. Now click on Close button. A dialer will be created in your windows 7 PC and you can enter your credential anytime to connect Internet with this dialer.
You are now connected to the internet with PPPoE dialer. Browse any site. I hope, you will be success to browse any site now.
I hope, you will be able to setup an ISP with MikroTik PPPoE Server and User Manager Radius Server prepaid billing system if you follow the above steps properly. However, if you face any difficulty to do above steps properly, follow my video tutorial about MikroTik PPPoE Server Configuration with User Manager prepaid billing system. I hope, it will reduce your any confusion.
MikroTik PPPoE Server Configuration with User Manager Radius Server Prepaid Billing System has been discussed in this article. I hope you will be able to setup your ISP with MikroTik PPPoE Server and User Manager Radius Server prepaid billing system. However, if you face any problem to configure your PPPoE Server and User Manager Radius Server with prepaid billing system, feel free to discuss in comment or contact with me from Contact page. I will try my best to stay with you.
Хотите добавить немного новогоднего стиля на свой рабочий стол? Тогда обои в рождественской стилистике Tux подойдут как нельзя кстати. Все это возможно благодаря талантливому дизайнеру Mark Riedesel, который уже в который год радует своих фанатов просто потрясающими новогодними артами.
Самое интересное, что все эти арты создаются в свободном программном обеспечении (таком, как Gimp, Inkscape и Blender), Марк очень ответственно подходит к каждой работе, и на выходе получаются по-истине красивые изображения.
Придать своему Linux новогодний вид
Это проще, чем кажется. Все арты доступны для скачивания с личного сайта Марка. Изображения доступны в высоких разрешениях, и они будут отлично смотреться даже в 4K. Такс, котаны, что может быть лучше? Я и сам решил поставить одну из версий этих крутых картинок на свой рабочий стол.
Новогодний Tux 2011
Новогодний Tux 2014
Новогодний Tux 2016
Эти работы впечатляют, не правда ли? Вы можете загрузить любую из них, после чего ваш рабочий стол засияет рождественскими красотами.