Есть два типа людей: одни не знают, что такое фракталы, а другие уверены, что есть два типа людей: одни не знают, что такое фракталы, а другие уверены, что есть два типа людей: одни не знают, что такое фракталы, а другие уверены, что есть…
Аудит доступа к журналам аудита. Тем, кто озадачен внедрением PCI DSS, это вполне понятно. Ну и остальным может быть интересно, кто лазит по логам. Но! Это работает только если записи о событиях собираются в централизованное место хранения. А то при компрометации системы взломщик запросто может потереть все журналы.
Тут мы настроим аудит всего доступа к журналам Windows Application, Security и System. Через PowerShell:
Как защитить личные данные, работая на компьютере под управлением Linux? Несколько простых советов от команды конфиденциального поисковика DuckDuckGo. Перевод статьи из официального блога компании. Как защитить конфиденциальные данные на Linux? Несколько простых советов, которые помогут вам защитить конфиденциальные данные на устройствах под управлением операционной системы Linux.
Автор: Alex Semёnov-Sherin
Дата публикации: 2018-01-05T15:25:00.000+07:00
Критическая уязвимость популярных процессоров ставит под угрозу конфиденциальные данные пользователей (пароли, кэшированные файлы, ключи лицензионного софта и т. д.). Гипотетический фикс снизит производительность компьютеров почти на треть. Кто виноват и что делать? Чипокалипсис: Критическая уязвимость процессоров (Intel, ARM, AMD) Кто виноват? Буквально на днях была «найденная»
Ripple (с англ. переводится как «рябь на воде») представляет собой глобальную систему взаиморасчетов. Она имеет свои уникальные особенности, которые отличают Рипл от других криптовалют. Это не альткоин биткоина — с BTC система имеет мало общего. Она не использует традиционный блокчейн, который мы привыкли видеть в большинстве криптовалют.
Что такое Ripple — особенности системы, экскурс в историю
Большинство криптовалют отличаются от Bitcoin лишь некоторыми нюансами. Например, одни более анонимны и безопасны, другие работают со смарт-контрактами. Однако существуют системы, которые пошли намного дальше. Яркий пример — криптовалюта Ripple (XRP). О ее выдающейся популярности свидетельствует уже тот факт, что сегодня по капитализации Рипл занимает 4 место. Чем эта сеть заинтересовала пользователей и как смогла добиться таких выдающихся показателей, мы поговорим далее.
Принцип деятельности системы базируется на основе договоренностей, так называемого консенсуса. Для наглядности возьмем в качестве примера такую схему. Вам нужно отдать своему партнеру в другой стране 100 долларов. Встретиться лично не получается, отправлять переводом накладно, а потому вы договариваетесь со своим знакомым поставщиком, который находится в той местности, и он отдает свои деньги вашему партнеру.
Этому знакомому затем третьи лица переводят ценности, эквивалентные ста долларам, причем это может происходить как в любой удобной ему валюте, так даже быть возвращено материальными вещами. В итоге все получают, что хотят, хотя мало кто из всей цепочки знает друг друга — все взаимодействие основано на доверии. В Ripple роль таких людей выполняют серверные узлы.
Основа системы Рипл — это реестр (по англ. ledger) в виде распределенной базы данных, где хранятся все данные об аккаунтах и транзакциях пользователей. При его работе используется протокол RPCA — Ripple Protocol consensus algorithm.
Обновляется реестр каждые несколько секунд и самый актуальный в данный момент времени называется LCL — Last Close Ledger. Копии реестра хранятся на серверах сети, которые еще называют узлами.
С внешним миром, а точнее с магазинами, обменными пунктами, система взаимодействует через так называемые «шлюзы». Любой желающий, кто хочет провести транзакцию, должен отправить шлюзу деньги с помощью банковской карты, электронной платежной системы. Далее деньги можно менять на любую валюту мира. При этом система сделает это по самому выгодному курсу.
Когда в систему поступает заявка на новую транзакцию, она распространяется по сети подобно ряби на воде. Инициатором такой заявки может быть любой узел. Остальные сервера решают стоит ли ее добавлять в реестр или отвергнуть. Так формируются наборы кандидатов для добавления. На их рассмотрение серверам отводится определенное время.
С каждой итерацией проверки наборы стают все больше похожими друг на друга. Как только разница между ними сводится к минимуму, считается что система пришла к консенсусу. Непринятые заявки остаются в наборах и отправляются на новый этап рассмотрения совместно с только что поступившими транзакциями. Таким образом реестр сети обновляется каждые несколько секунд.
Ripple позволяет пользователям переводить друг другу средства в любой валюте —долларах, евро, кронах, мексиканских песо, иенах, рупиях, и даже драгоценными металлами, такими как платина, золото, серебро. Причем перевод занимает считанные секунды.
Платформа имеет также свою внутреннюю валюту XRP. Все монеты были выпущены на страте проекта. Их количество — 100 миллиардов токенов. Причем только около 7 миллиардов XRP были распределены между пользователями за время существования системы, большая половина осталась во владении Ripple Labs. Такое положение естественно вызывает опасения у сообщества, поскольку компания имеет все возможности для манипулирования курсом. И они не беспочвенны.
Наглядный пример произошел на бирже Bitstamp, когда Джед МакКалеб пытался продать около 100 миллионов монет системы, что равнялось около 1 миллиону долларов. Бирже пришлось заморозить средства МакКалеба, иначе обрушение курса было бы неминуемым.
Чтобы снизить напряжение среди сообщества, Ripple Labs оставшиеся в ее распоряжении монеты заблокировала с помощью смарт-контрактов. Всего их 55 и каждому соответствует по миллиарду токенов. Раз месяц один контракт истекает, и компания имеет право распоряжаться высвободившимися средствами. Преимущественно она направляет их на поддержание текущей деятельности Ripple Labs и дальнейшее развитие системы.
Поскольку все монеты были выпущены изначально, майнинг Ripple не производится. А потому заработать с помощью вычислительных мощностей своего компьютера XRP не получится. В первое время компания раздавала токены за участие в разнообразных проектах, однако позднее такая возможность получить монеты была приостановлена.
Монета Рипл делится на миллион частей, именуемых drop (капля). При проведении транзакций с каждого участника снимается около 0.00001 XRP. Это настолько мизерные средства, что их даже комиссией назвать сложно. Главная цель такого списания —защита от спама. Если сеть начнут атаковать большим количеством транзакций, размер комиссии будет автоматически подниматься для тех аккаунтов, которые это делают, и в конце концов атака захлебнется, поскольку окажется невыгодной.
Самый интересный нюанс с XRP — снимаемые комиссионные средства уничтожаются, таким образом количество монет в системе постоянно уменьшается.
Криптовалюта Рипл хоть и считается децентрализованной, поскольку серверов (узлов) в сети большое количество, однако не в полном смысле этого слова. Сервер создать и добавить в систему может кто-угодно. Однако прежде чем его допустят к обработке транзакций, необходимо пройти аттестацию Ripple Labs и получить звание доверенного узла. Для этого необходимо:
иметь отменную репутацию;
всегда быть доступным в сети;
иметь хорошее Интернет-соединение.
При этом сторонних серверов в системе сравнительно немного. Большая часть узлов принадлежит самой компании.
В то время как традиционные криптовалюты ориентированы на простых пользователей и нацелены стать альтернативной системой платежей, Рипл, наоборот активно интегрируется в банковскую отрасль. Основные клиенты системы — крупные банки и финансовые организации, которым система предлагает выгодные способы мгновенного перевода денег по всему миру.
Ripple — как все начиналось
Начало проекта было заложено еще в 2004 году. Тогда Райан Фуггер, выдающийся программист из Канады, начал работать над платежной системой Ripplepay, которую запустил уже в 2005 году. Система представляла собой одноранговую p2p-сеть — с ней пользователи имели равные права и все денежные переводы совершались на принципах взаимного доверия. Широкую популярность Ripplepay не получила в интернет сообществе из-за нехватки финансирования, однако существование продолжала.
Позднее Фуггер знакомится с Джедом МакКалебом, который известен как создатель файлообменной сети eDonkey. В 2011 году они полностью обновляют систему, позаимствовав у биткоина идею децентрализации, но отказавшись при этом от майнинга. В 2012 году к ним присоединяется Крис Ларсен и создается дочерняя компания OpenCoins, которая занимается усовершенствованием платежного функционала.
Уже в следующем году ее переименовывают на Ripple Labs. Большинство членов старой команды покидают проект, возглавляет его теперь Ларсен и свою деятельность компания нацеливает преимущественно на работу с крупными финансовыми учреждениями. Первый значительный успех в этом направлении — сотрудничество с немецким банком Fidor в 2014 году. После этого на Ripple обратили внимание другие крупные игроки финансового мира, в частности, WesternUnion.
В 2016 году компании удалось привлечь инвестиций на 55 миллионов долларов. Из ведущих банков с Рипл начинают совместную деятельность:
National Australia Bank;
Shanghai Huarui Bank;
BMO Financial Group;
Standard Chartered и другие.
В начале 2017 года Рипл подписывает договор с Национальным банком Абу-Даби, который работает в 17 странах мира. Сегодня список финансовых организаций, с которыми Ripple сотрудничает, обширен.
Основные преимущества системы
Разработчики системы утверждают, что их основная цель — позволить пользователям полностью контролировать свои финансовые средства и проводить платежи между разными странами с минимальными затратами в считанные секунды. По их мнению, обмен деньгами должен происходить с той же скоростью, что и обмен информацией. Что касается крупных банков, то по подсчетам платформа позволяет на каждой транзакции им экономить более 3,5 доллара.
Таким образом к основным плюсам Риппл можно отнести:
высокую скорость транзакций в сети;
безопасность проведения платежей;
возможность работы с разными валютами;
мизерные комиссионные сборы;
дефляционность родных монет, которые после проведения платежей уничтожаются.
Капитализация валюты сегодня составляет почти 8, 5 миллиардов долларов. И это при цене в 20 центов за монету, что составляет около 12 рублей. При этом курс Ripple к рублю, а также другим валютам начал активно расти с середины весны 2017 года, что наглядно видно со следующего графика.
График роста стоимости XRP по отношению к рублю
Исходя из этого, прогноз Ripple выглядит многообещающим. Поскольку с компанией готовы сотрудничать такие крупные воротилы финансового мира, успех в ближайшие годы ей обеспечен, и монеты системы будут в долгосрочной перспективе только дорожать.
Купить Ripple на бирже криптовалют StormGain
Необходимо зарегистрироваться на бирже StormGain в один клик по ссылке. Чтобы пополнить торговый счет, Вы может воспользоваться двумя способами — с помощью кредитной карты, а также с помощью любой платежной системы. Минимальная сумма для пополнения зависит от криптовалюты:
Bitcoin — 0,005 ВТС;
Bitcoin Cash — 0,160 BCH;
Ethereum — 0,200 ETH;
Litecoin — 0,550 LTC;
Ripple — 160 XRP.
Если пополнять баланс с помощью кредитной или дебетовой карты, то минимальная сумма составляет 50 долларов/евро. Чтобы внести средства на баланс, необходимо зайти в свой профиль и выполнить несколько действий:
выбрать криптовалюту и нажать на кнопку «Пополнить»;
скопировать сгенерированный адрес;
вставить его в той платежной системе, откуда будет осуществлен перевод.
Подробная инструкция по бирже StormGain есть у нас на сайте.
Начиная с сентября 2017 года удостоверяющим центрам предписано обязательно проверять CAA-записи в DNS перед генерацией сертификата. CAA (RFC-6844, Certificate Authority Authorization) позволяет владельцу домена явно определить удостоверяющий центр, который имеет полномочия для генерации сертификатов для указанного домена. При наличии CAA-записи все остальные удостоверяющие центры обязаны блокировать выдачу сертификатов от своего имени для данного домена и информировать его владельца о попытках компрометации. Читать →
Проект начался с указания руководства. Старая сеть уже совсем ни куда не годилась. Так как я только устроился на новую работу, меня ознакомили с ситуацией и показали схемы. Схемы были старые и только в печатном варианте, их пришлось перечерчивать в электронный вид автокадом.
Пока еще с бумажными схемами провели обследование местности. Задачей было определить место расположения распределительных шкафов по зданию и их количество, так же необходимо было подсчитать количество абонентов – существующих и предполагаемых, длины кабельных линий, способ прокладки кабеля по коридорам и в помещении, определить расположением серверной комнаты. Это всё заняло достаточно много времени с учетом согласования расположений РШ и серверной с руководством, передача помещения и т.п. По итогам обследования приблизительные контуры новой сети уже начали вырисовываться.
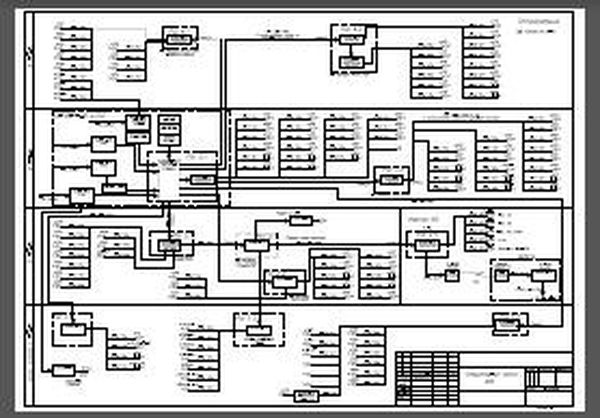
Нужно отметить пару нюансов начального этапа проекта. Во-первых, во-вторых и в-третьих нужно пользоваться современными методиками проектирования, использовать кодекс СКС и немножко пользоваться своим воображением. Сеть должна стремиться к структуре звезды – в центре коммутатор, от него расходятся поэтажные коммутаторы и далее отводы к пользователям. Предполагалось достичь структуры, как на рисунке ниже. Такой рисунок можно составить в браузерной программе на сайте www.draw.io.
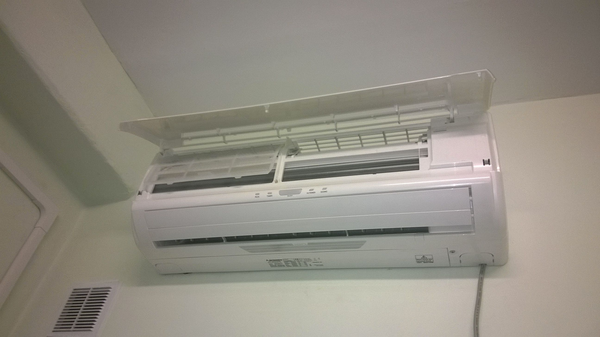
На роль серверной претендовали три или четыре помещения в разных частях здания. При выборе серверной комнаты нужно обратить внимание на её площадь, она должна быть не менее 6м2, желательно без окон, пол из плиток. Обязательно наличие кондиционера, системы пожаротушения, контролируемой вентиляции, герметичной железной двери и по необходимости охранной сигнализации. Должна быть отдельная линия электропитания. Циркуляции воздуха в серверной практически нет. Кондиционер нужен для охлаждения воздуха, а приточка и вытяжка могут понадобиться в экстренных ситуациях. Желательное расположение серверной где-нибудь в центре здания, чтоб кабельные линии расходились в разные стороны и не превышали 100м до поэтажных коммутаторов.
В итоге, две комнаты не подошли по размерам, одна оказалась очень сырой, осталось наиболее подходящее помещение на третьем этаже, которое было складом. Его и выбрали. Из необходимых систем нам удалось достичь присутствия кондиционера, отдельного электропитания и системы оповещения о пожаре. Если бы пришел приемщик со стороны, такую серверную он бы не одобрил. Составилась предварительная схема расположения оборудования в помещении.
В серверную должна заводится отдельная линия электропитания кабелем не менее ВВГ 3х2.5мм2, которая подключается на отдельный автомат 16-25А в электрощитовой и так же оканчивается автоматом в серверной, а уже от него все розетки для серверов, коммутаторов и прочего оборудования. Электрики сопротивлялись, но свою работу сделали.
Количество розеток 220В подсчитать сложно, по этому, их сразу нужно делать с хорошим запасом, минимум 15-20 шт. Обязательно должна быть возможность подсоединить металлические шкафы к заземлению.
Еще одна система – это связь. Нужно было перетянуть телефонные линии для организации внешнего шлюза через ADSL модем и для 3х VPN. До этого модемы стояли в совершенно неожиданных местах.
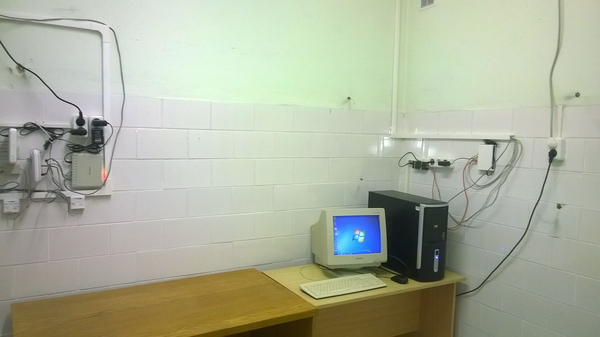
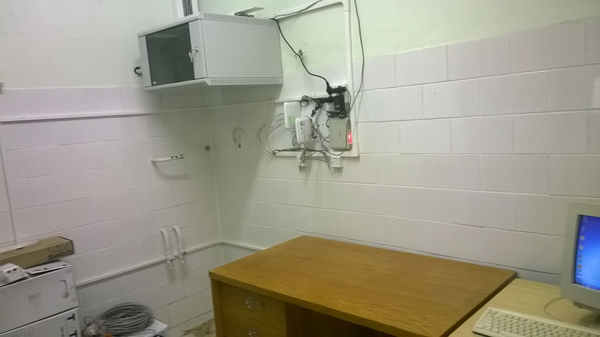
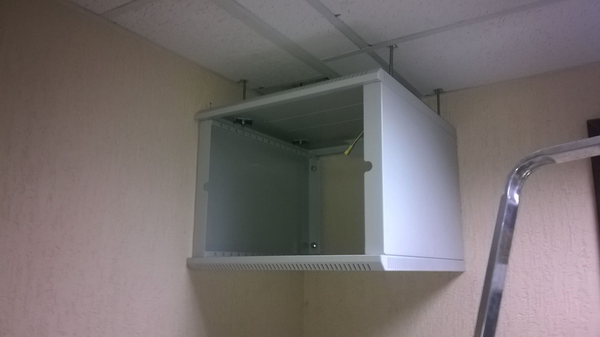
Вид серверной после завершения первого этапа проекта на фото ниже.
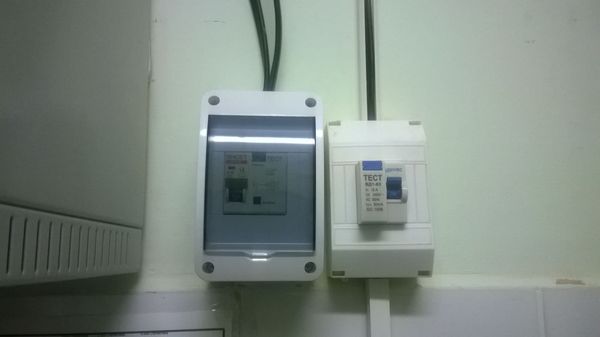
Первый РШ.
Кондиционер.
Выглядит немного грубовато, и тут есть организационные проблемы, например, при закупке не было возможности выбрать стоечный сервер или напольный высокий шкаф, единый для всего оборудования. Закупка была очень затянутой и хорошо, что вообще хоть что-то купили.
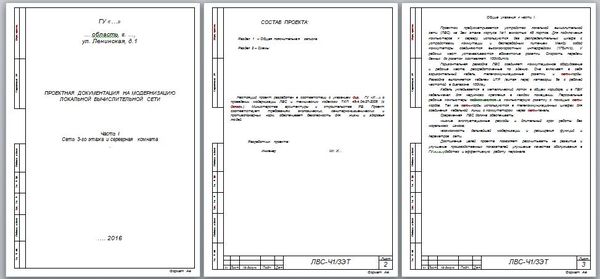
После предварительного обследования были нарисованы схемы и оформлена пояснительная записка.
Проект делался в несколько этапов. Для примера пояснительная записка от первого этапа. Записка очень краткая, с указанием основных моментов.
Остальные части проекта идут как дополнение с другим количеством розеток и длинной кабеля.
Первая схема – это структура предполагаемой сети с указанием РШ и количеством отводов, а так же с указанием примерных длин кабеля.
На схеме есть место, где несколько коммутаторов включены друг в друга последовательно по причине длинной кабельной линии. При длине более ста метров по кабелю UTP без усилителей сигнала сеть работает нестабильно. Такие ситуации следует обходить с использованием опто-волоконных линий. В данной ситуации это было невозможно по организационным причинам.
Между корпусами №2 и №5 передача данных осуществляется через две встречно направленные точки wi-fi CPE510. Система стабильно работает уже год. Замечаний нет. Остальная сеть по типовой структуре СКС.
По проекту получилось 185 портов. Когда в ЛВС официально насчитывается более 128 портов, по законодательству РБ её нужно регистрировать в БелГИЭ. Портом считается каждый разъем RJ-45 в коммутаторе, способный передавать данные (как задействованный, так и не подключенный). Официально – значит оборудование проходит по бухгалтерии.
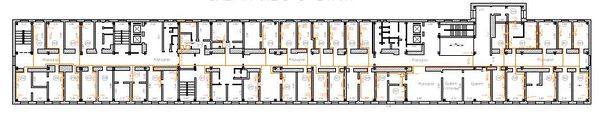
Следующая схема поэтажная на примере одного этажа.
В среднем на этаж получается 40 абонентов, где-то больше, где-то меньше. Чтоб не тянуть много длинных линий, спроектировано по два распределительных шкафа на этаж. РШ крепятся к стене дюбелями 16х80мм. Там, где стены совсем песочные или гипсо-картоновые шкафы крепятся к бетонному потолку шпильками М8, как на фото ниже.
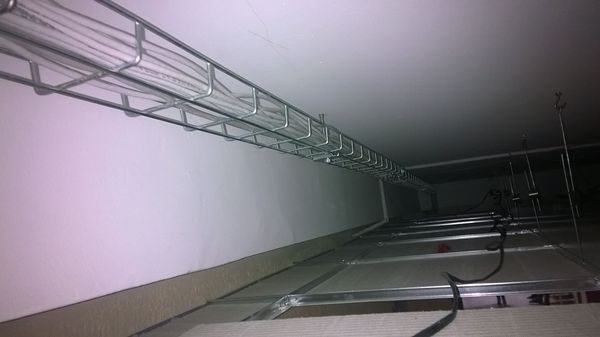
По коридорам кабель укладывается в металлическом лотке за подвесным потолком. Выбран лоток с размерами 30х100мм (высота х ширина) длинной по 3м каждый.
В помещениях кабель укладывается в ПВХ кабельный канал и заканчивается розеткой.
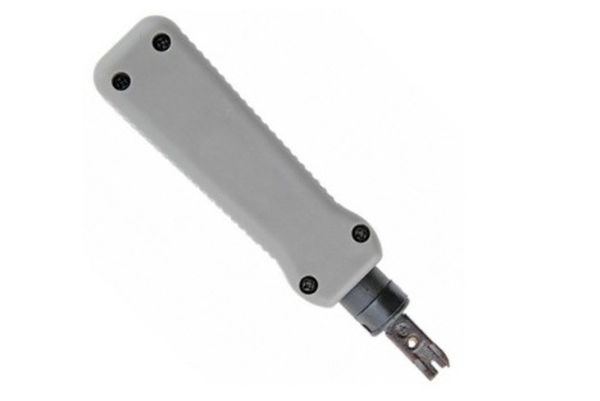
Для одного кабеля подходит кабельный канал 16х16мм. Если 2-5 кабелей, то размер кабельного канала 25х16мм, как на фото выше. Компьютерные розетки выбраны с одним или двумя разъемами RJ-45. Они расшиваются по стандарту А или Б. Главное, чтоб стандарт был один на всю сеть. В нашей организации везде Б. Для расшивки требуется инструмент, например спец.нож T-431.
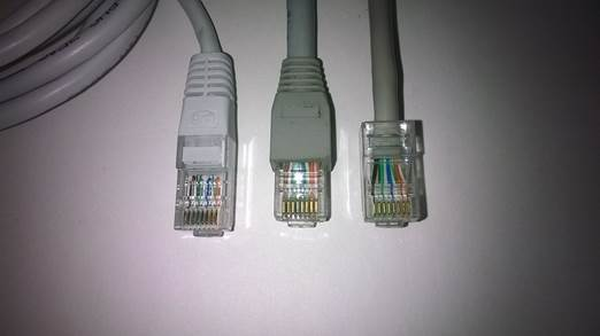
Розетка и ПК соединяются патч-кордом, который обжат так же по стандарту Б (TIA/EIA-568B).
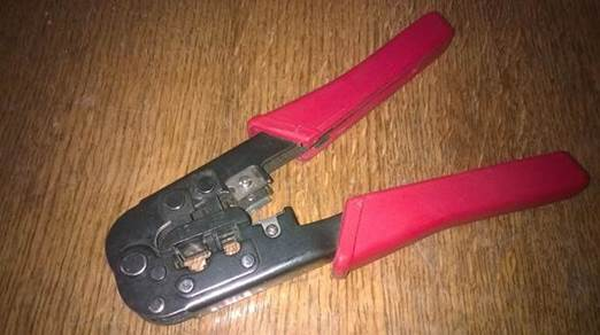
Обжим коннекторов RJ-45 выполняется другим специальным обжимным инструментом, который на фото ниже.
Перед началом монтажных работ нужно позаботиться, чтоб все необходимые инструменты были под рукой. Кроме двух названных, минимально необходимым является еще перфоратор и болгарка, чтоб сверлить стены и пилить металлические лотки. Обязательно нужна стремянка не менее 1,7м, кусачики, отвертки, молоток и черный маркер, чтоб подписывать кабель и розетки.
Оборудование и материалы закупались в несколько этапов. Первоначально построили сеть 3-го этажа вместе с серверной. Затем, оценив плюсы и минусы, докупили материалы и оборудование.
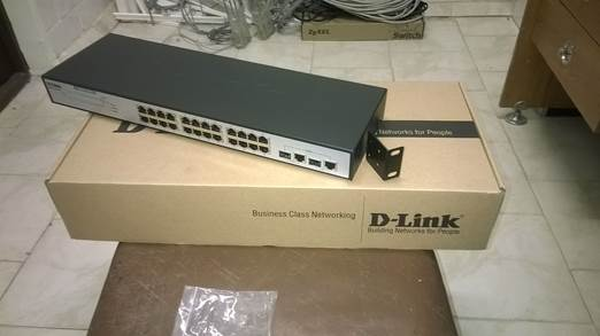
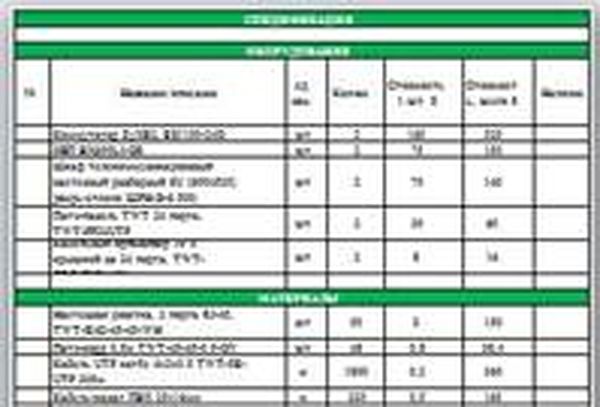
Сеть по стоимости рассчитывалась как бюджетная из наиболее дешевых материалов и с максимальной скоростью 100Мбитс от коммутаторов D-Link и ZyXEL. Однако, на втором этапе нашлись средства и закупили более дорогие управляемые коммутаторы с гигабитными портами ZyXEL GS-1900. Ситуация стала по веселее. Стоимость ЛВС на один этаж можно посмотреть в смете ниже.
Сюда для полной картины нужно добавить еще оплату проектных, монтажных работ и электрику. Так же был закуплен сервер за 3000$, в смете не указан.
Монтажом сети занялась армия из двух – инженер и техник. Руководство посчитало, что привлекать стороннюю организацию экономически нецелесообразно, стоимость одной точки получается в три раза дороже, чем двое будут заниматься этим за зарплату. О том, как происходил монтаж инфраструктуры и настройка оборудования описано в дальнейших статьях рубрики ЛВС.