MikroTik Router has a lot of features which help to customize your network as your requirement. Sometimes, it may be your requirement that you need to allow per IP internet access. Normally, when you apply masquerade NAT rule in your MikroTik router, you accept all private IP will be masqueraded or a network block will be masqueraded. But if you do so and enable a DHCP server in your network, you may face a lot of unauthorized accesses in your network. Because when a user will be connected in our network, he/she will get internet information (IP, Subnet mask, Gateway and DNS) by DHCP server and can access internet through your MikroTik router. So, an unauthorized user can consume your bandwidth. But you don’t want that any user can access internet through your MikroTik router without your permission. If you want to prevent unauthorized access in your network, you have to apply a strategy named Single IP NAT strategy. Single IP NAT strategy will help you to control unauthorized access to your network. If you apply single IP NAT strategy, no IP device can get internet access through your router until you allow that IP.
Single IP NAT Strategy
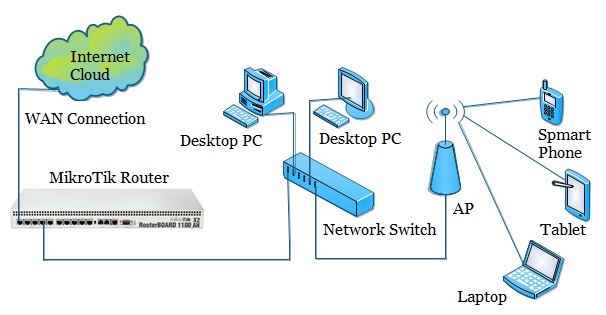
Single IP NAT Strategy is not a MikroTik service but a logical tricks which will prevent unauthorized internet access in your network. Say, you are going to build a DHCP enabled network with MikroTik router in your office like below network diagram where users will come with their IP devices and he/she will be connected with your network by wire or wireless device.

But you don’t want that any user can access internet through your DHCP server without your permission. For this, you should apply single IP NAT strategy in your MikroTik router. If you wish to apply single IP NAT strategy in your MikroTik router, keep reading this article where I will show you how to apply single IP NAT strategy in your MikroTik router.
Single IP NAT Configuration in MikroTik Router
Before going to apply single IP NAT strategy in your MikroTik, you have to complete MikroTik router basic configuration without NAT configuration. If you are a new MikroTik user, spend some time to study my previous article about MikroTik Router Basic Configuration using winbox and complete basic configuration of your MikroTik router without NAT configuration. Because single IP NAT strategy will be applied in NAT configuration. If you have completed your MikroTik router basic configuration according to my article, follow below steps to apply single IP NAT strategy in your MikroTik router.
- Go to IP > Firewall menu and click on NAT tab and then click on add new button (PLUS Sign) to create a new NAT rule. In New NAT Rule window click on General tab and then select srcnat from Chain drop-down box.
- Now click on Advanced tab and type ipblock1 or your own string as you like in Src. Address List input box.
- Click on Action tab and choose masquerade from Action drop-down list and then click Apply and OK button.
- Now click on Address List tab in Firewall window and click on add new button (PLUS Sign) to create a new list. Choose ipblock1 or your provided string from Name drop-down list and type the IP address on which you want to allow internet in Address input box and then click Apply and OK button.
- Do step 4 every time you want to allow an IP to access internet through your router.
After this configuration, you can see that IP addresses which are listed in Address List panel can access internet trough your MikroTik router. But other IP addresses of your network block cannot access internet through your router although these IP address are obtained by IP devices from your MikroTik DHCP server.
You have to follow the above steps carefully otherwise you cannot apply single IP NAT strategy in your MikroTik router. If you face any difficulty to do above steps properly, watch my below video carefully about Single IP NAT Strategy in MikroTik Router.
The logical tricks named Single IP NAT Strategy to prevent unauthorized internet access in your network has been explained step by step in this article. A video tutorial has also been uploaded to remove your any confusion to apply single IP NAT strategy in MikroTik router. However, if you face any problem to apply single IP NAT strategy in your MikroTik router, feel free to discuss in comment or contact with me from Contact page. I will try my best to stay with you.