Функция скрытия чата Viber удобно повышает конфиденциальность и наводит порядок в разговорах. Если вы хотите сохранить планы сюрпризов в тайне или хотите управлять своим цифровым пространством, это руководство проведет вас через простые шаги, как скрыть и показать ваши чаты Viber.
Если вам нужно временно скрыть чат из основного списка или вы хотите восстановить ранее скрытый разговор, вы можете легко сделать это как на устройствах Android, так и на iOS. Однако давайте сначала проверим некоторые вещи, которые следует запомнить, прежде чем создавать секретный чат в приложении Viber.
Что следует помнить, прежде чем скрывать или показывать чаты Viber
Если вы хотите скрыть или показать чаты Viber на своем телефоне, важно помнить несколько вещей.
- Вы можете скрыть как индивидуальные, так и групповые чаты.
- Сообщества в Viber нельзя скрыть
- Скрытые чаты скрыты только на вашем устройстве, а не на устройстве другого человека.
- Забыть PIN-код означает потерять доступ к скрытым чатам. Вы можете сбросить его, но ваши скрытые чаты будут удалены.
Как скрыть чаты Viber
Вы можете скрыть отдельные чаты или групповые разговоры, чтобы защитить свою конфиденциальность в Viber. Это становится необходимым, особенно если вы делитесь своим устройством с другими или хотите, чтобы определенные разговоры были более конфиденциальными.
Помните, что при скрытии чата он удаляется из основного списка чатов, но не удаляется сам разговор, что гарантирует, что вы всегда сможете восстановить его при необходимости. Для этого следуйте простым методам, приведенным ниже:
1. С экрана чата
Если вы ранее общались с этим человеком и хотите скрыть этот чат в Viber, это самый быстрый способ.
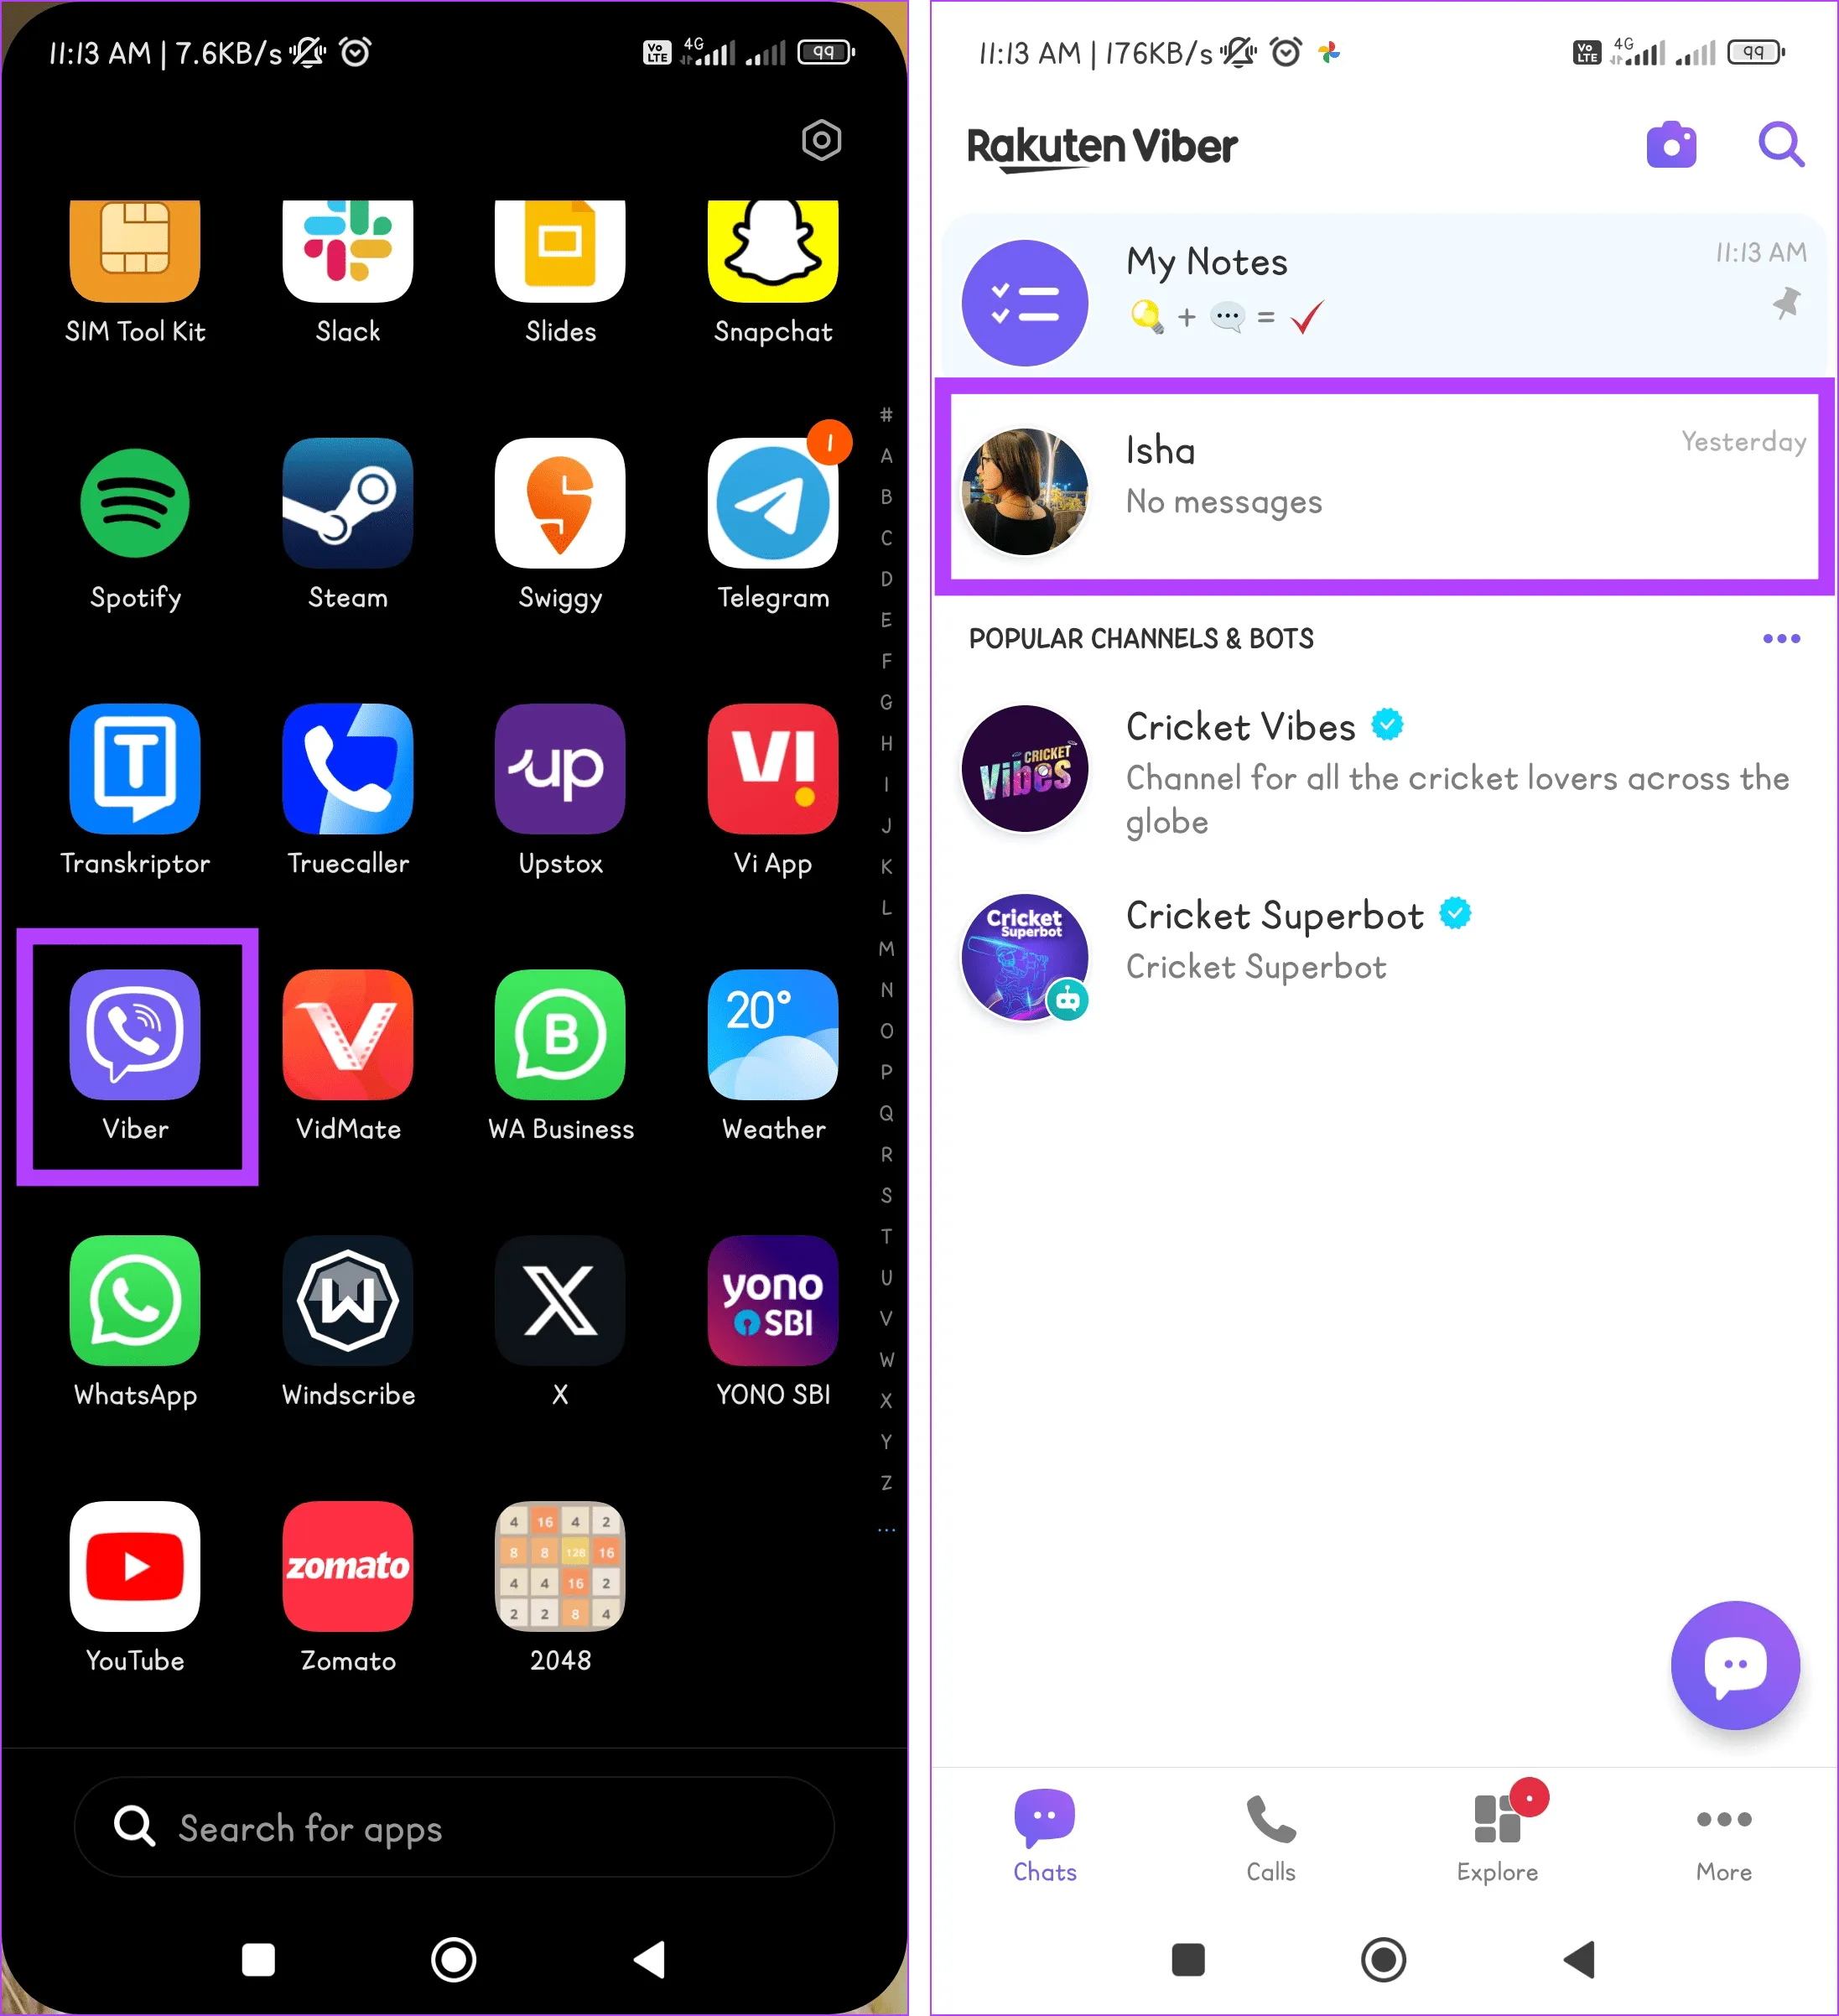
Шаг 1. Откройте приложение Viber на своем устройстве и найдите чат, который хотите скрыть.

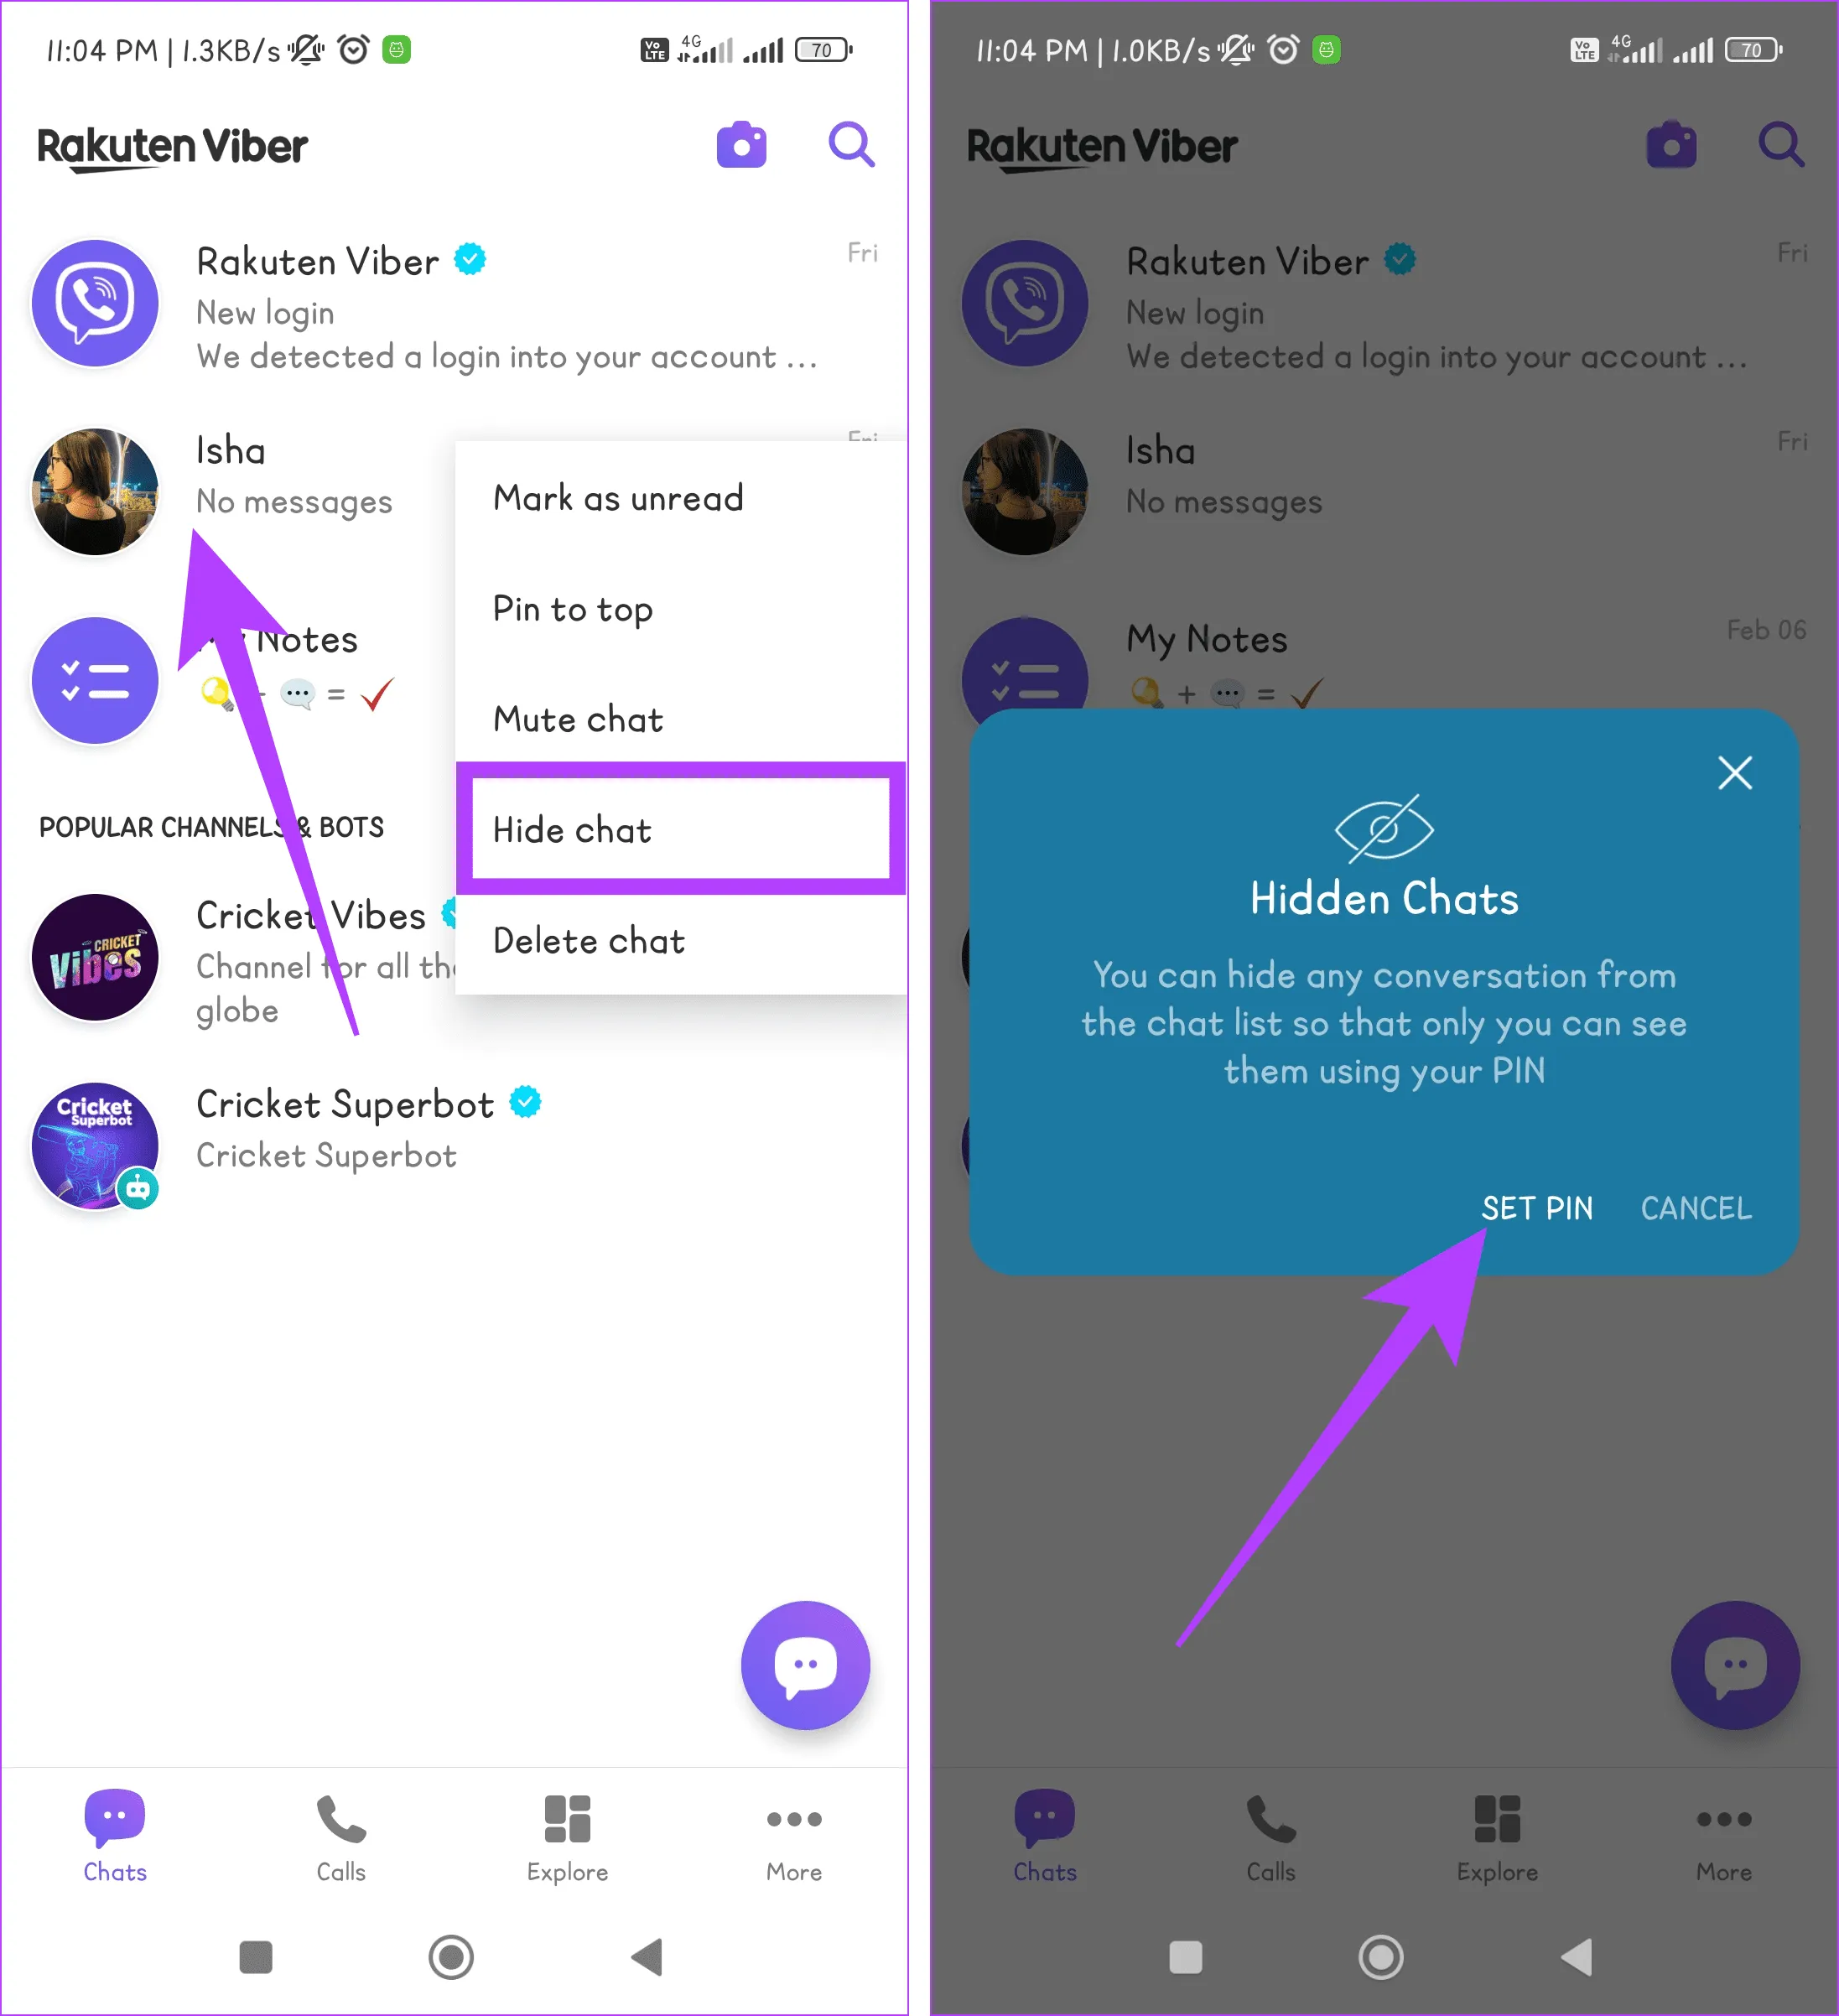
Шаг 2. Нажмите и удерживайте чат, выберите «Скрыть чат» и нажмите «Установить PIN-код» во всплывающем окне.
Примечание. Запрос PIN-кода происходит только во время первоначальной попытки скрыть чат.

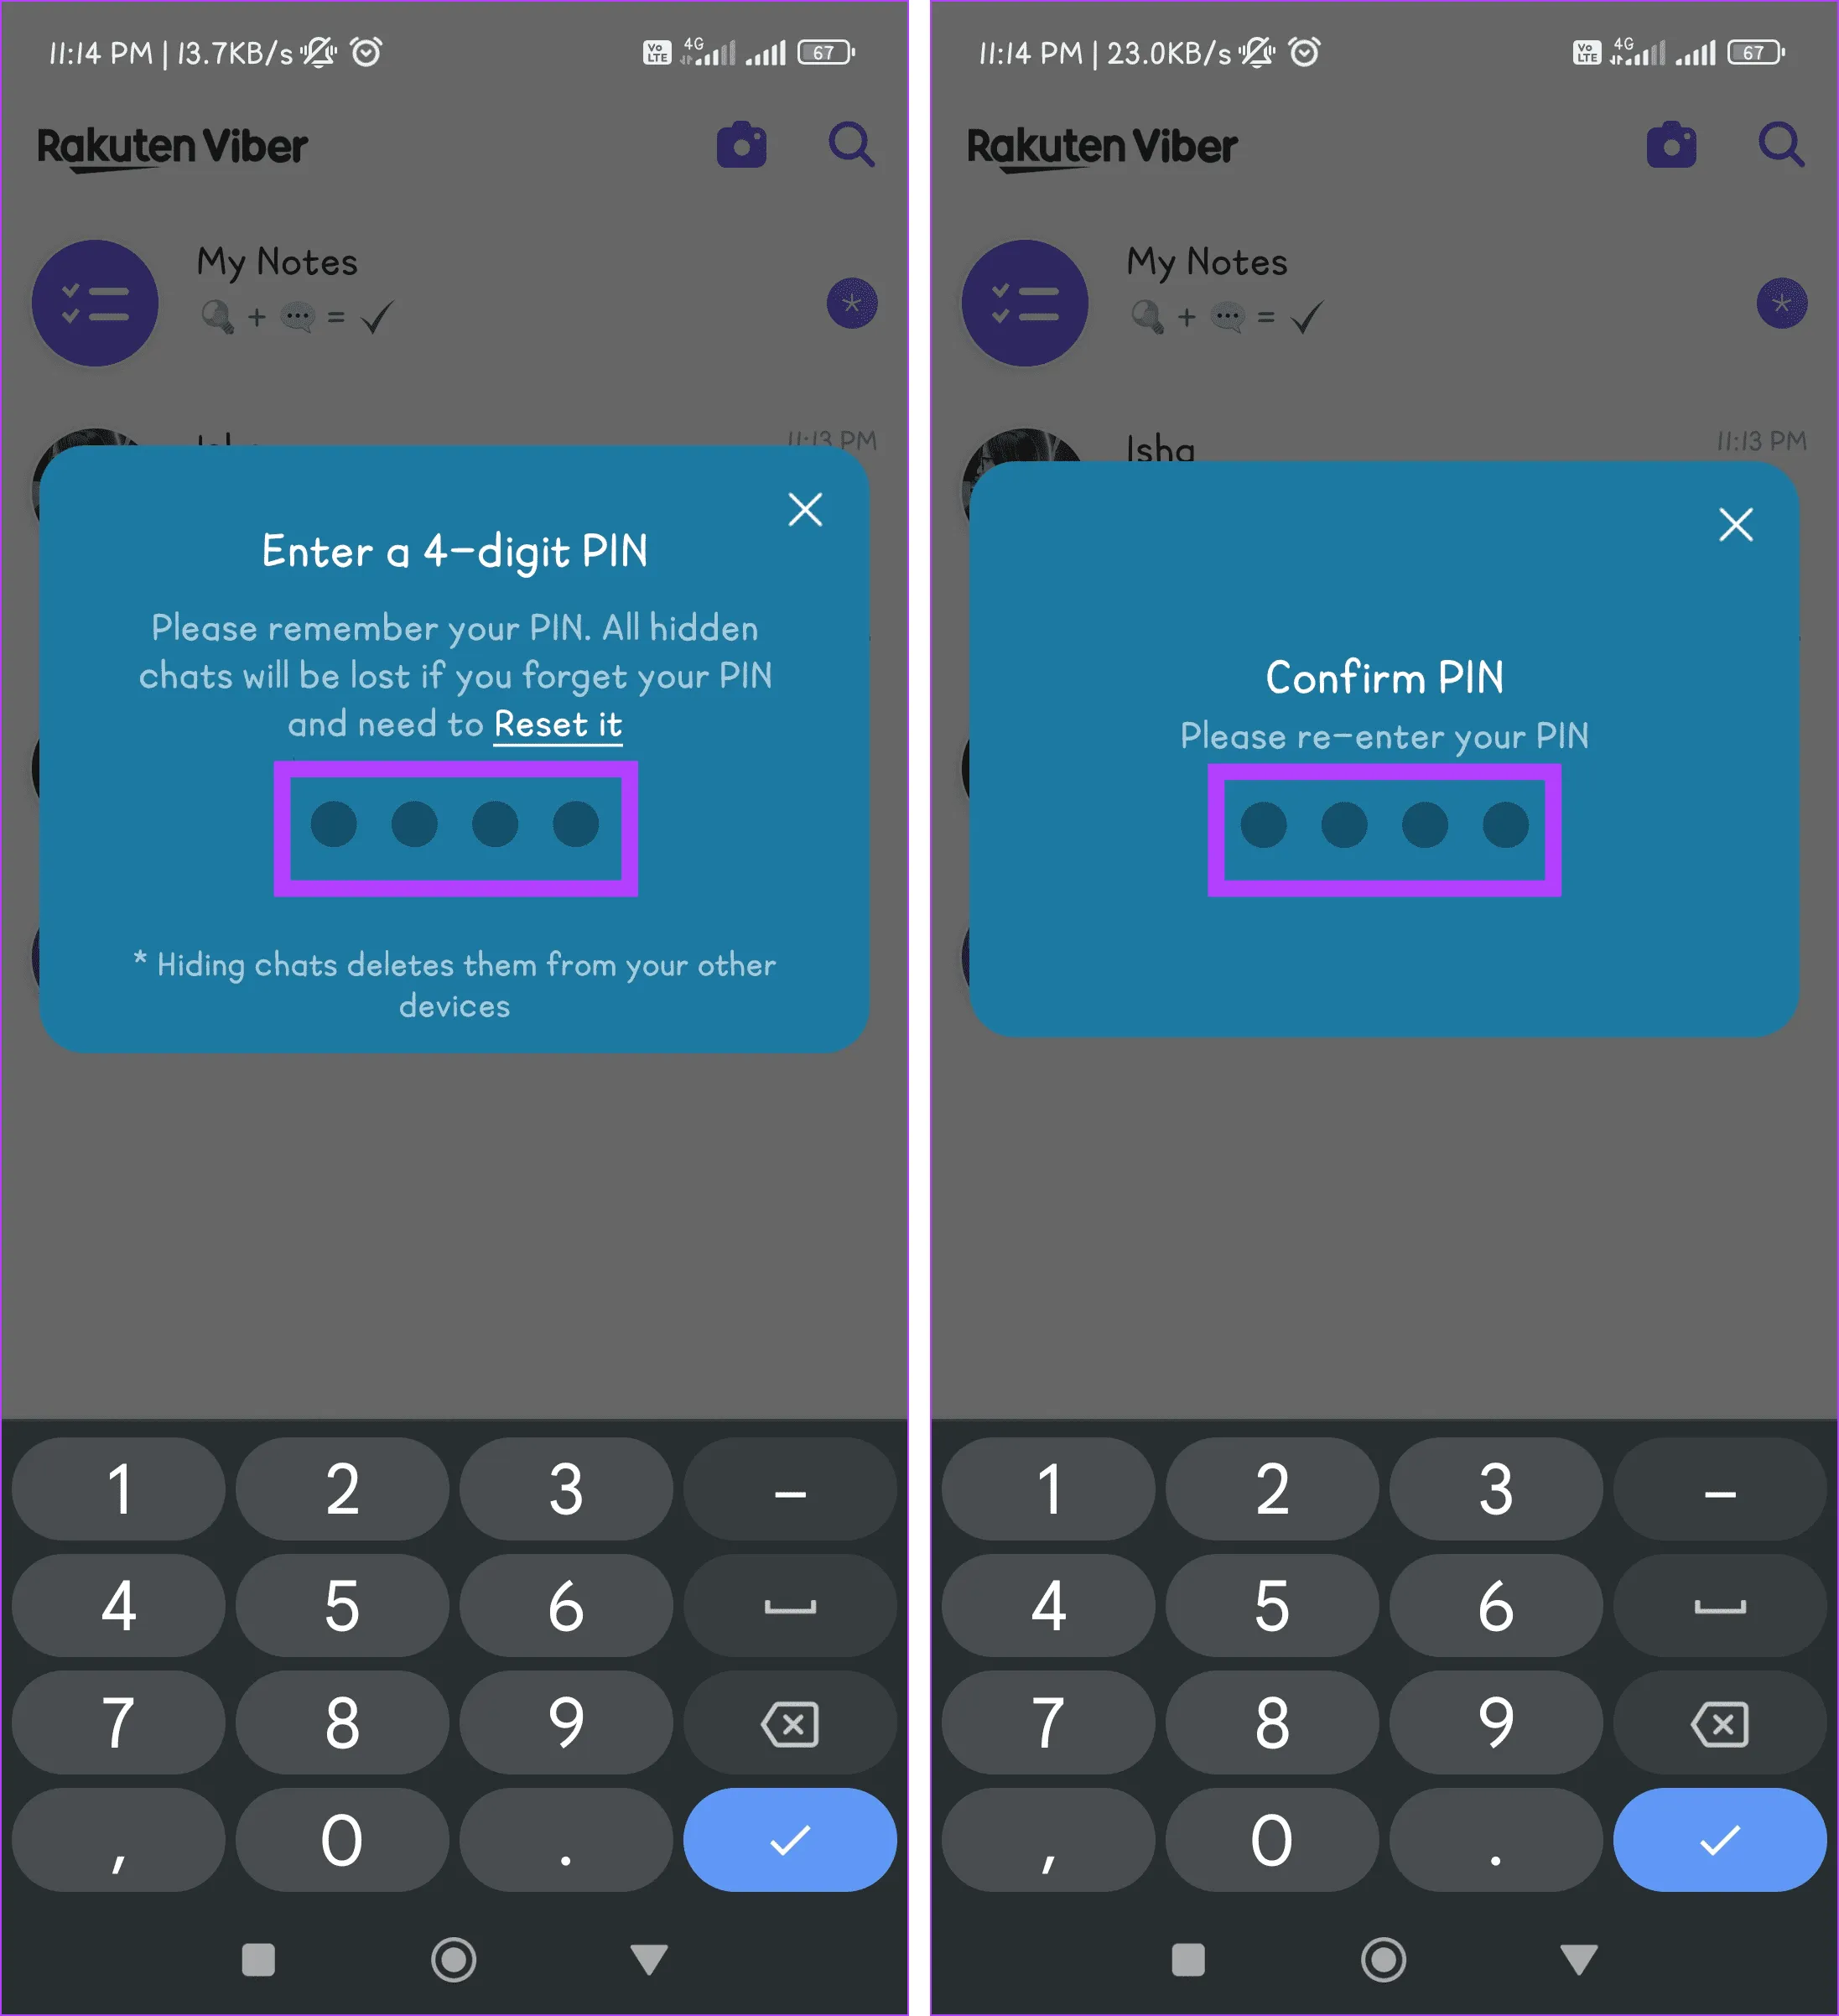
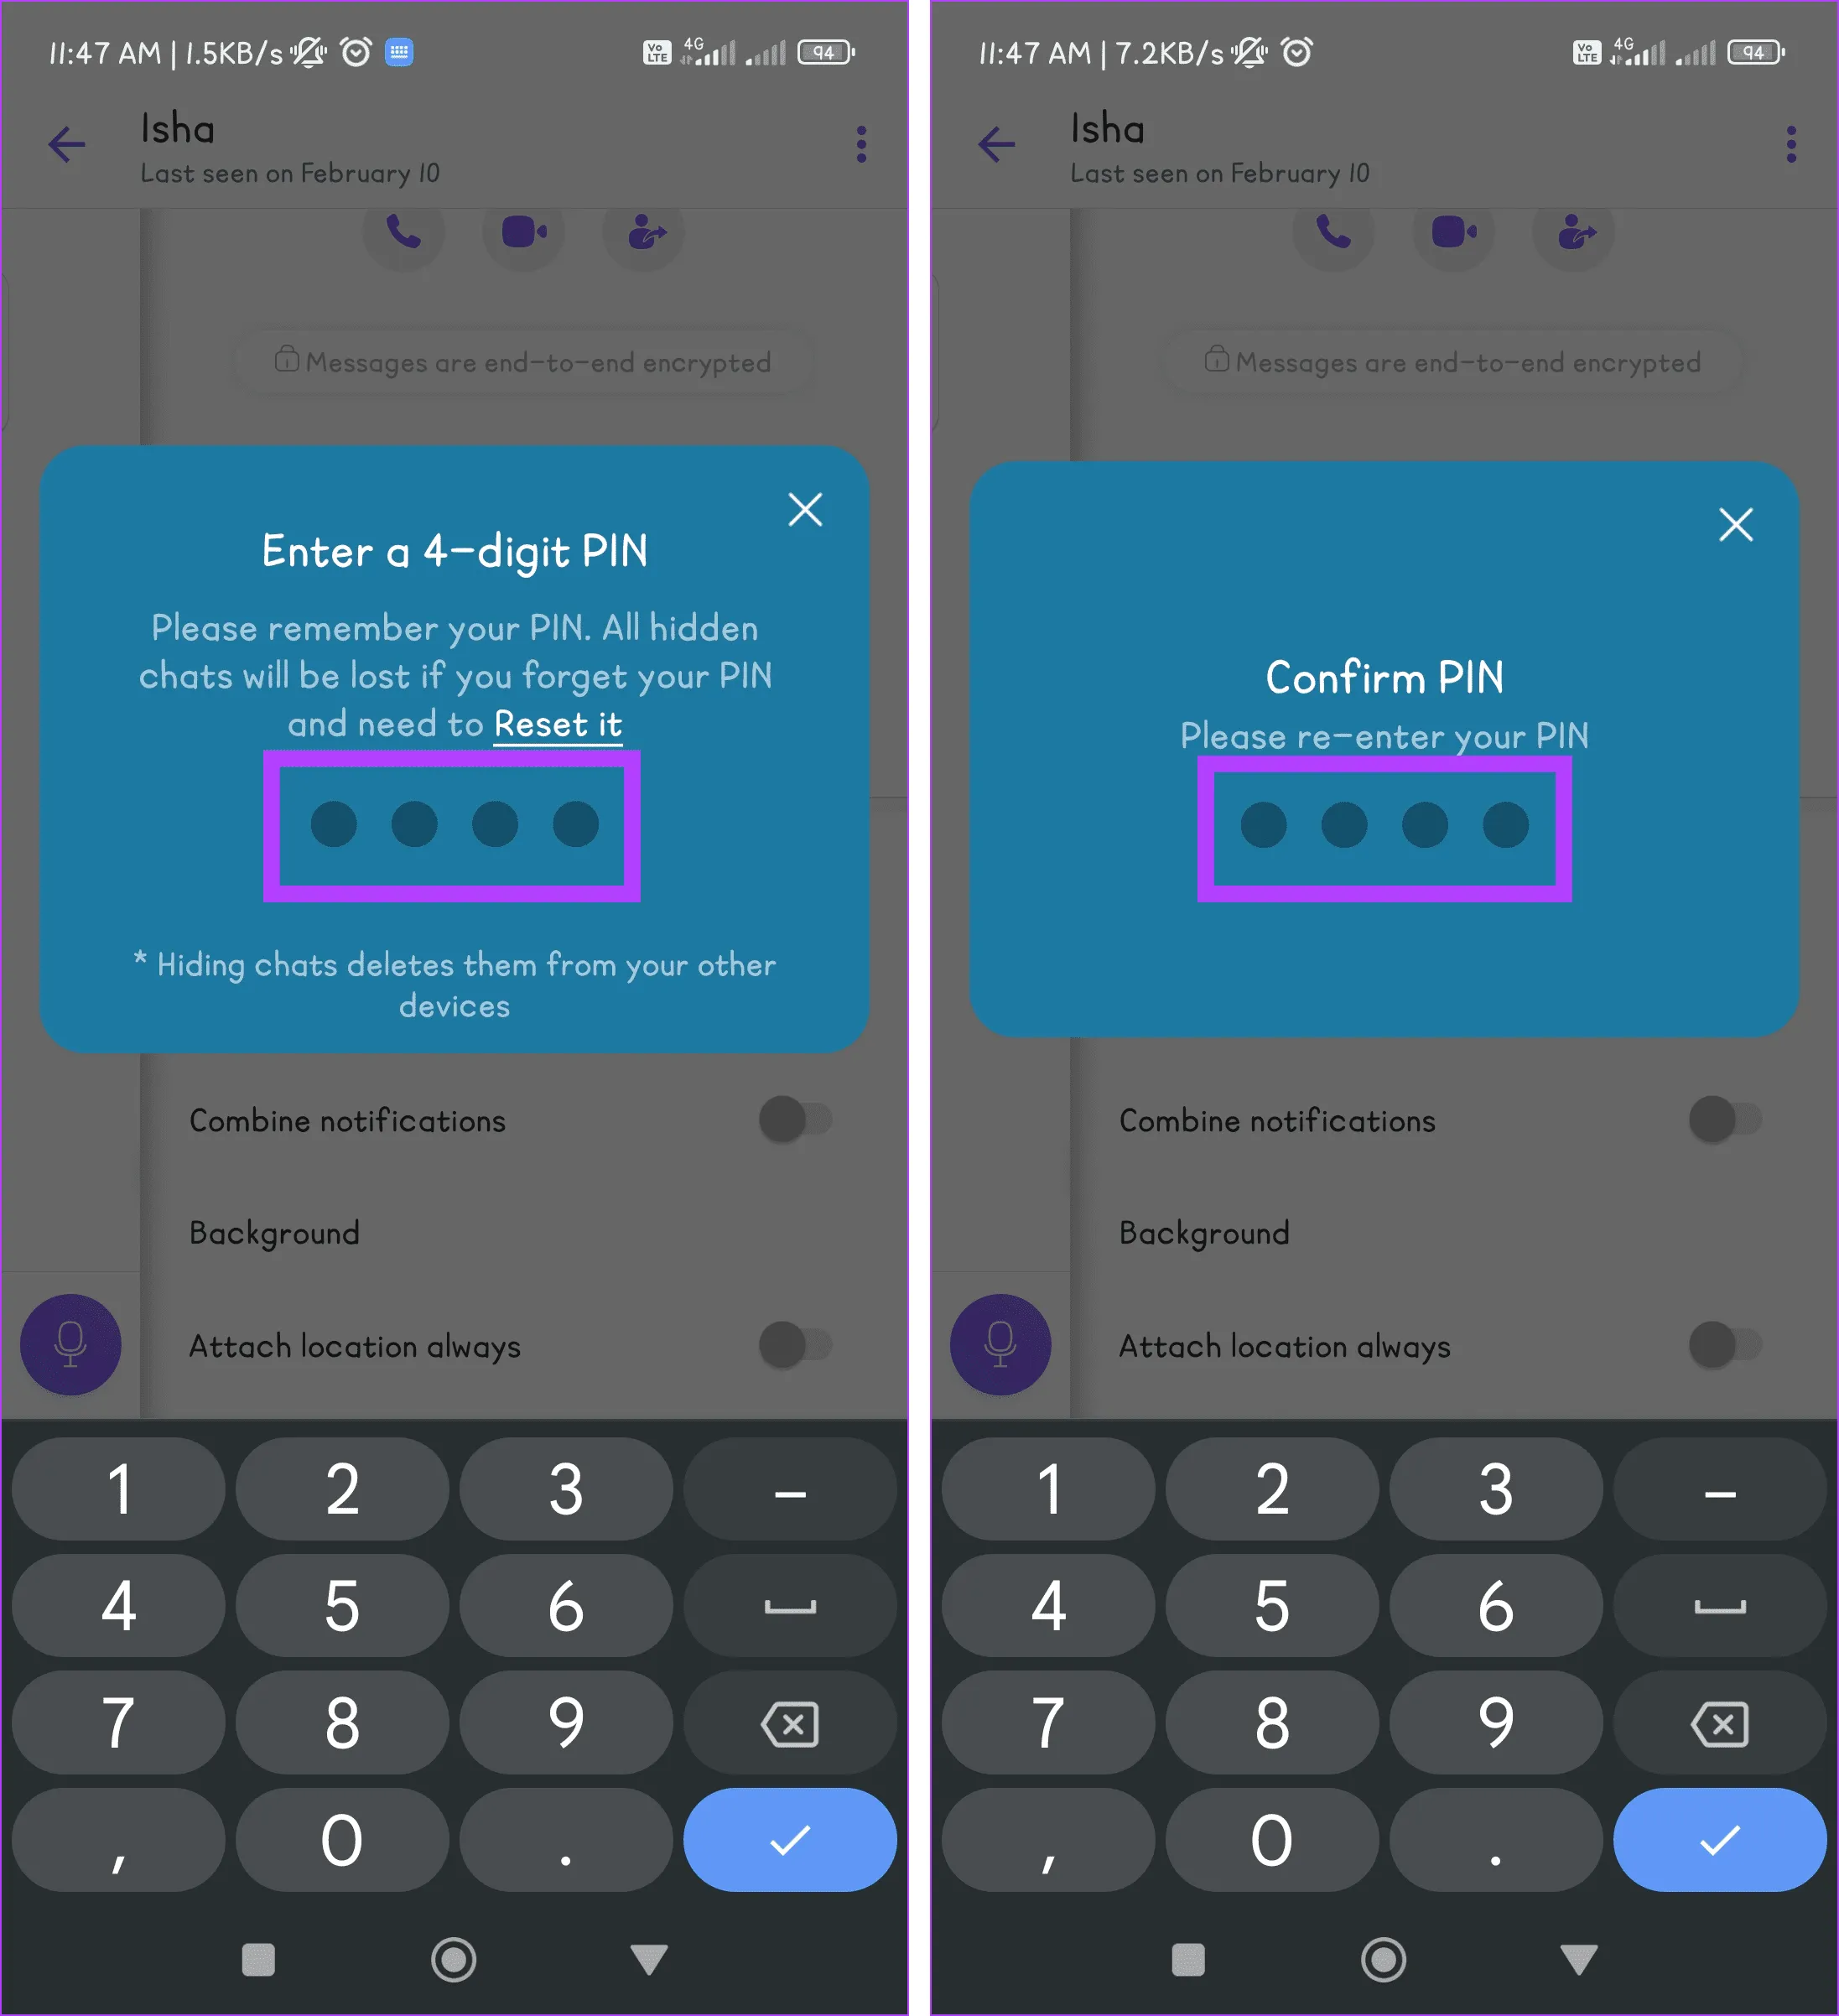
Шаг 3. Введите и подтвердите свой PIN-код, введя его еще раз.
Примечание. Вы также можете включить Face ID или Touch ID на iPhone.

2. Из всех контактов
Если вы не можете найти чат, который хотите скрыть, это также можно сделать в разделе «Все контакты». Придерживайтесь следующих простых шагов:
Шаг 1. Перейдите в приложение Viber и коснитесь значка «Чаты».

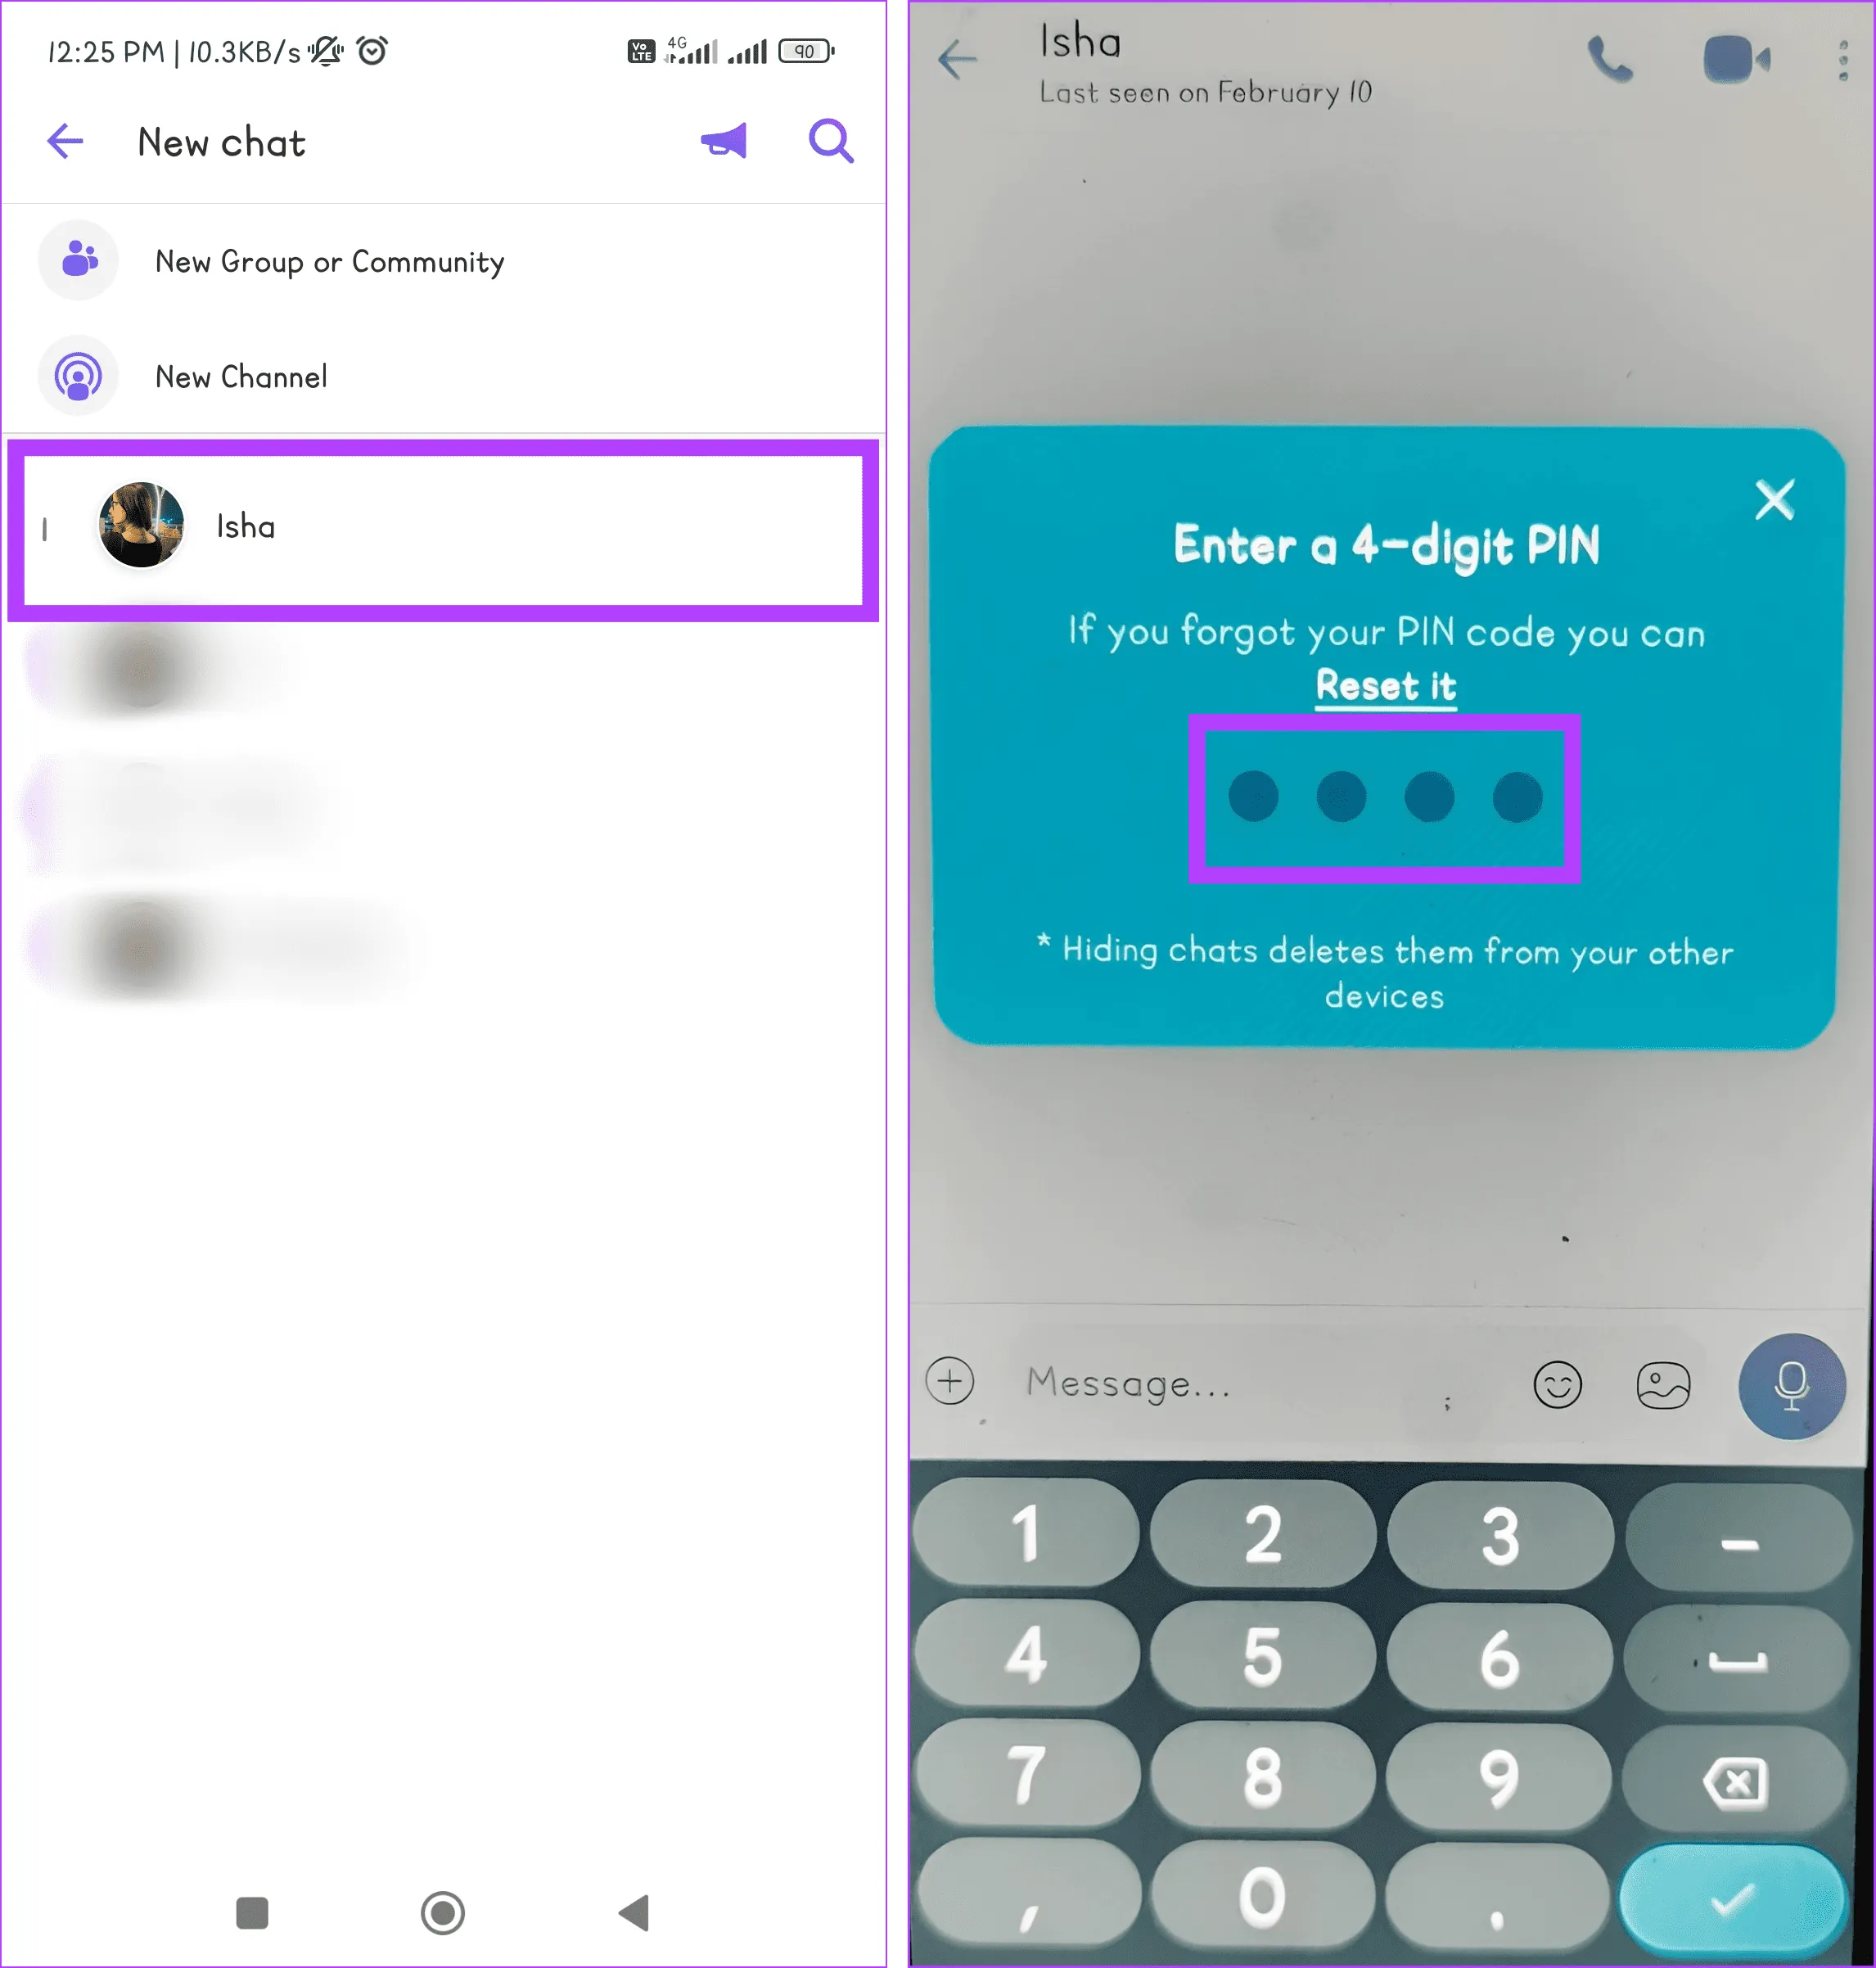
Шаг 2. Нажмите значок «Поиск», введите имя пользователя и коснитесь карточки контакта, чтобы открыть чат.

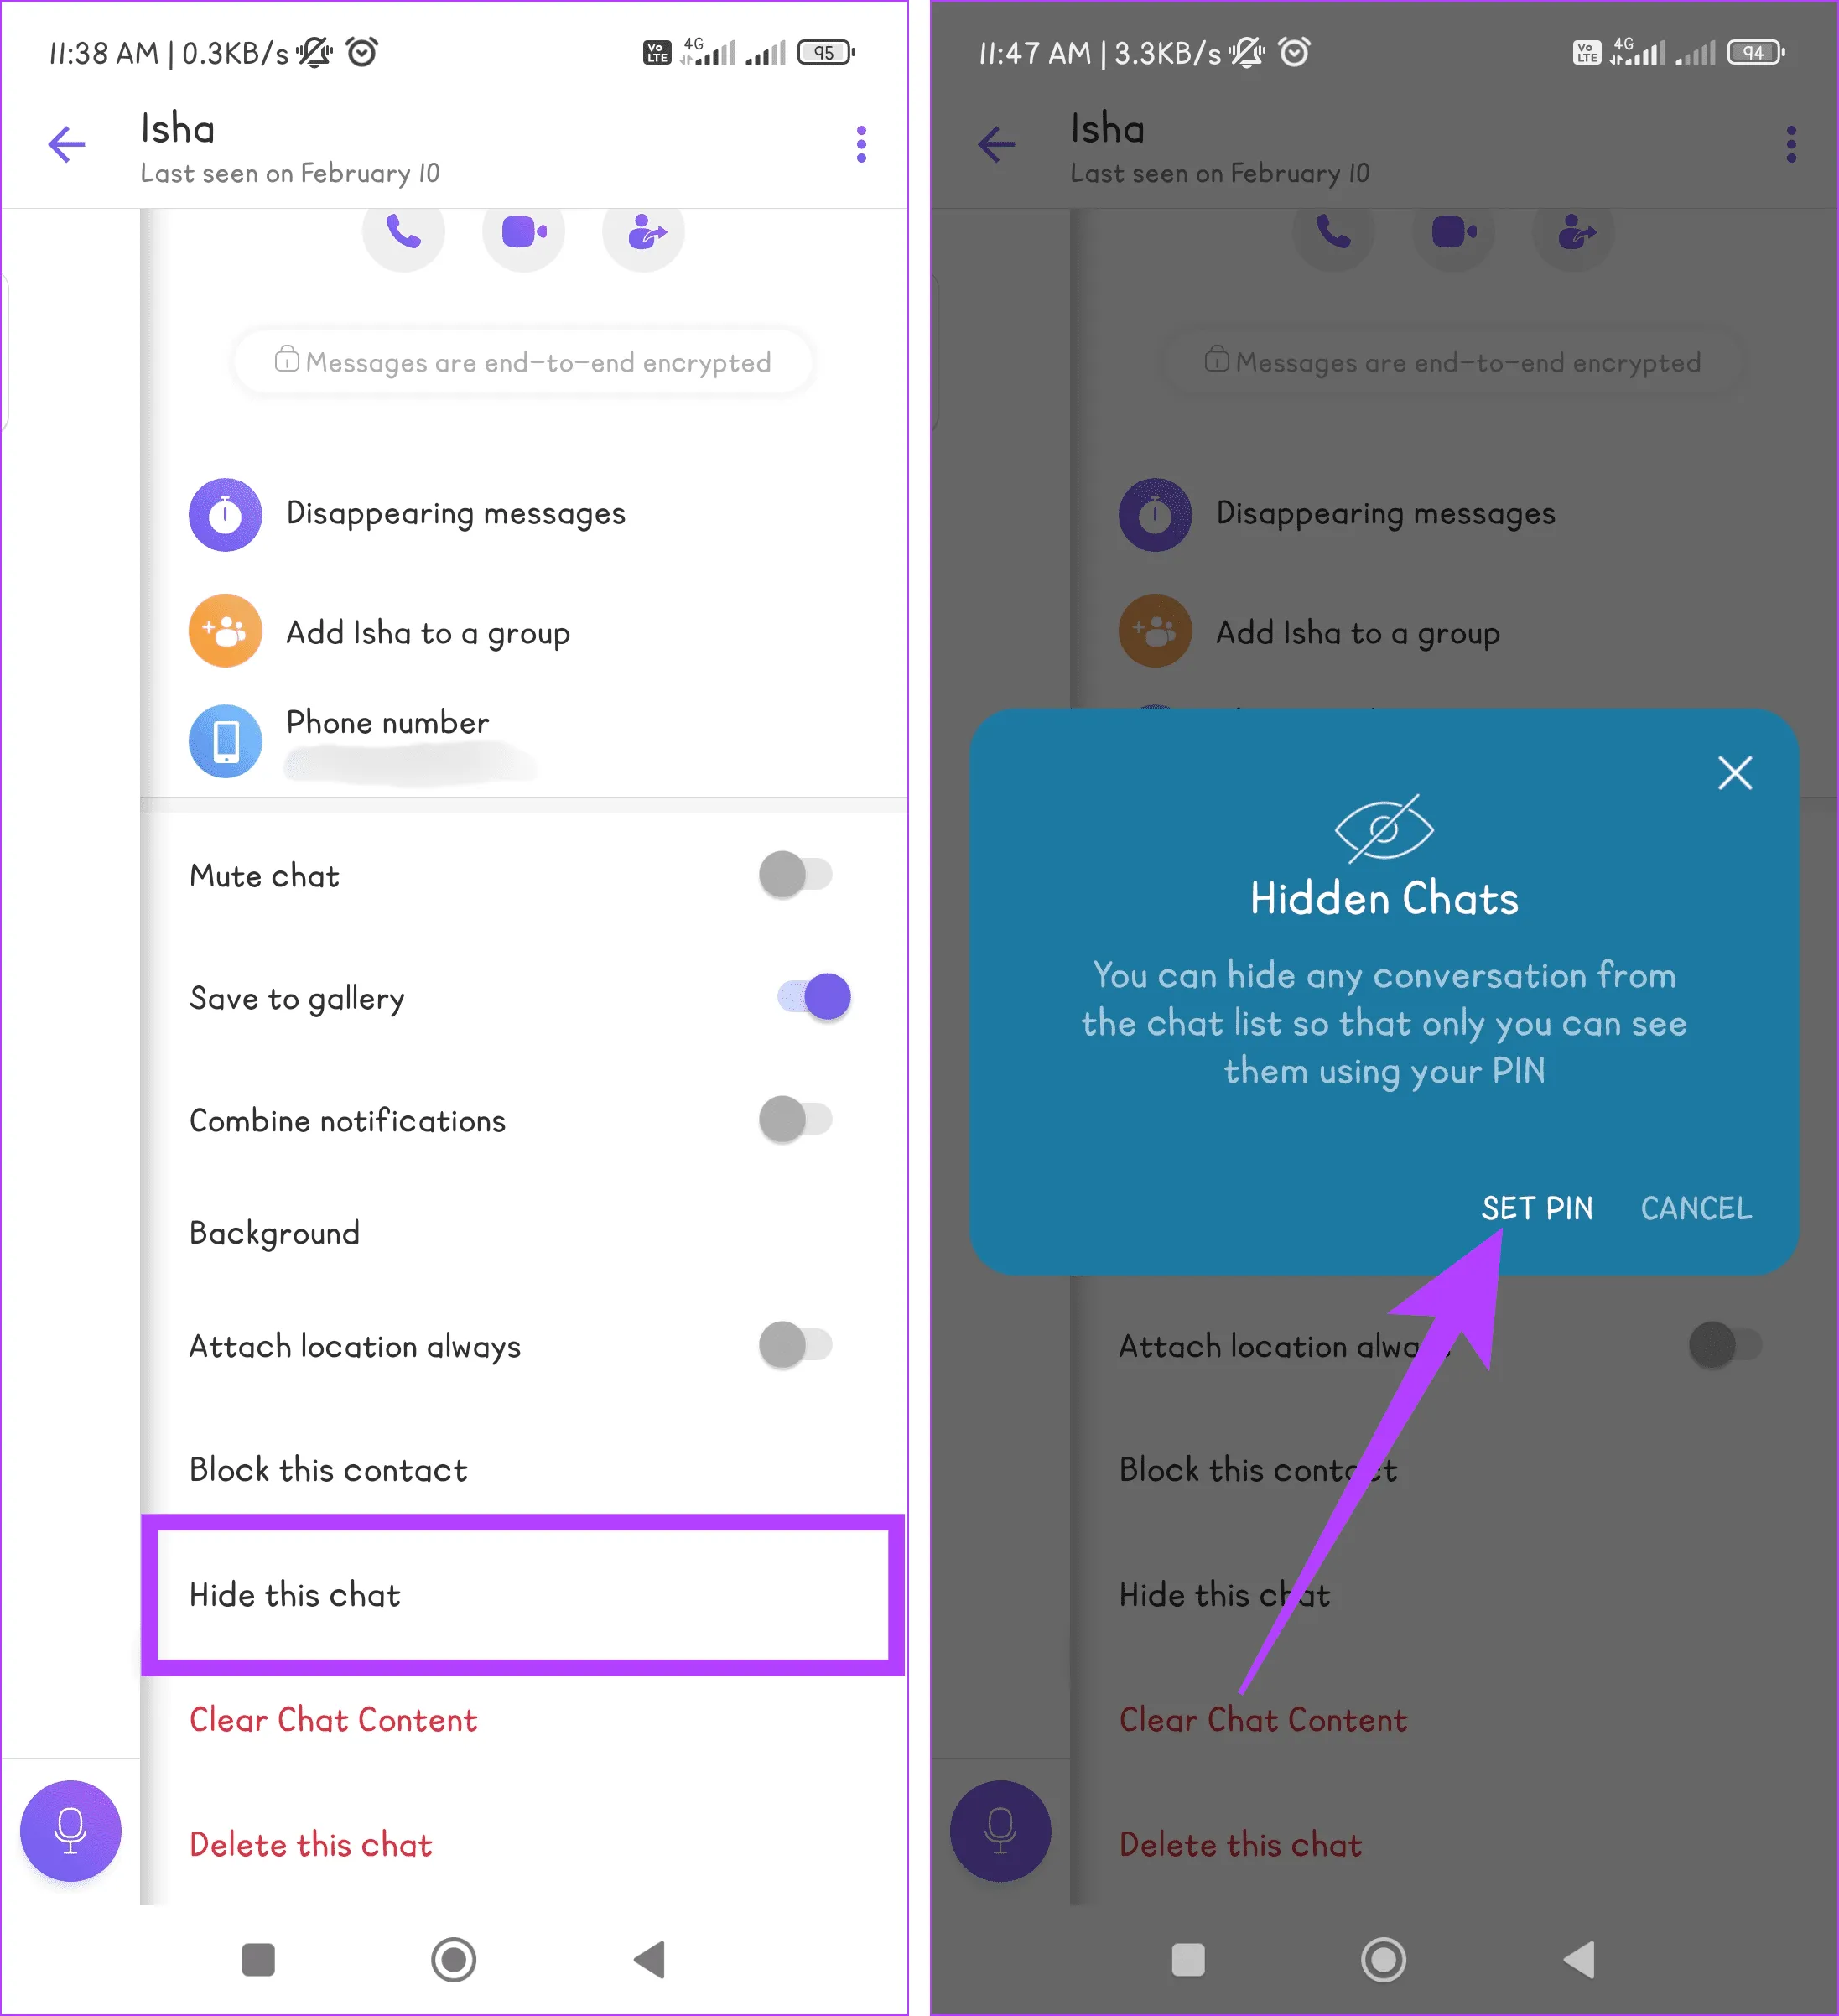
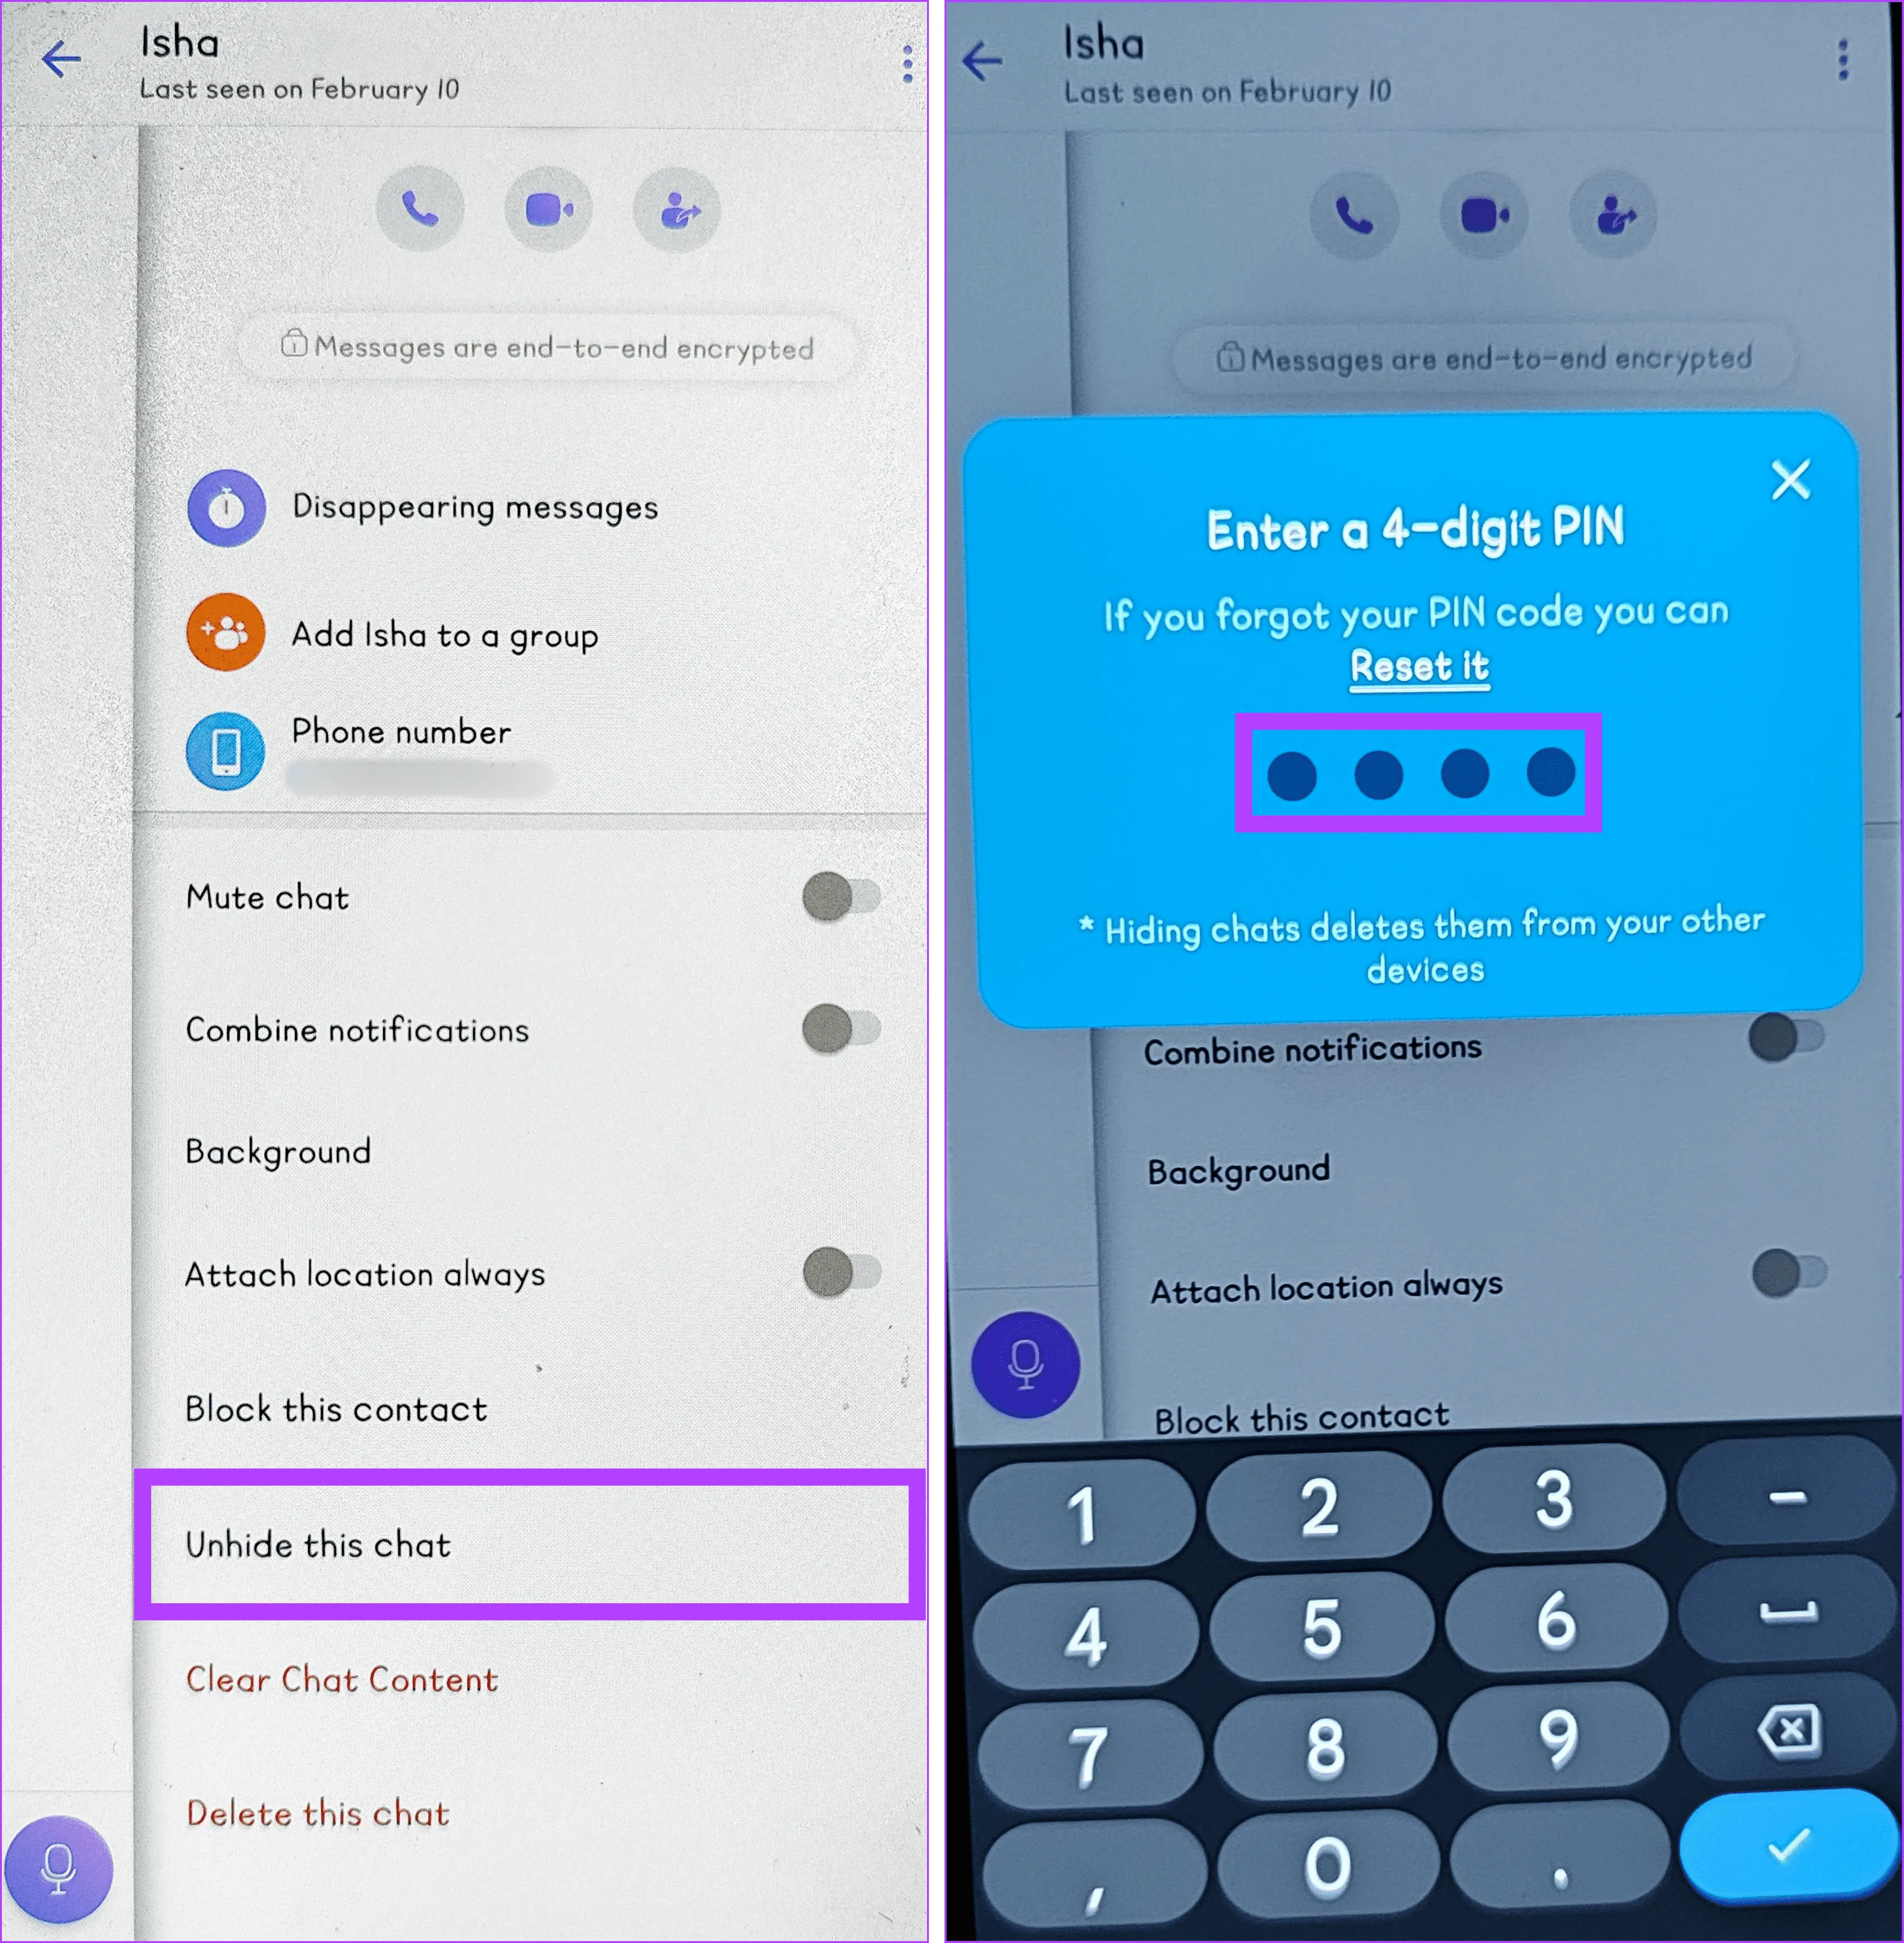
Шаг 3. Нажмите трехточечный значок и выберите «Информация о чате».

Шаг 4. Прокрутите вниз и выберите «Скрыть этот чат». Нажмите «Установить PIN-код», когда будет предложено.

Шаг 5. Введите четырехзначный PIN-код и повторите его для подтверждения.

Как увидеть скрытые сообщения в Viber
Если вы используете приложения для обмена сообщениями, такие как Viber, и заботитесь о конфиденциальности, возможно, вам захочется увидеть скрытые чаты. Чтобы выявить эти скрытые разговоры в Viber, следуйте методам, описанным ниже:
1. С экрана чата
Экран чата в Viber таит в себе больше секретов, чем вы думаете. Одним из них является то, что он позволяет вам видеть скрытые чаты. Выполните следующие действия, чтобы проверить скрытые тексты:
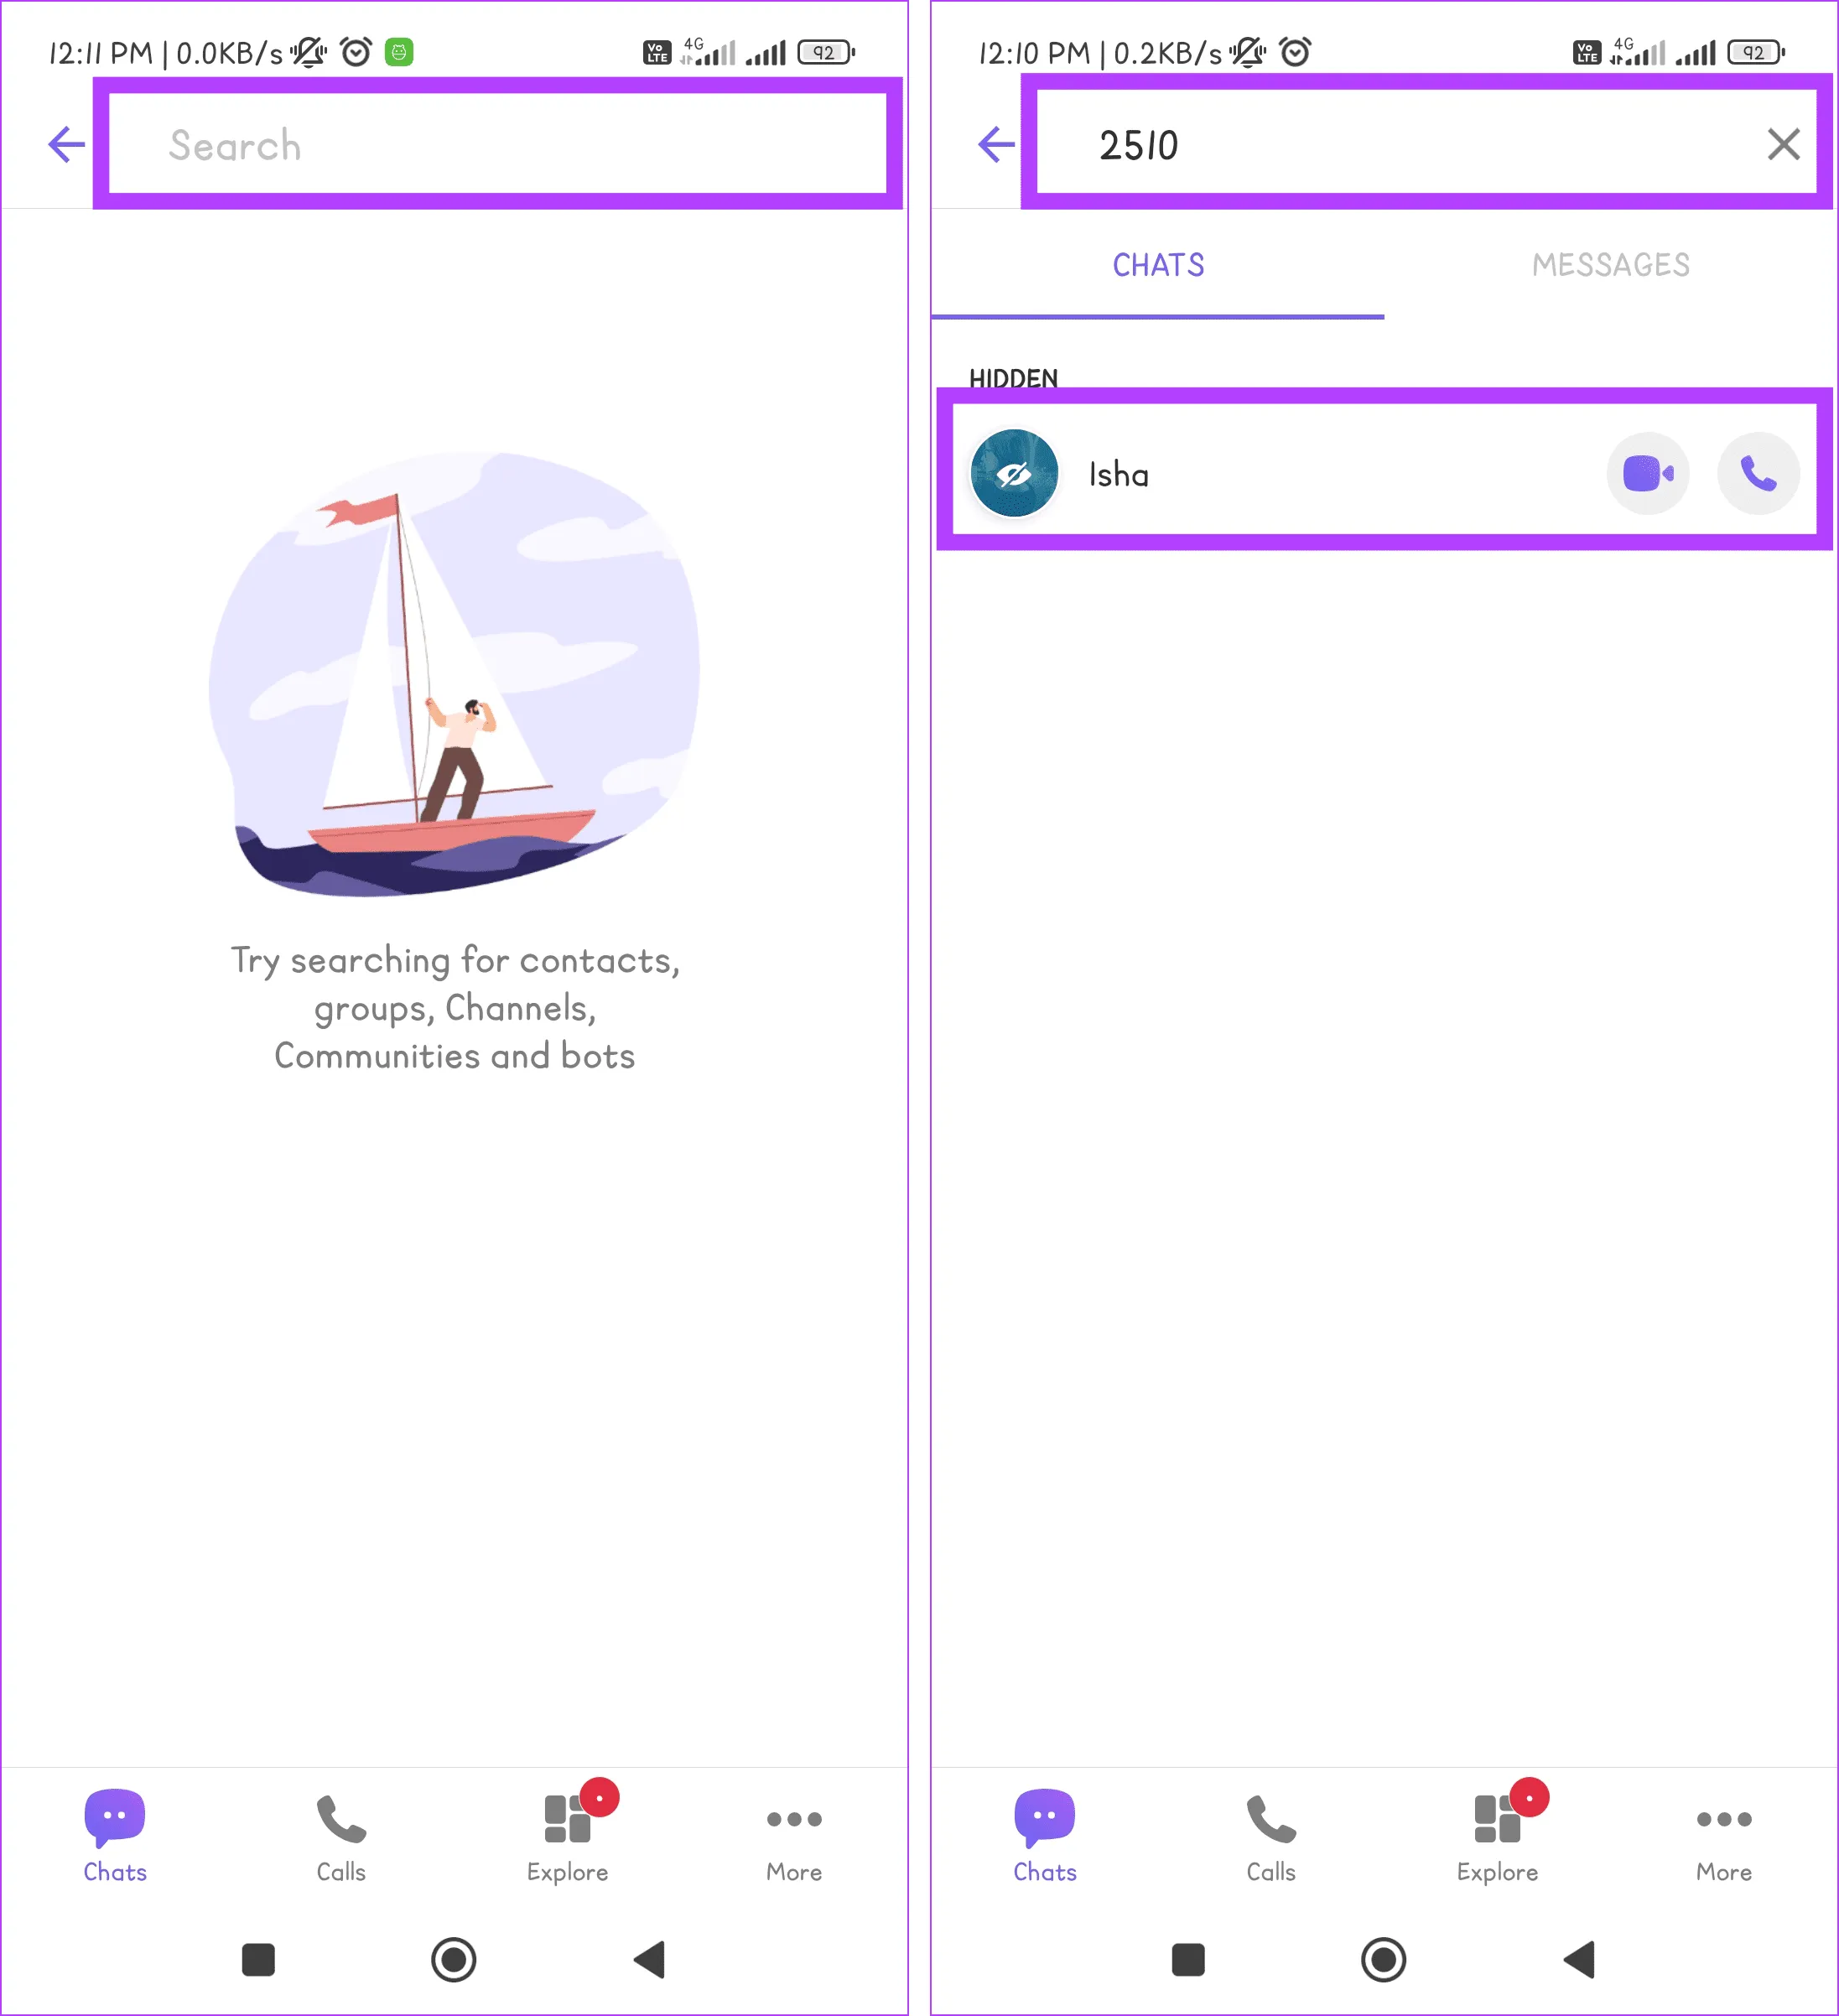
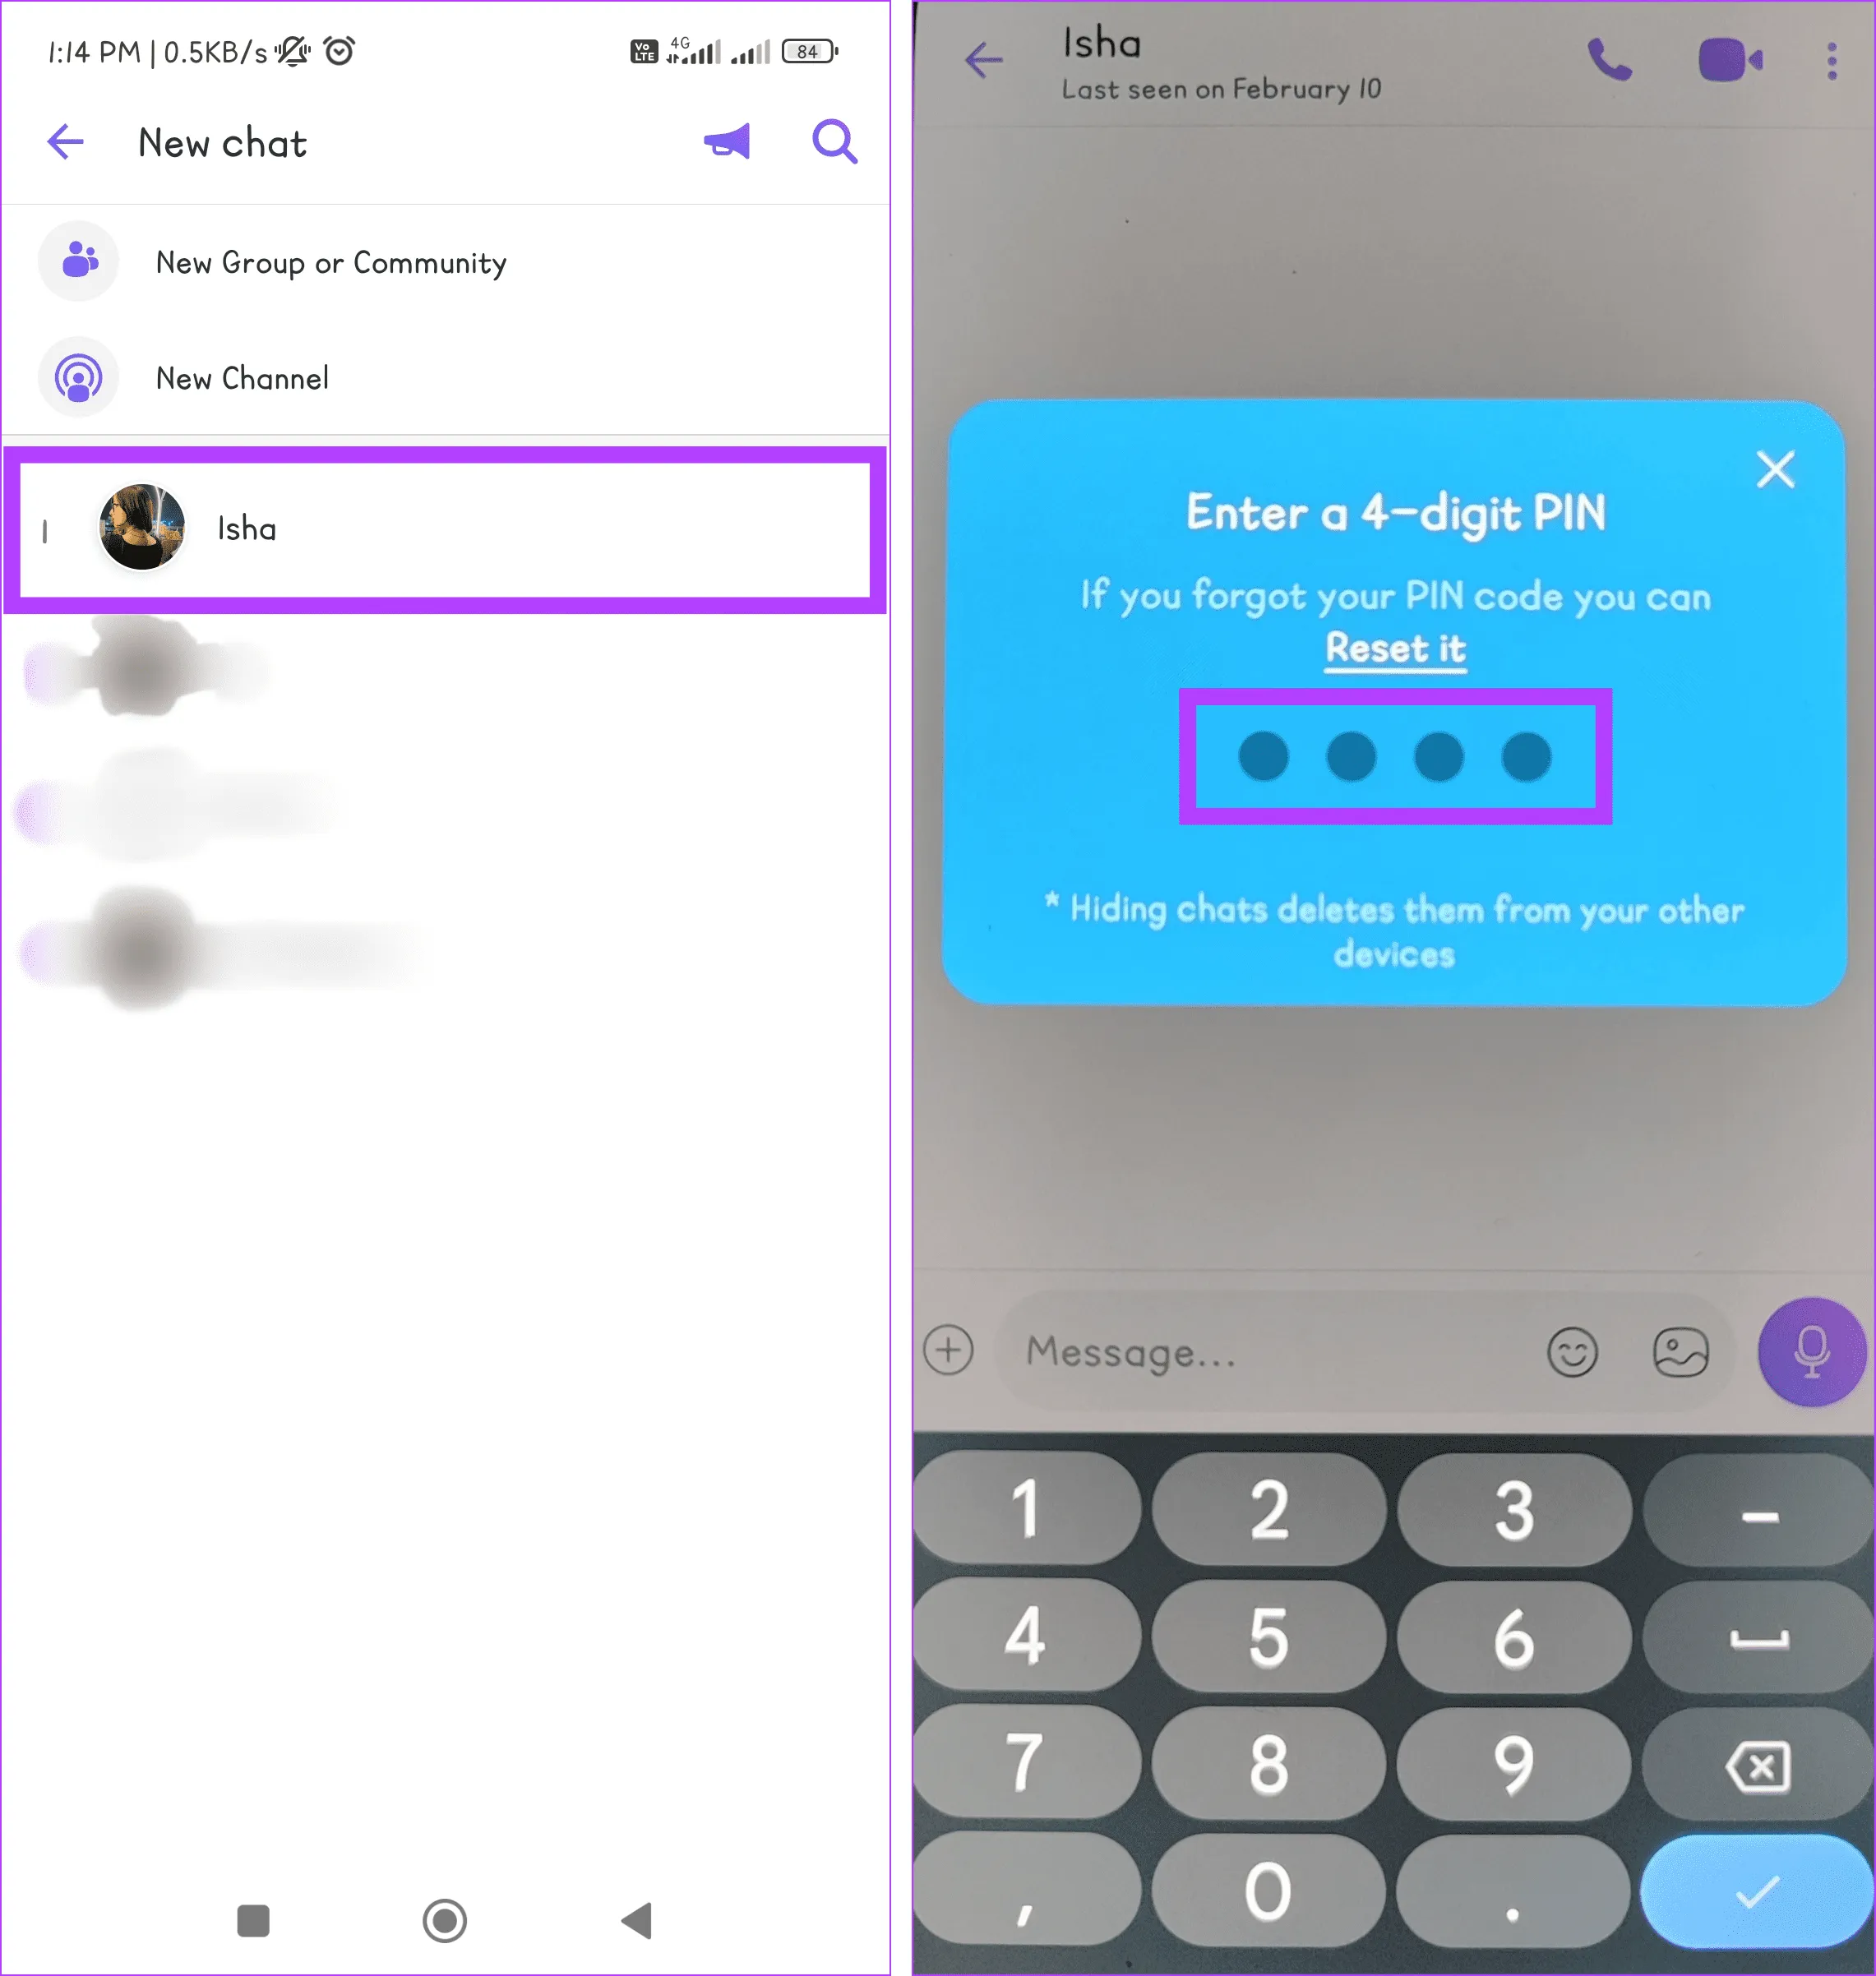
Шаг 1. Откройте приложение Viber на своем устройстве и коснитесь значка поиска.

Шаг 2. Введите 4-значный PIN-код и нажмите на скрытый чат, который вы хотите просмотреть.

2. Из всех контактов
Еще один способ проверить скрытые чаты в Viber — через раздел «Все контакты». Вот как это делается:
Шаг 1. Запустите приложение Viber и коснитесь значка чата.

Шаг 2. Найдите пользователя со скрытым чатом. Нажмите на карточку контакта и при появлении запроса введите четырехзначный цифровой PIN-код.

Как показать чаты Viber
Хотя сокрытие чатов Viber обеспечивает уровень конфиденциальности, может наступить момент, когда вы захотите вернуться к этим спрятанным разговорам. Этот процесс удивительно прост. Следуйте инструкциям:
Примечание. Вы можете сбросить свой PIN-код, если когда-нибудь забудете его, но при этом ваши скрытые разговоры будут удалены навсегда.
1. С экрана чата
Вы можете использовать экран чата в приложении Viber, чтобы мгновенно отобразить чаты Viber. Выполните следующие действия:
Шаг 1. Перейдите в приложение Viber на своем устройстве и коснитесь значка «Поиск».

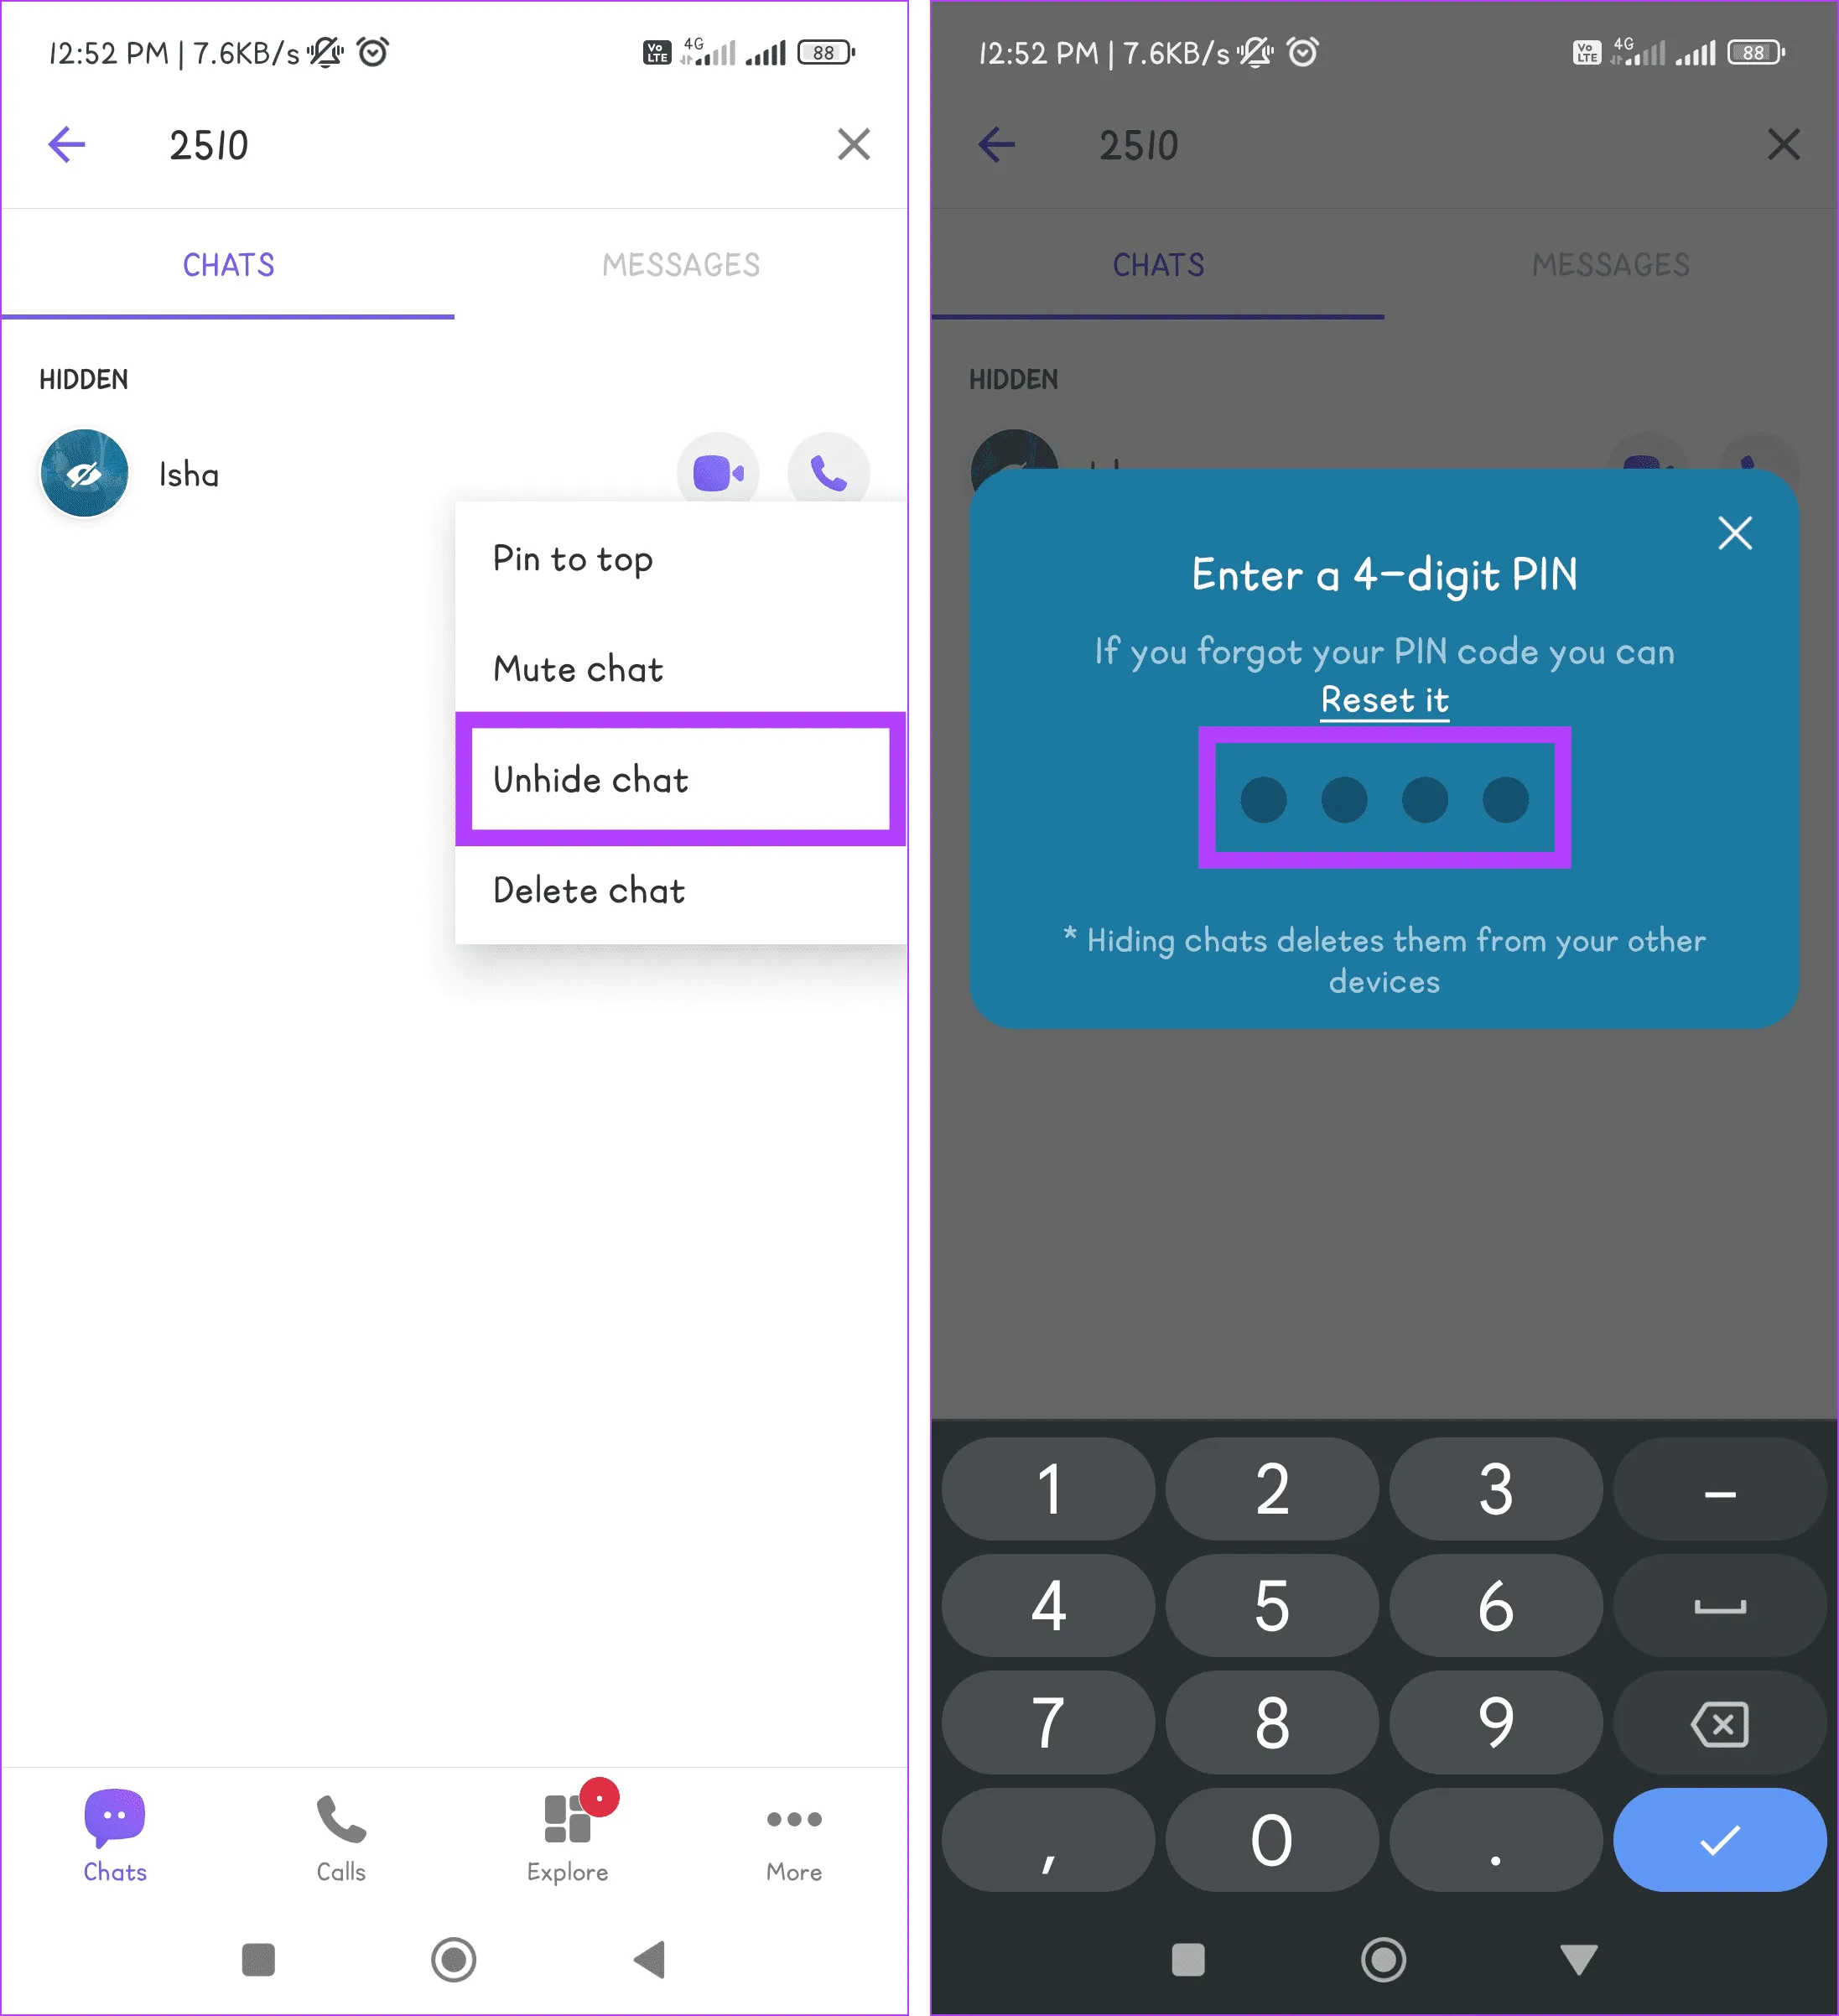
Шаг 2: Введите 4-значный PIN-код. Нажмите и удерживайте чат, который хотите отобразить.
Шаг 3. Выберите «Показать чат» в списке опций и введите свой PIN-код.

2. Из всех контактов
Если вы ищете более традиционный способ отображения чатов в Viber, вам подойдет раздел «Все контакты». Следуйте инструкциям, чтобы узнать, как это делается:
Шаг 1. Откройте Viber на своем телефоне и коснитесь значка, похожего на пузырь чата.

Шаг 2. Найдите контакт, который хотите отобразить. Нажмите на карточку контакта этого человека и введите свой 4-значный PIN-код.

Шаг 3. Коснитесь значка с тремя точками и выберите «Информация о чате».

Шаг 8. Прокрутите вниз и нажмите «Показать этот чат». Наконец, введите свой PIN-код еще раз для подтверждения.

Часто задаваемые вопросы о секретном чате Viber
1. Получаю ли я уведомления о скрытых беседах в Viber?
Нет, когда вы скрываете разговор в Viber, это означает, что чат заархивирован и не появится в вашем основном списке чатов. В результате вы не будете получать уведомления о сообщениях в скрытых беседах. Однако вы по-прежнему можете получить доступ к этим беседам и просмотреть их в любое время.
2. Могу ли я скрыть чаты Viber в настольном приложении?
К сожалению, настольное приложение Viber не позволяет скрывать чат на момент написания этого руководства.
Чаты Viber защищены
Как только вы научитесь скрывать и показывать чаты Viber на мобильном телефоне, вы сможете быть уверены, что находитесь за рулем. Вы можете не только навести порядок в своем списке чатов, но и получить возможность защитить свою конфиденциальность и восстановить разговоры, когда это необходимо. Вам нравится этот простой, но полезный способ персонализировать Viber? Дайте нам знать в комментариях ниже.
2024-03-10T09:56:01
Вопросы читателей
