Небольшую, но достаточно интересную фичу добавила Microsoft в очередную инсайдерскую сборку Windows 11 Build 22635.3640. На этот раз изменения затронули дизайн и структуру главного «домашнего» раздела – в нем теперь будет не две, а три отдельных вкладки «Недавние», «Избранное» и «Общий доступ», которой не было в предыдущих сборках операционной системы. Читать
Архив метки: Windows
Как в Windows 11 включить показ кнопки копирования файлов в диалоговом окошке «Поделиться»
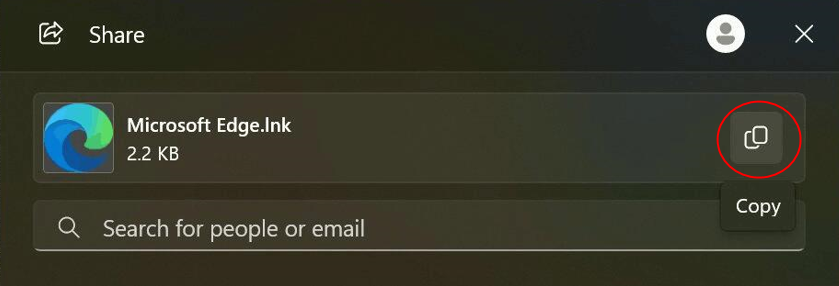
Традиционно продолжая следить за ключевыми изменениями в функционале Windows 11, сегодня мы рассмотрим еще одно небольшое улучшение – на этот раз в функционале диалогового меню «Поделиться». В сборке 22635.3575 Microsoft добавила небольшую опцию, позволяющую копировать файл, которым собирается поделиться пользователь, в буфер обмена. Кнопка быстрого копирования размещается справа от названия файла, но не у всех инсайдеров.
Not-a-Virus:HEUR.AdWare — Что это за угроза в Касперском?
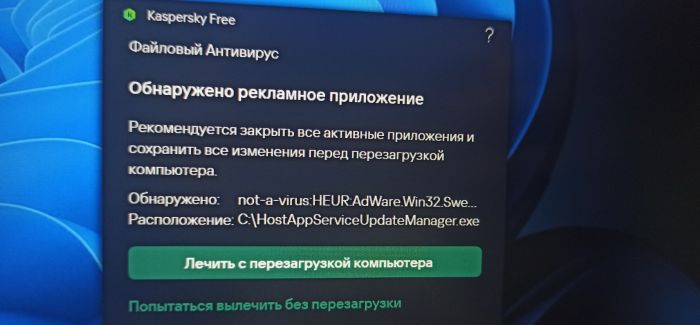
Not a Virus HEUR AdWare — Это не вирус, а рекламное ПО, которое определяется антивирусным продуктом Kaspersky Internet Security при эвристическом анализе. Читать
Как в Windows 11 включить постоянное использование Num Lock
Если вам приходится часто и подолгу работать с цифрами, наверняка вы используете на клавиатуре цифровой блок, включая его каждый раз нажатием клавиши Num Lock. Усилий это не требует никаких, но, возможно, было бы лучше сделать эту клавишу включенной по умолчанию. Мы уже рассматривали способ постоянного включения Num Lock в Windows 10, сегодня давайте посмотрим, как это можно сделать в Windows 11. Читать
Group Policy inaccessible
Столкнулся с неожиданной и неочевидной проблемой с применением групповых политик в Windows Server 2008 R2. Сервер настраивал давно, на момент настройки все работало. С тех пор ничего не менялось, но некоторые политики перестали применяться. Стал разбираться, с чем это связано.
Используемая лицензия AutoCAD недействительна
В данном руководстве разберем, что делать, когда возникает ошибка, что Используемая лицензия AutoCAD недействительна. Компанией Autodesk обнаружена недействительная лицензия, доступ к ней заблокирован. Читать