Если у вас два компьютера, то вам наверняка захочется соединить их между собой через сетевой кабель и тем самым создать небольшую локальную сеть, которую можно использовать для передачи файлов или совместных онлайн игр.
В данной статье вы можете ознакомиться с инструкцией, которая поможет реализовать эту идею. Статья будет актуальной как для компьютеров с Windows 7, так и для Windows 10. Читать →
MikroTik Router is popularly used in not only ISP network but also enterprise office network. So, network administrators of any company should learn how to maintain MikroTik router properly. A regular task of a network administrator is to store configuration file backup. Almost every network administrator takes configuration file backup manually. But MikroTik router provides an E-mail tool by which network administrators can automate configuration file backup regularly via email and can reduce his/her daily manual task easily. E-mail tool is not configured by default in MikroTik router. So, network administrators must configure E-mail tool as well as do some scripting for getting email backup service. In this article, I will show you how to configure MikroTik E-mail tool to get configuration file backup via email with a few steps.
Now we will configure MikroTik E-mail tool so that it can send configuration file backup via email. Complete configuration for storing backup and then sending via email can be divided into 3 steps.
Email configuration
Writing script for storing backup and sending Email
Creating scheduler for executing script regularly
Step 1: MikroTik Router Email Configuration
For sending email from MikroTik router, first we need to configure sender email. MikroTik does not have a SMTP server. For this, we have to provide SMTP server as well as username and password so that MikroTik router can send mail through that SMTP server. So, to setup SMTP server and username and password in your MikroTik router, follow my below steps carefully.
Go to Tools > Email and provide sender email information as below: Server: SMTP Server IP address (Use your mail server IP or try using this Gmail IP: 173.194.77.108) Port: SMTP Server Port (usually 25 or if you use Gmail SMTP, use 587) From: Put your email address which will indicate from address for the mail. User: Put email user name (first part of @ sign) or full email address if applicable. Password: Put your email password.
Alternatively, you can do below cmd:/tool e-mail set address=173.194.77.108 set port=587 set from=systemzonedotnet@gmail.com set user= systemzonedotnet set password=******* Where 173.194.77.108 is Gmail SMTP Server IP, systemzonedotnet@gmail.com is a test mail ID created for this article and “*******” is the password.
For checking email configuration, send a test mail from MikroTik with below cmd:/tool e-mail send to=sezan.sayeed@yahoo.com subject=”email test” body=”email test” tls=yes
If everything is OK, the test email will be sent to the receiver email address. Email configuration has been completed if you follow above steps carefully. Now we will write script for storing backup file and sending via mail.
Step 2: Script for storing backup file and sending via email
After completing email configuration, we will no write a script that will store backup file and then send the backup file to the desired mail address. Follow below steps to write script in your MikroTik router.
Go to System > Scripts and click on PLUS SIGN (+) to add new script. New Script window will appear.
Type your script name (for example, Mail Backup) in Name input box and then copy and paste the below code in source box. :log info “Mikrotik Backup JOB Started . . . “ :global backupfile configbackup :log info “Deleting old Backup File If available otherwise ignore & process further . . . “ /system backup save name=$backupfile :log info “Backup process pausing for 10s so it complete creating backup file” :delay 10s :log info “Start Sending Backup File via Email using GMAIL SMTP . . .” tool e-mailsend to=sezan.sayeed@yahoo.com subject=([/system clock get date] . ” MikroTik Backup”) body=”MikroTik email Backup” tls=yes file=$backupfile :delay 40s :log info “Backup Finished” :log info “Deleting Backup File. All Done.” /file remove $backupfile
Now click Apply and OK button for saving this script.
You can run this script manually by clicking Run Script button or typing this cmd: > system script run 0
Script for storing configuration backup file and sending the file via email is now ready. Now we will create a scheduler so that this script can be run regularly at a fixed time.
Step 3: Scheduler for Executing Script Regularly
We have created script for storing configuration and sending via mail. But the script cannot execute itself. So, we have to create a scheduler that will execute the above script regularly at our desired time. For creating a scheduler in your MikroTik router, follow my below steps.
Go to System > Scheduler and click on PLUS SIGN (+) to add new scheduler.
Type scheduler name in Name input box and put script executing time in Start Time input box. For example, if you want to execute the script at 5:30 PM, put the time as 17:30:00.
Put sending time interval at Interval input field. For example, if you want to execute the script daily, put the value as 24:00:00
Now put your script name that you have provided at step 2(here, Mail Backup) in On Event box and then click Apply and OK button.
Scheduler is now ready. If everything is OK, MikroTik Router will send a mail regularly to the desired email address where configuration file should have attached.
You should follow the above steps one by one otherwise your desired result may not come. If you face difficulty to do above steps properly, please watch my video tutorial carefully about MikroTik Router Auto Backup via Email. I hope, it will reduce your confusion.
Note: This configuration has been done in MikroTik Router OS version 5.20. If you face any problem in upgraded version, please let me know. I will try to solve the problem.
MikroTik Router configuration file backup via email has been discussed in this article. I hope, you are now able to configure your MikroTik Router for sending configuration file backup via email. If you face any problem, feel free to discuss in comment or contact with from Contact page. I will try my best to stay with you.
VPN (Virtual Private Network) is a technology that extends private network across a public network. It enables private network users to send and receive data across public network as if their network devices were directly connected to the private network.
MikroTik Router provides a lot of VPN services. Among them, MikroTik PPTP is the mostly used VPN service. It is a client-server VPN. So, a user can access server, printer, IP phone and any other network devices of any private network across public network using MikroTik PPTP. For example, if you are a system administrator or an employee of an office and you need to access your office server, printer or any network devices while you are outside of your office, MikroTik PPTP will be a better solution for you.
MikroTik PPTP service can be applied in two methods.
Connecting remote workstations/clients (VPN between routers and PPTP clients, almost all OSs including Windows)
In this article, I will show how to configure MikroTik PPTP service that will be able to connect a remote workstation (any Operating System including Windows) across public network and the remote workstation will be able to get access to local network as if the workstation was directly connected to the local network.
Network Diagram
To configure a MikroTik PPTP service that will connect a remote workstation across public network, I am establishing a network like below diagram.
Client-server Network Topology
In this diagram, a MikroTik Router (say your office router) is connected to internet through ether1. Workstations are connected to ether2. Laptop is connected to the internet and can reach MikroTik Router’s public IP. After configuring PPTP Tunnel, the laptop will be able to connect to MikroTik local network as if it was directly connected to the local network.
IP Information for this configuration
MikroTik WAN IP: 172.22.15.221/24 (Must replace with your Public IP provided by your ISP)
MikroTik LAN Gateway: 192.168.20.1/24
Local Address for remote client: 192.168.20.1 (MikroTik LAN Interface IP)
Remote Address: 192.168.20.50 (IP address that will be assigned to remote client)
MiroTik VPN Configuration with PPTP
VPN configuration in MikroTik router with PPTP service can be divided into two parts.
Part 1: MikroTik router basic configuration
Part 2: PPTP server configuration
Part 1: MikroTik Router Basic Configuration
In the first part, we will complete MikroTik Router basic configuration. Basic RouterOS configuration includes assigning WAN IP, LAN gateway IP, DNS IP, NAT configuration and default route configuration. The following steps will show how to do these topics in your RouterOS.
Login to MikroTik RouterOS using winbox and go to IP > Addresses. In Address List window, click on PLUS SIGN (+). In New Address window, put WAN IP address (172.22.15.221/24) in Address input field and choose WAN interface (ether1) from Interface dropdown menu and click on Apply and OK button. Click on PLUS SIGN again and put LAN IP (192.168.20.1/24) in Address input field and choose LAN interface (ether2) from Interface dropdown menu and click on Apply and OK button.
Go to IP > DNS and put DNS servers IP (8.8.8.8 or 8.8.4.4) in Servers input field and click on Apply and OK button.
Go to IP > Firewall and click on NAT tab and then click on PLUS SIGN (+). Under General tab, choose srcnat from Chain dropdown menu and click on Action tab and then choose masquerade from Action dropdown menu. Click on Apply and OK button.
Go to IP > Routes and click on PLUS SIGN (+). In New Route window, click on Gateway input field and put WAN Gateway address (172.22.15.1) in Gateway input field and click on Apply and OK button.
Basic RouterOS configuration has been completed. Now it is time to enable PPTP server in our MikroTik Router.
Part 2: PPTP Server Configuration in MikroTik Router
After completing MikroTik router basic configuration, you need to configure PPTP server in MikroTik Router. Complete PPTP server configuration in MikroTik router can be divided into four steps.
Enabling PPTP server
Creating PPP Secrets (Username and Password)
Enabling proxy-arp on LAN interface.
Creating PPTP interface
Step 1: Enabling PPTP Server in MikroTik Router
The first step to create PPTP Tunnel in MikroTik Router is to enable PPTP server. The following step will show how to enable PPTP server in your MikroTik Router.
Go to PPP menu item and click on PPTP Server button from PPP window.
Now click on enabled checkbox and then click Apply and OK button. PPTP server will be enabled.
Alternatively, you can do this cmd: > interface pptp-server server> set enabled=yes
And to show pptp-server status: > interface pptp-server server> print
Step 2: Creating PPP Secrets(username and password)
Now it is time to create a user who will be connected to pptp server. To create username and password, follow the below steps carefully.
Go to PPP > Secrets and click on PLUS SIGN (+).
Now put username and password in Name and Password input field. Choose Service=pptp, Profile=default, Local Address= 192.168.20.1 (Router interface IP), Remote Address= 192.168.20.50 (Local IP address that will be assigned to the remote client).
Click Apply and OK button. A PPTP user that means VPN user will be created now.
Alternatively, you can do this cmd: > ppp secret> add name=username service=pptp password=123 local-address=192.168.20.1 remote-address=192.168.20.50
To show secrets from cmd: > ppp secret> print
PPP user who will be connected from remote client machine has been created. At this point, if the user gets connected from the remote client machine and try to ping any workstation from the remote machine, the ping will time out because the remote client is unable to get ARPs from workstations. The solution is to set up proxy-arp on the LAN interface
Step 3: Enabling proxy-arp on LAN interface
The following steps will show how to enable proxy-arp on your LAN interface.
Click on Interfaces menu item and then click on interface tab.
Click twice on your LAN interface (ether2). Interface property window will appear.
Under General tab, choose proxy-arp from ARP dropdown menu.
Click Apply and OK button.
After enabling proxy-arp, the remote client can successfully reach all workstations in the local network behind the router.
Step 4: Creating PPTP Interface
You can optionally create PPTP interfaces. If you do not create PPTP interface manually, a PPTP interface will be created dynamically when a user will be connected. The following steps will show you how to create a PPTP interface for a specific user manually in MikroTik router.
Go to PPP > Interface and click on PLUS SIGN (+) and then choose PPTP Server option.
Put PPTP interface name in the Name field.
Put username for whom you are creating this interface in User input field.
Click on Apply and then OK button.
If you need to apply specific filter rule for a specific user, create this PPTP interface otherwise it is always better to allow creating PPTP interface dynamically.
PPTP Server is now ready to accept PPTP client. Now I will show how to create PPTP client in Windows Operating System.
PPTP Client Configuration
Almost all Operating Systems including Windows support PPTP client. In this article, I will show how to configure PPTP client in Windows 7 operating system. All other Windows versions follow almost the same procedure.
Go to Control Panel and choose View Items by Small icons and then click on the Network and Sharing Center item.
From Network and Sharing Center window, click on Setup a new connection or network
From Setup a New Connection or Network window, choose Connect to a workplace connection option and click on Next button.
Connect to a Workplace window will ask: How do you want to connect? Click on Use my Internet connection (VPN)
Now provide MikroTik Router’s WAN IP in Internet address input field and provide a name of your VPN in Destination name input field and then click on Create button. Your VPN network adapter will be created.
Again go to Network and Sharing Center window and click on Change adapter settings link. Your newly created VPN adapter will be found here.
Click mouse right button and click Connect option.
Now provide PPTP user’s username and password in Username and Password input field respectively and then click Connect button.
If everything is OK, you will be able to connect to your PPTP server and a PPTP Tunnel will be created between MikroTik Router and your remote client. Now try to ping and hope there will be no problem to get ping reply.
If you use other operating system than Windows, please search in Google how to create PPTP client at that specific operating system. I hope you will a get solution.
If you have any confusion to do above steps properly, please watch my below video carefully about MikroTik VPN configuration with PPTP. I hope, it will remove your any confusion about VPN in MikroTik Router with PPTP service.
MikroTik VPN configuration with PPTP has been discussed in this article. I hope, you are now able to configure a VPN tunnel with MikroTik PPTP. However, if you face any problem to configure a VPN network with MikroTik router, feel free to discuss in comment or contact with me from Contact page. I will try my best to stay with you.
Мне понадобилось использовать роутер mikrotik в качестве клиента openvpn с заменой шлюза по-умолчанию на сервер openvpn. Проще говоря мне нужно было скрыть весь трафик и направить его только через vpn сервер. В openvpn это реализуется очень просто, достаточно на сервере указать для конкретного пользователя параметр redirect-gateway def1. На клиенте под windows это без проблем работает. В микротике пришлось разбираться.
MikroTik is an excellent router for managing ISP or local ISP Bandwidth. For this, most of the ISPs are now using MikroTik router for managing their client bandwidth. There are various types of queue services in MikroTik router for managing internet bandwidth. Among them PCQ can specially be used for maintaining ISP or local ISP bandwidth. So, in this article I will show how to maintain ISP or local ISP Bandwidth with MikroTik PCQ service.
MikroTik PCQ Service
PCQ stands for Per Connection Queues. This service helps to maintain ISP or local ISP Bandwidth so easily. As a network administrator of any ISP company, you should manage various offered bandwidth packages like 512kbps connection, 1Mbps connection or 2Mbps connection for the clients. Managing these packages with MikroTik Simple Queues will be so hardy and time killing. But PCQ will be so helpful for managing these bandwidth packages because in PCQ service you will just create different PCQ profile according to your bandwidth packages and assign any PCQ profile to a network block. Then, every IP of this block will get equal bandwidth that you assigned in PCQ Profile. So, your MikroTik Queue configuration is just one time. You will map network block according to your offered bandwidth packages and then assign client IP according to their purchase bandwidth. The whole process will be shown in the rest of this article.
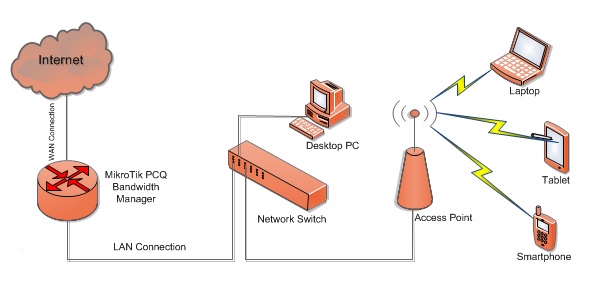
MikroTik PCQ Bandwidth Manager
Managing ISP Bandwidth with MikroTik PCQ Service
PCQ is a simple but effective and hassle free method for managing your ISP bandwidth. Say, you have three offered packages for your ISP clients. These are 512kbps connection, 1Mbps connection and 2Mbps connection. So, your proposed plan would be like below.
512kbps clients will get 192.168.10.0/24 block IP.
1Mbps clients will get 192.168.11.0/24 block IP and
2Mbps clients will get 192.168.12.0/24 block IP.
Now if a client purchases 512kbps connection, you will just assign him/her a 192.168.10.0/24 block IP or if a client purchases 1Mbps connection, you will assign him/her a 192.168.11.0/24 block IP. If you configure PCQ in your MikroTik router properly, every client of these blocks will get your assigned bandwidth because in PCQ service every client gets equal bandwidth that will be assigned for the whole block.
Complete PCQ configuration with MikroTik router can be divided into two steps.
MikroTik router basic configuration
MikroTik PCQ configuration
Step 1: MikroTik Router Basic Configuration
Before going to start MikroTik PCQ configuration, first we need to complete MikroTik router basic configuration. MikroTik basic configuration includes assigning WAN IP, LAN gateway IP, default gateway IP, DNS IP and NAT configuration. These basic steps were explained in my another article about MikroTik router basic configuration using winbox. If you are a new MikroTik user, spend some times to study that article and complete MikroTik router basic configuration and then follow the rest of this article to complete MikroTik PCQ configuration.
Step 2: MikroTik PCQ Configuration
After completing MikroTik router basic configuration, we will now configure MikroTik PCQ service for managing client bandwidth. MikroTik PCQ configuration can be divided into two steps.
Queue Types Configuration
Simple Queue Configuration
Queue Types Configuration
First we will configure/create Queue Types for our offered packages. Here we will define Upload and Download speed for our offered packages. So, follow my below steps to complete Queue Types configuration.
Login to your MikroTik Router and click on Queues menu. Now click on Queue Type tab and then click on PLUS SIGN (+) to add new Queue type. New Queue Type window will appear.
In this window, type 512kbps_Download or as you like in Type Name input box and select pcq from the Kind drop-down menu. This pcq will decide to assign rated bandwidth for all the clients who have this queue type. Now type 512k in Rate input box and check the Dst. Address checkbox from the Classifier panel and then Click Apply and then OK button.
Again click on PLUS SIGN (+) and type 512kbps _Upload in Type Name input box. Choose pcq from the Kind drop-down menu and type 512k in Rate input box and then check Src. Address from the Classifier panel and then click Apply and OK button.
Do step 2 and step 3 for 1Mbps connection and 2Mbps connection. Just change the Rate value 1M and 2M accordingly for these connections.
PCQ Queue types configuration has been completed. Now we will configure Simple Queue for these PCQ Queue types.
Simple Queues Configuration for PCQ Queue Types
After creating PCQ Queue Types, we will now declare different IP blocks that will get these PCQ Queue types. Follow my below steps to complete Simple Queue configuration for the PCQ Queue Types those you created before.
Click on Simple Queues tab and click PLUS SIGN (+) to add new simple queue. New Simple Queue window will appear now. In General tab, type 512kbps_Clients in Name input box or any text that you like and type 192.168.10.0/24 in Target input box. You can also define multiple IP blocks by clicking Add new value button located at right side of Target input box and typing new IP block.
Click on Advanced tab and choose 512kbps_Upload and 512kbps_Download from Queue Type drop-down menu. As you have assigned 512kbps Upload and Download for Queue Type of this simple queue, all the IPs in this IP block will get 512kbps speed separately. Now click Apply and then OK button.
Do step 1 and 2 for 1Mbps connection and 2Mbps connection. Just change Target address and Queue Type for these connections.
PCQ configuration in MikroTik Router for the proposed packages has been completed. Now assign your clients IP and check their bandwidth with free internet speed test tool. I hope you will get your desired result. However, if you face any problem to follow above steps, please watch the below video carefully about ISP or Local ISP Bandwidth Management with MikroTik PCQ.
ISP or local ISP Bandwidth Management with MikroTik PCQ has been described step by step in this article. Also a video tutorial has been uploaded to reduce any confusion on configuration. I hope you are now able to configure PCQ in your MikroTik router and able to maintain your client bandwidth without any hassles. However, if you face any problem to assign bandwidth to your ISP client with PCQ configuration, please discuss in comment or contact with me from Contact page. I will try my best to stay with you.
MikroTikis a popular and mostly used router because of having a lot of networking functionalities and cheap price. MikroTik router can be found both Router Board and MikroTik OS. If you buy a MikroTik Routerboard (like MikroTik Routerboard 450G, MikroTik Routerboard 1100 AH), you will find a machine where MikroTik OS is prebuilt but the machine contains limited processing resources such as limited RAM and limited processor core. So, your network could be slow if you use a MikroTik Routerboard for maintaining a large network (Note: Sometimes it is better to use Routerboard like CCR1016-12G because it is specially designed for working at layer 3 and processing many millions of packets per second). On the other hand, if you install MikroTik OS on a PC or on a Server, you will get a faster processor with sufficient RAM. So, it will be easy and faster for maintaining a large network with this MikroTik PC router (Note: PC or Server processors are specially designed for working at layer 7 and working with application. So, it will be better avoiding low configuration PC or Server). As MikroTik PC router is a better solution for a larger network, this article is designed to show you the necessary steps to install MikroTik OS on a PC or a Server.
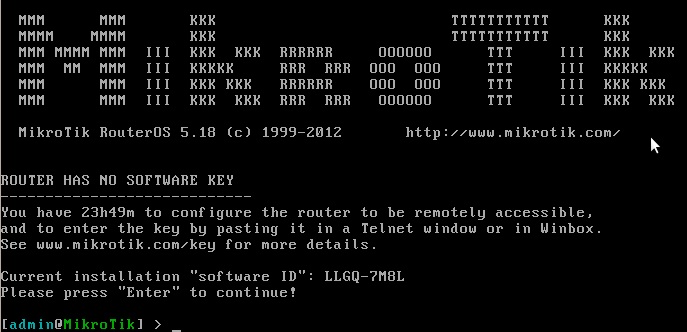
MikroTikRouterOS CLI
Requirements
It should have at least two network cards to turn a PC or Server into a MikroTik Router. One card will be used as LAN connection and another card will be used as WAN connection. It is also better to use more than one core and sufficient memory for processing millions of network packets. You must remember that IDE HDD is required for installing RouterOS.
MikroTik PC Router Installation
MikroTik OS can be installed on a virtual machine or on a physical machine. If you interested to install MikroTik OS on a virtual machine, download VMware Workstation to create a virtual machine and then follow my video tutorial about Setup MikroTik OS on VMware Virtual Machine. If you interested to install MikroTik OS on a physical machine, download MikroTik OS ISO and burn the ISO in a blank CD or DVD or in a USB flash drive and then follow my below steps to install MikroTik OS ISP on your physical machine.
Boot your PC or Server from your bootable media such as CD or DVD ROM. If everything is OK, MikroTik OS will be started to install and format the disk. If you use a large disk, it will take more time to format. So, be patient to wait. After formatting the disk, it will ask you for selecting packages those will be installed.
To install all packages, press ‘a‘ or press ‘M’ for minimal installation and then press ‘i‘ for starting installation.
It will now ask you whether it will keep old configuration or not. Press ‘n‘, because it will be better to delete old configuration in your disk. It will now show a warning message. Press ‘y‘ for continue installation. All selected packages will be installed and then it will ask you to hit ‘Enter‘ key to reboot the system. Hit ‘Enter‘ key now.
After rebooting, it will ask you to provide login credential. MikroTik default username is ‘admin‘ and password is blank. So, type ‘admin‘ for MikroTik login and password left blank and then hit ‘Enter‘ key.
MikroTik CLI will appear now. It will also show a Software ID in the login screen. Write down this Software ID because it will be required when you want to purchase a license from MikroTik site.
How to install MikroTik OS in a Physical Machine to make a MikroTik PC Router has been discussed in this article. A video is also uploaded to reduce your any confusion. However, if you face any problem to install MikroTik OS ISO on your physical machine, feel free to discuss in comment or contact with me form Contact page. I will try my best to stay with you.