2020-11-24T14:31:28
Медиа
Вы боитесь возиться со своим живым сайтом? Хотите попробовать новую тему или плагин? Вы хотите проверить свой сайт, внося изменения в свой контент? Если да, вы можете создать сайт WordPress в автономном режиме и обновить его позже.
Веб-сайт продвигает ваш бизнес, услуги и привлекает больше клиентов. Это мощный маркетинговый инструмент для процветания вашего бизнеса. Если вы вкладываете в это время и усилия, хорошо иметь веб-сайт, которым вы будете гордиться. В наши дни пользователи стали умнее и разборчивее в отношении доступных опций. Даже бренды соревнуются за их внимание. Таким образом, важно быть в курсе последних технологических достижений. Иногда вам нужно переключиться на последние темы. Это даст вам красивый обновленный веб-сайт, отражающий ваш бренд с лучшими результатами SEO. Обычно разработчики и владельцы сайтов предпочитают создавать тему WordPress в автономном режиме. Читать
Новые версии дистрибутивов Linux ориентированы на работу с современным железом. Для старых машин они слишком громоздки, и даже выполнение простых задач — например, перемещение файлов — заставляет компьютер задействовать все ресурсы процессора и ОЗУ. В результате пользователи сталкиваются с постоянными зависаниями и системными ошибками.
К счастью, существует много легковесных дистрибутивов, которые могут вдохнуть новую жизнь в старое железо. Разработчики вырезали из них почти всё, к чему вы привыкли как к должному в обычных системах Linux, будь то библиотеки, утилиты или графические программы. Именно это позволило добиться компактности и низкой ресурсоёмкости. Читать
В Windows 10 вы можете вернуться к предыдущей версии Microsoft Edge по мере необходимости, и вы можете выполнить эту задачу двумя разными способами, и в этом руководстве вы узнаете, как это сделать. В отличие от устаревшей версии, версия Microsoft Edge для Chromium периодически получает обновления от операционной системы на неопределенный срок, чтобы предоставлять исправления, улучшения и новые функции так же своевременно, как и другие современные браузеры (например, Firefox и Chrome).
Единственная проблема с этим подходом заключается в том, что иногда новые версии Microsoft Edge могут развертываться с ошибками или вызывать неожиданные проблемы. Хотя простого способа удалить браузер в Windows 10 больше нет, есть возможность вернуться к предыдущей версии, которая позволяет устранить проблемы или вернуться к более ранней версии, когда все работало правильно, с использованием файла .msi или групповой политики.
Эта функция предназначена для организаций, но любой может использовать ее для отката к предыдущей версии Microsoft Edge.
В этом руководстве вы узнаете о двух поддерживаемых методах перехода на более старую версию Microsoft Edge в Windows 10.
Начиная с версии 86, вы можете понизить версию Microsoft Edge для Chromium, загрузив и установив файл .msi, но сначала вы должны отключить обновления для браузера, что требует установки дополнительных шаблонов групповой политики для управления настройками браузера.
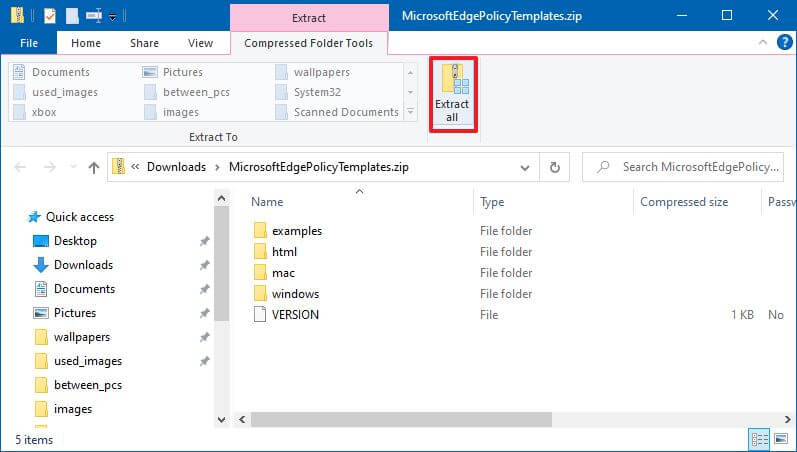
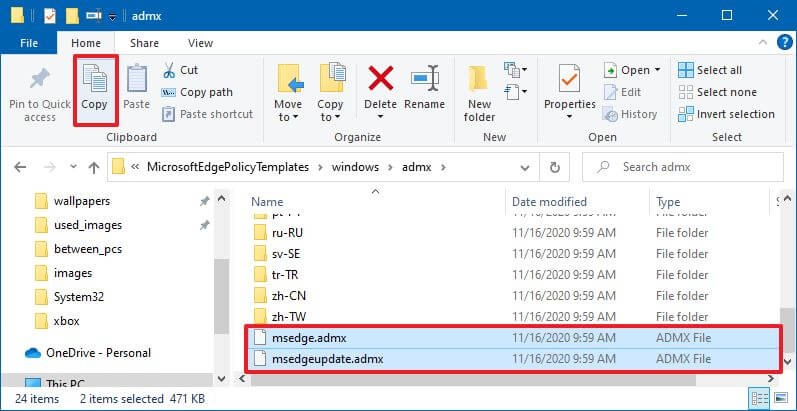
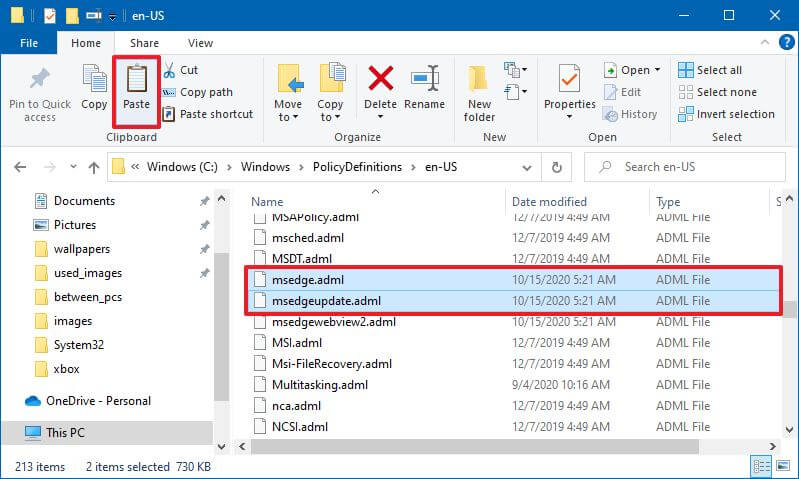
Чтобы установить шаблоны групповой политики для управления Microsoft Edge, выполните следующие действия:

windowsadmx
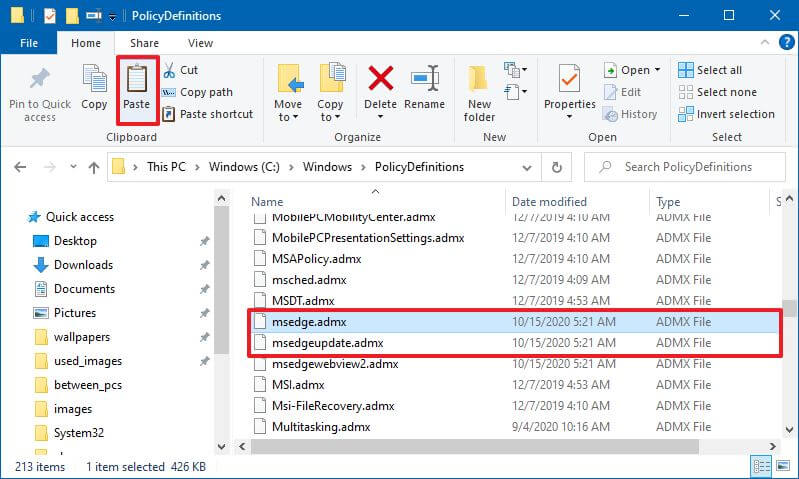
C:WindowsPolicyDefinitions
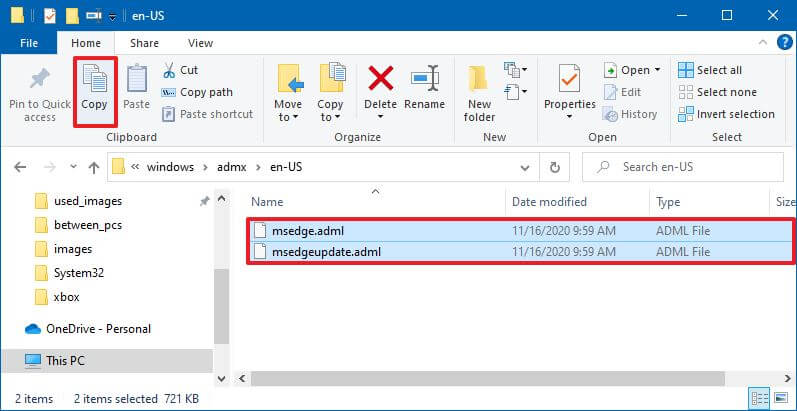
C:WindowsPolicyDefinitionsen-US
В приведенной выше команде обязательно измените en-US для папки, соответствующей вашему языку.
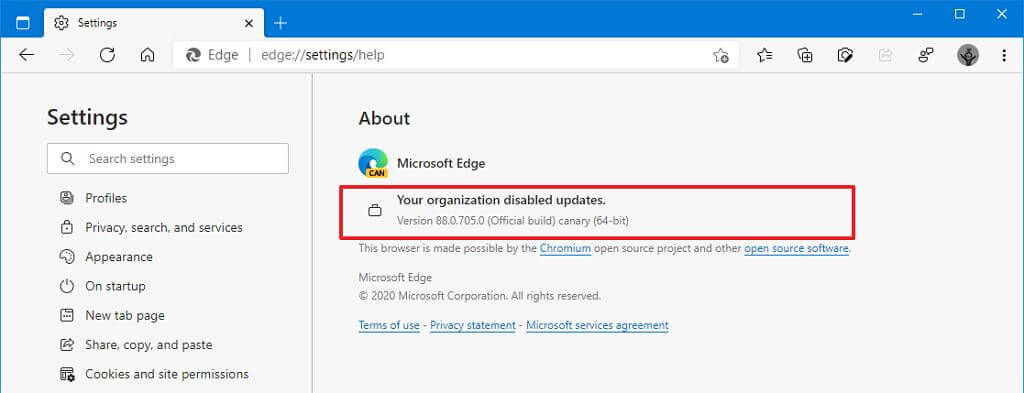
Выполнив эти шаги, вы можете продолжить отключение обновлений для Microsoft Edge.
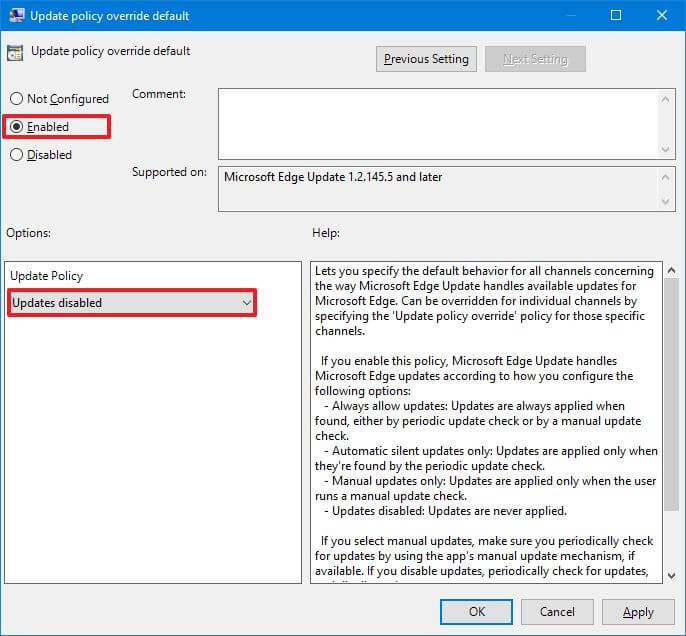
Чтобы отключить обновления для Microsoft Edge, выполните следующие действия:
gpedit и щелкните верхний результат, чтобы открыть редактор групповой политики.
Конфигурация компьютера> Административные шаблоны> Обновление Microsoft Edge> Приложения> Microsoft Edge
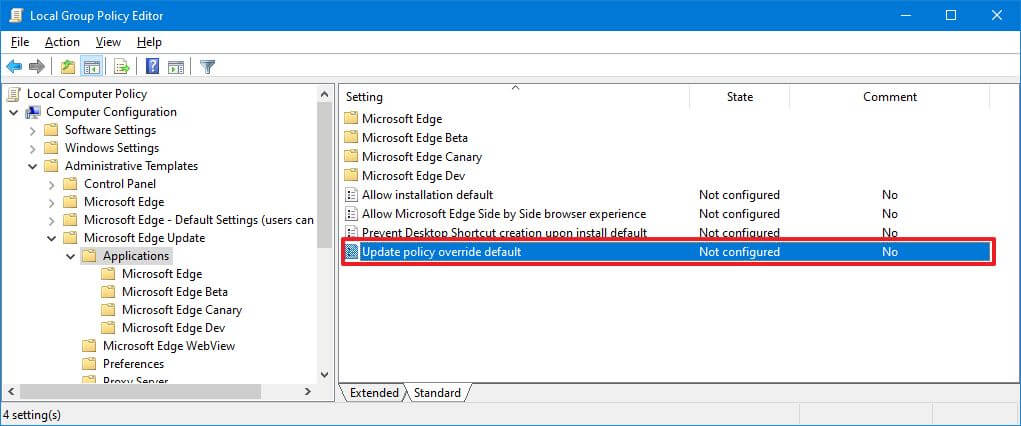 Совет: если вы хотите отключить обновления для всех каналов (стабильный, бета-версия, для разработчиков и Canary) браузера, вы можете настроить политику переопределения политики обновления Computer Configuration > Administrative Templates > Microsoft Edge Update.
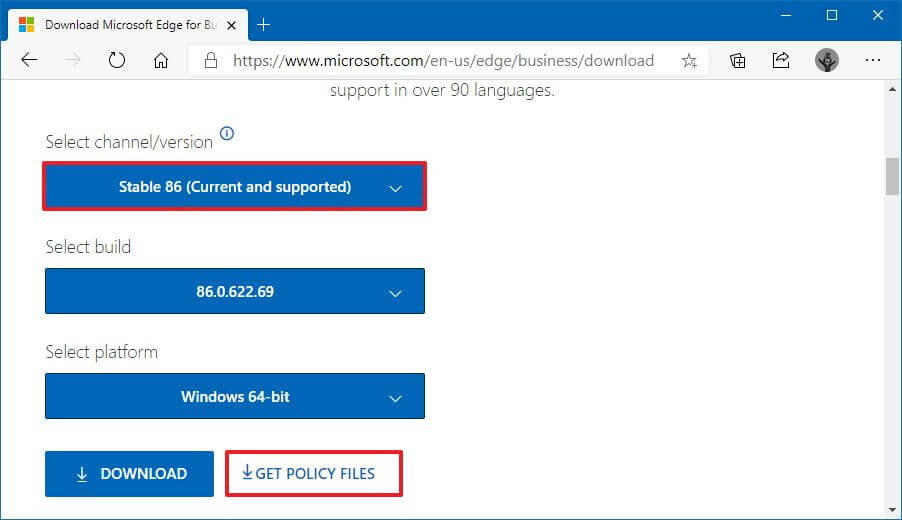
После выполнения этих шагов вы можете продолжить загрузку установщика для более старой версии Microsoft Edge, которую вы планируете понизить.
Чтобы загрузить более старую версию Microsoft Edge, выполните следующие действия:
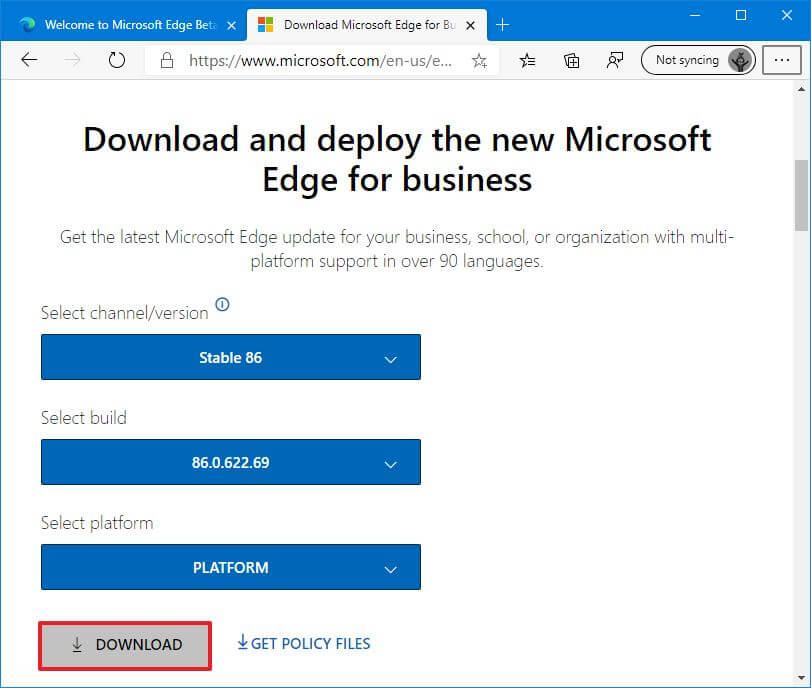
После выполнения этих шагов вы можете использовать файлы с приведенными ниже инструкциями для отката к предыдущей версии Microsoft Edge.
Чтобы вернуться к более ранней версии Microsoft Edge, выполните следующие действия:
cd C:PATHTOMSI-INSTALLER
C:PATHTOMSI-INSTALLER>msiexec /I FileName.msi /qn ALLOWDOWNGRADE=1
В команде обязательно обновите C: PATH TO MSI-INSTALLER, указав путь к месту установки. Также замените FileName.msi фактическим именем установщика.
Например, эта команда переводит Edge на более раннюю версию MicrosoftEdgeEnterpriseX64.msi версии 84, расположенной в папке загрузок:
C:Usersm__laDownloads>msiexec /I MicrosoftEdgeEnterpriseX64.msi /qn ALLOWDOWNGRADE=1
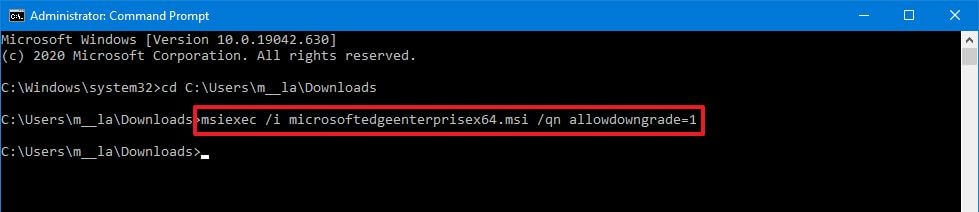
После того, как вы выполните эти шаги, текущая версия браузера будет удалена, а более старая версия будет установлена в Windows 10.
Вы также можете выполнить постепенный переход на более раннюю версию, настроив три конкретных объекта групповой политики. Этот метод также требует установки шаблонов политики для управления браузером с помощью редактора групповой политики. Если у вас не установлены шаблоны, обратитесь к предыдущим шагам, чтобы загрузить и установить шаблоны политик Microsoft Edge в Windows 10.
Чтобы откатить Microsoft Edge к предыдущей версии с помощью групповой политики, выполните следующие действия:
Конфигурация компьютера> Административные шаблоны> Обновление Microsoft Edge> Приложения> Microsoft Edge
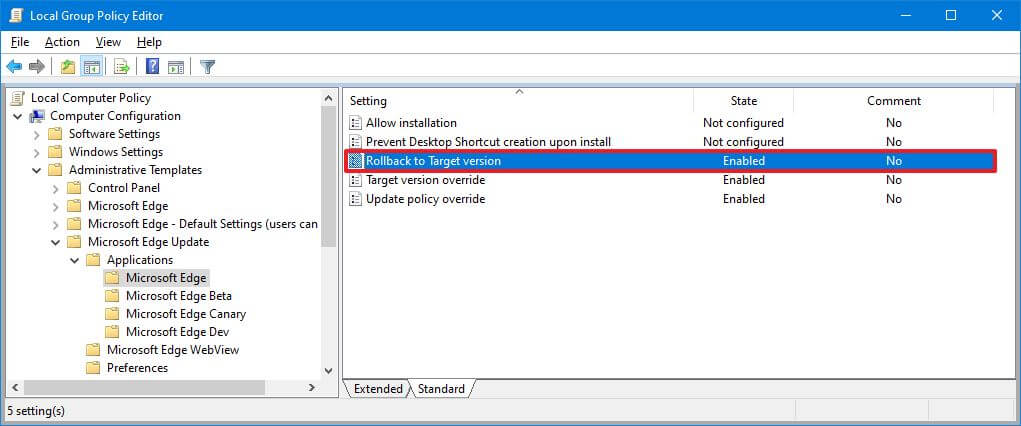
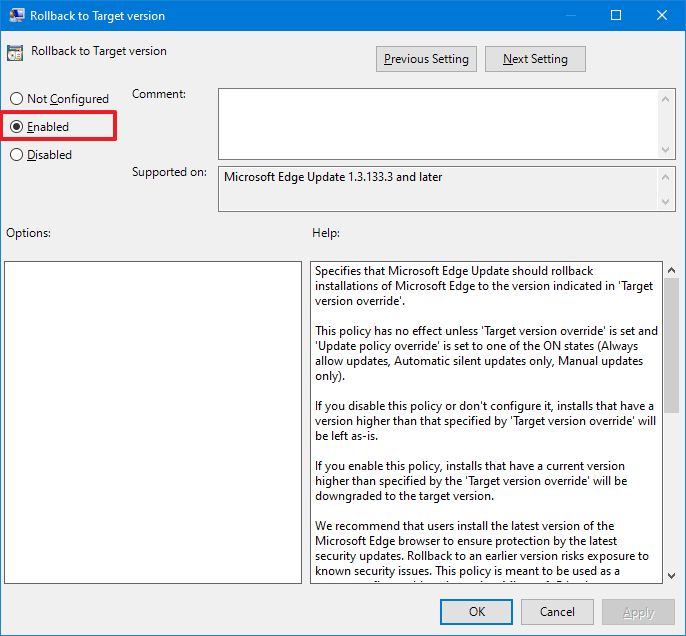
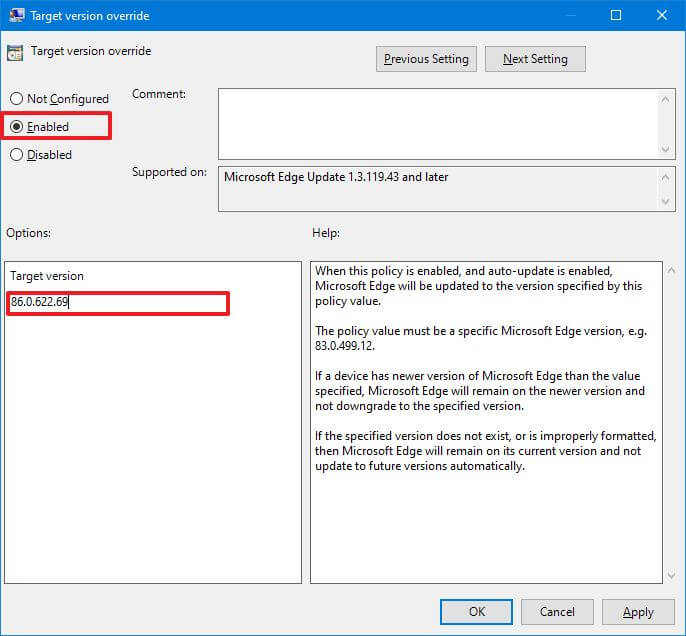
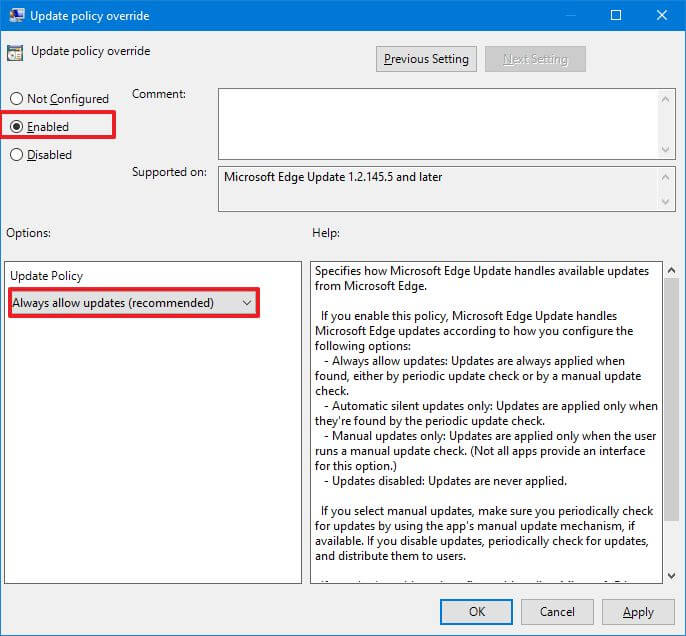
После выполнения этих шагов, в следующий раз, когда Microsoft Edge автоматически проверяет наличие обновлений (обычно каждые десять часов), он должен загрузить и установить старую версию браузера.
Хотя существуют поддерживаемые способы перехода на более раннюю версию Microsoft Edge, эти параметры предназначены только для устранения проблем или временного решения конкретной проблемы. Всегда рекомендуется использовать браузер с последними обновлениями, чтобы убедиться, что вы используете наиболее безопасную доступную версию.
Для каждой бизнес-структуры всегда актуальным является вопрос сложности набора грамотных и квалифицированных кадров, которые могут принести немалую пользу своему предприятию. Отыскать в море предложений и резюме нужного перспективного специалиста очень непросто.
Для непрофессионалов весьма непросто справиться с такой важной задачей, как набор персонала на вакансии или отбор в своем коллективе наиболее талантливых сотрудников для их подготовки на высококлассных специалистов. Для этого пользуются услугами опытных it-рекрутеров.
В IT-сфере проблема поиска новых кадров нужной специализации стоит не менее остро, чем в любой другой отрасли. И трудности эти заключаются не только в том, чтобы найти сотрудника с необходимыми характеристиками, но и он чтобы он смог стать эффективным в общем рабочем процессе фирмы.
Для решения таких сложных задач более разумно и рационально обратиться к услугам рекрутинговых компаний, обладающих необходимыми знаниями, опытом и инструментами для обеспечения успешного поиска подходящих сотрудников.
В специализированных агентствах работают высококлассные специалисты кадрового набора, которые способны ускорить и упростить процесс поиска работника, провести его наиболее эффективно и получить отличный результат, подобрав наиболее подходящую кандидатуру на вакансию.
IT-рекрутер — это специалист отбору и найму работников для IT-компаний по разным специальностям. Он обладает специальными навыками и должен быть хорошо подкован в сфере информационных технологий. Очень важен практический опыт и степень сложности задач, которыми он занимался.
Чтобы рекрутер был достаточно профессионален и эффективен, заказывайте услуги компании «GlobalStaff — Профессиональный it рекрутинг» (сайт: globalstaff.biz). Наши специалисты имеют все нужные навыки, чтобы успешно выполнить ваш заказ.
Хорошее владение новыми технологиями является основополагающим фактором для каждой IT-компании, поэтому при подборе специалистов следует правильно отобрать соискателей на вакансию и оценить степень их подготовки для выполнения предстоящих задач.
При выявлении профессиональности кандидата важно владеть специальной терминологией и понимать, о чем идет речь. Профессиональный рекрутер хорошо разбирается в тонкостях информационных технологий и может квалифицированно оценить уровень подготовки кандидата.
Применяя грамотно свои знания, рекрутер имеет возможность всесторонне оценить все факторы, влияющие на эффективность потенциального работника:
Правильная тактика и организация работы рекрутера — залог успешного замещения вакансии.
Сегодня в статье поговорим о том, как установить и настроить совместную работу медиацентра MiniDLNA и клиента сети торрент – qBittorrent на ОС Ubuntu 18.0420.0422.04.
Устанавливать и настраивать будем на Ubuntu Server 20.04. Для Debian подобных систем инструкция будет тоже справедлива.
Для того, чтобы клиенты видели DLNA-сервер, они должны находились в одной подсети.
Обновляемся систему до актуального состояния:
sudo apt update && sudo apt dist-upgrade
Создаем системного пользователя с отключенным шелом и одноименной группой.
sudo useradd qbittorrent -b /home/ -m -U -s /bin/false
Задаем пароль для нашего пользователя
sudo passwd qbittorrent
Давайте теперь установим наш торрент клиент без GUI интерфейса. На Ubuntu Server 20.04 LTS команда будет выглядеть так:
sudo apt install qbittorrent-nox
Создаём и открываем файл qbittorrent-nox.service
sudo nano /etc/systemd/system/qbittorrent-nox.service
Добавим следующее содержимое:
[Unit]
Description=qBittorrent Command Line Client
After=network.target

[Service]
#Do not change to "simple"
Type=forking
User=qbittorrent
Group=qbittorrent
UMask=007
ExecStart=/usr/bin/qbittorrent-nox -d --webui-port=8080
Restart=on-failure

[Install]
WantedBy=multi-user.target
Если настраивали автостарт при помощиsystemd, то выполнять настройку с помощьюinit.dне надо.
Скачаем скрипт демона и оправим его в автозагрузку.
wget -O /etc/init.d/qbittorrent https://launchpadlibrarian.net/38905385/qbittorrent
sudo chmod 755 /etc/init.d/qbittorrent
sudo update-rc.d qbittorrent defaults
Для удаления набираем следующую команду:
sudo update-rc.d -f qbittorrent remove
Откроем содержимое скрипта:
sudo nano /etc/init.d/qbittorrent
Отредактируем в соответствии с листингом:
DAEMON_ARGS="--webui-port=8080"
USER=qbittorrent
Команды для управления демоном:
sudo service qbittorrent start
sudo service qbittorrent stop
sudo service qbittorrent restart
sudo service qbittorrent status
Для запуска наберите в терминале:
qbittorrent-nox
Если необходимо изменить настройки qbittorrent через терминал, то откройте на редактирование следующий файл.
sudo nano /home/qbittorrent/.config/qBittorrent/qBittorrent.conf
BitTorrent]
SessionDefaultSavePath=/home/qbittorrent/video
SessionExcludedFileNames=
SessionInterface=ens18
SessionInterfaceAddress=10.5.1.100
SessionInterfaceName=ens18
SessionPort=54218
SessionQueueingSystemEnabled=false
SessionTempPath=/home/qbittorrent/video/temp
Установка разрешенных сетей для подключения к qbittorrent без ввода логина и пароля
WebUIAuthSubnetWhitelist=10.5.1.0/24, 10.1.1.0/24
Для включения протокола HTTPS c помощью самоподписанного сертификата.
sudo mkdir /home/qbittorrent/.config/qBittorrent/ssl

sudo openssl req -x509 -nodes -days 1095 -newkey rsa:2048 -keyout /home/qbittorrent/.config/qBittorrent/ssl/sert.key -out /home/qbittorrent/.config/qBittorrent/ssl/sert.crt
*.key и *.crt должны быть в одну строчку.
Также их можно прописать в настройках веб-интерфейса.
sudo nano /home/qbittorrent/.config/qBittorrent/qBittorrent.conf
WebUIHTTPSEnabled=true

WebUIHTTPSCertificate="@ByteArray(-----BEGIN CERTIFICATE-----n Cert n-----END CERTIFICATE-----n)"

WebUIHTTPSKey=@ByteArray(-----BEGIN PRIVATE KEY-----n Key n-----END PRIVATE KEY-----n)
Давайте теперь установим наш медиацентр minidlna
sudo apt install minidlna
Настроим демон minidlna на запуск от нашего пользователя qbittorrent
sudo nano /etc/init.d/minidlna
Находим строчки
USER=minidlna
GROUP=minidlna
Меняем их значение:
USER=qbittorrent
GROUP=qbittorrent
На сегодня автоматом создается сервис в systemd. Для редактирования открываем следующий файл:
sudo nano /etc/systemd/system/multi-user.target.wants/minidlna.service
Также как и выше меняем User и Group с minidlna на qbittorrent.
[Unit]
Description=MiniDLNA lightweight DLNA/UPnP-AV server
Documentation=man:minidlnad(1) man:minidlna.conf(5)
After=local-fs.target remote-fs.target autofs.service

[Service]
User=qbittorrent
Group=qbittorrent

Environment=CONFIGFILE=/etc/minidlna.conf
Environment=DAEMON_OPTS=-r
EnvironmentFile=-/etc/default/minidlna

RuntimeDirectory=minidlna
LogsDirectory=minidlna
PIDFile=/run/minidlna/minidlna.pid
ExecStart=/usr/sbin/minidlnad -f $CONFIGFILE -P /run/minidlna/minidlna.pid -S $DAEMON_OPTS

[Install]
WantedBy=multi-user.target
Пересчитываем настройки systemd
sudo systemctl daemon-reload
Меняем группу и владельца директории /var/cache/minidlna
sudo chown -R qbittorrent:qbittorrent /var/cache/minidlna/
Настроем конфигурационный файл minidlna:
sudo cp /etc/minidlna.conf{,.bkp} && sudo nano /etc/minidlna.conf
user=qbittorrent
media_dir=P,/home/qbittorrent/pictures
media_dir=V,/home/qbittorrent/video
media_dir=A,/home/qbittorrent/music
db_dir=/var/cache/minidlna
log_dir=/var/log/minidlna
log_level=general,artwork,database,inotify,scanner,metadata,http,ssdp,tivo=warn
root_container=B
#network_interface=eth0
port=8200
friendly_name=MiniDLNA
serial=1234567890
model_number=1234
inotify=yes
album_art_names=Cover.jpg/cover.jpg/AlbumArtSmall.jpg/albumartsmall.jpg
album_art_names=AlbumArt.jpg/albumart.jpg/Album.jpg/album.jpg
album_art_names=Folder.jpg/folder.jpg/Thumb.jpg/thumb.jpg
notify_interval=60
max_connections=10
Создадим наши каталоги:
sudo mkdir /home/qbittorrent/{music,pictures,video,torrent}
Устанавливаем права
sudo chown -R qbittorrent:qbittorrent /home/qbittorrent/
Перезагружаем демон если настраивали minidlna с помощью init.d
sudo /etc/init.d/minidlna restart
Перезагружаем демон если настраивали minidlna с помощью systemd
systemctl restart minidlna.service
Перечитываем кэш
minidlnad -R
Правим sysctl.conf иначе будет ругаться в логах на эту настройку.
sudo nano /etc/sysctl.conf
Добавим в конце файла.
# MiniDLNA
fs.inotify.max_user_watches = 100000
Применим настройку
sudo sysctl -p
Проверяем логи и смотрим статистику:
sudo cat /var/log/minidlna
Если возникает ситуация, когда необходимо сбросить кэш minidlna, можно воспользоваться командами:
sudo service minidlna stop
Удаляем кеш файл
sudo rm -rf /var/cache/minidlna/files.db
запускаем службу:
sudo service minidlna start
[endtxt]