
Несколько простых советов, как тренировать память в быту, чтобы она становилась крепче с каждым днём: Читать
Несколько простых советов, как тренировать память в быту, чтобы она становилась крепче с каждым днём: Читать
Зимний сезон распродаж сейчас в самом разгаре. Всегда очень сложно разобраться в обилии скидок, которые окружают нас на каждом углу, поэтому мы подготовили для вас 5 секретов от итальянских стилистов и имидж-консультантов — как искать и покупать только лучшие вещи по самым выгодным ценам во время этих распродаж. 1 секрет: Покупайте только то, что вы купили бы по полной стоимости
Важнейшее правило — не бегите к кассе оплачивать товар с большой скидкой, если вы не стали бы тратиться на него по полной стоимости. При этом подумайте, насколько эта вещь сочетаема с другими предметами гардероба, может, иначе вы рискуете ее так и не надеть.

Здесь принцип тот же — если вещь «не ваша», не тратьтесь на то, что потом будет просто висеть у вас в шкафу. Спросите себя «Не буду ли я потом жалеть, что не сделала эту покупку?», если ответ отрицательный, значит, вы можете смело идти дальше.

Пытаясь охватить вниманием сразу все, вы рискуете там ни на чем не остановиться — лучше подумайте, какие предметы гардероба вам нужны прежде всего, и акцентируете свое внимание в нужном направлении.
Например — вам нужна юбка и брюки. Или вы хотите, например, обувь именно от этого дизайнера или вас интересует конкретный размер, это также очень помогает.
И возьмите на вооружение — цены в начале распродаж, как правило все еще достаточно высоки, поэтому проявите немного терпения и вы будете вознаграждены.
Если вы знаете, что именно вы хотите купить, совершенно естественно спешить с приобретением — так вы можете быть уверенными, что в наличии будет нужный цвет и размер. Но и не забудьте вернуться в любимое местечко к концу распродаж, возможно, оставшиеся вещи также вас порадуют.

Скорее всего у вас есть на примете уже несколько конкретных вещей, о которых вы давно мечтаете — освежите свой wish-лист. Ну а если что-то понравилось до невозможности, сделайте себе маленький подарок!

Итальянская школа моды и стиля специально для портала «Италия по-русски»
ScuolaStile


Ученые сделали сенсационное заявление – у Земли есть двойник и находится он в пределах Солнечной системы. Как пишет gazetadaily, двойником нашей планеты является один из спутников Сатурна — Титан Астрономы получили самую детальную и полную на сегодняшний день карту поверхности Титана. Читать
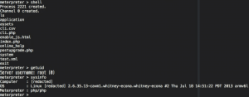
Вот и NAS от Seagate отличились (Seagate Personal Cloud Home Media Storage).
В отличии от Western Digital не явный бэкдор, а все лишь ошибки в функционале.
NAS предоставляет для управления веб-приложение Media Server.
С помощью запросов к его функциям getLogs и uploadTelemetry можно выполнить произвольный код на устройстве.
Веб-приложение доступно только из локальной сети, но можно заставить пользователя отправить вредоносные запросы, заманив на фишинговый сайт.
Уязвимость исправлена в версии прошивки NAS OS v4.3.18.0.
Эксплойт для уязвимости и ее подробное описание доступны: https://blogs.securiteam.com/index.php/archives/3548.
void softReset()
{
    asm volatile ("jmp 0");
}
Автор: dim.medvedev
Дата публикации: 2018-01-24T03:16:00.000-08:00
The Dynamic Host Configuration Protocol (DHCP) is a client-server protocol that is used to assign an IP address and other network configuration parameters dynamically to each device on a network so that they can communicate with other IP networks. DHCP Server is popularly used in an Enterprise Office Network because in an office network various types of IP devices such as Laptop, Desktop, Tablet, Smartphone, IP Phone and so on are maintained and almost all IP devices support DHCP. An ISP Network can also be maintained with DHCP Server.
MikroTik Router has a built-in DHCP Service that can easily be used to manage DHCP enabled devices. Along with MikroTik DHCP Server, MikroTik User Manager Radius Server can also be used to manage DHCP clients and their bandwidth so efficiently. So, if you design your network with MikroTik DHCP Server and User Manager Radius Server, your network will be an easily manageable and smart network. In this article, I will discuss how to configure a static DHCP Server in MikroTik Router with User Manager Radius Server and manage DHCP clients/users so easily and efficiently.
Article Purpose
The purpose of this article is to design a smart and easily manageable network with
Network Diagram
For the configuration of this article I am going to establish a network like below network diagram.
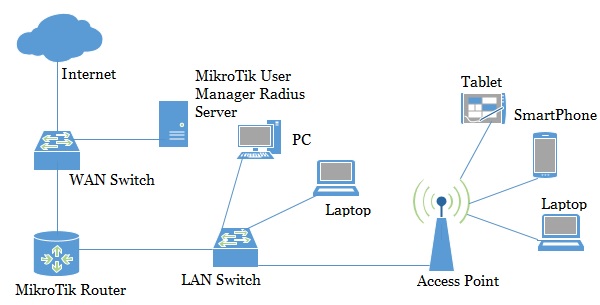
This is a simple and basic network diagram. In real situation, your network might be larger than this network but the basic diagram will remain same. In this network, the WAN Distribution Switch is connected to internet gateway. MikroTik Router’s (NAS) WAN interface and MikroTik User Manager Radius Server are also connected to this WAN Distribution Switch. DHCP users will be connected to NAS Router through LAN Switch and will get internet access and MikroTik Router will communicate to Radius Server through WAN interface.
Core Devices and IP Information
To setup a Hotspot network according to above network diagram, I have installed and completed initial configuration of MikroTik User Manager Radius Server Package in a dedicated physical server where MikroTik RouterOS is running. I have also a physical MikroTik RouterOS (MikroTik RouterBOARD 1100AHX2) which is the NAS (Network Access Server) RouterOS of this network. IP information that I am using for this network configuration are given below.
This IP information is just for my RND purpose. So, change this information according to your network requirements.
We are now going to start our DHCP network configuration with User Manager Radius Server according to the above network diagram. The complete configuration can be divided into two parts.
In the first part, we will configure our MikroTik RouterOS (NAS) so that it can turn into a static DHCP Server and can communicate with Radius Server to authenticate DHCP clients. Complete RouterOS configuration can be divided into below topics.
MikroTik Router basic configuration includes WAN IP, LAN IP and DNS IP assigning and NAT and Default Gateway Configuration. The following steps will show how to perform these topics in your MikroTik RouterOS.
MikroTik Router basic configuration has been completed. Now we will configure DHCP Server in our NAS RouterOS.
Now we will configure DHCP Server in our NAS RouterOS. The following steps will show you how to configure a DHCP Server in your MikroTik RouterOS.
DHCP Server configuration has been completed. Now we will create two firewall rules so that only our permitted users can access internet via our MikroTik Router.
We will now create two firewall rules so that only our permitted user can get internet access via our MikroTik Router. If any expert user wants to do any unfair connection, he will be rejected by these following rules.
What we have done is that we have blocked all the users coming from LAN interface with the first firewall rule and then we have allowed all the users who have in permitted_users address list or group with the second firewall rule. Obviously, the second rule must place before the first rule otherwise permitted_users will not get internet access because they will go under first blocked rule. The permitted_users group will be supplied from Radius Server.
The following steps will show you how to configure Radius client in MikroTik RouterOS.
Radius client configuration has been completed. Now MikroTik RouterOS is able to communicate with Radius Server to authenticate DHCP users.
MikroTik User Manager Radius Server installation and initial configuration has been discussed in my previous article. If you don’t have enough introduction with User Manager Radius Server installation and initial configuration, first spend some time to study that article and complete your Radius Server installation and initial configuration and then continue my below section. In this section, I will cover below topics in our Radius Server for DHCP user authentication, authorization and accounting.
The following steps will show you how to add client router in User Manager Radius Server.
MikroTik RouterOS has been added in User Manager Radius Server as a client router. Now User Manager will reply any query that will be asked by our MikroTik RouterOS.
Now we will create user profile so that we can manage our DHCP user’s bandwidth and permission. The following will show how to create user bandwidth limitation and maintain user permission with User Manager Radius Server.
| Parameter name | Rx | Tx |
| Rate limit | 512k | 512k |
| Burst rate | 1M | 1M |
| Burst threshold | 512k | 512k |
| Burst time | 60 | 60 |
| Min rate | 32k | 32k |
Also choose priority from Priority dropdown menu. For my configuration I am choosing 8 that mean lowest priority.
Profile configuration in User Manager Radius Server has been completed. Now we will create users who will be permitted to get internet access.
Now we will add our DHCP clients in User Manager Radius Server. The following steps will show you how to add users/DHCP clients in your Radius Server.
First DHCP user has been created. Similarly, you can create as many users as you want following the above steps properly.
Our static DHCP server is ready. Now it is time to test our DHCP server. Connect the device that you added here in your network. If everything is OK, the device will be able to get internet access via your NAS Router.
Normally, there is no option in MikroTik static DHCP Server to authenticate DHCP users by providing MAC address and then assign IP address dynamically. For example, a guest user comes to your office and provides his smartphone MAC address. Now you will add this MAC address and assign available IP address manually and then he will be connected to your network. But in this process, finding an available IP address may be a boring task. Using Radius Server, you can avoid this boring task if you want. The following steps will show how to provide IP dynamically via static DHCP Server using MikroTik User Manager Radius Server.
Now our static DHCP with Radius Server is ready to provide IP address dynamically to our desired users. Connect your desired device to your network. If everything is OK, your user will get IP address dynamically from your defined IP ranges.
I hope, it will be so easy to configure a static DHCP network with MikroTik User Manager Radius Server if follow the above steps properly. However, if you face any confusion to follow the above steps, feel free to watch my video tutorial about MikroTik static DHCP Server Configuration with User Manager Radius Server. I hope, it will reduce your any confusion.
MikroTik Static DHCP Server Configuration with User Manager Radius Server has been discussed in this article. I hope you will be able to configure your network with MikroTik DHCP Server and User Manager Radius Server so easily. However, if you face any confusion to design your DHCP network with User Manager Radius Server, feel free to contact with me from Contact page. I will try my best to stay with you.