Приветствую вас на блоге inetsovety.ru. Из этой статьи вы узнаете, как перевести сайт на HTTPS и подключить SSL сертификат безопасности. Перед вами будет пошаговый план действий, если вы решили самостоятельно изменить http на https у своего сайта на ВордПресс, который уже давно работает и проиндексирован поисковыми системами.
Заказ сертификата
Выпуск и подключение бесплатного SSL сертификата от Let’s Encrypt выполняется в течении 5-30 минут. Дождитесь его подключения, после чего продолжайте настраивать редиректы для перехода на https и вносить изменения в файлы сайта.
Сразу же после выпуска бесплатный SSL сертификат от Let’s Encrypt будет подключен к сайту.
Проверьте доступность сайта по протоколам HTTP и HTTPS в разных браузерах. Если все открывается, начинаем по шагам настраивать перенаправление на https.
Внимание! Возможны проблемы с отображением некоторых элементов дизайна сайта. Это происходит из-за их загрузки по старому протоколу «http». Как это исправить будет рассказано дальше.
Далее я дам вам наглядные инструкции, как подключить сертификат от Let’s Encrypt на двух хостингах, которыми я пользуюсь – Бегет и Макхост. Если Вас не утраивает ваш хостер, можете переехать на любой из этих хостингов и получить 20% скидку на оплату, подробнее по ссылке https://inetsovety.ru/skidki/
Подключение SSL сертификата на Beget
В панели управления переходим в раздел «Домены и поддомены». Кликаем по кнопочке с надписью «SSL» у нужного домена:

Следующий шаг — нажать на кнопку «Установить» для запуска процесса выпуска и установки бесплатного сертификата Let’s Encrypt:

Вы получите сообщение, что заявка получена. Сообщение об выполнении заявки придет на ваш имейл.

На хостинге Бегет в выходной день воскресенье заявку на выпуск сертификата выполнили в течении 21 минуты.
Установка SSL сертификата на Макхост
В меню слева выберите «Сайты» и в списке установленных откройте панель управления. В горизонтальном меню кликните по значку с надписью «Настройки и PHP». И перейдите по ссылке «Выпустить сертификата Let’s Encrypt SSL»:

На следующем этапе укажите домен, будьте внимательны, не ошибитесь с адресом! И нажмите на кнопку «Заказать»:

Вас перенаправит на страницу, на которой вы сможете отслеживать, когда статус обработки заявки будет выполнен. Процесс занимает 10-20 мин.
Как http поменять на https у внутренних ссылок
Начальный этап перевода сайта на https – настройка ссылок внутри сайта. Работа ссылок внутренней перелинковки между страницами, загрузка изображений, видео, подключение внешних скриптов должны осуществляться, используя протокол на https.
Этот этап самый трудоемкий и ответственный, и занимает больше всего времени и требует предельной внимательности.
Обязательно! Прежде чем приступить к манипуляциям с сайтом, сделайте бэкап базы данных и файлов сайта.
Абсолютные и относительные ссылки
Прежде чем приступать, разберемся в чем разница между этими двумя типами.
- абсолютные ссылки имеют вид https://inetsovety.ru/sayty-dlya-zarabotka-v-internete — в них присутствует протокол http;
- относительные //inetsovety.ru/sayty-dlya-zarabotka-v-internete — без протокола.
По умолчанию все ссылки на сайте имеют абсолютные. Как вместо http сделать https? Вариантов два:
- Внести правки в базу данных сайта вручную. Этот вариант подойдет опытным программистам.
- Воспользоваться плагином, который быстро произведет замену по указанным настройкам. Им мы и воспользуемся.
Установите и активируйте плагин Search Regex. В меню инструменты выберите его. Я поступлю следующим образом – заменю протокол в ссылках на https, и не буду их менять на относительные:

Таким образом, мы изменили ссылки на внутренние страницы, изображения и другие подгружаемые медиа-файлы на сайте.
Замена протокола в URL на сайте
В самом начале статьи был описан способ изменения ссылок внутри статьи на изображения и ссылки. Но у нас еще остались неизмененные ссылки на внутренние файлы (CSS-стили, JavaScript-библиотеки и другие адреса, включающие название домена со старым протоколом).
Устанавливаем плагин Velvet Blues Update URLs. В меню «Инструменты» перейдите по «Update URLs». На странице указываем адреса для замены, не потеряйте слеш в конце URL.
Отметьте птичками пункты настроек замены, как на изображении ниже:

Запустите процесс автозамены, кликом по кнопке «Update URLs NOW».
После проведенных действий отключите и удалите оба плагина, они нам больше не нужны.
Как правильно переехать на https и настроить редиректы
Если при попытке войти в админку сайта, вас перебросило на страницу с ошибкой, что страница не найдена. Напишите в тех поддержку, или сами попробуйте исправить ситуацию, добавив в файл wp-config.php, находящийся в корне сайта, следующую строчку:
define(‘FORCE_SSL_ADMIN’, true);
Если у вас подключены плагины защиты и кеширования, отключите их на время работ.
Изменяем протокол сайта в админке
Чтобы перевести сайт на https, в административной панели сайта, выбери в меню слева раздел «Настройки» и перейдите в «Общие настройки».

Найдите строки «Адрес WordPress (URL)» и «Адрес сайта (URL)», где указан URL сайта с протоколом http. Добавляем букву «s» и получаем нужный нам протокол https в ссылке. Чтобы изменения вступили в силу, нажмите на кнопку «Сохранить изменения».
Правки в robots.txt
Чтобы переход на https на WordPress был корректным, в файле robots.txt мы изменяем три директивы.
Первое – указываем протокол https в директиве Hosts. Это мы делаем специально для поисковой системы Яндекс.
Второе – вносим изменения в ссылки на карту сайта, добавив букву «s».
Должно получиться вот так:
Host: https://inetsovety.ru


Sitemap: https://inetsovety.ru/sitemap.xml.gz


Sitemap: https://inetsovety.ru/sitemap.xml
Сохраняем изменения в файле.
Прописываем 301 редирект на HTTPS в htaccess
Следующий шаг – установить 301 редирект с http на https в файле .htaccess. Если этого не сделать, то ваш сайт будет открываться по разным адресам и на HTTP, и на HTTPS. А это грозит появлением дублей и возможными санкциями от поисковиков.
Поскольку я настраивала 301 редирект на HTTPS на хостинга Бегет и Макхост, я увидела, что коды переадресация на https у этих хостеров разные. Здесь я не буду приводить их. Рекомендую вам написать в службу поддержки хостера и вы получите от техподдержки ответ со ссылкой на код переадресации на https.
Важно! Проверьте работу редиректа. Введите в адресную строку браузера ссылку на ваш сайт с протоколом HTTP, если произошло автоматическое перенаправление на HTTPS. Значит, все работает корректно.
Возможные ошибки переезде сайта на https
Если вы смогли сделать защищенное соединение для сайта без ошибок, это подтвердит отображение зеленого значка в виде закрытого замка слева в адресной строке.
Если этого значка нет, одной из причин является наличие смешанного содержимого на странице. Что это такое? Это значит, что на странице имеются ссылки с HTTP протоколом. Нам предстоит найти их и заменить в них протокол на HTTPS. Тогда содержание страницы будет полностью защищено.
Чтобы посмотреть исходный код страницы нажмите комбинацию клавиш «CTRL+U». Далее «CTRL+ F», чтобы появилась строка поиска по содержимому страницы. В строку поиска вводим «http://» (без кавычек) и просматриваем подсвеченные результаты.
Важный момент! Браузеры блокируют отображение незащищенного контента на странице.
Если поиск предыдущим способом ничего не показывает, а значок упорно твердит, что на странице есть незащищенный контент. Используем следующий метод. У меня это браузер Мозилла. Кликаем правой кнопкой мыши по странице и выбираем в меню «Исследовать элемент». Внизу экрана появляется поле для просмотра кода элементов страницы, но нас интересует вкладка «Консоль», именно на ней показываются ошибки смешанного содержимого mixed content:

Чаще всего находятся ссылки на изображения лого в шапке или в футере на дополнительные страницы. Измените протоколы у этих урлов, чтобы полноценно перейти на https с http.
Важно! Проверьте в разных браузерах (Mozilla Firefox, Google Chrome) отображение значка, свидетельствующего о защищенном содержании страницы. Откройте не только главную, но и внутренние ссылки (рубрики, страницы, посты).
Также, есть сервис проверки корректности работы SSL
Зеленые отметки говорят о том, что все настроено правильно.
Переезд сайта в Google и Яндекс Вебмастер
Переезд на https в Гугл Вебмастер подразумевает два действия. Добавляем в Search Console Google сайт с протоколом HTTPS. В моем случае для подтверждения прав собственности на сайт не потребовалось, поскольку файл уже был загружен на хостинг при добавлении http версии сайта.
Все что нужно нам сделать в панели Вебмастера Гугл для добавленного сайта – добавить ссылку на карту сайта на новом протоколе. Для этого зайдите в раздел «Сканирование» и выберите «Файлы Sitemap». С соответствующее поле добавьте ссылку на sitemap.xml.

Инструкцию по работе с Инструментом Гугл Вебмастер смотрите по ссылке https://inetsovety.ru/google-search-console/
В Яндекс Вебмастере для http версии, сообщаем о переходе на HTTPS. В меню находим «Индексирование» и переходим по ссылке «Переезд сайта». Здесь поставьте птичку у пункта «Добавить HTTPS» и сохраните изменения.

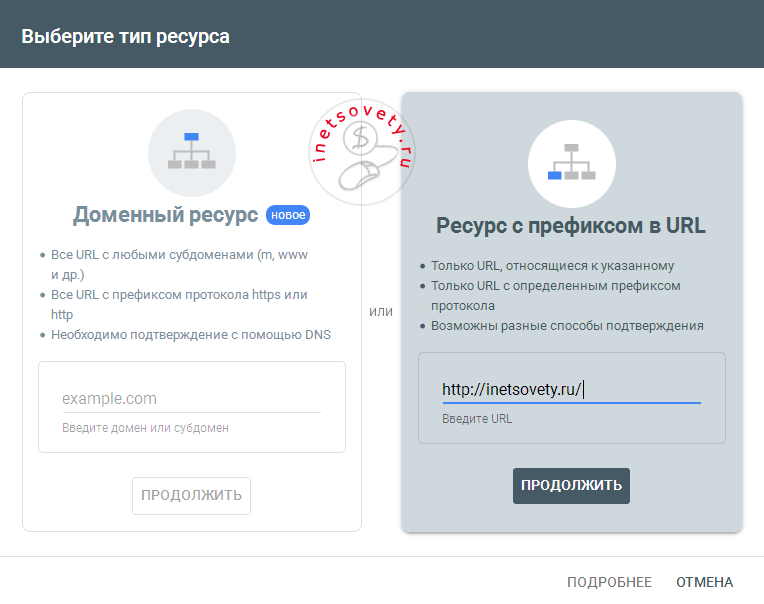
Следующий шаг переезда сайта на https в Яндекс Вебмастере — добавить версию сайта с протоколом HTTPS:

Подтвердите права на его управление. Если у вас добавлена http версия, то проверочный файл уже есть на хостинге и просто нажмите проверить.

Как и в случае с Гугл Вебмастером, добавляем ссылку на sitemap.xml в разделе «Индексирование» пункт «Файлы Sitemap»:

Важно! Если у HTTP-версии сайта были следующие дополнительные настройки, обязательно перенесите их на HTTPS-версию:
- региональность, турбо-страницы, важные страницы и избранные запросы в панели ЯВ;
- параметры URL и список ссылок в Disawov Links Tool для GW;
- для коммерческого сайта внесите изменения в адрес сайта в Яндекс.Справочнике и сервисе Мой Бизнес от Google.
Переход на HTTPS в Яндекс и замена главного зеркала занимает несколько недель.
Теперь вы знаете, как подключить https и настроить необходимые редиректы на WordPress. Если вы все сделали правильно, то не потеряете позиции и трафик с поисковых систем. Желаю вам удачно переехать на https и только роста трафика после установки защищенного протокола. На этом у меня все. Делитесь своими историями, перехода и задавайте вопросы в комментариях ниже.


