MikroTik Wireless Router is popularly used as WiFi AP. MikroTik WiFi AP has a lot of features to tune WiFi network as your requirements. MAC authentication is one the amazing and useful features in MikroTik WiFi. MAC authentication enables filtering MAC address that means no MAC can be able to connect to WiFi AP without authentication. MAC authentication can be done either local database or RADIUS Server. MAC authentication with RADIUS Server provides facility to manage multiple APs from centralized database. User Manager is a RADIUS Application developed by MikroTik team and can be used to manage PPPoE, Hotspot, DHCP and Wireless user easily. How to install User Manager RADIUS Server with basic configuration was discussed in my previous article. I also discussed how to configure MikroTik Wireless Router as WiFi AP in another article. In this article I will discuss how to manage WiFi user with User Manager RADIUS Server.
Network Diagram
The following network diagram is being followed for this article configuration.
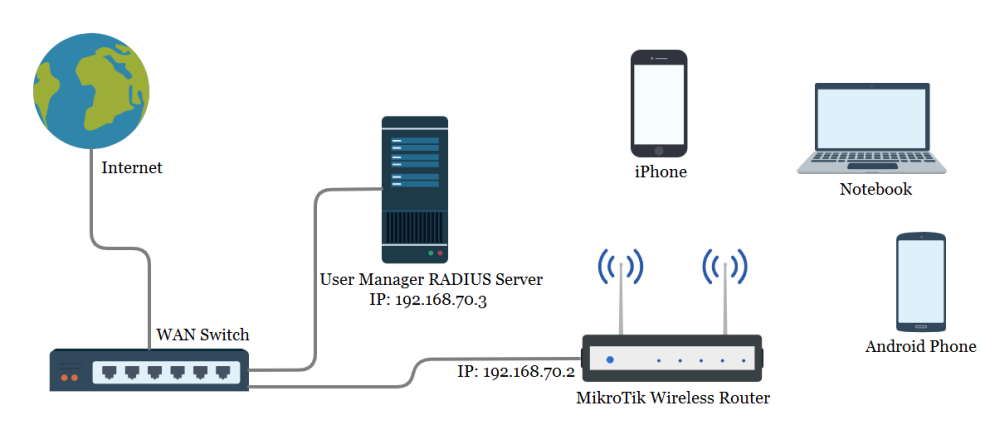
In this network diagram a MikroTik Wireless Router (RB941-2nD) is being used as WiFi AP (IP: 192.168.70.2) which is connected to a WAN Switch where a User Manager RADIUS Server (IP: 192.168.70.3) is also connected. The WiFi AP will be configured as MAC authenticated AP so that no Wireless device (Laptop, Smart Phone, Notebook and so on) will be connected without providing MAC Address and the MAC Address will be authenticated from RADIUS Server.
MAC Authenticated WiFi AP Configuration with RADIUS Server
The complete MAC authentication WiFi AP configuration with User Manager RADIUS Server can be divided into the following two parts.
- Enabling MAC authentication from RADIUS Server in WiFi AP
- User Manager RADIUS Server configuration for authenticating WiFi devices
Part 1: Enabling MAC Authentication from RADIUS Server in MikroTik WiFi AP
MikroTik Wireless Router configuration as WiFi AP was discussed in another article. The default authentication scheme in MikroTik WiFi AP is anyone can connect just knowing SSID and Password. This scheme is obviously not prefer for secure network. So, MAC authentication is the best choice for any wireless network. As MAC authentication is not enabled by default, we have to enable MAC authentication manually to apply this scheme. The following steps will show how to enable RADIUS MAC authentication in MikroTik WiFi AP.
- From Winbox, click on Wireless menu item. Wireless Tables window will appear.
- Click on Security Profiles tab and then double click on created WiFi Profile that is being used by WiFi AP. Security Profile window will appear.
- Click on RADIUS tab and then click on MAC Authentication check box.
- If you want to MAC accounting, click on MAC Accounting check box and set Interim Update (example: 00:00:59 for one minute interval) time (The time interval for sending accounting status to RADIUS Server).
- Optionally you can choose MAC address format that you prefer from MAC Format dropdown menu.
- You can also set whether the MAC will be send as only username or both username and password to RADIUS Server for authentication. The default MAC mode is username only and I am keeping the default setting.
- Click Apply and OK button.
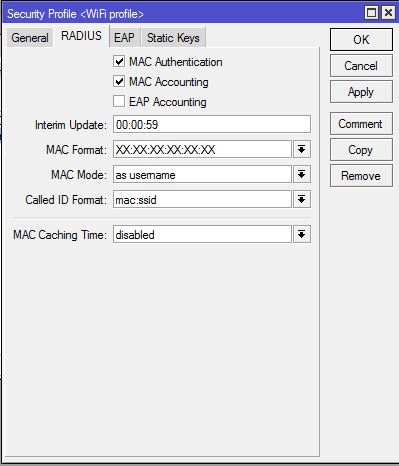
MikroTik WiFi AP is now MAC authenticated WiFi AP and the MAC authentication will be checked from RADIUS Server. So, if RADIUS Server allows any MAC address, the device will be allowed to connect to WiFi AP otherwise the device will be rejected.
Now we have to configure RADIUS client in MikroTik RouterOS so that RouterOS can communicate to RADIUS Server to send and receive authentication, authorization and accounting data. The following steps will show how to configure RADIUS client in MikroTik RouterOS.
- From Winbox, click on RADIUS menu item. Radius window will appear.
- Click on PLUS SIGN (+) to add a RADIUS Server. New Radius Server window will appear now.
- Click on wireless checkbox from Service panel.
- Put RADIUS Server IP address (in this article: 192.168.70.3) in Address input field.
- Put Shared secret (in this article: 123) in Secret input field and remember it because you have to provide this secret in RADIUS Server Routers configuration.
- Click Apply and OK button.
- From RADIUS window, click on Incoming button. RADIUS Incoming window will appear.
- Click on Accept checkbox and the default port will be 3799. So, nothing to do. Click Apply and OK button.
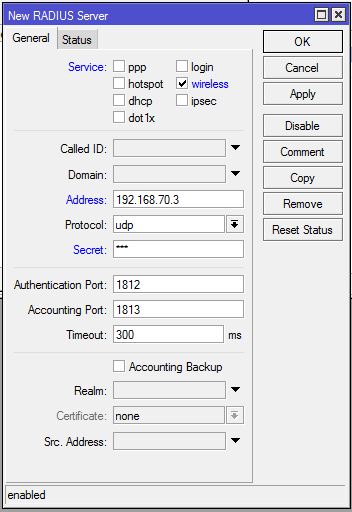
RADIUS Client configuration in MikroTik RouterOS has been completed. Now MikroTik RouterOS will be able to communicate with the assigned RADIUS Server.
We will now configure User Manager RADIUS Server so that wireless device can be authenticated from RADIUS Server and get proper authorization.
Part 2: User Manager RADIUS Server Configuration for Authenticating WiFi Devices
User Manager is a RADIUS application and RADIUS Server is used to do AAA (Authentication, Authorization and Accounting) solution. So, using User Manger RADIUS Server we can do authentication, authorization and accounting of WiFi devices in a Wireless Network. How to install User Manager RADIUS Server with basic configuration was discussed in another article. So, here I will only show how to configure User Manger for authenticating WiFi devices.
At first we will add our Wireless Router as a NAS device of User Manager so that User Manager can reply any RADIUS query of our Wireless Router. The following steps will show how to add MikroTik Wireless Router as a NAS device in User Manager RADIUS Server.
- Login User Manager Web Interface.
- Click on Routers menu item. Router page will appear.
- From top menu bar click on Add menu and then choose New option. Router Details window will appear now.
- In Main panel, put a meaningful name (example: MikroTik Router) for that client router in Name input field.
- Put the IP address of the client router (example: 192.168.70.2 that will use User Manager as its RADIUS client) in IP address input field.
- Put the password that you provide in RouterOS RADIUS Client configuration in Shared secret input field. This password must match otherwise the Wireless Router cannot communicate with this RADIUS Server.
- In Radius incoming panel, check the CoA (Change of Authorization) check box and put CoA port 3799. This port will be used to send acknowledgment to NAS device for a user’s authorization. For example, if a user exceeds his time limit, RADIUS Server will tell the NAS device to disconnect the user immediately.
- Click Add button to add this NAS device.
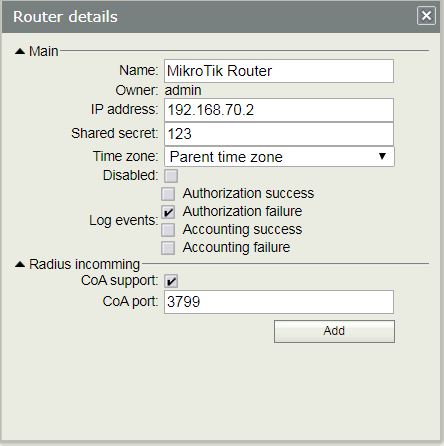
Wireless Router and User Manager RADIUS Server are now ready to communicate with each other. In the next step we will configure RADIUS user that will be authenticated in WiFi AP.
In User Manager RADIUS Server, every user must have a profile otherwise the user cannot be valid. So, before creating user we have to configure profile for the users. In this article we will create three profiles according to the following information.
| SN | Profile Name | Limitation |
| 1 | 1 Mb Package | 1 Mbps download speed |
| 2 | 2 Mb Package | 2 Mbps download speed |
| 3 | 5 Mb Package | 5 Mbps download speed |
The following steps will show how to create these three profiles with the described limitation.
- Click on Profiles menu item. Profile page will appear.
- From Profiles tab click on PLUS SIGN (+). Create profile pop up window will appear.
- Put the first Profile name (1 Mb Package) in Name input box and click Create button. Profile and Profile property list will appear that can be changed as required.
- The created profile has no limitation. To add limitation click on Add new limitation button. Profile part pop up window will appear.
- In Period panel, you can set Days and Time when this profile will be active. By default it will keep 24/7.
- From Limits Panel click on New limit button. Limitation details popup window will appear.
- In Main panel, put a limit name (example: 1Mb) in Name input field.
- In Rate limits panel, put 1M in Rate limit Tx input field and click Add button. Optionally you can set Burst Tx limit, Burst threshold and Burst time. In MikroTik Wireless Router, the Tx limit (transfer limit from AP to wireless device) is applied and Rx cannot be applied. Rx limit only applicable for RouterOS client. So, don’t need to put Rx limit.
- Created limit will be available and remain selected in Limits panel. Click Add button to add this limit to user profile.
- First profile with proper limitation will be created.
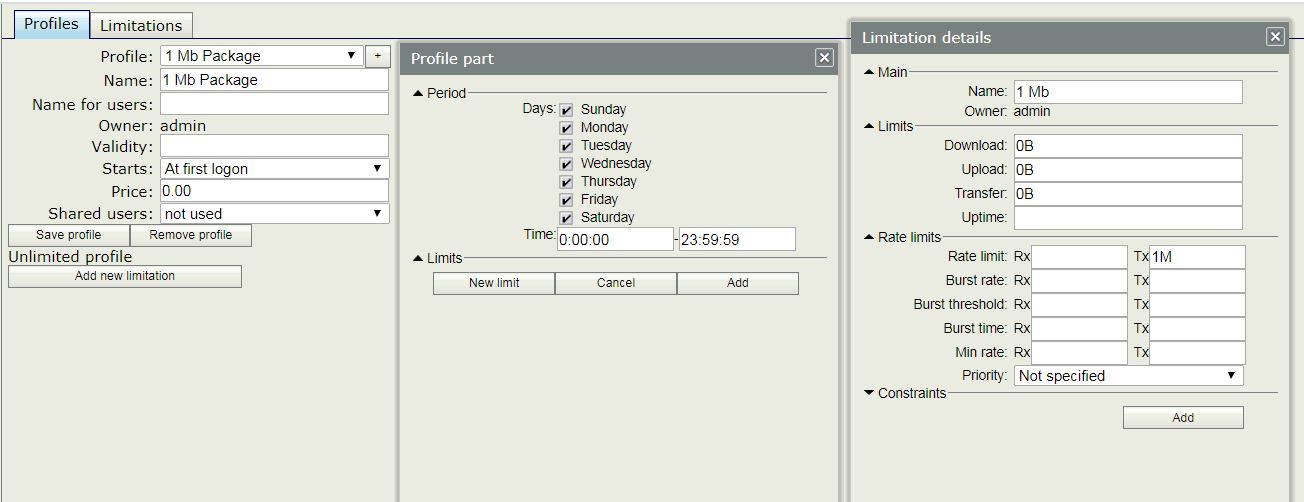
Similarly create 2 Mb and 5 Mb Packages. After creating profiles we will now create user and assign created profile to the user.
The following steps will show how to create user in User Manager RADIUS Server.
- Click on Users menu item. User page will appear.
- From top menu bar click on Add and then click on One option. User details popup window will appear.
- In Main panel, put the device MAC address that you want to allow in Username input filed. As we have chosen MAC Mode only username in WiFi RADIUS configuration, keep the Password field blank.
- From Constraints panel, you can set IP address for this user from IP address input filed and from Wireless panel, you can set private password (SSID password) for this user from Preshared key input field.
- You can also put user private information in Private information panel.
- From Assign profile dropdown menu choose any created profile (example: 1 Mb Package) that you want to assign for this user.
- Click Add button to create this user.
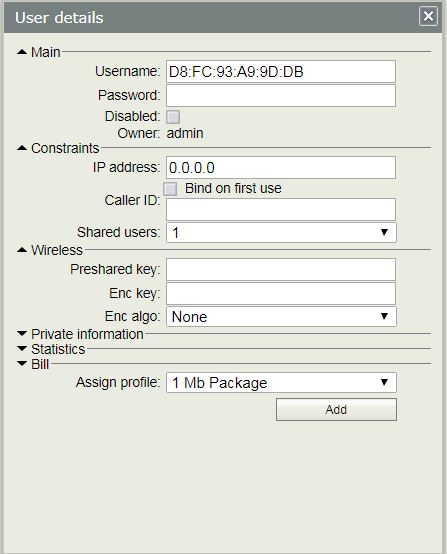
You can create as many users as you want for your wireless network following the above steps.
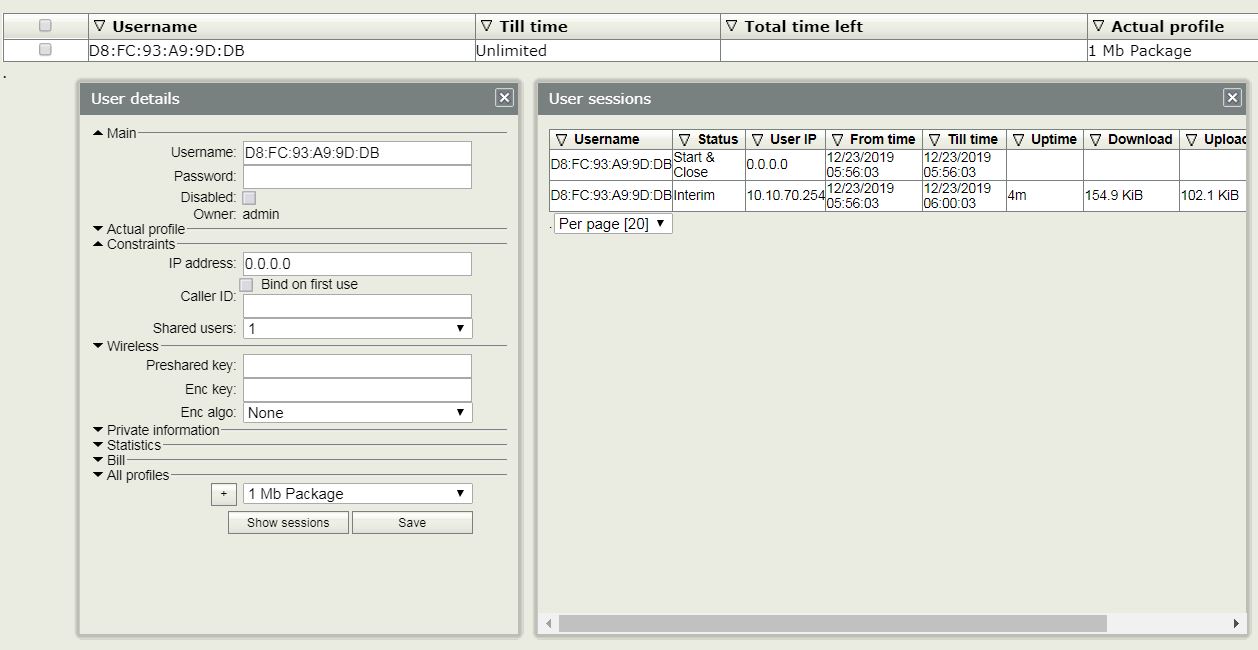
After creating user, now connect the desired wireless device to the WiFi AP. If everything is OK, your desired device will be able to connect to your wireless network and you will find the user’s active session in User Manager RADIUS Server.
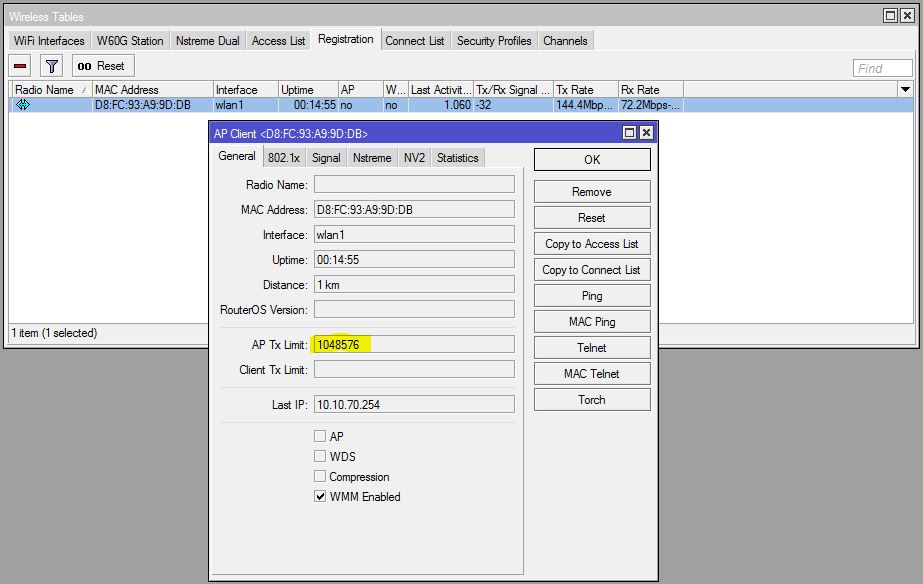
You can also find the connected users status in Registration tab in Wireless Tables window. Here you will find the user’s data transfer speed in AP Tx Limit status.
If anyone tries to connect to your WiFi AP who is not allowed, he will be rejected.
A common query is if anyone knows allowed MAC Address and changes his MAC address, he will be able to connect in this hacking process. MikroTik has an easy solution for this situation. Put private password in Preshared key while creating user in User Manager RADIUS Server. To be connected to WiFi AP, a user must match MAC address and Preshared key otherwise he will not be able to connect. So, MAC address hacking will be useless.
If you face any confusion to follow the above steps properly, watch the following video about WiFi MAC Authentication with RADIUS Server. I hope it will reduce your any confusion.
How to Configure RADIUS MAC Authentication in MikroTik Wireless Router has been discussed in this article. I hope you will now be able to configure MAC Authentication WiFi AP with User Manager RADIUS Server. However, if you face any confusion, feel free to discuss in comment or contact me from Contact page. I will try my best to stay with you.