Вы действительно хотите опубликовать пост в блоге по электронной почте в WordPress? Недавно один из наших пользователей обнаружил скрытые сообщения по электронной почте опцию в WordPress и хочет узнать больше об этом. WordPress позволяет писать и публиковать сообщения в блоге прямо из вашей электронной почты. В этой статье мы покажем вам, как добавлять комментарии и посты по электронной почте в WordPress, и как расширить эту функцию в дальнейшем.
Кому нужна функция создание постов по электронной почте в WordPress?
В некоторых странах правительства запрещают сайты с критикой их политики. Если сайт заблокирован государством, то она становится тяжелее для людей, чтобы открыть его и публиковать контент.
Функция сообщений по электронной почте позволяет публиковать контент, даже когда вы не можете открыть ваш сайт.
Эта функция также полезна для журналистов и активистов, работающих в неспокойных районах с небольшим подключения к интернету.
Он также может быть использован в школе, колледже, и офисных сетей, где доступ к внешним сайтам ограничен, контролируется.
Как настроить функцию сообщение электронной почты в WordPress
Сначала нужно создать секретную учетную запись электронной почты с доступом по протоколу POP3.
Вы можете создать эту учетную запись электронной почты с помощью Gmail или вы можете создать учетную запись электронной почты с собственного домена. Наиболее WordPress хостинг провайдеры предлагают бесплатные учетные записи электронной почты для каждого домена хоста с ними.
При создании учетной записи электронной почты, вы должны убедиться, что адрес электронной почты, выбрать трудно угадать. Вы должны использовать случайный набор цифр и алфавитов. Например: andreyex@gmail.com
Важно, что никто не может угадать это письмо, потому что любые письма, полученные публикуются как сообщения в блоге.
После того как вы создали адрес электронной почты, следующим шагом является настройка сообщения по электронной почте в WordPress, так чтобы любое письмо что получил на этот адрес обрабатывается как новый пост.
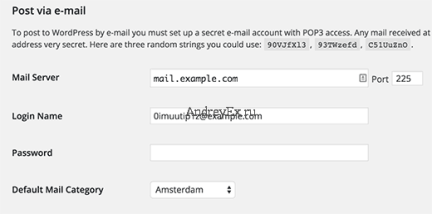
WordPress имеет встроенный в пост через функцию электронной почты находится в разделе «Настройки » Написание страницы в WordPress админке.

Однако, эта функция будет удалена из WordPress в будущей версии. Это также не очень сложное и не хватает важных функций, которые вам нужно будет правильно публиковать сообщения по электронной почте. Именно поэтому мы рекомендуем Вам использовать плагин.
Настройка почтой через Postie
Первое, что вам нужно сделать, это установить и активировать Postie плагин. После активации плагин добавит новый пункт меню в админ-баре. Нажатие на нее приведет вас к странице настроек плагина.

Вот где вы сможете ввести регистрационные данные для секретной учетной записи электронной почты, который вы создали ранее.
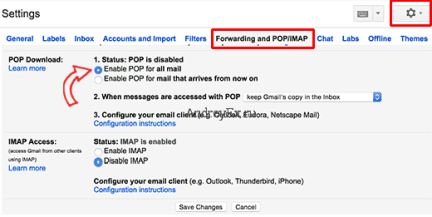
Если вы используете Gmail для вашей секретной учетной записи электронной почты, то сначала убедитесь, что у вас включен POP3. Нажмите на значок шестеренки в Gmail, а затем нажмите на настройки. Теперь идем в «пересылка по Pop/IMAP ’ на вкладке и выберите включить Pop для всех писем.
Не забудьте нажать на кнопку Сохранить, чтобы сохранить настройки.

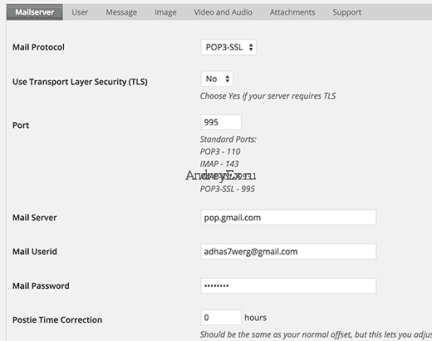
Сейчас настройки Postie, выберите POP3 в качестве Вашего почтового протокола и ‘нет’ на ‘использовать протокол TLS’.
Использовать 995 порт и pop.gmail.com как ваш почтовый сервер. Введите свой полный адрес электронной почты в качестве почтового идентификатора пользователя и предоставить пароль для этой учетной записи электронной почты.
Для целей тестирования, выберите «проверить вручную» в строке » проверять почту каждые:’.
Не забудьте изменить этот параметр для автоматического расписания после того как вы проверили и подтвердили, что пост через электронную почту работает нормально на вашем сайте.
Нажмите на кнопку Сохранить изменения, чтобы сохранить настройки.
Тестирование поста через функцию электронной почты
Теперь давайте идти вперед и испытать наш пост по электронной почте, чтобы увидеть как он работает должным образом.
Все, что вам нужно сделать, это отправить письмо на ваш секретный адрес электронной почты. Вы можете использовать любую учетную запись электронной почты, чтобы отправить это письмо. Не стесняйтесь добавлять вложения, изображения и ссылки на ваш мейл.
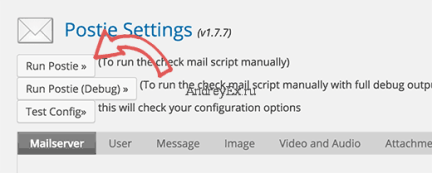
Теперь посетите страницу настроек Postie и щелкните на кнопку Запустить Postie.

Postie будет теперь пытаться войти на ваш секретный адрес электронной почты и считает ваше сообщение. Если она находит новое сообщение, то оно будет добавлено в WordPress как новый пост и сразу же будет опубликовано на вашем сайте.
Расширенный пост по электронной почте
Postie позволяет размещать на WordPress используя все возможности редактирования поста. Он может обрабатывать HTML-форматирование, встроенные изображения, аудио и видео файлы.
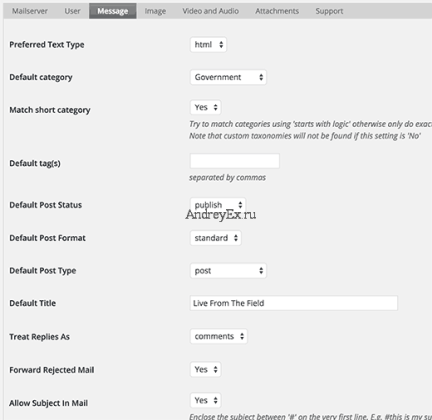
Посетите страницу параметров плагина, а затем щелкните на вкладке сообщение.

Сначала вы должны изменить предпочтительный Тип текста на HTML. Это позволит вам отображать вложенные изображения и ваш собственное HTML-форматирование.
Вы можете выбрать по умолчанию категории и теги на все посты, поступающими по электронной почте. Вы можете изменить статус сообщения и выберите стандартный тип поста.
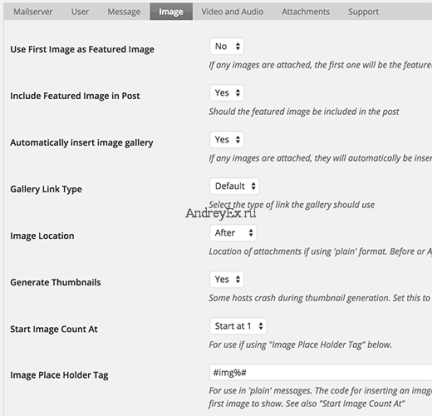
Переключитесь на вкладку изображение в параметрах Postie, и вы увидите множество опций для обработки изображений по электронной почте. Вы можете установить вложение как Избранные изображения или как встроенные изображения. Вы можете даже позволить postie обнаружить ряд изображений, а затем создать галерею с приложенными изображениями.

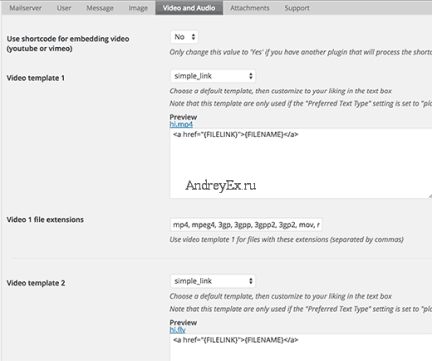
Вы можете переключиться на видео и закладкой аудио, и сконфигурируйте параметры для прикрепленных аудио и видео файлов. Postie может встроить видео, как WordPress, и вы можете также использовать короткие ссылки, если вы хотите. Это особенно полезно, когда вы используете плагин, который просит Вас, чтобы обернуть вашу ссылку на видео в шорткод.

Для еще более продвинутых вариантов, мы рекомендуем проверить документацию на Postie сайте.
Мы надеемся, что эта статья помогла вам узнать, как добавлять комментарии и сообщения по электронной почте в WordPress. Вы также можете проверить наш гид о том, как добавить подписки по электронной почте на ваш WordPress блог.
2015-09-23T16:29:03
CMS WordPress