Apache — это популярнейший свободный веб-сервер. Состоянием на 2020 год он используется на 33% всех сайтов интернета, а это приблизительно 304 миллиарда сайтов. Этот веб-сервер был разработан в далеком 1995, как замена для популярного тогда сервера NCSA и исправил множество его проблем. Ходят слухи что его имя походит от a patchy, заплатка, так как он исправлял ошибки NCSA. Сейчас же, это кроссплатформенная программа, поддерживающая Windows, Linux и MacOS и обеспечивающая достаточную гибкость, настраиваемость и функциональность. Программа имеет модульную структуру, что позволяет расширять ее функциональность почти до бесконечности с помощью модулей.
Установить Apache в Linux можно с помощью нескольких команд, но программа предоставляет очень большое количество настроек, которые можно изменить, а также модулей, после включения которых она будет работать лучше. В этой статье будет рассмотрена установка и настройка Apache, в качестве основной системы мы будем использовать Ubuntu, но вы можете повторить эти действия в любом другом дистрибутиве. Будет рассмотрена не только установка самой программы, но и способы ее настройки, настройка виртуальных хостов apache, а также самые полезные модули.
Философия операционных систем Unix гласит, что все есть файл. Это значит, что вся работа с этой операционной системой сводится к файлам. Поскольку Linux можно считать тоже потомком Unix, то эта концепция применима и здесь. Файлы это объекты, в которые мы записываем информацию и наши данные, исполняемые файлы, но кроме этих привычных нам понятий здесь есть файлы специального назначения — файлы устройств, файлы туннелей, сокетов и многое другое. Эта тема очень слабо освещена в интернете, поэтому в нашей сегодняшней статье мы рассмотрим типы файлов linux. Читать →
MikroTik is an excellent router for managing ISP or local ISP Bandwidth. For this, most of the ISPs are now using MikroTik router for managing their client bandwidth. There are various types of queue services in MikroTik router for managing internet bandwidth. Among them PCQ can specially be used for maintaining ISP or local ISP bandwidth. So, in this article I will show how to maintain ISP or local ISP Bandwidth with MikroTik PCQ service.
MikroTik PCQ Service
PCQ stands for Per Connection Queues. This service helps to maintain ISP or local ISP Bandwidth so easily. As a network administrator of any ISP company, you should manage various offered bandwidth packages like 512kbps connection, 1Mbps connection or 2Mbps connection for the clients. Managing these packages with MikroTik Simple Queues will be so hardy and time killing. But PCQ will be so helpful for managing these bandwidth packages because in PCQ service you will just create different PCQ profile according to your bandwidth packages and assign any PCQ profile to a network block. Then, every IP of this block will get equal bandwidth that you assigned in PCQ Profile. So, your MikroTik Queue configuration is just one time. You will map network block according to your offered bandwidth packages and then assign client IP according to their purchase bandwidth. The whole process will be shown in the rest of this article.
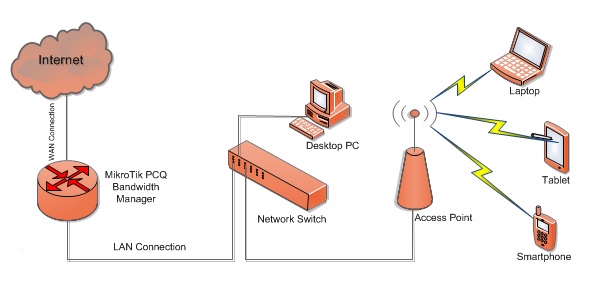
MikroTik PCQ Bandwidth Manager
Managing ISP Bandwidth with MikroTik PCQ Service
PCQ is a simple but effective and hassle free method for managing your ISP bandwidth. Say, you have three offered packages for your ISP clients. These are 512kbps connection, 1Mbps connection and 2Mbps connection. So, your proposed plan would be like below.
512kbps clients will get 192.168.10.0/24 block IP.
1Mbps clients will get 192.168.11.0/24 block IP and
2Mbps clients will get 192.168.12.0/24 block IP.
Now if a client purchases 512kbps connection, you will just assign him/her a 192.168.10.0/24 block IP or if a client purchases 1Mbps connection, you will assign him/her a 192.168.11.0/24 block IP. If you configure PCQ in your MikroTik router properly, every client of these blocks will get your assigned bandwidth because in PCQ service every client gets equal bandwidth that will be assigned for the whole block.
Complete PCQ configuration with MikroTik router can be divided into two steps.
MikroTik router basic configuration
MikroTik PCQ configuration
Step 1: MikroTik Router Basic Configuration
Before going to start MikroTik PCQ configuration, first we need to complete MikroTik router basic configuration. MikroTik basic configuration includes assigning WAN IP, LAN gateway IP, default gateway IP, DNS IP and NAT configuration. These basic steps were explained in my another article about MikroTik router basic configuration using winbox. If you are a new MikroTik user, spend some times to study that article and complete MikroTik router basic configuration and then follow the rest of this article to complete MikroTik PCQ configuration.
Step 2: MikroTik PCQ Configuration
After completing MikroTik router basic configuration, we will now configure MikroTik PCQ service for managing client bandwidth. MikroTik PCQ configuration can be divided into two steps.
Queue Types Configuration
Simple Queue Configuration
Queue Types Configuration
First we will configure/create Queue Types for our offered packages. Here we will define Upload and Download speed for our offered packages. So, follow my below steps to complete Queue Types configuration.
Login to your MikroTik Router and click on Queues menu. Now click on Queue Type tab and then click on PLUS SIGN (+) to add new Queue type. New Queue Type window will appear.
In this window, type 512kbps_Download or as you like in Type Name input box and select pcq from the Kind drop-down menu. This pcq will decide to assign rated bandwidth for all the clients who have this queue type. Now type 512k in Rate input box and check the Dst. Address checkbox from the Classifier panel and then Click Apply and then OK button.
Again click on PLUS SIGN (+) and type 512kbps _Upload in Type Name input box. Choose pcq from the Kind drop-down menu and type 512k in Rate input box and then check Src. Address from the Classifier panel and then click Apply and OK button.
Do step 2 and step 3 for 1Mbps connection and 2Mbps connection. Just change the Rate value 1M and 2M accordingly for these connections.
PCQ Queue types configuration has been completed. Now we will configure Simple Queue for these PCQ Queue types.
Simple Queues Configuration for PCQ Queue Types
After creating PCQ Queue Types, we will now declare different IP blocks that will get these PCQ Queue types. Follow my below steps to complete Simple Queue configuration for the PCQ Queue Types those you created before.
Click on Simple Queues tab and click PLUS SIGN (+) to add new simple queue. New Simple Queue window will appear now. In General tab, type 512kbps_Clients in Name input box or any text that you like and type 192.168.10.0/24 in Target input box. You can also define multiple IP blocks by clicking Add new value button located at right side of Target input box and typing new IP block.
Click on Advanced tab and choose 512kbps_Upload and 512kbps_Download from Queue Type drop-down menu. As you have assigned 512kbps Upload and Download for Queue Type of this simple queue, all the IPs in this IP block will get 512kbps speed separately. Now click Apply and then OK button.
Do step 1 and 2 for 1Mbps connection and 2Mbps connection. Just change Target address and Queue Type for these connections.
PCQ configuration in MikroTik Router for the proposed packages has been completed. Now assign your clients IP and check their bandwidth with free internet speed test tool. I hope you will get your desired result. However, if you face any problem to follow above steps, please watch the below video carefully about ISP or Local ISP Bandwidth Management with MikroTik PCQ.
ISP or local ISP Bandwidth Management with MikroTik PCQ has been described step by step in this article. Also a video tutorial has been uploaded to reduce any confusion on configuration. I hope you are now able to configure PCQ in your MikroTik router and able to maintain your client bandwidth without any hassles. However, if you face any problem to assign bandwidth to your ISP client with PCQ configuration, please discuss in comment or contact with me from Contact page. I will try my best to stay with you.
Настраиваю распределенную систему мониторинга и на одном из виндовых хостов получаю ошибку: init_cpu_collector(): cannot make counterpath for «\»: [0xC0000BBD] Обязательный аргумент пропущен или указан неправильно. В элементах данных при этом ошибки: Collector is not started либо Invalid performance counter path.
MikroTikis a popular and mostly used router because of having a lot of networking functionalities and cheap price. MikroTik router can be found both Router Board and MikroTik OS. If you buy a MikroTik Routerboard (like MikroTik Routerboard 450G, MikroTik Routerboard 1100 AH), you will find a machine where MikroTik OS is prebuilt but the machine contains limited processing resources such as limited RAM and limited processor core. So, your network could be slow if you use a MikroTik Routerboard for maintaining a large network (Note: Sometimes it is better to use Routerboard like CCR1016-12G because it is specially designed for working at layer 3 and processing many millions of packets per second). On the other hand, if you install MikroTik OS on a PC or on a Server, you will get a faster processor with sufficient RAM. So, it will be easy and faster for maintaining a large network with this MikroTik PC router (Note: PC or Server processors are specially designed for working at layer 7 and working with application. So, it will be better avoiding low configuration PC or Server). As MikroTik PC router is a better solution for a larger network, this article is designed to show you the necessary steps to install MikroTik OS on a PC or a Server.
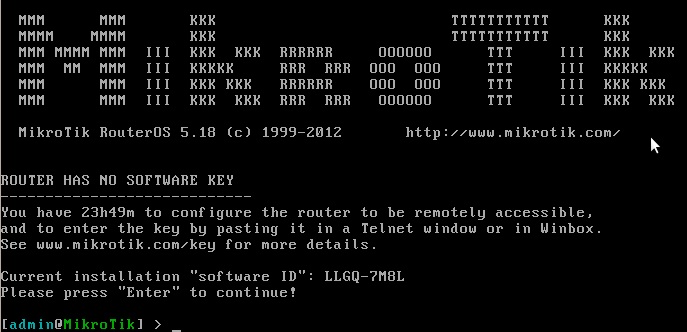
MikroTikRouterOS CLI
Requirements
It should have at least two network cards to turn a PC or Server into a MikroTik Router. One card will be used as LAN connection and another card will be used as WAN connection. It is also better to use more than one core and sufficient memory for processing millions of network packets. You must remember that IDE HDD is required for installing RouterOS.
MikroTik PC Router Installation
MikroTik OS can be installed on a virtual machine or on a physical machine. If you interested to install MikroTik OS on a virtual machine, download VMware Workstation to create a virtual machine and then follow my video tutorial about Setup MikroTik OS on VMware Virtual Machine. If you interested to install MikroTik OS on a physical machine, download MikroTik OS ISO and burn the ISO in a blank CD or DVD or in a USB flash drive and then follow my below steps to install MikroTik OS ISP on your physical machine.
Boot your PC or Server from your bootable media such as CD or DVD ROM. If everything is OK, MikroTik OS will be started to install and format the disk. If you use a large disk, it will take more time to format. So, be patient to wait. After formatting the disk, it will ask you for selecting packages those will be installed.
To install all packages, press ‘a‘ or press ‘M’ for minimal installation and then press ‘i‘ for starting installation.
It will now ask you whether it will keep old configuration or not. Press ‘n‘, because it will be better to delete old configuration in your disk. It will now show a warning message. Press ‘y‘ for continue installation. All selected packages will be installed and then it will ask you to hit ‘Enter‘ key to reboot the system. Hit ‘Enter‘ key now.
After rebooting, it will ask you to provide login credential. MikroTik default username is ‘admin‘ and password is blank. So, type ‘admin‘ for MikroTik login and password left blank and then hit ‘Enter‘ key.
MikroTik CLI will appear now. It will also show a Software ID in the login screen. Write down this Software ID because it will be required when you want to purchase a license from MikroTik site.
How to install MikroTik OS in a Physical Machine to make a MikroTik PC Router has been discussed in this article. A video is also uploaded to reduce your any confusion. However, if you face any problem to install MikroTik OS ISO on your physical machine, feel free to discuss in comment or contact with me form Contact page. I will try my best to stay with you.
Операционная система должна быть не только функциональной, но и иметь приятный взгляду интерфейс. И если c возможностями у Ubuntu всё не так уж плохо, то о красоте разработчики явно не позаботились. Стандартные наборы иконок, кочующие из версии в версию, способны повергнуть в депрессию даже эмоционально стойких пользователей.
Разнообразить внешний вид рабочего стола можно, установив в систему дизайнерские иконки. Их количество измеряется сотнями, а подобрать желаемый вариант легче всего на сайтах deviantart.com и gnome-look.org. Ну а в этой статье вашему вниманию представлены 10 лучших (по мнению автора) наборов иконок для Ubuntu.