Если у сервера не настроить часовой пояс, то появится целый ворох проблем после запуска проекта. Рассмотрим пример как сменить часовой пояс на CentOS 7. Читать
Архив рубрики: Публикации
Обзор фильма I.T. «Искусственный интеллект. Доступ неограничен»

Поговорим о фильме сегодня «Искусственный интеллект. Доступ неограничен», хотя оригинальное название значится как «I.T.», ну это собственно не так важно.
Стоит отметить, что фильм то поучительный на самом деле. С развитием технологий, а в частности информационных мы становимся все более подвержены разного рода нетривиальными для большинства 3,1416-здецам.
Сразу скажу тем кто не смотрел, посмотреть можно. Но читать статью далее лучше потом, после просмотра. Скажите себе или мне в комментариях прав я или не прав, а может и добавите чего-нибудь.
Итак продолжим про поучительность. Поучительны как поддельные письма от доктора с положительными результатами анализов на рак груди, так и рассылка оскорбительных писем клиентам компании – и все это действительно может случится. Да и удаленный доступ к системе управления автомобилем не кажется чем то уж сверхъестественным. Отправка же сообщения с порнографическим содержанием в школу жертвы и вовсе недавно анонсировалось в СМИ ( тогда злоумышленник действовал через ТОР и выманивал у жертвы под предлогом обнародования уже полученного материала еще больше контента. Взяли его с внедрением в фотографию очередной отправляемой фотографии кода, который позволил определить его реальный ip-адрес). А вот вывод из строя системы навигации самолетов это конечно на грани фантастики. Вывод из строя таких систем не только может вынудить компанию понести существенные убытки и в последствии отбывать тюремные сроки руководству, но и спровоцировать гибель огромного количества людей. Подходы с точки зрения безопасности при эксплуатации данных систем должны быть приоритетными и аспекты информационной безопасности в этой системе имеют особую значимость. С учетом этого возникает вопрос:
И где в такой крутой компании, которая вдуматься только- предоставляет подачу самолетов как такси на заказ через приложения офицеры информационной безопасности???
Хотя возможно если бы их показали было бы только хуже))
Главные выводы:
-Нельзя резко увольнять айтишника который админит сервера систем обеспечивающих бизнес-процесы со словами : ” ты уволен, завтра освободи стол” и думать что ничего не случиться, а потом требовать сменить логины и пароли и восстановить систему.
-Телкам не надо постить бесконечное количество фотографий а также персональной информации, владение которой злоумышленником позволит последним реализовать свои коварные планы.
-Тщательнее проверять кандидатов при устройстве на работу. Чувак который подделал документы (душевно больной с правами и оружием) получает доступ ко всему без судя по всему должной проверки ( у нас даже в некоторых коммерческих организациях предусмотрен детектор лжи), а уж стандартные запросы в гос органы в стиле МВД и вовсе классика.
– Менять пароли после компрометации. Вспомните момент когда Пирс называл пароль от вай-фая у себя дома.
– По возможности ездить на механике и не использовать системы умный дом (ну это так уж – в идеале).
P.S. В фильме хацкер конечно больной на всю кукушку, порой страшно, порой забавно
2017-09-28T19:55:19
Медиа
Настройка UPnP в MikroTik
В Winbox настройки можно найти открыв «IP» — «UPnP«.
Для включения поставим галочку напротив Enabled.
После этого нужно указать интерфейсы, нажмем «Interfaces» и «Add New«.
1. Внешний (external) WAN порт, обычно это ether1-gateway.
2. Внутренний (internal) порт или бридж, например bridge1.
Через консоль так:
/ip upnp

set enabled=yes

show-dummy-rule=yes

allow-disable-external-interface=no

/ip upnp interfaces

add interface=ether1-gateway type=external

add interface=bridge1 type=internal
2017-09-25T09:00:46
MikroTik
Обзор менеджеров паролей для Linux
Сегодня большинство пользователей Интернета подвергаются кибератакам, а не потому, что они не используют каких-либо лучших мер безопасности, а потому, что используют слабые пароли для защиты своих учетных записей.
Пароли – ваш последний способ защиты от онлайн-угроз.
Несмотря на то, что мы с трудом можем контролировать нарушения данных, по-прежнему важно поддерживать надежные пароли, которые могут помешать совершать атаки с использованием брутфорса.
Целесообразно создавать длинные, сложные и разные пароли для различных онлайн-счетов.
Ваш пароль должен содержать не менее 16 символов с комбинацией цифр, символов, алфавитов верхнего и нижнего регистра. Но очень сложно запомнить такие сложные пароли.
К счастью, для облегчения всего этого процесса у нас есть инструменты для управления паролями для наших различных дистрибутивов ОС, поддерживающих наши настольные компьютеры, телефоны и т. д.
Это может значительно уменьшить проблему запоминания пароля и облегчить использование сложных сложных паролей.
В этой статье я покажу вам список инструментов , доступных для Linux.
Средство управления паролями – это программное приложение, которое помогает вам хранить и управлять паролями.
Менеджеры паролей обычно хранят свои пароли в зашифрованном виде.
Им потребуется пользователь, чтобы создать главный пароль, который является очень сильным, который предоставляет пользователю доступ ко всей базе данных паролей.
Существует два типа инструментов Менеджеров Паролей: автономные и онлайн-менеджеры паролей.
Офлайн-инструменты MП хранят информацию о пароле в своих персональных системах, тогда как в онлайн-инструментах MП пароли хранятся в облачных провайдерах.
Вкратце, менеджер паролей должен безопасно хранить большую информацию о пароле. Функции, которые делают администратора паролей идеальными, таковы:
Кросс-платформенное приложение
Работает с нулевой моделью знаний
Двухфакторные методы аутентификации
Вот некоторые из лучших инструментов управления паролями в Linux.
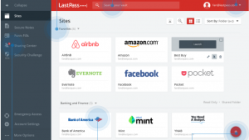
1) LastPass
Это один из лучших онлайн-инструментов для управления паролями и один из самых рейтинговых.
Он поставляется с расширением, мобильным приложением и даже поддержкой настольных приложений для всех браузеров и операционных систем.
Он используют средства хранения паролей на основе облачных вычислений, шифруя личную информацию пользователя и пароли с помощью шифрования AES-256 с помощью PBKDF2 SHA-256 и солей хеша, чтобы обеспечить полную безопасность в облаке.
Загрузите последнюю версию Lastpass Software из расширений для Linux.
Инструкции по установке в командной строке.
Загрузите это программное обеспечение из указанной выше ссылки
Щелкните правой кнопкой мыши и сохраните файл lplinux.tar.bz2 на свой компьютер.
После загрузки запустите:
# tar xjvf lplinux.tar.bz2

# cd lplinux && ./install_lastpass.sh
Неограниченное хранилище для паролей и заметок, многофакторная аутентификация и OTP, автоматическое резервное копирование и синхронизация для вашего первого устройства, автоматическое заполнение логинов и форм, паролей настольных приложений – вот некоторые из его основных функций.
2) Keeper
Keeper мы уже рассмотрели намедни, можете ознакомится подробнее по ссылке ниже:
Keeper – безопасный способ сохранить пароль с управлением из командной строки
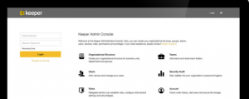
По этой ссылке вы можете загрузить последнюю версию программного обеспечения Keeper Password Manager для Linux.
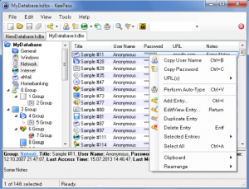
3) KeePass
Ознакомится с установкой Keepass на Windows
KeePass – бесплатный, легкий и простой в использовании менеджер паролей.
Он поможет вам безопасно управлять паролями, помещая все ваши пароли в одну базу данных и управляемый одним основным ключом или файлом ключа.
Все, что вам нужно сделать, это запомнить один единственный мастер-пароль или файл ключа, чтобы разблокировать всю базу данных.
Он шифрует ваши пароли и регистрационную информацию, используя самые безопасные алгоритмы шифрования, 256-битным шифрованием AES по умолчанию, или, возможно, 256-битное шифрование Twofish.
Загрузите свежую версию программного обеспечения KeePass для Linux.
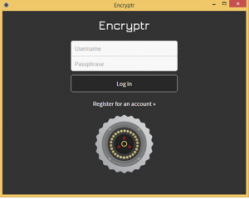
4) SpiderOak Encryptr
Encryptr является продуктом с открытым исходным кодом, с нулевой моделью знаний, облачным менеджером паролей.
Он шифрует ваши пароли, используя Crypton JavaScript framework.
Все приложения на основе криптона основаны исключительно на клиенте, в котором только сервер используется в качестве носителя для доступа к базе данных, в которой они хранятся.
Он использует сквозное шифрование и предоставляет высокоуровневые API для управления учетными записями пользователей, хранения данных и обмена информацией.
Он поддерживает Windows, OS X, Linux и Android.
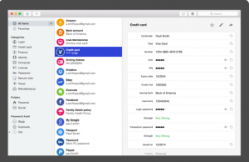
Это легкое приложение, которое поставляется с некоторыми базовыми функциями для шифрования паролей, номеров кредитных карт и вообще любых текстов / ключей.
Скачать последнюю версию Encrypt можно по ссылке
5) EnPass
Как и KeePass и Keeper , EnPass уже был нами рассмотрен. Ссылка на мануал по нему ниже:
Напомню, что скачать Enpass для Linux можно по ссылке на официальном сайте
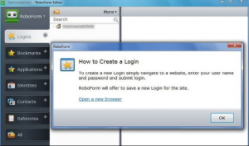
6) RoboForm
RoboForm – бесплатное программное обеспечение для управления паролями с открытым исходным кодом и простым в использовании интерфейсом.
Он поставляется с несколькими функциями, такими как заполнение форм, синхронизация паролей, генератор паролей и т. д, помимо управлением паролями.
Он поможет вам безопасно управлять паролями, помещая все ваши пароли в одну базу данных и управляемый одним основным ключом.
Он шифрует наши пароли для входа и другую информацию, используя шифрование AES для обеспечения высокого уровня безопасности.
Он доступен для популярных дистрибутивов ОС, а также для браузеров, таких как Internet Explorer, Chrome и Firefox, а также для мобильных платформ.
Скачать Roboform с официального сайта
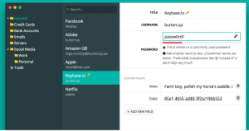
7) Buttercup
Buttercup предоставляет интерфейс для взаимодействия пользователей с их архивами.
Он состоит из нескольких компонентов, включая репозитории и пакеты npm.
Основной компонент отвечает за структуру архива, функциональность, шифрование, сохранение и загрузку.
Он также управляет разрешением конфликтов для оптимизации архива.
Электрон обеспечивает полный контроль над его поведением и дизайном, оставаясь при этом весьма портативным.
Он также оснащен красивым интерфейсом для всех настольных приложений. Этот браузер доступен для Chrome.
Он обеспечивает надежную защиту, архивы шифруются с использованием криптографической библиотеки Node с помощью метода GCES AES 256 бит, поэтому чувствительное содержимое обрабатывается очень безопасно.
Мы можем использовать личные хранилища облака для хранения наших паролей.
Он является кросс-платформенным и доступен для всех популярных дистрибутивов ОС.
Скачать менеджер паролей Buttercup
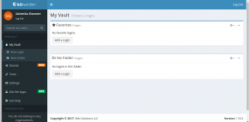
8) Bitwarden
Это один из популярных решений для управления паролями с открытым исходным кодом.
Безопасные функции синхронизации облака позволяют вам получать доступ к вашим данным из любого места на любом устройстве.
Ваше хранилище удобно оптимизировано для использования на настольных компьютерах, ноутбуках, планшетах и телефонах.
Все ваши данные будут полностью зашифрованы до того, как они покинут ваше устройство, только у вас есть права на доступ к нему.
Ваши данные полностью зашифрованы с помощью шифрования AES, солей хэширования и PBKDF2.
Это кросс-платформенное приложение, поддерживаемое во всех популярных дистрибутивах ОС.
Он также поставляется расширением, мобильным приложением для всех популярных браузеров, таких как Google Chrome, Firefox, Opera, Vivaldi и Tor Browser.
9) Passmgr
Passmgr – это простой и мощный менеджер паролей командной строки.
Все данные хранятся в зашифрованном виде с использованием безопасного режима AES256-GCM, и файл хранится в домашнем каталоге пользователя.
Команда passmgr по умолчанию позволяет выбрать учетные данные, а затем скопировать их в буфер обмена.
 $ passmgr

[passmgr] master passphrase for /home/linoxide/.passmgr_store:


n) User URL

1) mygituser github.com

2) Thomashogn@gmail.com facebook.com


Choose a command [(S)elect/(f)ilter/(a)dd/(d)elete/(q)uit]

Select: 1


Passphrase copied to clipboard!

Clipboard will be erased in 15 seconds.


...............


Passphrase erased from clipboard.
2017-09-21T16:18:40
Медиа
Ник Билтон Киберпреступник #1
 История о создателе Silk Road.
Бестселлер The New York Times и Amazon! Реальная история о создателе крупнейшего онлайн-рынка для торговли наркотиками и оружием «Шелковый путь». Как ловили киберпреступника №1 и кем он оказался на самом деле ? читайте в этой книге.
Вас ждёт правдивая и захватывающая история о гении киберпреступного мира, создавшего самый неуязвимый и масштабный “черный рынок” в Сети. Журналист Ник Билтон провел масштабное расследование, изучил тысячи документов и сотни тысяч свидетельств, чтобы создать эту уникальную книгу.
MikroTik VLAN and Bridge Configuration
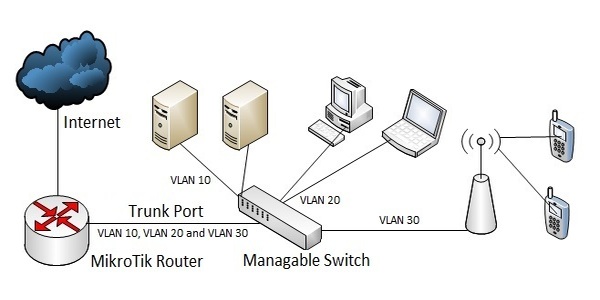
VLAN and Bridge are two useful features in MikroTik Router. These two features are frequently used in any MikroTik network configuration. VLAN divides a physical interface into multiple logical interfaces. So, you can isolate your network into multiple logical networks on a physical interface. On other hand, MikroTik Bridge integrates multiple physical interfaces in a logical interface. So, you can extend your broadcast domain on multiple physical interfaces and can extend your popular services such as PPPoE or DHCP on multiple physical interfaces. As VLAN and Bridge are useful to any MikroTik network, this article is designed to show the necessary steps to configure VLAN and Bridge in MikroTik Router.
VLAN in MikroTik
VLAN (Virtual Local Area Network) is used to create multiple virtual LANs on a single physical interface. It is a layer 2 method that divides a single broadcast domain into multiple broadcast domains. So, proper VLAN planning can increase your network performance as well as network privacy.
There are various situations when you need to create VLAN in your MikroTik router. For example, if your ISP provides your WAN connection through a VLAN, you have to create a VLAN on your WAN interface or if you need to isolate your VIP users from other network users for any security purpose, VALN will be a better solution to isolate your physical network into multiple logical networks.
How to Create VLAN in MikroTik
VLAN can easily be created in MikroTik router like other network devices. Following steps will show you how to create VLAN in your MikroTik Router.
- Login to your MikroTik Router by winbox with your login credentials.
- Click on Interfaces menu from left menu bar and then click on VLAN tab.
- Click on PLUS SIGN (+) to add new VLAN interface. A new window named New Interface will appear.
- Put your VLAN name what you wish in Name input field.
- Put your VLAN id in VLAN ID input field. If you want to create VLAN for WAN connection, your ISP will provide you the VLAN ID. If you want to create VLAN for your network, provide an integer number between 1 to 4095 what you wish.
- Now choose your physical interface on which you want to create VLAN from Interface dropdown menu.
- Click Apply and OK button.
A new VLAN interface has been created. Similarly, you can create as many VLANs as you want following the above steps.
Your newly created VLAN interface will behave like a physical interface. So, you can assign an IP on this VLAN interface as well as you can use this interface for routing. You will find your newly created VLAN interface all the places where there is an option to select interface such as assigning IP address on an interface, selecting your network gateway interface and so on.
If you wish to create VLAN for your local network, you have to configure a manageable switch. Follow my article about MikroTik VLAN routing configuration with manageable switch. It will show how to configure inter-VLAN routing with MikroTik Router and manageable switch.
MikroTik Bridge
Every port in MikroTik Router is a layer 3 port by default and its keep in different broadcast domain. So, if you create a PPPoE server or a DHCP server on any interface, the service cannot be accessible from any other interfaces and other interfaces keep unused sometimes. If you want to use these unused interfaces and want to access your DHCP or PPPoE server from all the interfaces, you have to turn your layer 3 ports to layer 2 ports and bind them to a layer 3 logical port. MikroTik bridge feature has come for this purpose.
MikroTik Bridge turns layer 3 ports to layer 2 ports and bind them with a logical layer 3 port. So, all the bridge ports as well as the logical layer 3 port keep in the same broadcast domain. Now it is possible to access any service like PPPoE or DHCP from any bridged MikroTik port.
How to Create Bridge in MikroTik Router
There are two major steps to create Bridge in MikroTik Router. First step is creating a logical bridge interface and second step is binding your desired physical interface to this logical interface. Following steps will show you the complete bridge configuration in MikroTik Router.
- Login to your MikroTik Router by winbox with your login credentials.
- Click on Bridge menu item from left menu bar. Bridge window will appear now.
- Click on Bridge tab if not selected and then click on PLUS SIGN (+). New Interface window will appear.
- Put your bridge interface name as you wish in the Name
- Click Apply and OK
- Now click on Ports tab and then click on PLUS SIGN (+). New Bridge Port window will appear.
- Choose your physical interface that you want to bind to the bridge interface from Interface dropdown menu.
- Choose your Bridge interface that you created before from Bridge dropdown menu.
- Click Apply and OK
- Do step 6 to step 9 if you want to add more physical interfaces to your bridge interface.
Creating logical bridge interface and binding physical interfaces to this bridge interface have been completed. Now any service that is created on bridge interface will be accessible from your bound physical interfaces easily.
If you face any problem to do above steps properly, watch below video carefully about MikroTik VLAN and Bridge Configuration. I hope it will help you to do the above steps successfully.
MikroTik VLAN and Bridge configuration has been discussed in this article. I hope you are now able to create VLAN or Bridge in your MikroTik Router if necessary. However, if you face any problem to create VLAN or Bridge in your MikroTik Router, feel free to discuss in comment or contact with me from Contact page. I will try my best to stay with you.
2017-09-19T22:33:05
MikroTik Router Tutorials & Guides