Появилась новая угроза отравления кеша DNS, которая носит название Side-channel AttackeD DNS (SAD DNS).
Эта новая атака работает следующим образом: SAD DNS позволяет хакерам перенаправлять трафик, предназначенный для определенного домена, на сервер под их контролем.
С помощью этой атаки они могут легко шпионить за вашим трафиком.
Это атака по побочным каналам сети может быть с серьезными последствиями для безопасности как пользователей, так и предприятий, даже если ваши серверы в Германии
Этот новый недостаток затрагивает операционные системы Linux (ядро 3.18-5.10), Windows Server 2019 (версия 1809) и новее, macOS 10.15 и новее, FreeBSD 12.1.0 и новее.
Скрипт, созданный BlueCat, на самом деле довольно прост и выглядит так:
#!/usr/bin/env bash

#

# THE SOFTWARE IS PROVIDED "AS IS", WITHOUT WARRANTY OF ANY KIND, EXPRESS

# OR IMPLIED, INCLUDING BUT NOT LIMITED TO THE WARRANTIES OF MERCHANTABILITY,

# FITNESS FOR A PARTICULAR PURPOSE AND NONINFRINGEMENT. IN NO EVENT SHALL THE

# AUTHORS OR COPYRIGHT HOLDERS BE LIABLE FOR ANY CLAIM, DAMAGES OR OTHER

# LIABILITY, WHETHER IN AN ACTION OF CONTRACT, TORT OR OTHERWISE, ARISING FROM,

# OUT OF OR IN CONNECTION WITH THE SOFTWARE OR THE USE OR OTHER DEALINGS IN

# THE SOFTWARE.

###########################################################################

#

# Three options for installation. Choose one of the following:

#

# 1. Copy to /etc/cron.minutely

#

# 2. Copy the script to the DNS server. Create a file in /etc/cron.d with

#    the following syntax:

#

#    * * * * *root    /path/to/icmp_ratelimit.sh >/dev/null 2>&1

#

# 3. Create a user cron entry while using `crontab -e`

#

#    * * * * * /path/to/icmp_ratelimit.sh >/dev/null 2>&1

#

# - Change "/path/to" to match the exact location of the script.

# - Finally, make sure it is executable: chmod +x /path/to/icmp_ratelimit.sh

#

seconds="60"

while [[ ${seconds} -gt 0 ]]

do

     echo $((500 + ${RANDOM} % 1500)) > /proc/sys/net/ipv4/icmp_ratelimit

     echo $((500 + ${RANDOM} % 1500)) > /proc/sys/net/ipv6/icmp_ratelimit

    sleep .95

done
Примечание. BlueCat может обновлять скрипт для включения IPv6. Не забудьте проверить их официальную страницу GitHub, чтобы узнать о дальнейших обновлениях этого скрипта.
Скрипт будет делать то же, что и предстоящий патч Linux, и рандомизировать ограничение скорости.
Чтобы быть более конкретным, по словам Дэвида Максвелла, директора по безопасности программного обеспечения в BlueCat:
«Скрипт примерно эквивалентен изменению ядра Linux, совершенному 16 октября. Один раз в секунду он устанавливает новый рандомизированный предел для ответов ICMP, между 500-1500/с. Он будет работать в системах с ядром Linux версии 2.4.10. или новее “.
Создайте этот скрипт с помощью команды:
sudo nano /usr/local/bin/icmp_ratelimit.sh
sudo chmod u+x /usr/local/bin/icmp_ratelimit.sh
sudo crontab -e
Внизу этого файла вставьте следующее:
*/10 * * * * flock -xn /root/.icmpratelimit-lock -c /usr/local/bin/icmp_ratelimit.sh
Сохраните и закройте файл.
Обязательно позаботьтесь об этом на всех своих машинах с Linux.
Это все, что нужно сделать.
Ваши серверы и рабочие столы Linux должны быть защищены от SAD DNS до указанного времени, поскольку у поставщиков DNS есть постоянное исправление или ядро Linux официально будет исправлено от этой атаки.
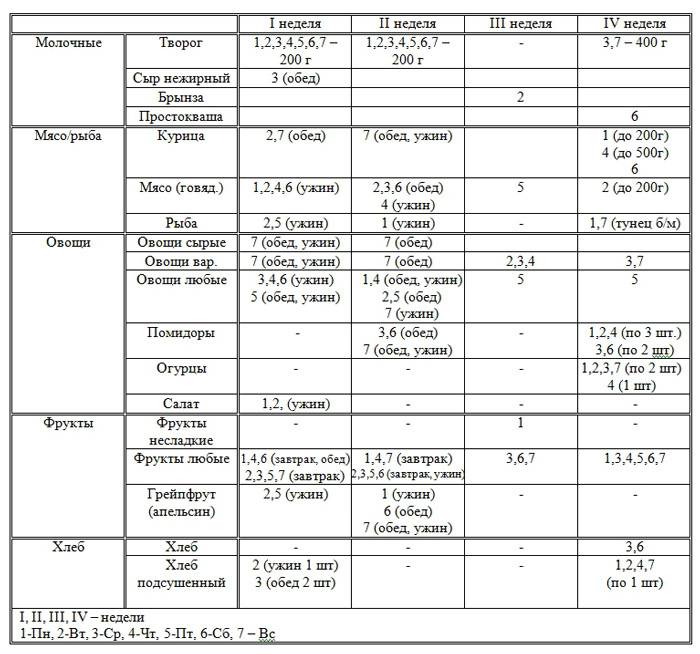
Чтобы диетическое питание не казалось слишком пресным, из овощей и мясных продуктов можно приготовить «правильные» блюда:
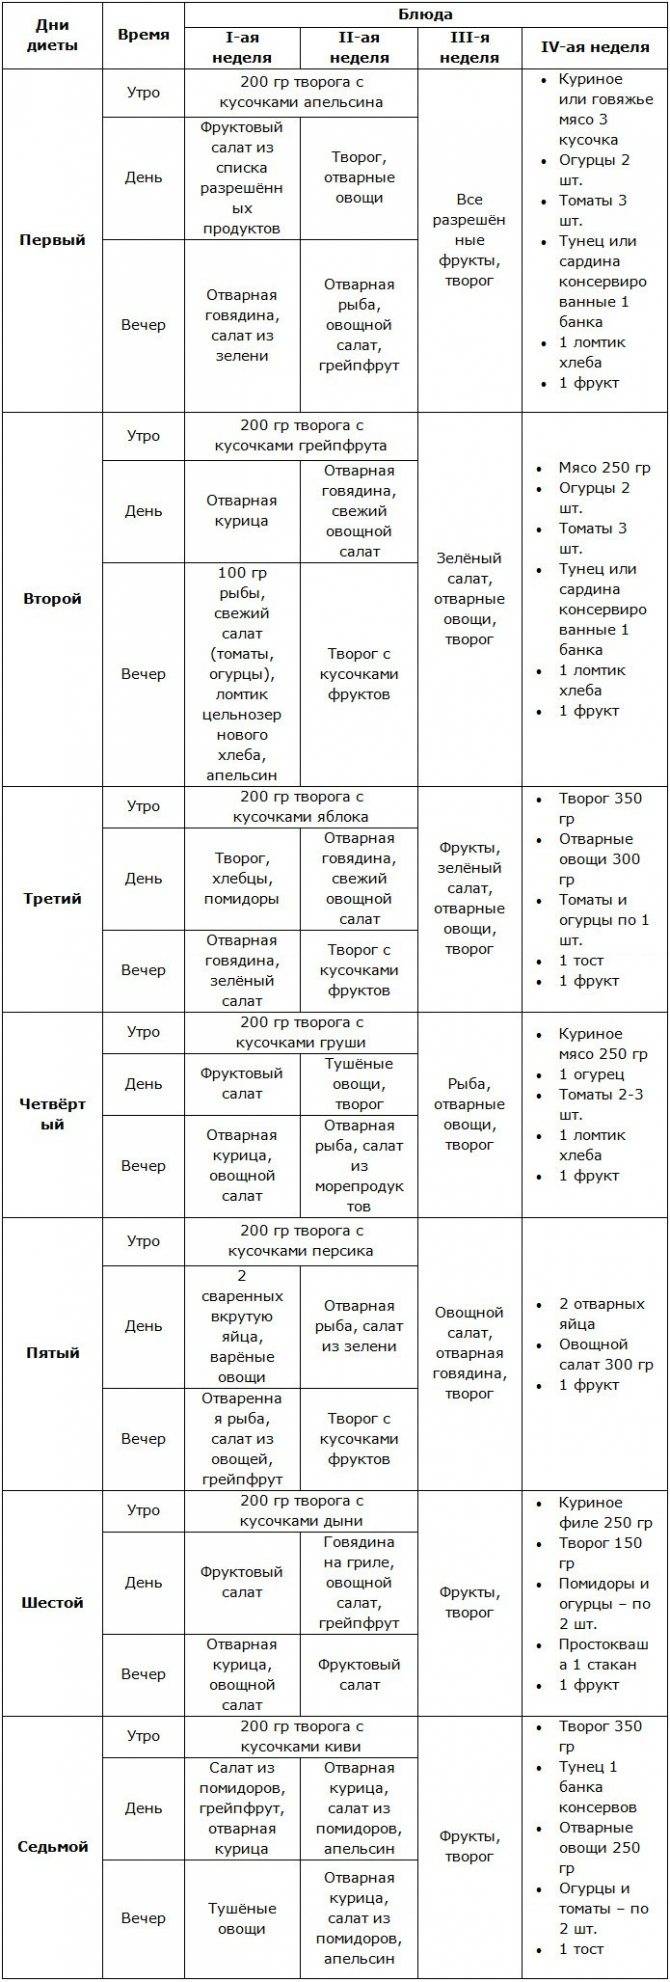
Меню творожного варианта диеты Магги достаточно многообразное, вам не придется есть один творог. Из разрешенных продуктов – нежирное мясо, цитрусовые, ананасы, яблоки, груши, киви, арбузы, дыни, бобовые, морковь, баклажаны и кабачки. Отметим, продукты из меню, в которых нет веса порции, можно кушать столько, сколько захочется. На творожной диете Магги ежедневно нужно употреблять не менее 2 литров воды. Разрешается пить кофе и чай без сахара и молока в любое время, независимо от приема пищи. Ниже – меню творожной диеты Магги, рассчитанное на 4 недели.
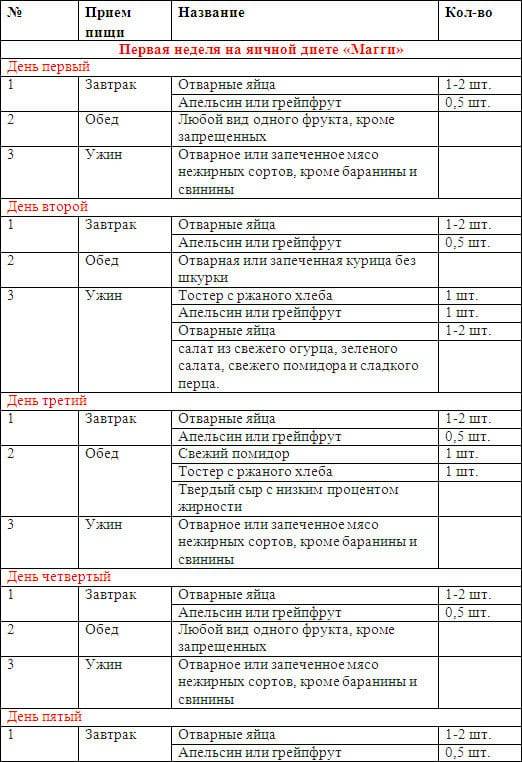
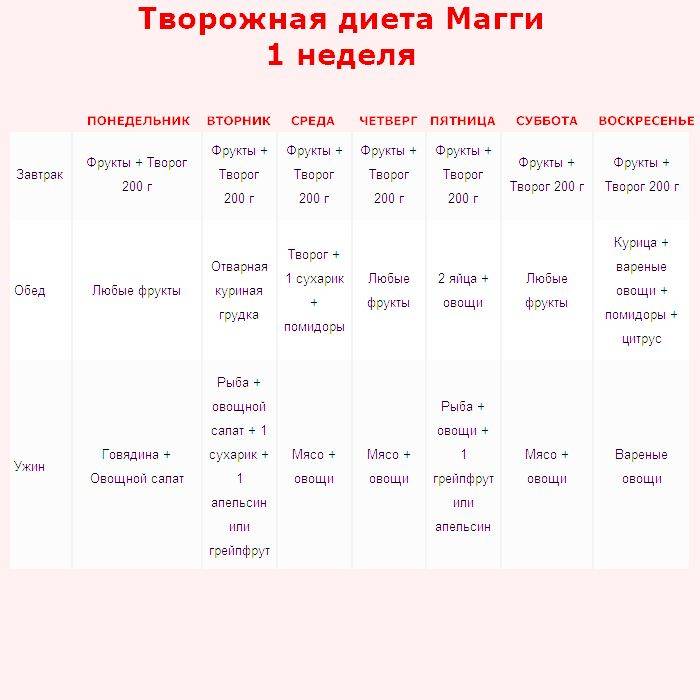
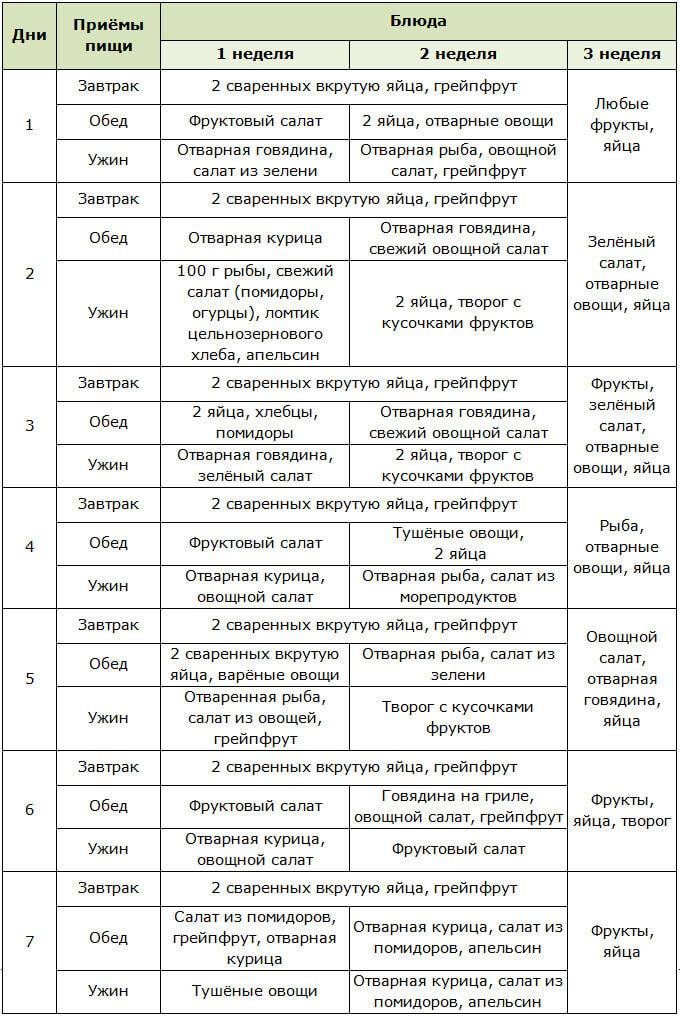
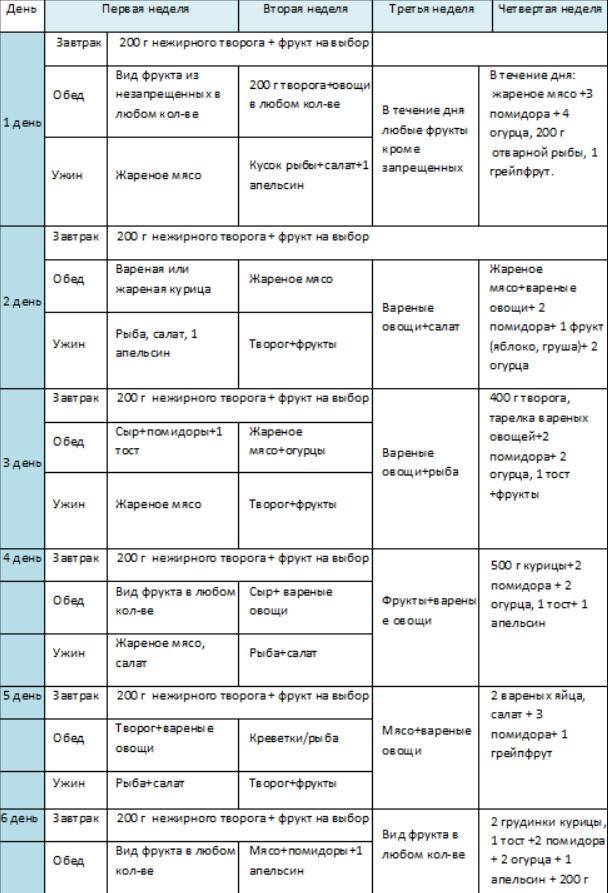
Творожная диета Магги: меню первой недели
Не забывайте о том, что за день на творожной диете Магги рекомендовано выпивать до 2-х литров жидкости!
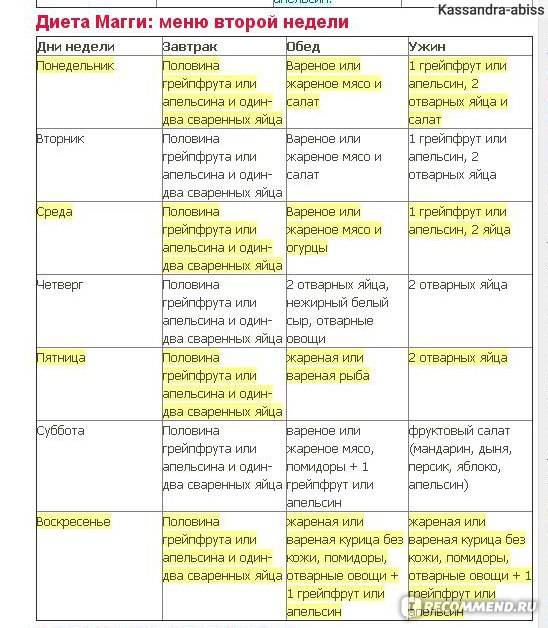
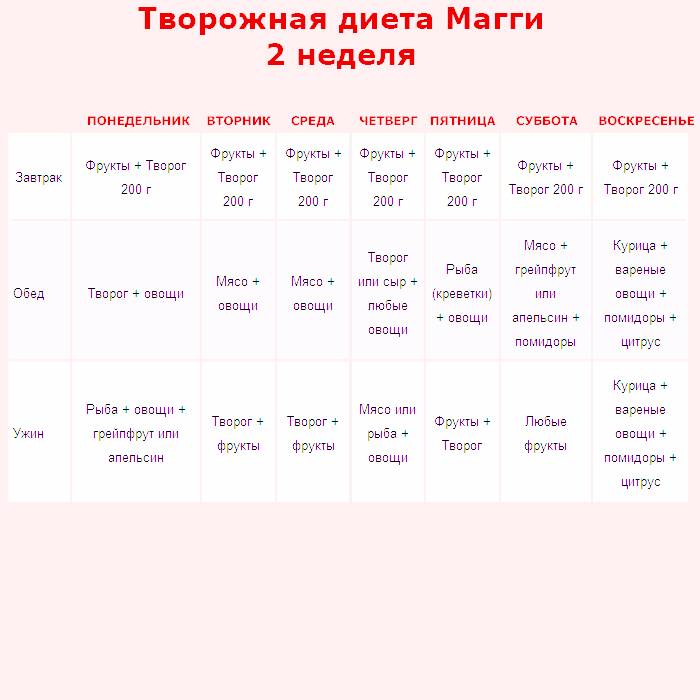
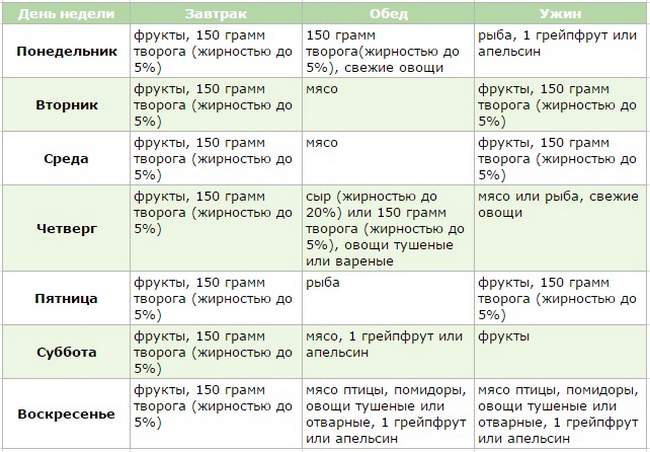
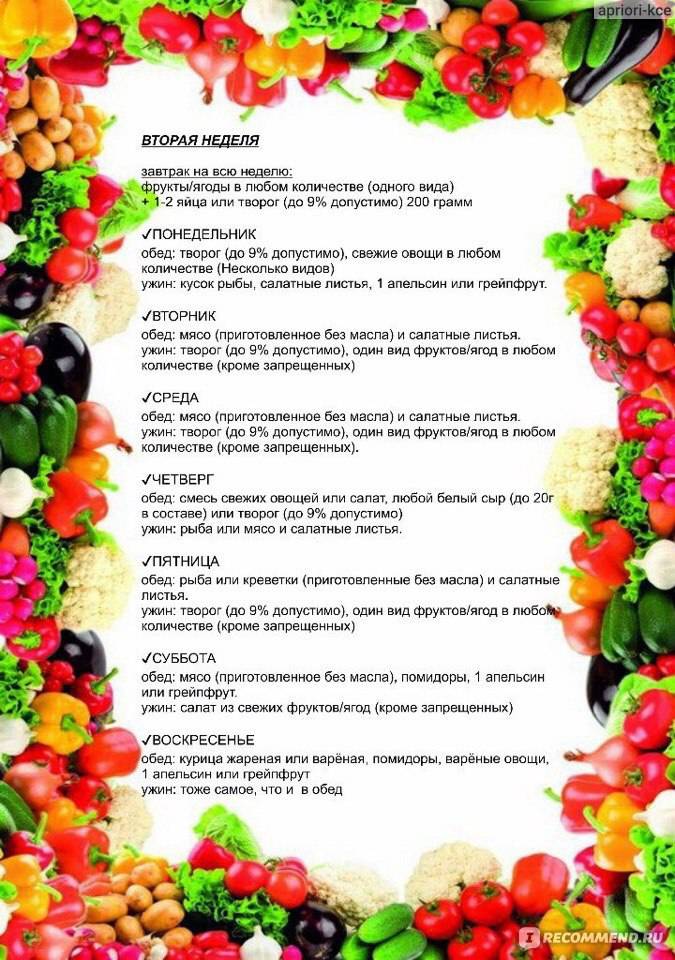
Творожная диета Магги: меню второй недели
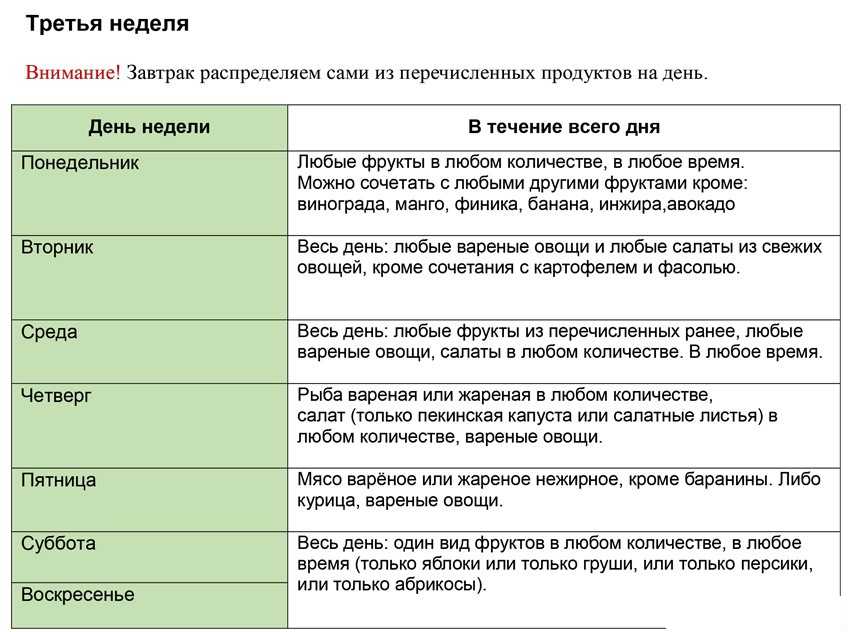
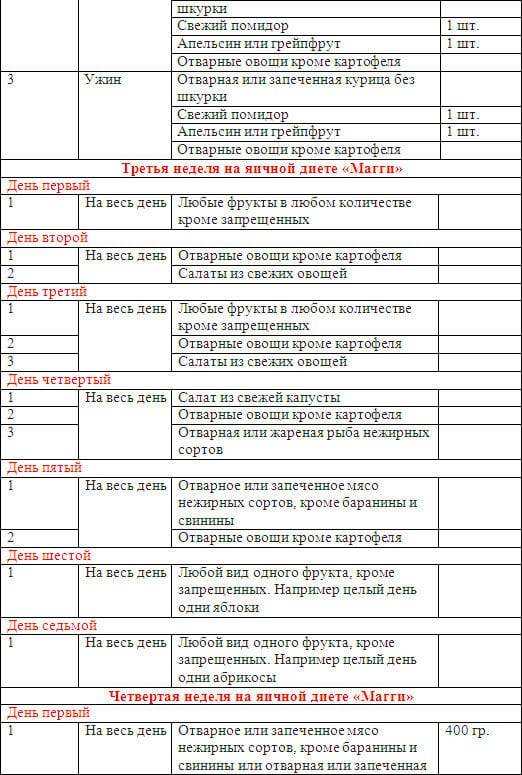
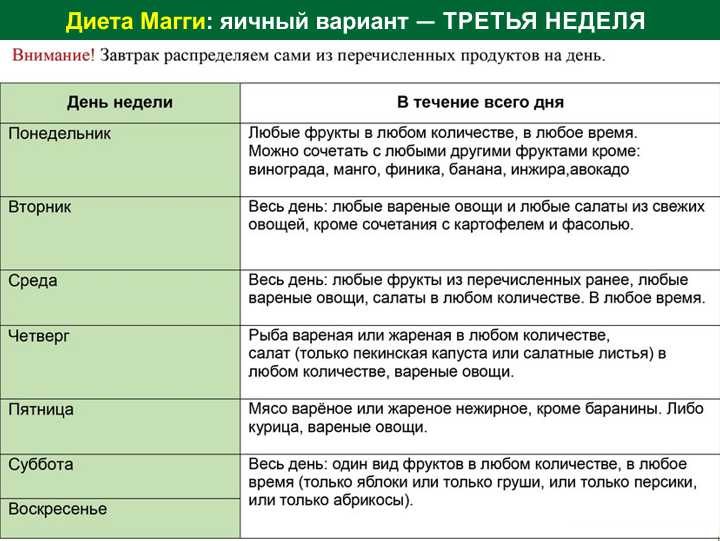
Творожная диета Магги: меню третьей недели
На третьей недели вы можете самостоятельно распределить меню на завтрак, обед и ужин. Также разрешается натощак выпивать 100 г 1%-кефира.
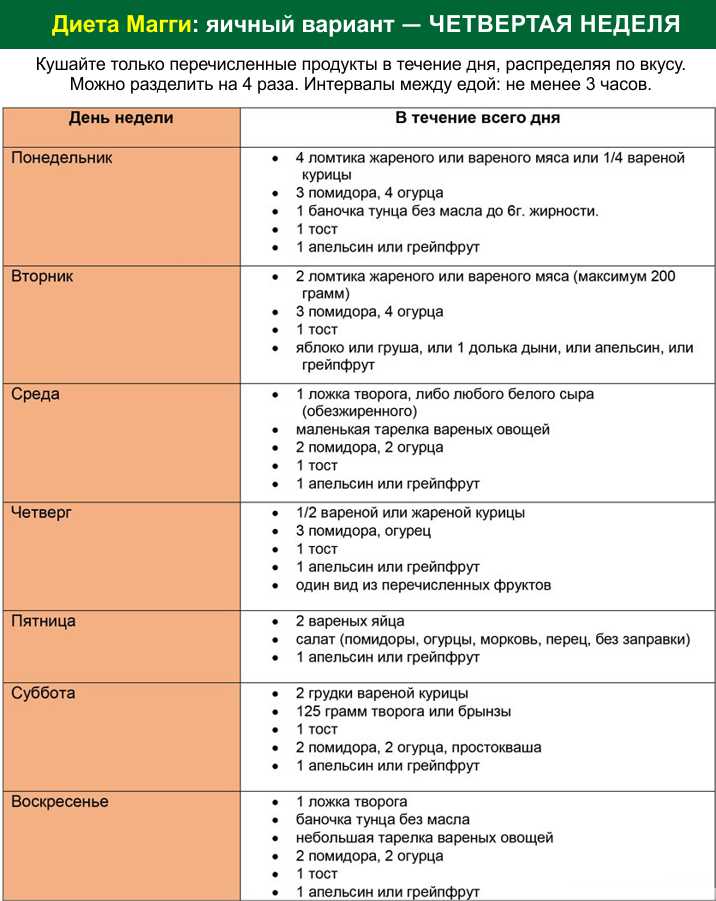
Творожная диета Магги: меню четвертой недели
Четвертая неделя почти не отличается от второй, за исключением курицы, которую нужно заменить на отварное мясо и тунец.
Читать также
8 полезных лайфхаков, которые помогут похудеть каждой
Мы рассказали вам об эффективной творожной диете Магги и поделились ее подробным меню на 4 недели. Пробуйте, упорно идите к своей цели и не забывайте сделать за новостями ХОЧУ.ua, чтобы получить информацию о новых эффективных диетах первыми!
Материалы по теме:
Beauty-редактор
Для того, чтобы закрепить результат и лишние килограммы не вернулись обратно после завершения диеты, следует придерживаться определённый рекомендаций.
Прежде всего, рацион должен состоять преимущественно из тех же продуктов, что и в последние 4 недели
Благодаря этому, организм не будет подвержен стрессу из-за смены питания и удастся избежать проблем с пищеварением.
Количество выпечки, сахара, жирной пищи стоит максимально уменьшить.
Объёмы потребляемых продуктов нужно увеличивать постепенно, лучше, чтобы после каждого приёма пищи оставалось лёгкое чувство голода.
По возможности, во время приготовления разнообразных блюд, соль стоит заменять соевым соусом.
Важно продолжать пить достаточное количество воды, заменять ею другие, менее полезные напитки.
Перечень продуктов, которые вам разрешены на ближайший месяц, совсем невелик. Тем не менее, он оставляет некоторый простор для действий, и в ряде случаев вы сможете выбирать из разрешенного списка альтернативу, которая по вкусу.
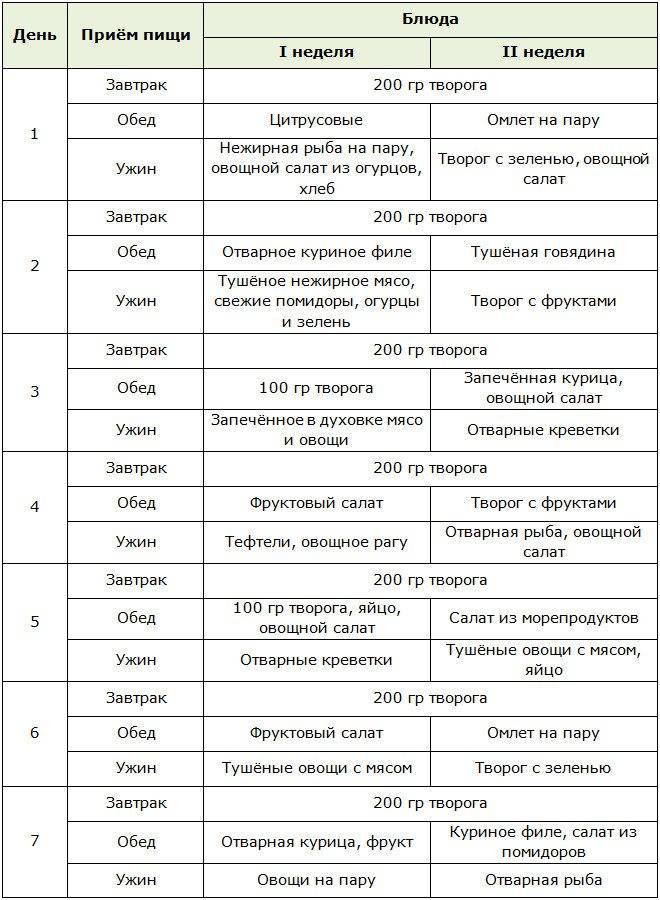
Никаких сюрпризов диетологи нам не подготовили, и главный продукт в этой диете, предсказуемо, творог, который должен соответствовать следующим требованиям:
Жирность от 1 до 5%. Обезжиренные (0%) формы найти в продаже несложно, но на фоне полного отсутствия жиров страдает усвоение кальция, а разница в калорийности некритична.
Свежесть. Срок хранения творога составляет 3-4 дня, это касается как домашней, так и заводской продукции после вскрытия упаковки.

фото с сайта http://eda26.ru/
Скорость усвоения творожного белка очень невысока, благодаря чему насыщение после порции этого продукта продолжается несколько часов, что позволяет легче пережить диетические будни.
В этом разделе особо не разгуляешься, поскольку диета «Магги творожная» меню на каждый день предполагает более, чем скромное. Приступая к похудению, позаботьтесь о покупке следующих категорий продуктов:
Мясо (нежирные сорта). Крольчатина, телятина, индейка, и фаворит спортивного питания – куриная грудка. Эталонный способ приготовления – отваривание, но допустимо протушить без жира, приготовить на пару или запечь в духовке.
Рыба, также нежирных сортов. Хек, судак, щука, окунь, треска, камбала или форель могут быть отварены, протушены или приготовлены на гриле по вашему вкусу.
Овощи (любые, кроме картофеля), которые можно есть сырыми, приготовить теми же способами, что и мясо или обжарить на сковороде-гриль без масла до состояния al dente. Можно есть практически не ограничивая себя, поскольку диета не регламентирует их количество. Но все же соблюдайте разумные рамки, и не наедайтесь до отвала.

фото с сайта http://www.armenpogosov.com/
Фрукты – вычеркните из планов бананы, финики, виноград, инжир и манго, а в остальном диета Магги дает полный карт-бланш.
Соль и специи – никто не запрещает слегка подсолить пищу или использовать натуральные специи, чтобы рацион не показался совсем уж пресным.
Жидкость – выпивайте ежедневно 1,5-2 л. Здорово, если это будет чистая питьевая вода, но допускается также любой несладкий напиток – минералка, чай и даже чашечка кофе.
О кашах, макаронах, и, тем более, сладостях пока придется забыть. Все углеводы вы будете получать из фруктов, но в отдельные дни в плане питания присутствует черный, ржаной или цельнозерновой хлеб.
Меню диеты на следующие две недели представлено в виде списка продуктов на день, которые нужно равномерно распределить на три приема пищи – завтрак, обед и Ужин. При этом совершенно нет разницы, какие продукты употреблять утром, днем и вечером.


Меню 4-й недели творожного варианта диеты Магги в таблице ниже:
День недели | Меню |
Понедельник | Варенная или приготовленная на пару курица – 200 грамм, 1–2 огурца, 2–3 помидора, фрукты, кусочек хлеба, 1 баночка тунца без масла. |
Вторник | 1–2 огурца, 2–3 помидора, фрукты, ломтик хлеба. |
Среда | Обезжиренный творог – 400 грамм, отварные или запеченные овощи, 1–2 огурца и такое же количество помидоров, кусочек хлеба, фрукты. |
Четверг | Вареная курица – 500 г, 1–2 огурца, два помидора, ломтик хлеба, фрукты. |
Пятница | Два вкрутую сваренных яйца или паровой омлет, фрукты и овощи из списка разрешенных продуктов. |
Суббота | Вареная куриная грудка, творог, кусочек хлеба, огурец, помидор, любые фрукты, стакан кефира или ряженки с низким содержанием жира. |
Воскресенье | 400 грамм творога, тунец без масла, огурец и помидор, кусочек хлеба, фрукты. |
Перед тем, как садиться на эту диету, стоит посетить врача и получить его разрешение. Снизить риск для здоровья, вызванный стрессом от снижения количества калорий, можно так: за несколько дней до нужно уменьшить количество рафинированной и жирной пищи в организме.
Строго соблюдайте все рекомендации, и сможете рассчитывать на отличные результаты.
| Дни недели | Завтрак (в четко определенное время) | Обед (в четко определенное время) | Ужин (в четко определенное время) |
| Пн | Творог – 200-граммовая порция, 1 грейпфрут (среднего размера) | Фрукты (см. запрещенные выше) – количество любое | Мясо – 200 граммов (вареное, можно говяжье), 1 овощ – огурец или морковь |
| Вт | Творог – 200-граммовая порция, 1 грейпфрут (среднего размера) | Мясо курицы (оптимально – филе), обязательно без кожицы и в вареном виде | Нежирная рыба (сварить или запечь), тост (для подсушивания использовать тостер либо духовку), свежие овощи, 1 фрукт (оптимально – грейпфрут) |
| Ср | Творог – 200-граммовая порция, 1 грейпфрут (среднего размера) | Тост – 1 шт., помидор, сыр (жирность не выше 17 процентов) | Отварное мясо (только не баранина), порция тушеных овощей |
| Чт | Творог – 200-граммовая порция, 1 грейпфрут (среднего размера) | Фрукты (только один определенный вид) – до наступления сытости | Мясо (запечь или отварить), морковь, отварная свекла, горошек |
| Пт | Творог – 200-граммовая порция, 1 грейпфрут (среднего размера) | Творог – 200-граммовая порция, сырые овощи в любом количестве (например, морковь с соевым соусом), 2 куриных яйца | Рыба (запечь в фольге), апельсин – 1 шт., овощи |
| Сб | Творог – 200-граммовая порция, 1 грейпфрут (среднего размера) | Фрукт определенного вида (количество – до сытости) | Мясо (отварить), свежие овощи (в любом количестве) |
| Вскр | Творог – 200-граммовая порция, 1 грейпфрут (среднего размера) | Отварное филе, овощной суп (варить на воде), салат из помидоров и зеленого лука, 1 грейпфрут | Отварные овощи |
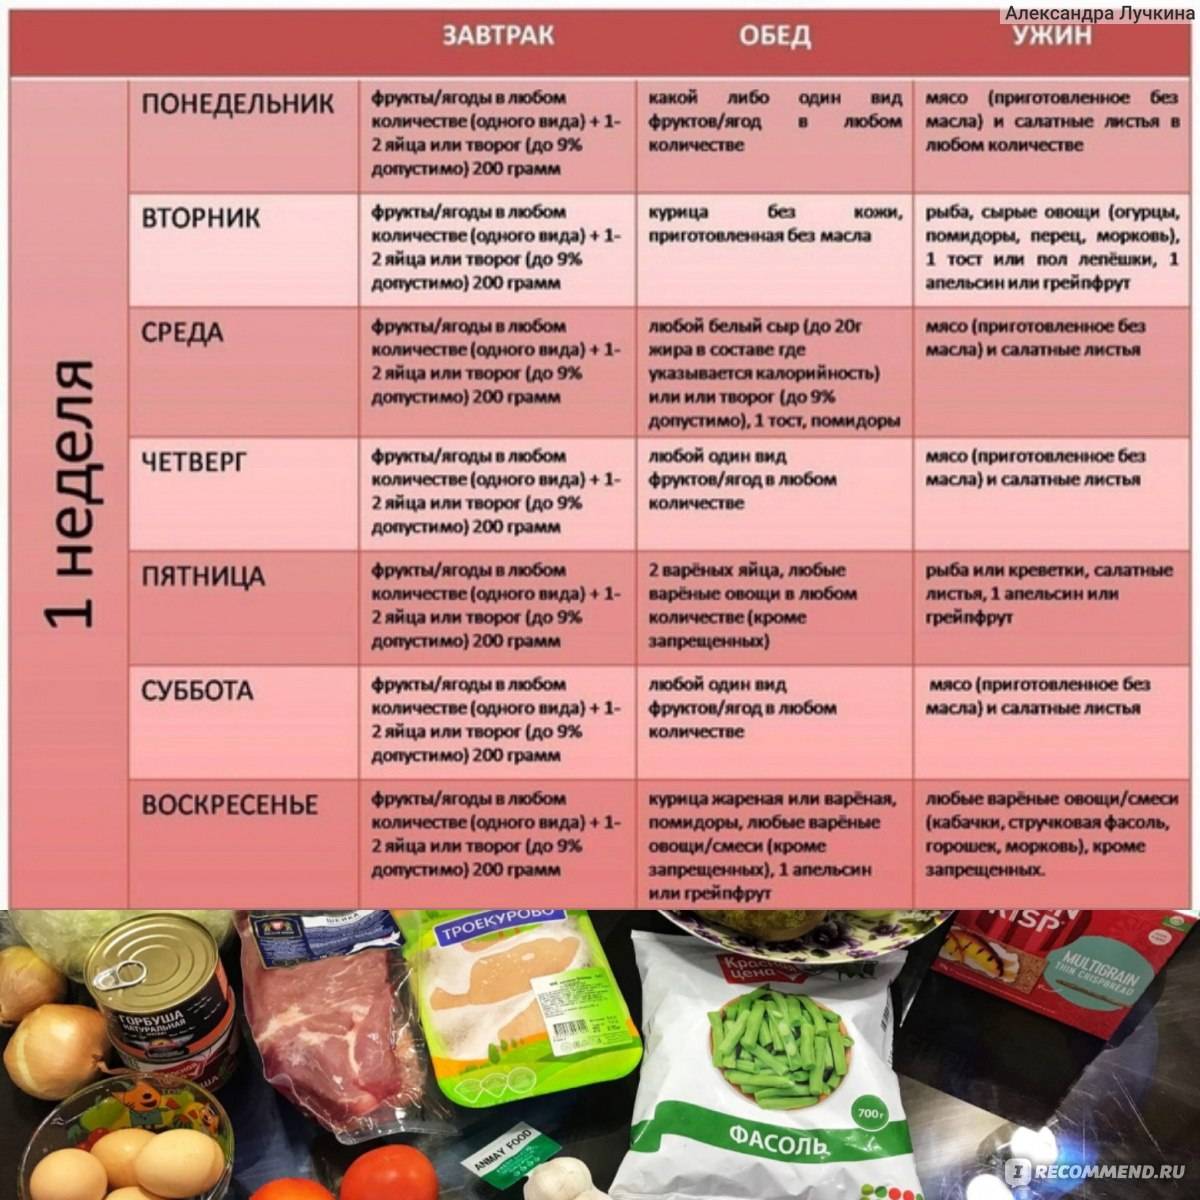
Первая неделя проходит со сложностями, организм еще не привык к таким ограничениям.
| День недели | Утро | День | Вечер |
| Пн | Завтрак как на прошлой неделе | Свеж. овощи и отвар. говядина | Как завтрак, только плюс овощи |
| Вт | Завтрак как на прошлой неделе | Как в пн | Рыба на пару, туш. овощи, апельсин |
| Ср | Завтрак как на прошлой неделе | Салат из свеклы, моркови и чеснока, мясо на пару | Фрукт 1 вида и творог |
| Чт | Завтрак как на прошлой неделе | Нежир. сыр, овощи (в салате, заправленном соевым соусом) | Отвар. овощи, рыба |
| Пт | Завтрак как на прошлой неделе | Минтай на пару, свеж. овощи | Творог, смеш. с фруктами |
| Сб | Завтрак как на прошлой неделе | Мясо со специями (отварить), салат из томатов, апельсин | |
| Вскр | Завтрак как на прошлой неделе | Филе кур. на пару, салат из помидоров, грейпфрут | Курица отвар., помидоры, грейпфрут |
В начале 2-й недели вес уже снизился – иногда до 5 кг минус. Соблюдать рацион становится проще.
Утром – 0,5 стакана обезжиренного кефира.
Продукты по дням:
Выходим на финишную прямую. Есть четкое количество определенных продуктов, которые вы делите сами между 3-мя приемами пищи ежедневно:
Как похудеть после 45 лет женщине: диета, отзывы, советы
Как похудеть после 45 лет женщине: диета, отзывы, советы
Как похудеть после 45 лет женщине: диета, отзывы, советы
berpee-s-zaprygiva123123niem-na-korobku-faza1
troinoi-pr34534234zhok-na-skakalke
troinoi-pry34234zhok-na-skakalke
Выходить из диеты Магги нужно разумно, не стоит сразу налегать на вредные продукты.
При соблюдении всех правил и стойкости духа реально сбросить 10 кг лишнего веса.
Сколько кг Вам удалось сбросить на диете Магги?
Poll Options are limited because JavaScript is disabled in your browser.
При соблюдении простых правил методики результаты творожной диеты Магги долго не заставят себя ждать. Уже через две недели авторы методики обещают получить заметные изменения – минус 10–15 кг. Однако для достижения более высокого эффекта следует придерживаться специального питания не меньше месяца. Как утверждают специалисты, именно столько требуется времени, чтобы организм полностью перестроился и начал сжигать жировые запасы.
Меню творожной диеты Магги построено на таком основном продукте, как творог. Также в диетический рацион включены яйца, мясо, фрукты и овощи. Творог, яйца и мясо, которые нужно употреблять во время соблюдения методики, обеспечивают организм витаминами и микроэлементами, а полезные овощи и фрукты – ускоряют обмен веществ.
В отличие от множества остальных диетических методик, действие которых основано на снижении калорийности рациона, творожная диета Магги направлена на изменение химического состава ежедневного рациона. Специально составленный рацион способствует изменению химических процессов в человеческом организме, из-за этой особенности диета еще известна, как «химическая»
Следует понимать: для того, чтобы сработала диета и ушли лишние килограммы, важно строго придерживаться меню, составленного отдельно на каждую неделю
Специалисты называют такие правила творожной диеты Магги:
Если по определенным причинам правила диеты и последовательность соблюдения меню были нарушены, продолжать ее нет смысла, необходимо начать все сначала.
Диета Магги отличается большим разнообразием продуктов, которые можно употреблять для похудения. Чтобы снизить вес, в меню предстоит включить овощи и зелень. Пища употребляется в запеченном, сыром и замороженном виде. Так, женщина может извлечь из холодильника овощную смесь и приготовить ее на пару. Во время осуществления процесса разрешается использовать только воду. Применение бульона запрещено.


Фрукты также разрешены к употреблению. Они могут быть приготовлены теми же способами, что и овощи, или употреблены в сыром виде. В состав рациона входят грейпфрут или апельсин. Их можно заменять между собой. В отношении других продуктов аналогичное правило не действует. Комбинировать друг с другом можно ананас, яблоки, арбуз, киви, груши и черешню. Подобный набор способствует сжиганию жиров и оказывает корректирующее воздействие на фигуру. Разрешаются практически все фрукты и ягоды. Под запрет попадают лишь бананы, виноград и инжир.
Кисломолочные продукты также активно применяются во время снижения веса. Для диеты Магги используются творог и сыр определенной жирности. Для первого продукта значение показателя не должна превышать 9%. Для второго оно ограничено 20%. На последнем этапе снижения веса в рацион вводят простоквашу.
Есть можно и рыбу, и морепродукты нежирных сортов. Чаще всего во время похудения потребляют креветки, судак, минтай, хек или треску. Это позволяет не допустить образование жира. Яйца также активно используется во время диеты Магги.
Употребляется мясо птицы. Есть можно курицу или индейку. Это нежирные разновидности мяса. Перед употреблением рекомендуется снять кожу. Она в пищу не идёт. Животное мясо также разрешено к употреблению. В меню разрешается включить говядину или телятину. Их варят, тушат или запекают. Употребление мясных субпродуктов также допустимо.
Мучное полностью из меню не исключается. Допустимо употребление хлебцов, ржаного хлеба, тостов и несладких диетических крекеров. Кофе и чай оказывают хорошее тонизирующее воздействие на организм. Однако их можно включить в меню только в том случае, если напитки употребляются без добавления молока, сливок и сахара. В редких случаях допустимо выпить 1 стакан диетической колы. В качестве приправ при приготовлении блюд можно использовать:
В качестве сахарозаменителей применяют сироп агавы или стевию. Во время приготовления пищи лучше использовать минимальное количество приправ. Дело в том, что слишком острое блюдо способно спровоцировать голод.
Диета Магги накладывает запрет на употребление целого перечня продуктов. Если женщина хочет снизить вес при помощи метода, ей необходимо отказаться от:
Диета Магги предполагает умеренное снижение калорийности рациона и позволяет худеющим избежать сильного чувства голода. Ингредиенты в меню на 4 недели подобраны таким образом, чтобы в организме происходил процесс расщепления жиров и очищения от токсинов.
Исходя из многочисленных отзывов женщин, выдержать диету Магги несложно, а результаты получаются потрясающими.
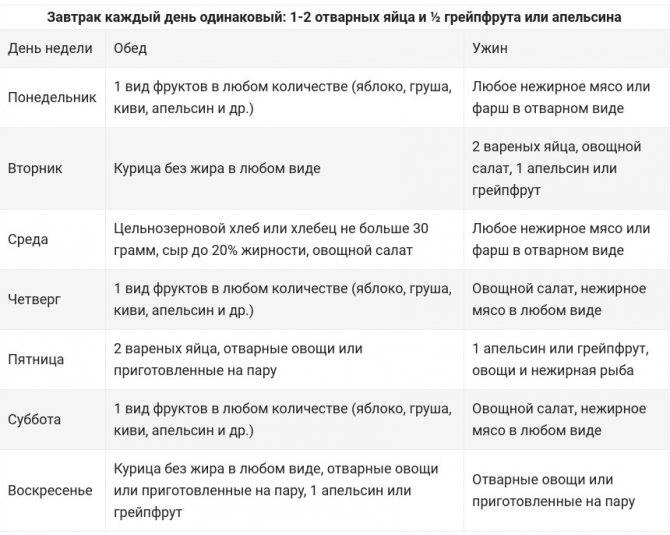
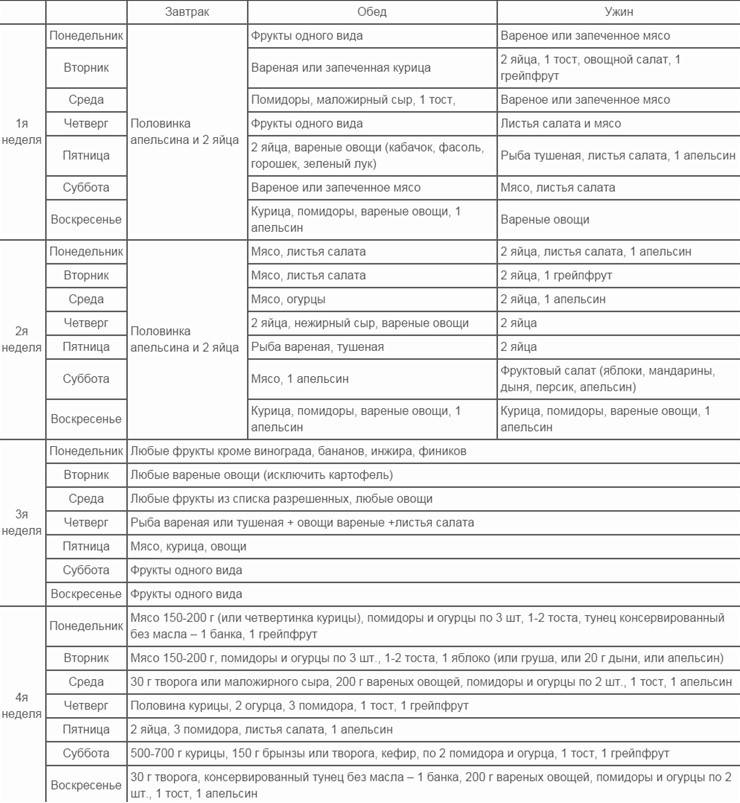
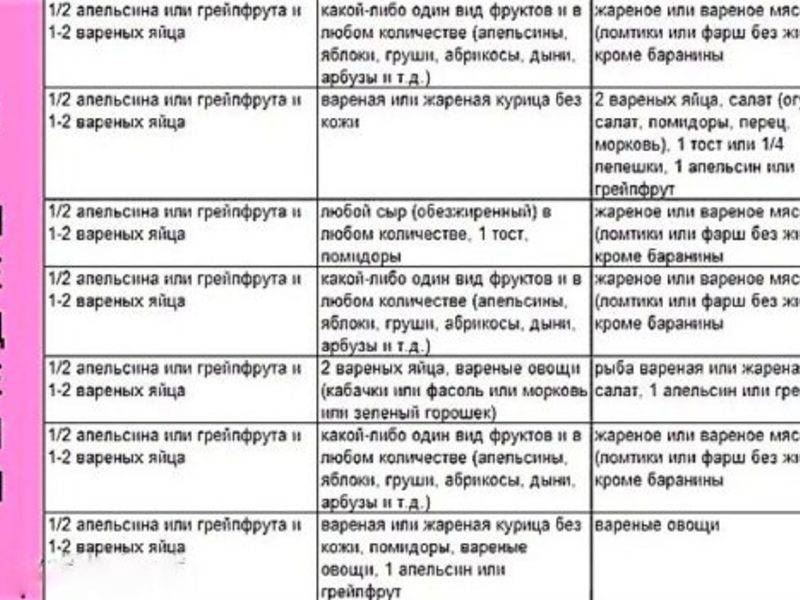
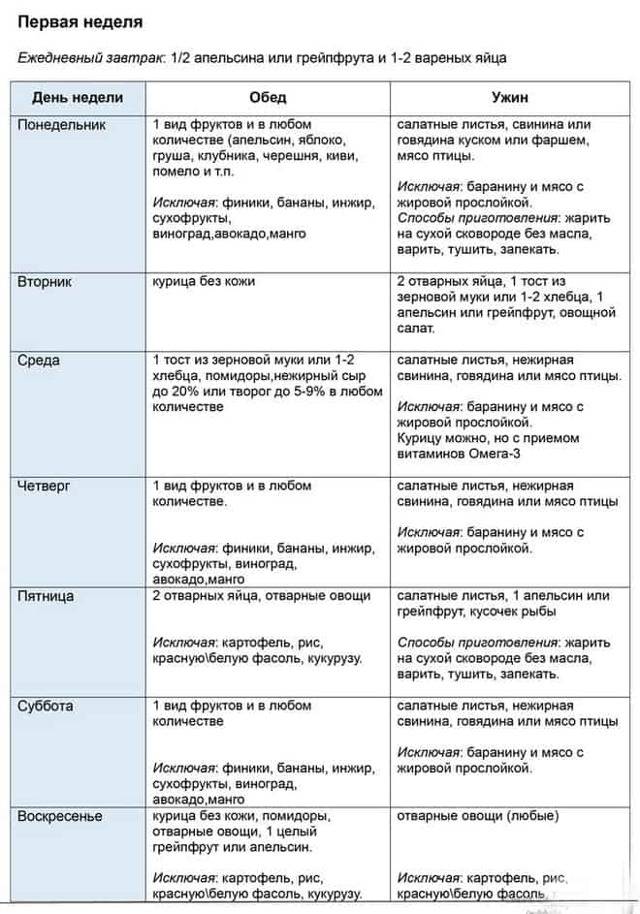
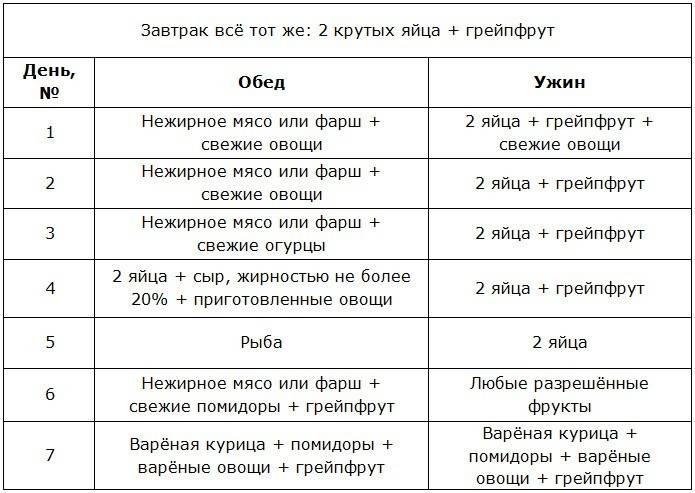
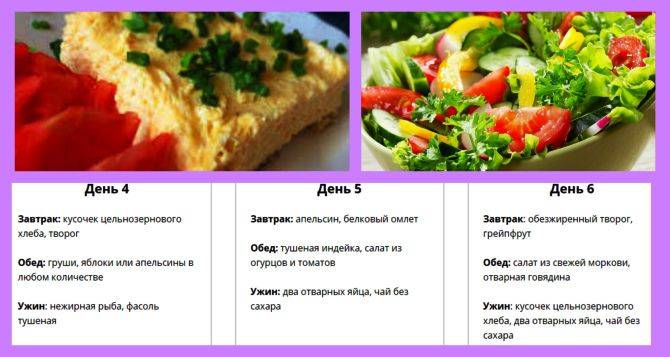
В этот период завтраки не будут меняться. Утром надо съесть половинку апельсина или грейпфрута и 1-2 яйца.
День недели | Обед | Ужин |
Понедельник | Апельсин, яблоко, груша, черешня или киви (на выбор). | Овощной салат, кусок отварной говядины. |
Вторник | Куриное мясо без кожи. | 2 отварных яйца, 1 тост из муки грубого помола или 1 хлебец, 1 апельсин или грейпфрут, овощной салат. |
Среда | 2 тоста из муки грубого помола или 2 хлебца, помидоры, нежирный сыр или творог. | Салат из овощей, запеченное в духовке филе индейки. |
Четверг | 1 вид фрукта в любом количестве. | Листья салата, отварная рыба. |
Пятница | 2 отварных яйца, овощи, приготовленные на пару. | Салат из овощей и зелени, 1 апельсин или грейпфрут, кусок запеченной говядины. |
Суббота | 1 вид фрукта в любом количестве. | Овощной салат, отварное филе свинины. |
Воскресенье | Курица без кожи, овощи, приготовленные на гриле, 1 целый апельсин или грейпфрут. | Тушеные овощи. |
Любые ошибки в диете Магги недопустимы. Если были нарушения режима питания и срывы в меню на 4 недели, то придется возвратиться к исходному пункту. Только так возможно правильное похудение.
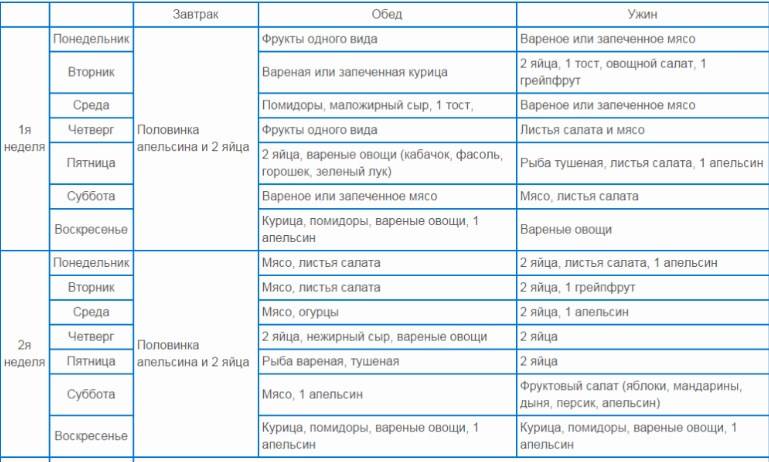
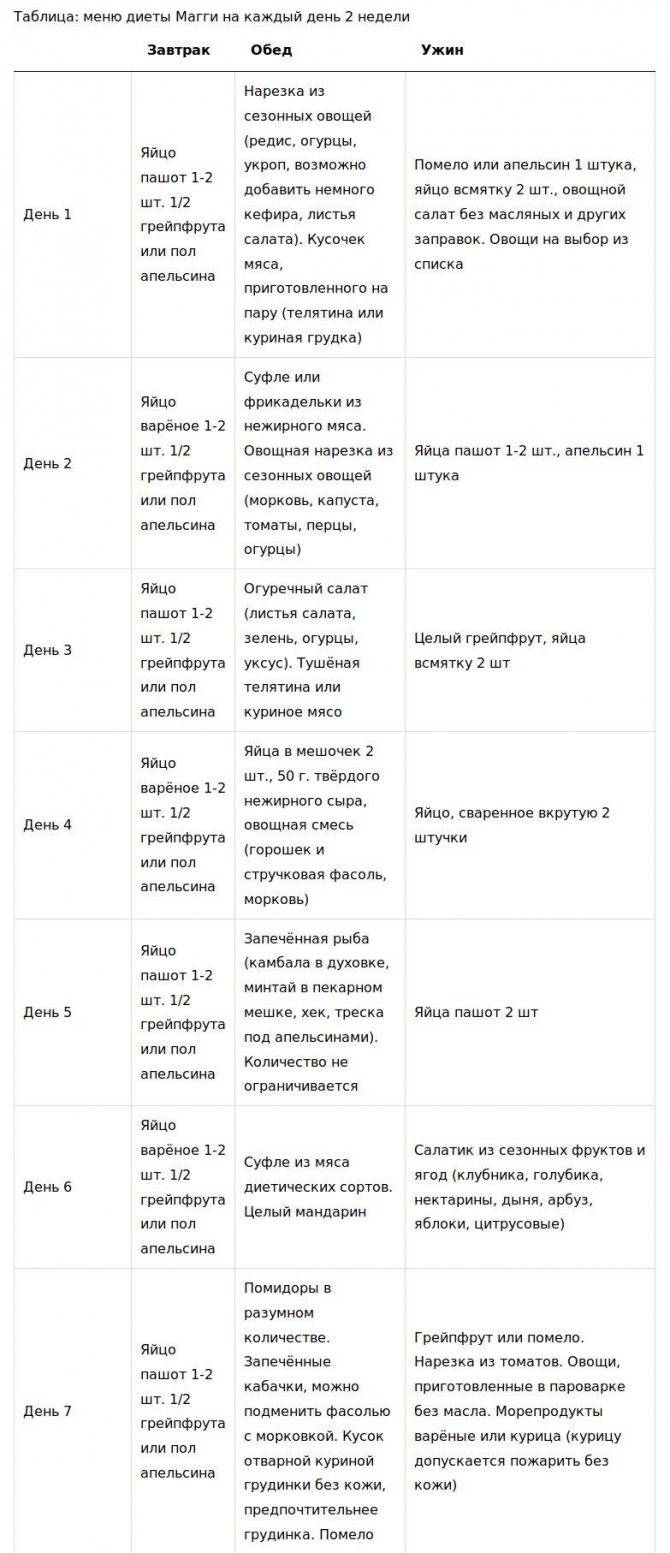
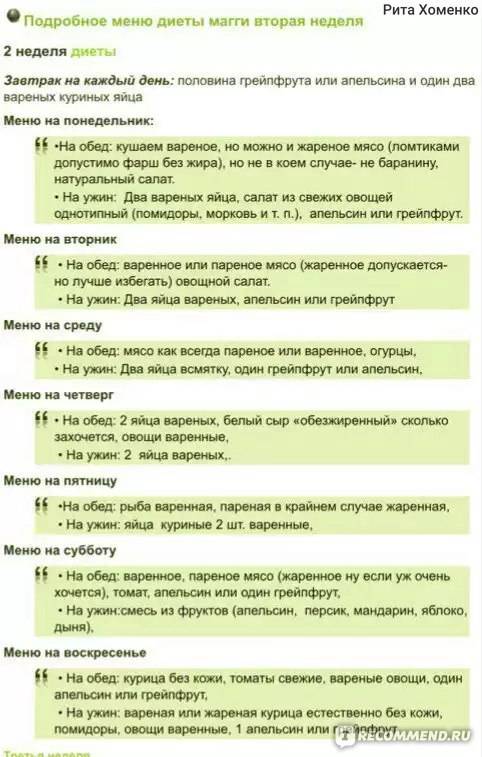
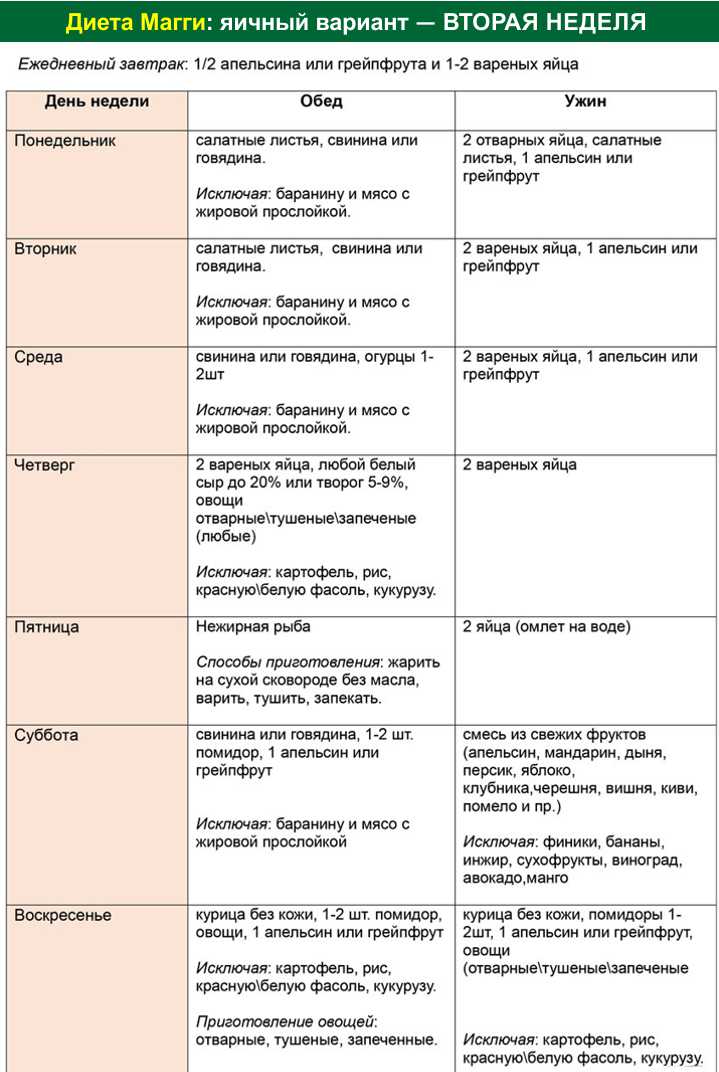
Организм уже начал привыкать к новому рациону, поэтому можно увеличить количество потребляемых яиц и мяса. Завтрак на второй неделе остаётся таким же.
День недели | Обед | Ужин |
Понедельник | Салатные листья, отварное филе свинины. | 2 отварных яйца, овощной салат, 1 апельсин или грейпфрут. |
Вторник | Овощной салат, отварная говядина. | 2 отварных яйца, 1 апельсин или грейпфрут. |
Среда | Запеченная в духовке говядина, 1-2 свежих огурца. | 2 отварных яйца, 1 апельсин или грейпфрут. |
Четверг | 2 яйца, любой мягкий сыр, жирностью до 20% или 5-9% творог, тушеные овощи. | 2 отварных яйца. |
Пятница | Тушеная рыба с овощами. | Омлет из 2 яиц на воде. |
Суббота | Запеченное в духовке филе свинины, 1-2 помидора, 1 апельсин или грейпфрут. | Ассорти из свежих фруктов. |
Воскресенье | Отварная курица без кожи, 1-2 помидора, 1 апельсин или грейпфрут. | Запеченная индейка без кожи, 1-2 помидора, 1 апельсин или грейпфрут, тушеные овощи. |
Судя по отзывам женщин, попробовавших диету Магги на 4 недели, на втором этапе вес уходит очень медленно. Однако не стоит переживать по этому поводу.
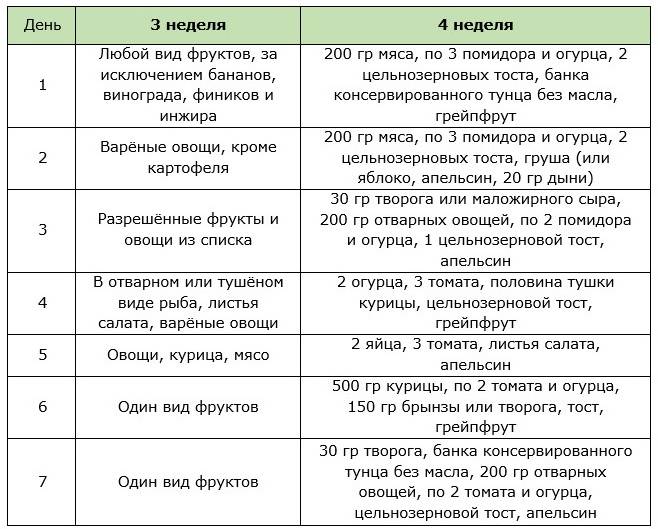
Пришла пора дать организму небольшую встряску. Теперь рацион изменится кардинально.
День недели | Продукты, которые необходимо употреблять в течение всего дня |
Понедельник | Разрешенные фрукты в любом количестве. |
Вторник | Любые отварные овощи и салаты из свежих овощей. |
Среда | Фрукты и тушеные овощи в любом количестве, салаты из свежих овощей. |
Четверг | Отварная, тушеная или запеченная, пекинская капуста, салатные листья. |
Пятница | Любое отварное нежирное мясо, птица без кожи, отварные или приготовленные на пару овощи в любом количестве. |
Суббота | Один вид фруктов в любом количестве, например, только яблоки. |
Воскресенье | Один вид фруктов в любом количестве, например, только груши. |
Для многих этот период может оказаться довольно сложным из-за однообразия. Но конечный результат того стоит.


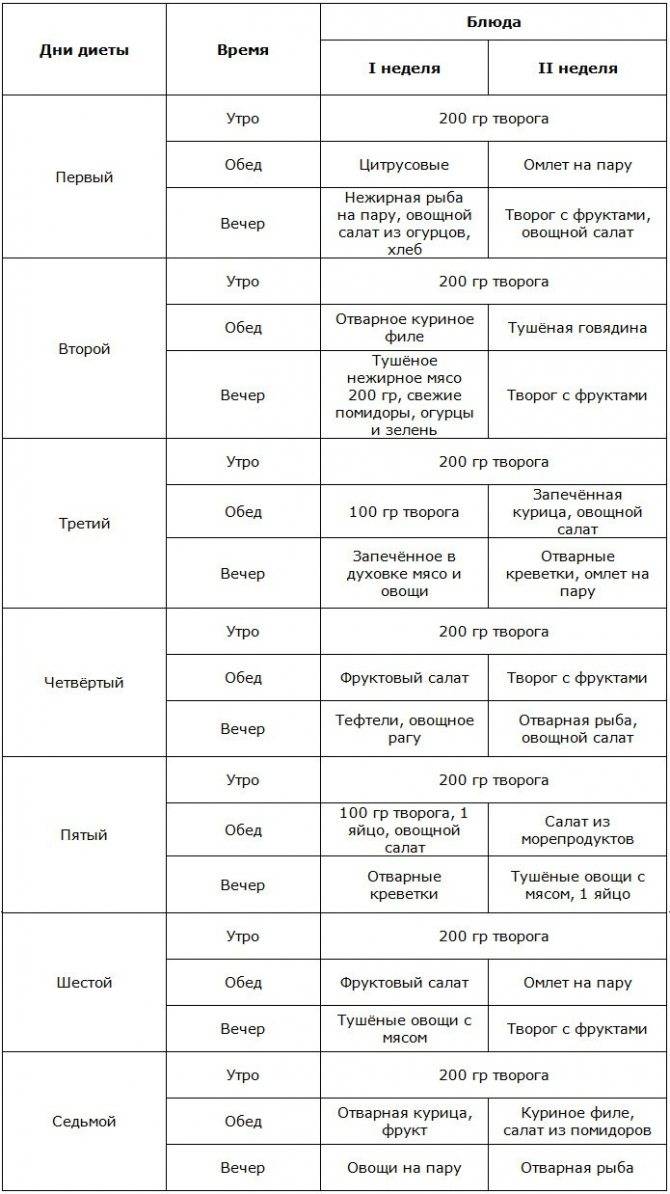
На этом этапе все блюда, указанные в таблице, необходимо употребить в течение дня. Оптимальное количество приёмов пищи – 4-5 раз с интервалом в 2-3 часа. Добавлять какие-либо дополнительные продукты в меню нельзя.
День недели | Меню на весь день |
Понедельник |
|
Вторник |
|
Среда |
|
Четверг |
|
Пятница |
|
Суббота |
|
Воскресенье |
|
Выходить из диеты надо очень аккуратно, чтобы вес не вернулся. В первые месяцы необходимо ограничивать себя в употреблении сладких и мучных продуктов.
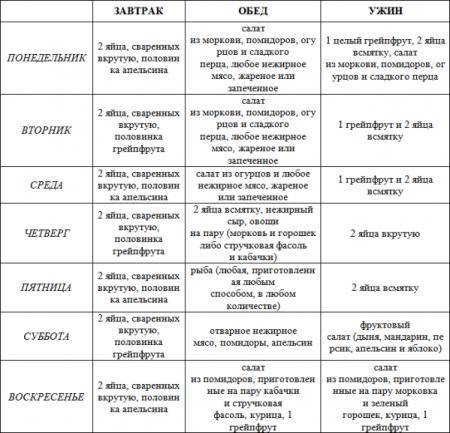
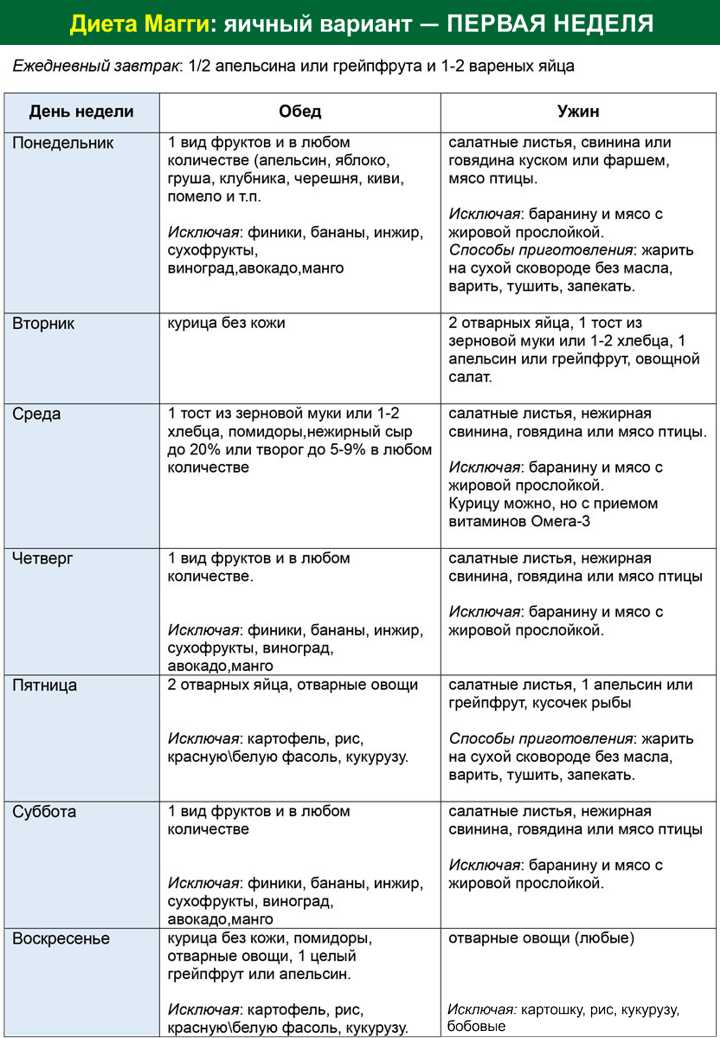
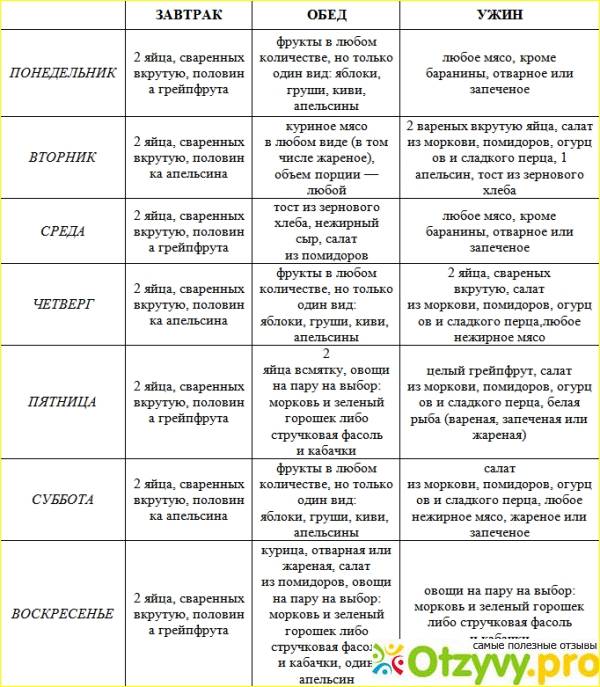
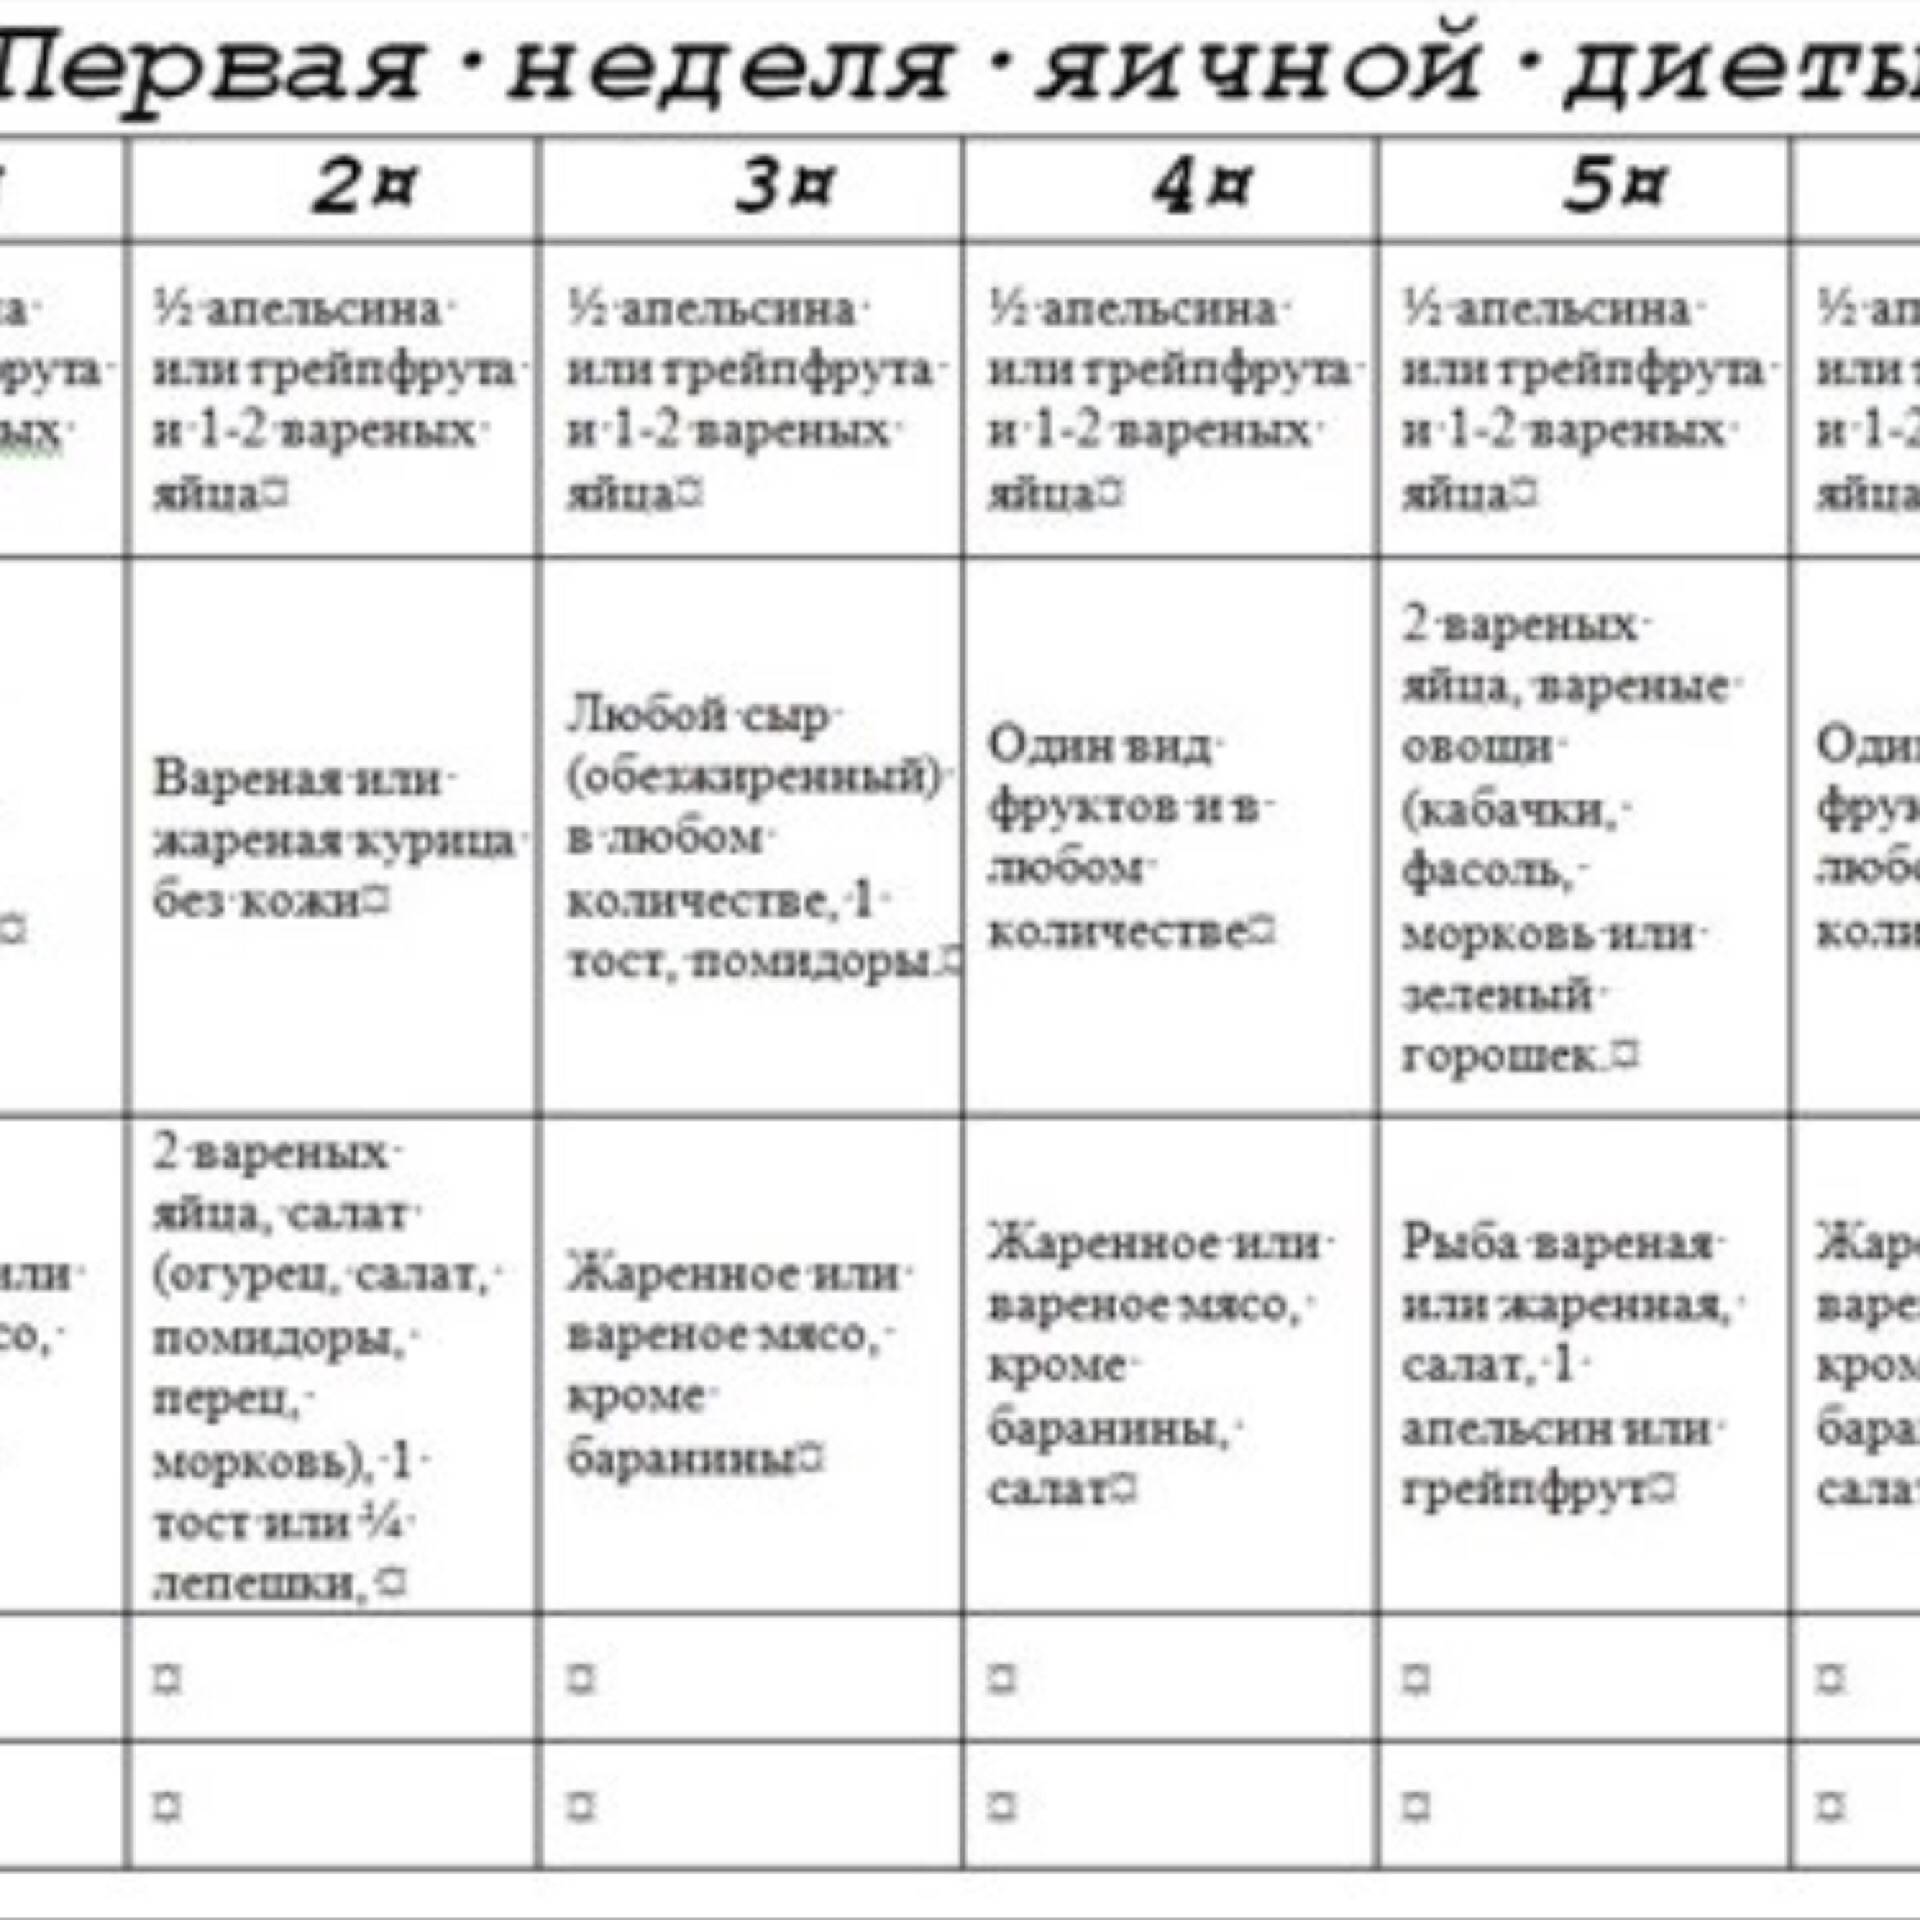
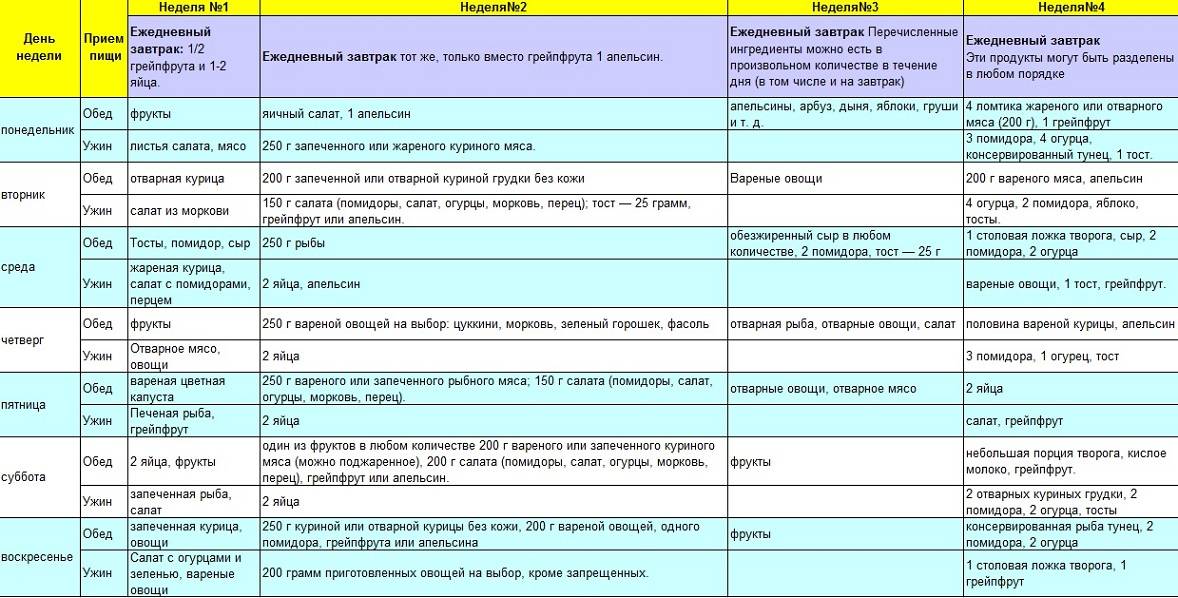
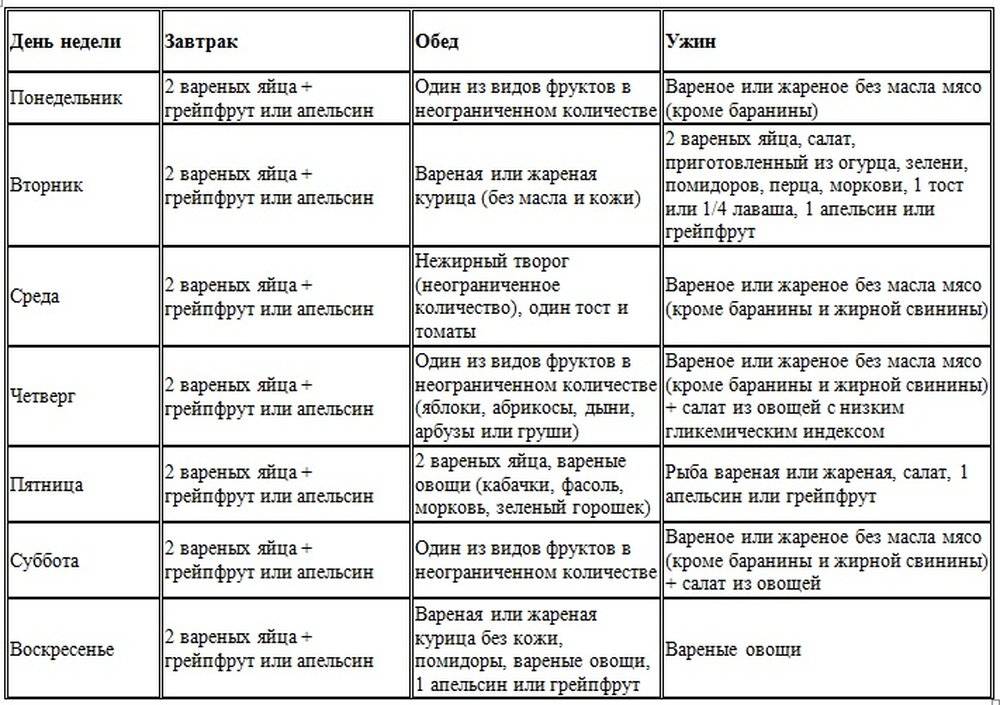
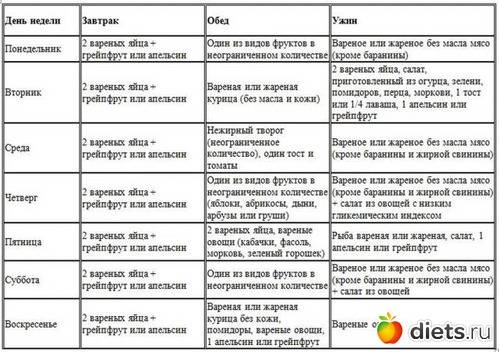
В первую неделю следует определиться с точным временем приема пищи и во все последующие придерживаться этого графика максимально точно.
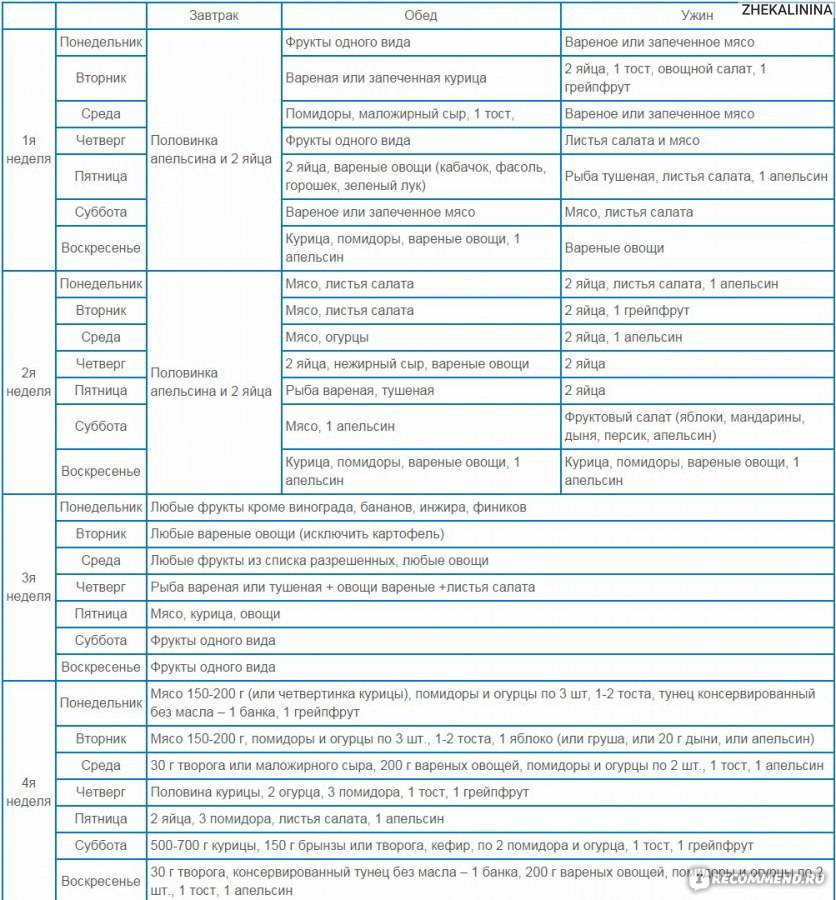
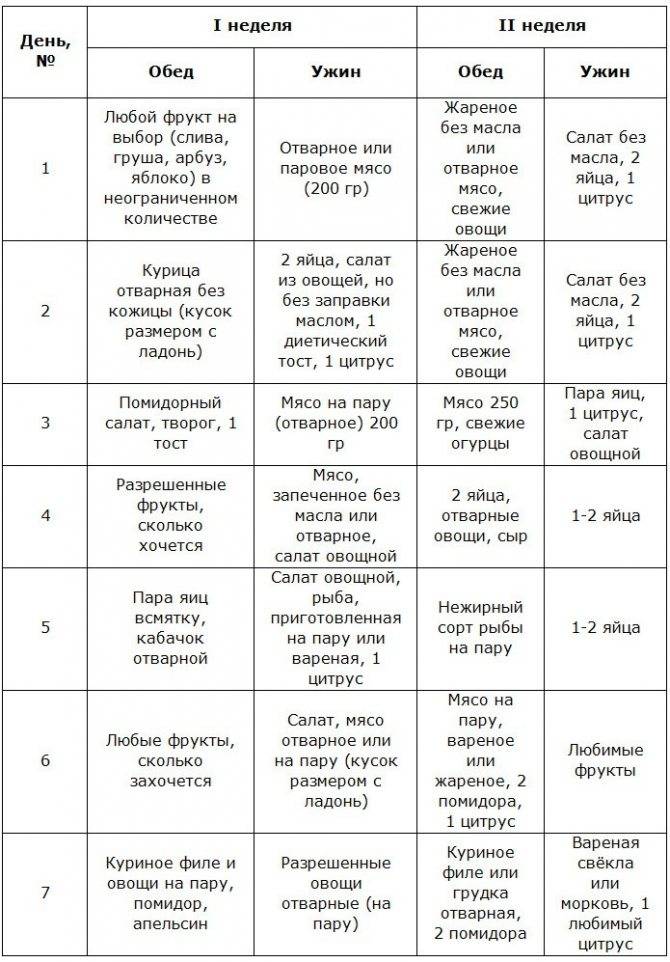
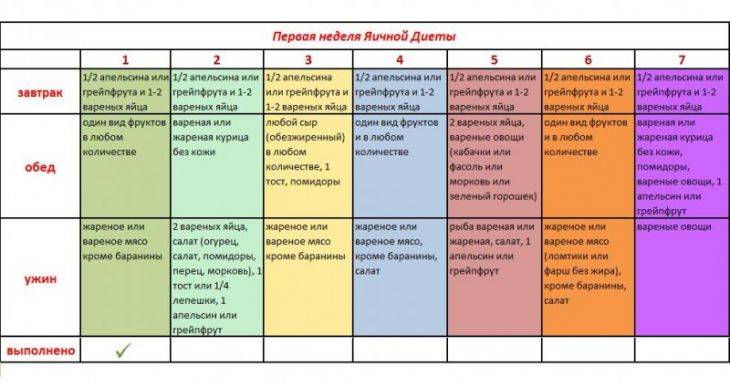
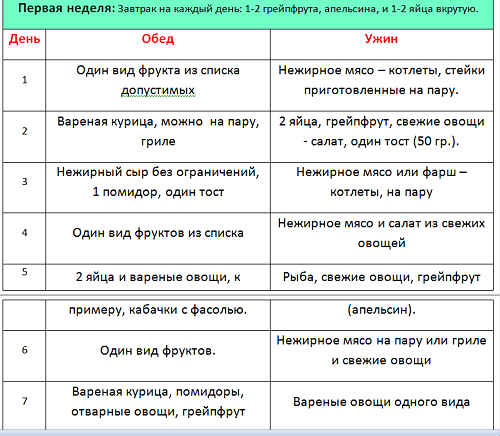
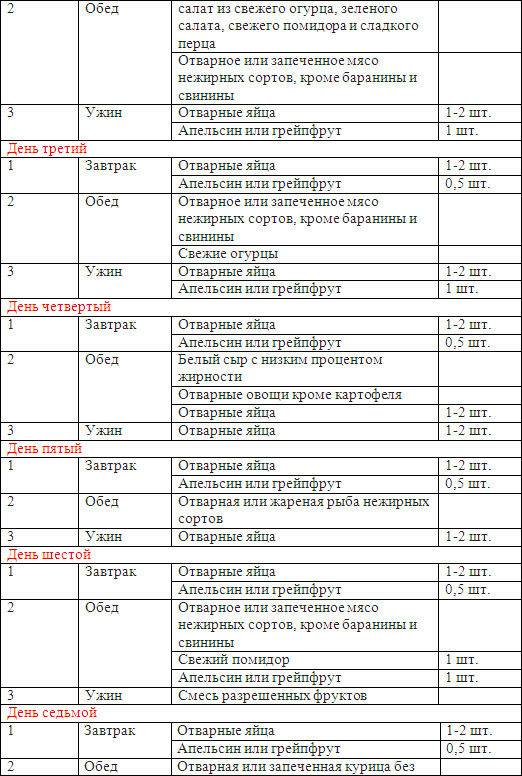
Меню для I недели:
| День | Утро | Обед | Вечер |
| 1 | 2 вареных яйца, ½ грейпфрута | Фрукты одного вида в неограниченном количестве | 200 г вареного или парового мяса |
| 2 | 2 яйца, сваренных вкрутую, ½ красного грейпфрута | 200 г курицы, поджаренной без шкурки | 2 яйца (омлет, жареные, вареные), 150 г овощного салата, 1 тост |
| 3 | 2 яйца вкрутую, ½ грейпфрута | 100 г нежирного сыра, 1 помидор, 1 тост | 200 г курицы отварной |
| 4 | 2 отваренных вкрутую яйца, ½ красного грейпфрута | Фрукты в любом количестве | 200 г вареной курицы |
| 5 | 1 грейпфрут | 2 яйца, 150 г отварных овощей | 200 г жареной рыбы, 100 г салата из овощей, 1 апельсин |
| 6 | 2 яйца, ½ красного грейпфрута | Фрукты (в любом количестве) | 200 г вареного или запеченного мяса |
| 7 | Яйца (2 шт.), половина грейпфрута | 200 г отварной курицы, 150 г овощей, 1 апельсин | 150 г вареных овощей |
II неделя:
| День | Утро | Обеденный прием | Вечер |
| Понедельник | 2 вареных яйца, полгрейпфрута | 100 г овощного салата, 200 г вареного либо запеченного мяса | Салат из свежей капусты (100 г), 2 яйца (омлет, всмятку), 1 грейпфрут |
| Вторник | ½ грейпфрута, 2 куриных яйца | 100 г овощного салата, 200 г мяса в вареном или запеченном виде | 2 яйца (в виде омлета или всмятку), 1 грейпфрут |
| Среда | 2 отваренных вкрутую яйца, 0,5 грейпфрута | Салат из овощей (100 г), запеченное или отварное мясо (200 г) | 2 яйца (омлет или всмятку), 1 грейпфрут |
| Четверг | ½ грейпфрута, яйца (2 шт.) вкрутую | 2 яйца, сыр нежирный (100 г), паровые овощи (150 г) | 2 яйца |
| Пятница | Яйца (2 шт.), полгрейпфрута | Рыба (200 г) | 2 яйца (всмятку или омлет) |
| Суббота | Яйца, отваренные вкрутую, ½ грейпфрута | Вареная курица (200 г), 1 помидор, 1 апельсин | Овощи на пару (150 г), 1 тост, 1 грейпфрут |
| Воскресенье | Половина грейпфрута, вкрутую сваренные яйца | Вареная говядина (200 г), овощной салат (100 г), 1 апельсин | Курица (200 г), помидоры, 1 грейпфрут |
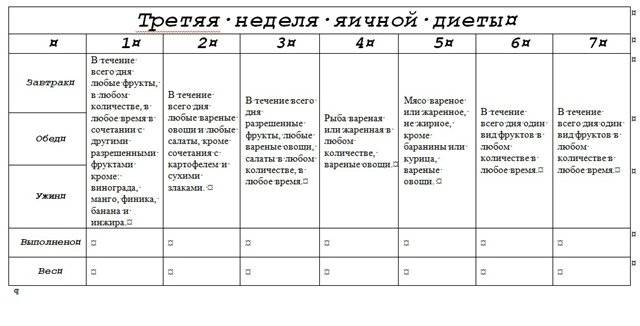
III неделя (продукты, рекомендованные на каждый из 7 дней, можно есть в неограниченном количестве):
| День | Меню |
| 1 | Фрукты |
| 2 | Овощи (вареные, тушеные или в виде салата из огурцов и томатов) |
| 3 | Фрукты |
| 4 | Рыба с овощами |
| 5 | Мясо с овощами |
| 6, 7 | Фрукты |
На IV неделе продукты и их количество на день худеющий может самостоятельно распределить на 3 приема пищи:
| День | Меню |
| 1 | 4 ломтика отварной говядины, 4 огурца, 4 томата, 1 банка рыбных консервов в собственном соку, 1 тост, 1 грейпфрут |
| 2 | 4 куска поджаренной курицы, по 4 помидора и огурца, 1 тост, 1 грейпфрут |
| 3 | 1 ст. л. творожной массы, 2 томата, 2 огурца, 1 апельсин |
| 4 | ½ курицы (жареной/запеченной), 1 огурец, 2 помидора, 1 апельсин |
| 5 | 2 шт. куриных яиц, 1 грейпфрут, 2 помидора |
| 6 | 100 г сыра, 200 г вареного мяса, 1 тост, по 2 томата и огурца, 1 апельсин |
| 7 | 1 ст. л. творога, 1 банка рыбной консервы, по 2 помидора и огурца, 1 апельсин |
В любой из приемов пищи разрешается пить черный, зеленый или травяной несладкий чай. На завтрак – чашку кофе, в течение дня – негазированную минеральную воду. Перекусы нежелательны, но если сильно одолевает голод, его можно заглушить, съев огурец или морковь.
Этот вариант похож на яичный, за исключением того, что яйца заменяют 150 г нежирного (1%) творога. Этот продукт подойдет на каждый день на завтрак, который можно дополнять фруктами. Примерное меню на 2 недели можно составить по аналогии с яичным видом диеты.
На III неделе рекомендованные продукты самостоятельно делятся на 3 приема:
С утра или вечером выпивают по ½ стакана обезжиренного кефира. На IV неделе повторяют меню II.
Пить, как и в предыдущем варианте, нужно кофе и чай без сахара, минеральную и обыкновенную воду. В день, включающий в рацион свежие овощи, можно сделать на ужин салат из свежей капусты, огурцов и томатов, сбрызнув его оливковым маслом и добавив пряности.
Перекусывать нежелательно, но если голод ощущается слишком сильно, можно съесть морковь, сельдерей, листовой салат, шпинат, кусок болгарского перца или огурец.
Оба варианта одинаково эффективны. На выбор влияют индивидуальные предпочтения и переносимость основных продуктов – яиц или творога. Оригинал любого варианта диеты можно уточнить у врача-диетолога.
Сообщение Диета магги появились сначала на 101 совет по уходу за волосами.
Источник: 101hairtips.com pohudenie
Когда вам необходимо выбрать библиотеку или фреймворк для создания веб-приложений, нет никаких сомнений в том, что библиотеки JavaScript предпочтительнее любой другой библиотеки. Но это не значит, что другие библиотеки недостаточно хороши.
Vue.js и Django — известные веб-фреймворки JavaScript. Они также являются инструментами с открытым исходным кодом. Vue.js известен тем, что создает чистые, многократно используемые веб-приложения на основе компонентов. Django — это фреймворк, построенный на Python, известный своей быстрой разработкой и рациональным дизайном кода.
В этой статье мы обнаружим некоторые из основных и более технических различий между Vue.js и Django. Сюда входят плюсы и минусы каждого фреймворка, компании, которые в настоящее время используют эти фреймворки, интегрированные инструменты и многое другое.
Vue.js — это интерфейсный JavaScript-фреймворк, который генерирует страницы на стороне клиента. Поскольку он отображает страницы на стороне клиента, Vue.js требует больше времени на первоначальную загрузку, но дает лучший опыт, когда необходимо перемещаться между страницами.
В то время как Django — это полнофункциональный Python-фреймворк, который генерирует страницы на стороне сервера. Его рендеринг на стороне сервера помогает при первоначальной загрузке страницы, но во время навигации нам, возможно, придется столкнуться с проблемами производительности из-за задержки в сети.
Vue.js — простая, удобная и фантастическая библиотека для ваших нужд. Вы можете изучить его на практике, если знаете Html, CSS и JavaScript. Vue.js — это фреймворк с быстрой кривой обучения. Документация, написанная для Vue.js, также проста для понимания и чрезвычайно подробна.
Документация настолько хорошо написана, что вы не должны растеряться, даже работая с ней целый день. Все шаги четко объяснены, а документация Vue.js — одно из лучших руководств, доступных для любого веб-фреймворка. Vue.js — это полная и функциональная экосистема JavaScript, которая является одной из лучших интерфейсных сред.
Django известен своим быстрым развитием, и это инструмент с открытым исходным кодом. У этого фреймворка также есть отличное сообщество. Django — это элегантная платформа MVC, которая помогает вам писать красивый код. Этот фреймворк бесплатен, имеет отличную документацию и очень прост в освоении. Он также предоставляет отличные пакеты и библиотеки для помощи в разработке.
Сообщество Vue.js меньше, чем два других конкурирующих фреймворка, reactJS и Angular. Vue.js не поддерживает фрагменты, а программно поддерживает только несколько корневых узлов. Еще один недостаток Vue.js — разметка YXML и HTML.
Django — это недостаточно мощный фреймворк для создания шаблонов и слабая ORM. Его автоматическая перезагрузка перезагружает весь сервер. Диспетчер URL-адресов Django игнорирует метод HTTP и имеет некоторую связь внутренних подкомпонентов.
Наличие минусов не обязательно означает, что фреймворк плохой. Фактически, каждая структура идет с намерением удовлетворить какую-то конкретную потребность или предоставить определенную ценность. Хорошо известно, что у каждой платформы есть свои особенности и стандарты, которые отличают ее от других платформ, и что один из них легко расставить по приоритетам в соответствии с вашими потребностями.
Обе эти структуры поддерживаются хорошими компаниями.
Vue.js поддерживается многими громкими именами, такими как:
Django также поддерживается некоторыми громкими именами, такими как:
В этой статье мы рассмотрели фреймворки Vue.js и Django и указали на их различия. Мы также обсудили плюсы и минусы каждого фреймворка и упомянули названия компаний, поддерживающих эти фреймворки. Vue.js становится все более популярным среди фреймворков JavaScript и интерфейсной веб-разработки, особенно с точки зрения одностраничных приложений и пользовательских интерфейсов. Между тем, Django получит признание как полноценный фреймворк для быстрой разработки.
Bitcoin Mixer, также известный как решения для смешивания биткойнов, — это система, которая позволяет защитить конфиденциальность вашего кошелька путем смешивания транзакций перевода. Не определено, кто является владельцем биткойн-кошелька. Эти кошельки имеют псевдонимы букв и цифр, известные как «псевдонимы», которые не зарегистрированы ни на какое имя. Как владелец кошелька, когда вы делаете перевод, неизвестно, что вы совершили этот перевод, но никнейм вашего кошелька будет отображаться. Если известно, что вы являетесь владельцем этого псевдонимного кошелька, все переводы, которые вы делаете с помощью этого кошелька, можно отслеживать в блокчейне. Системы биткойн-микшера предоставляют вам решения для защиты вашей конфиденциальности. В настоящее время доступны два типа решений для микширования биткойнов;
Центральные службы смешивания биткойнов, позволяют вам получать биткойны и отправлять их в новый созданный вами биткойн-кошелек. Таким образом, это усложняет совершенные вами переводы и затрудняет отслеживание этих транзакций в цепочке блоков. Когда вы получаете такую услугу, вы по-прежнему предоставляете свою личность центральному микшеру биткойнов, который вы используете. Если центральный микшер хочет и / или должен поделиться этой информацией, он может это сделать. По этой причине ваша конфиденциальность снова находится под угрозой. Другое дело, что центральный смеситель, с которым вы работаете, должен быть надежным. В противном случае, после получения вашего биткойна от вас, он не переведет его на другой ваш кошелек и может украсть ваши биткойны.
Децентрализованные биткойн-миксеры предоставляют решения для этих двух ситуаций, которые могут возникнуть в центрах. Поскольку он не подключен к центру, вы можете предотвратить кражу вашего биткойна или передачу вашей личности другим лицам. Принципы работы децентрализованных биткойн-миксеров: Когда группа собирается вместе и делает им большой трансфер. После этого процесса невозможно определить происхождение переведенных биткойнов. Все пользователи, участвующие в микшере, должны одобрить транзакцию, чтобы это действие произошло. Таким образом, в кругу доверия вы можете передавать данные, зная, что ваша конфиденциальность и биткойны в безопасности.
Любой, кто не хочет, чтобы их переводы отслеживались, может воспользоваться услугами микшера биткойнов. Хотя в сети блокчейн ваше имя никогда не будет видно, такая дополнительная мера может быть предпочтительнее.
Хотя это ситуация, которая варьируется в зависимости от законодательства страны, это возможно. Централизованные службы Bitcoin Mixer могут быть отключены и заблокированы в судебном порядке. Хотя это все еще возможно для децентрализованных сервисов микшера, такие неавторизованные сервисы сложнее закрыть и заблокировать. По этой причине в такой ситуации вы можете выбрать децентрализованные биткойн-миксеры.
Curl — это утилита командной строки для передачи данных с или на удаленный сервер. Он позволяет загружать или выгружать данные с использованием протоколов HTTP, HTTPS, SCP , SFTP и FTP .
Если вы пытаетесь загрузить файл с помощью curl и получаете сообщение об ошибке, в котором говорится, что curl command not found это просто означает, что пакет curl не установлен в вашей системе Debian.
В этом руководстве объясняется, как установить и использовать команду curl в Debian 10, Buster. Читать