Надпочечники – это крошечный парный железистый орган, расположенный в области почек, от полноценной работы которого зависят многие процессы в организме. Основная функция надпочечников – это выработка гормонов. Именно здесь происходит образование гормонов, отвечающих за стрессовую реакцию и нормальный жизненный тонус – адреналина и норадреналина. При недостаточном синтезе этих агентов у человека резко снижается стрессоустойчивость, появляется вялость, апатия, страдают адаптационные механизмы. Читать →
MikroTikis a popular and mostly used router because of having a lot of networking functionalities and cheap price. MikroTik router can be found both Router Board and MikroTik OS. If you buy a MikroTik Routerboard (like MikroTik Routerboard 450G, MikroTik Routerboard 1100 AH), you will find a machine where MikroTik OS is prebuilt but the machine contains limited processing resources such as limited RAM and limited processor core. So, your network could be slow if you use a MikroTik Routerboard for maintaining a large network (Note: Sometimes it is better to use Routerboard like CCR1016-12G because it is specially designed for working at layer 3 and processing many millions of packets per second). On the other hand, if you install MikroTik OS on a PC or on a Server, you will get a faster processor with sufficient RAM. So, it will be easy and faster for maintaining a large network with this MikroTik PC router (Note: PC or Server processors are specially designed for working at layer 7 and working with application. So, it will be better avoiding low configuration PC or Server). As MikroTik PC router is a better solution for a larger network, this article is designed to show you the necessary steps to install MikroTik OS on a PC or a Server.
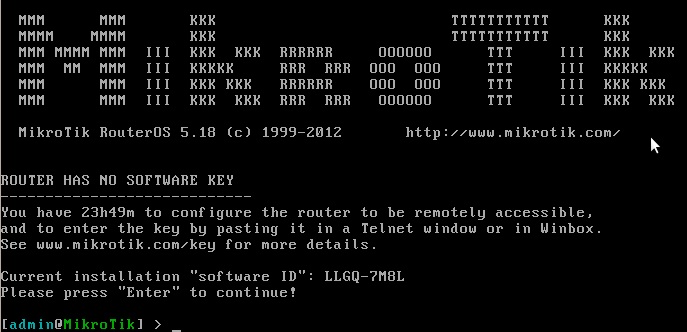
MikroTikRouterOS CLI
Requirements
It should have at least two network cards to turn a PC or Server into a MikroTik Router. One card will be used as LAN connection and another card will be used as WAN connection. It is also better to use more than one core and sufficient memory for processing millions of network packets. You must remember that IDE HDD is required for installing RouterOS.
MikroTik PC Router Installation
MikroTik OS can be installed on a virtual machine or on a physical machine. If you interested to install MikroTik OS on a virtual machine, download VMware Workstation to create a virtual machine and then follow my video tutorial about Setup MikroTik OS on VMware Virtual Machine. If you interested to install MikroTik OS on a physical machine, download MikroTik OS ISO and burn the ISO in a blank CD or DVD or in a USB flash drive and then follow my below steps to install MikroTik OS ISP on your physical machine.
Boot your PC or Server from your bootable media such as CD or DVD ROM. If everything is OK, MikroTik OS will be started to install and format the disk. If you use a large disk, it will take more time to format. So, be patient to wait. After formatting the disk, it will ask you for selecting packages those will be installed.
To install all packages, press ‘a‘ or press ‘M’ for minimal installation and then press ‘i‘ for starting installation.
It will now ask you whether it will keep old configuration or not. Press ‘n‘, because it will be better to delete old configuration in your disk. It will now show a warning message. Press ‘y‘ for continue installation. All selected packages will be installed and then it will ask you to hit ‘Enter‘ key to reboot the system. Hit ‘Enter‘ key now.
After rebooting, it will ask you to provide login credential. MikroTik default username is ‘admin‘ and password is blank. So, type ‘admin‘ for MikroTik login and password left blank and then hit ‘Enter‘ key.
MikroTik CLI will appear now. It will also show a Software ID in the login screen. Write down this Software ID because it will be required when you want to purchase a license from MikroTik site.
How to install MikroTik OS in a Physical Machine to make a MikroTik PC Router has been discussed in this article. A video is also uploaded to reduce your any confusion. However, if you face any problem to install MikroTik OS ISO on your physical machine, feel free to discuss in comment or contact with me form Contact page. I will try my best to stay with you.
После того как мы создали приложение с админкой, нам нужно кастомизировать главную страницу нашего блога, чтоб на ней отображались записи которые есть на блоге. Для этого нужно разобраться как работают ссылки в фреймворке Django.
1. Находим файл urls.py — у меня это путь D:djangoproblogblogblogurls.py
открываем и вставляем в массив(список) urlpatterns следующую строку
url(r'', include('blg.urls')),
Напоминаю — blg — так мы назвали наше приложение директория которого будет иметь такое же название и будет находится в директорииD:djangoproblogblog, это название еще встречается в файле settings.py(D:djangoproblogblogblog) в конце спискаINSTALLED_APPS.
В результате должно быть такое содержимое urls.py:
from django.conf.urls import url,include
from django.contrib import admin
urlpatterns = [
url(r'', include('blg.urls')),
url(r'^admin/', admin.site.urls),
]
После проделанного Django будет перенаправлять все запросы 'http://127.0.0.1:8000/' к blg.urls и искать там дальнейшие указания.
!!!обязательным является импортирование модуля include
Далее в директории blg нужно создать файл urls.py cо следующим содержимым:
from django.conf.urls import url, include
from . import views
urlpatterns = [
url(r'^$', views.post_list, name='post_list'),
]
Первая строка нам знакома, в ней мы импортируем модули url и include(наличие которого обязательно), во второй импортируем все вьюхи(Views) приложения — которых пока нет.
Теперь переходим на главную страницу нашего приложения и увидим ошибку окончание примерно которой следующее «…. 'post_list' — no attribute 'post_list' «… как побороть ошибку и как сделать свою страницу на html я вам расскажу в следующем посте
Вопросы и обсуждения приветствуются.
Автор: Няшный Человек
Дата публикации: 2016-06-12T17:03:00.000+03:00
Всем привет, у меня сейчас такая ситуация, очень сложно вспомнить, если долго не работаешь, как запустить сервер с Django проектом который лежит локально.
Для того чтоб такое не повторялось, я создал данную заметку, которая и вам может понадобиться…
Шаг первый: Открываем калькулятор, закрываем! Шаг номер два: Входим в виртуальное окружение Django
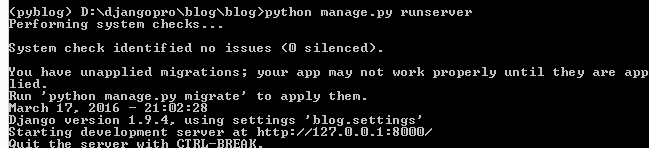
Шаг номер три: запускаем сервер Для этого я должен попасть в папку в которой находится manage.py
Вот и все, сервер запущен, приложение — сайт работает!!!
Автор: Няшный Человек
Дата публикации: 2016-06-12T15:37:00.000+03:00