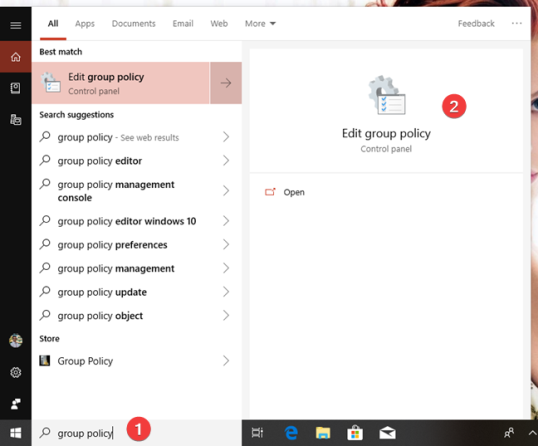
STP, что означает протокол связующего дерева, — это протокол сетевого уровня, который помогает в построении логической топологии без петель для сетей Ethernet. Многие улучшенные версии STP продолжали поступать на рынок со временем, внося новые улучшения в этот протокол:
- STP / 802.1D (оригинальный STP)
- PVST + (улучшения Cisco для STP, добавление функции для каждой VLAN)
- RSTP / 802.1W (улучшенный STP с гораздо более быстрой конвергенцией)
- Быстрый PVST + (улучшение RSTP в Cisco, добавление для каждой функции VLAN)
Вы можете видеть, что Cisco сделала много улучшений в этой области. Давайте вернемся к основам и рассмотрим причину, почему STP был необходим в первую очередь.
Прежде чем мы рассмотрим потребность в STP, давайте кратко рассмотрим, как работает уровень 2, когда ему нужно узнать адрес конкретного хоста.
Когда коммутатор получает пакет, но у него нет MAC-адреса узла назначения в его таблице, он транслирует сообщения на все узлы, кроме тех, от которых он получает. Если вы хотите узнать больше об этом, пожалуйста, обратитесь к этой статье на ARP.
Сценарий 1: широковещательный шторм
Давайте посмотрим на сценарий ниже:
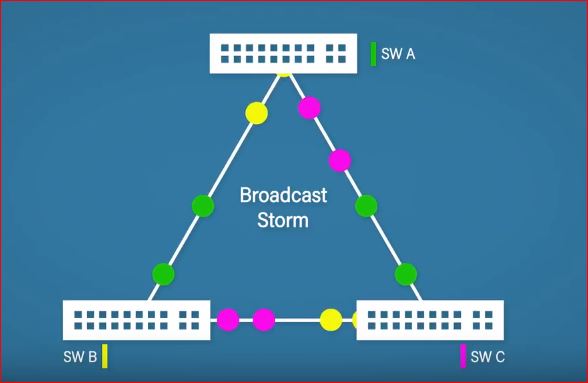
Допустим, в сети есть три коммутатора, как показано выше. Все переключатели связаны друг с другом. Коммутатор B отправляет широковещательную рассылку, а коммутатор A и коммутатор C принимают ее. Они не находят адрес и повторно транслируют сообщение.
Коммутатор B снова получает ретранслируемое сообщение от коммутатора A и коммутатора C. Думая об этой трансляции как о новой трансляции, коммутатор B снова транслирует те же сообщения, которые уже транслировались ранее. Таким образом, широковещательный шторм имеет место. Это продолжается до тех пор, пока порты не выйдут из строя или не произойдет сбой коммутатора.
Сценарий 2: дубликаты пакетов
Рассмотрим ту же архитектуру сети, которая приведена в сценарии выше. Здесь есть небольшой поворот. На этот раз коммутатор C подключен к хосту назначения, который искал коммутатор B. Что теперь?
Переключатель B будет транслироваться снова. Трансляция также достигает коммутатора C и коммутатора A. Коммутатор C просматривает пакет и доставляет пакет на хост назначения.
Однако на другой параллельной стороне коммутатор A также проверил свою таблицу и не смог найти хост назначения. Таким образом, он также транслировал сообщение, и коммутатор C снова получил тот же пакет. Таким образом, он просматривает пакет и снова доставляет его на хост назначения.
В чем здесь проблема? Можете ли вы угадать, не читая дальше?
Самая большая проблема здесь — двойная доставка и потеря пропускной способности.
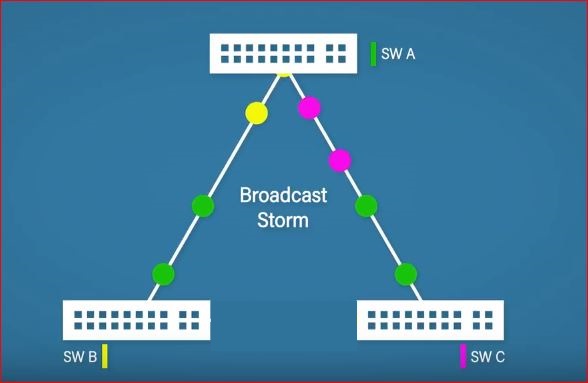
Теперь давайте выясним решение для сценария 2. Одним из лучших и самых простых решений было бы отключить коммутатор B от коммутатора C, чтобы не было дублирования пакетов. Потому что, в любом случае, коммутатор A будет транслировать пакет на коммутатор C, если хост назначения не найден в списке коммутатора A. Теперь это выглядит примерно так:
Если вы снова посмотрите на определение, теперь вы узнаете, почему STP был изобретен в первую очередь.
Хотя мы нашли решение, мы, тем не менее, не уверены, что блокировка соединения между B и C была более выгодной, или блокирование того же между коммутатором B и A. Давайте рассмотрим все это подробнее.
Какой порт заблокировать в STP?
STP выполняет ряд простых шагов, которые помогают STP решать многие проблемы, в том числе блокировать порт. Но, перед этим, вот некоторые термины, которые могут быть вам полезны:
Корневой мост
Как и «Корень» в древовидной структуре, Корневой мост является основным коммутатором или мостом на графике, где разные узлы представляют все другие мосты. Корневой мост управляет топологией связующего дерева.
Назначенный мост
Назначенный мост — это коммутатор, ближайший к корневому мосту, через который кадры будут перенаправлены на корневой мост.
Альтернативный мост
Это альтернативный путь к корневому коммутатору, но он отличается от пути к корневому мосту.
Резервный мост
Это резервный путь к сегменту, хотя будет другой существующий путь.
Порты, которые отключены.
Ниже приведены различные состояния, в которых порт коммутатора может находиться в любой данный момент времени:
Порт экспедирования
Порт, который полноценно работает.
Порт обучения
Порт, который не пересылает кадры, но изучает MAC-адреса.
Порт прослушивания
Порт, который не пересылает кадры и не изучает MAC-адреса.
Отбрасывание порта
Порт, который не передает никаких данных.
Давайте посмотрим, как работает STP, и решим, какой коммутатор, мост и порт должны находиться в каком состоянии:
- На первом этапе выбирается корневой мост (способ выбора корневого моста был рассмотрен далее в этой статье).
- Порты в корневом мосту переводятся в состояние пересылки.
- Порты в назначенных мостах, соединяющих корневой мост, называются корневыми портами.
- Оставшиеся ссылки на назначенном мосту выбирают назначенные порты.
- Остальные порты переведены в состояние блокировки.
Вот очень красивый пример из Википедии.
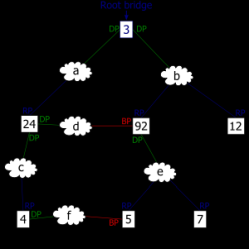
RP: корневой порт
DP: назначенный порт
BP: заблокированный порт
В целом весь процесс может выглядеть проще, но алгоритм работы за сценой сложен. Чем больше сеть, тем больше времени требуется алгоритму, чтобы расставить все по местам.
Операция протокола связующего дерева
Происходит следующий набор операций.
Определение корневого моста
Давайте подумаем об этом сценарии с самого начала. Предположим, что сеть создана с нуля. Все коммутаторы, которые являются частью сети, при включении все они утверждают, что являются корневым мостом.
Чтобы подтвердить утверждение, все коммутаторы должны транслировать свой идентификатор моста (BID), используя BPDU (блоки данных протокола моста). Общий идентификатор моста составляет 8 байтов, из которых 2 байта зарезервированы для приоритета моста, а остальные 6 байтов зарезервированы для MAC-адреса.
Идентификатор моста представляет собой комбинацию приоритета моста и MAC-адреса. За кулисами BID представляет собой сцепленную версию приоритета моста и MAC-адреса коммутатора / моста. По умолчанию каждый мост будет иметь идентификатор моста 32768, а каждый идентификатор моста будет кратен 4096.
Как определяется корневой мост?
После передачи широковещательного сообщения каждому мосту мост с минимальным значением BID становится корневым мостом. Если в обоих случаях приоритет моста одинаков, победителем будет самый низкий Mac-адрес.
Пример:
Допустим, есть связь между двумя мостами с BID:
Мост A: 32768.df56.6765.7876 и,
Мост B: 32768.df56.6765.7875
Теперь у вас есть вопрос — какой мост станет здесь корневым мостом? Если вы догадались, что это Мост B, значит, вы были правы.
Графический пример:
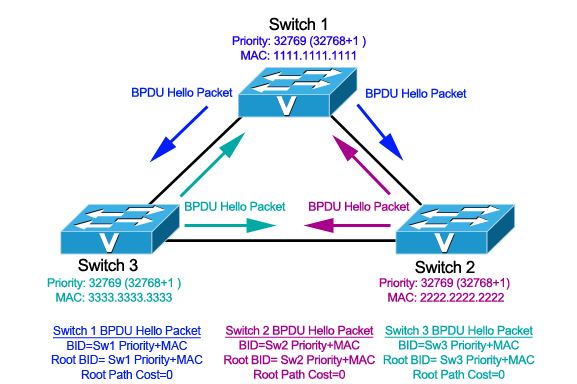
Давайте посмотрим, как эти отдельные коммутаторы реагируют на BPDU:
В тот момент, когда все коммутаторы включены, все коммутаторы, как упоминалось ранее, объявляют, что они являются корневым мостом, отправляя свой идентификатор моста в пакете приветствия.
Переключатель 1:
Когда коммутатор 1 получает приветственные BPDU от коммутатора 2 и коммутатора 3, он сравнивает значения идентификатора моста. В этой ситуации у коммутатора 1 самый низкий BID. Таким образом, коммутатор 1 отбрасывает пакеты приветствия, полученные от остальных коммутаторов, и продолжает объявлять себя корневым мостом.
Переключатель 2:
Здесь коммутатор 2 получает приветственные BPDU от обоих коммутаторов, то есть от коммутатора 1 и коммутатора 3. Давайте посмотрим, как коммутатор 2 реагирует на оба BPDU.
Когда Коммутатор 2 получает пакет от Коммутатора 1, он сравнивает значения BID и, безусловно, приветственный пакет BPDU от Коммутатора 1 заменяет его BID. Таким образом, коммутатор 2 изменяет свой BID на коммутатор 1. Когда он также получает BPDU от коммутатора 3, он будет сравнивать значения и будет продолжать отбрасывать BPDU из коммутатора 3.
Переключатель 3:
Допустим, коммутатор 3 сначала получает BPDU от коммутатора 2. Таким образом, он меняет свой BID на тот, что у коммутатора 2. Но когда он дополнительно получает BPDU от коммутатора 1, он снова меняет его на коммутатор 1.
В этот момент все коммутаторы получили BPDU друг друга и согласились с тем, что коммутатор 1 имеет самое низкое значение BID и, следовательно, является подходящим кандидатом на роль корневого моста сети.
После определения корневого моста коммутатор 2 и коммутатор 3 начинают организовывать свои соответствующие связи в корневые порты и назначенные порты, как обсуждалось в начале статьи.
Но выбор корневого моста — это не конец игры. Это только начало. И игра следует за: —
Определение маршрута с наименьшей стоимостью до корневого моста
Если вам известно о связующем дереве из теории графов, вы можете объяснить, почему мы говорим о расчете маршрута с наименьшей стоимостью до корневого моста.
В теории графов остовное дерево является подмножеством графа. Остовное дерево позволяет покрыть все вершины графа с минимально возможным числом ребер. Следовательно, остовное дерево не имеет петли, и, кроме того, оно также не может быть отключено.
Протокол Spanning Tree использует тот факт, что, как и Spanning Tree из теории графов, этот сетевой протокол может вычислять путь с наименьшей стоимостью от любого узла до корневого моста.
Таким образом, после определения корневого моста каждый узел начинает определять наименьшую стоимость корневого моста, чтобы оптимизировать всю сеть.
В качестве первого шага Root Bridge отправляет поток BPDU всем остальным коммутаторам. Корневая стоимость определяется путем суммирования затрат сегментов на пути, по которому он прошел пакет BPDU для прохождения от корневого моста к узлу.
Стоимость сегмента также зависит от скорости соединения конкретного сегмента. Вот диаграмма того же самого.
| Пропускная способность | Затраты |
| 10 Mbit | 100 |
| 100 Mbit | 19 |
| 1000 Mbit | 4 |
Иногда эти затраты на соединение возникают в захватывающих ситуациях, связанных с наименьшей стоимостью пути к корневому мосту. Посмотрите на картинку ниже: —
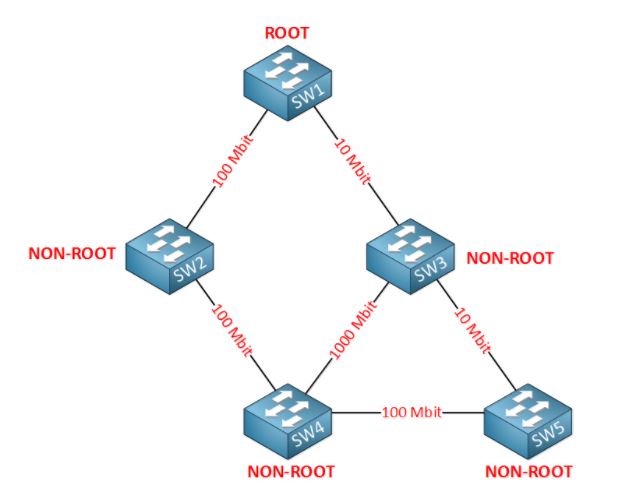
Можете ли вы угадать корневой порт для коммутатора 3 на рисунке выше?
Хотя может показаться, что коммутатор 3 напрямую подключен к корневому мосту, и это должно быть его путем, но если мы вычислим стоимость канала, то получится, что следующий поток является лучшим для коммутатора 3 для отправки данных на корневой мост.
Корневой мост -> Переключатель 2 -> Переключатель 4 -> Переключатель 3
Вы можете догадаться, почему? В соответствии с таблицей выше, вот расходы.
Переключатель 3 на Root Bridge напрямую равен 100 из-за его канала 10 Мбит / с. Но если мы вычислим путь, как сказано выше, он будет (19 + 19 +4 = 42).
Таким образом, в каждом из некорневых мостов порт, который получает BPDU с наименьшей стоимостью, становится корневым портом этого моста.
Далее все ссылки, подключенные напротив корневого порта, помечаются как назначенный порт. Также определяются заблокированные порты. Однажды все помечено и исправлено; сеть будет иметь полностью оптимизированную версию протокола связующего дерева.
Там могут быть другие условия. В случае большой сети в стоимости ссылки будет указана связь. В этом случае стоимость сети рассчитывается как часть Advanced STP. Advanced STP также говорит о том, что происходит в случае сбоя соединения.