MikroTik Port Forwarding or Port Mapping is a NAT application that is used to redirect a request from MikroTik IP address and port number combination to a local IP address and port number. For example, if you have a Web Server or FTP Server in your private/local area and want to access this local server from outside of your local area (from internet/public), you can apply MikroTik port forwarding or port mapping and can easily access your Web Server or FTP Server.
Port forwarding configuration in MikroTik Router is not so difficult task. In this article, I will show how to easily configure MikroTik Port Forwarding or Port Mapping using Winbox.
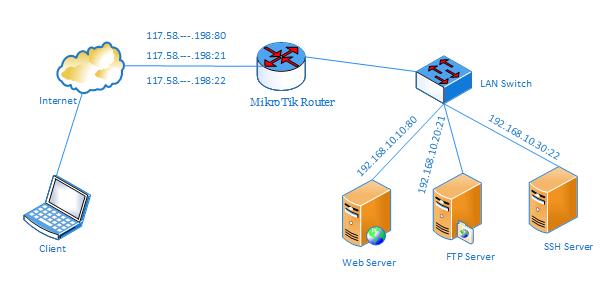
Network Diagram

In this network, MikroTik Router’s ether1 interface is connected to WAN having IP address 117.58.—.198/29 and ether2 interface is connected to a LAN switch having IP block 192.168.10.0/24. There are three servers (Web Server, FTP Server and SSH Server) in internal network and these are only accessible from LAN. Configuring MikroTik Port Forwarding, these servers can be accessible from out of this internal network (from internet/public) and this article will show how to configure MikroTik Port Forwarding to access these internal servers from internet or public network.
MikroTik Port Forwarding Configuration
MikroTik port forwarding can be used for a lot of purposes. Among these, I will only show the following three frequently used purposes.
- Port Forwarding to Internal Web Server
- Port Forwarding to Internal FTP Server
- Port Forwarding to Internal SSH Server
Port Forwarding to Internal Web Server
According to the network diagram, there is a Web Server (IP: 192.168.10.10) in internal network and now it is only accessible from internal network. Configuring MikroTik Port Forwarding, this Web Server can be accessible from out of this internal network and the following steps will show how to configure MikroTik Port Forwarding to access this internal Web Server from internet/public area.
- Login to MikroTik Router using Winbox with admin privilege credential.
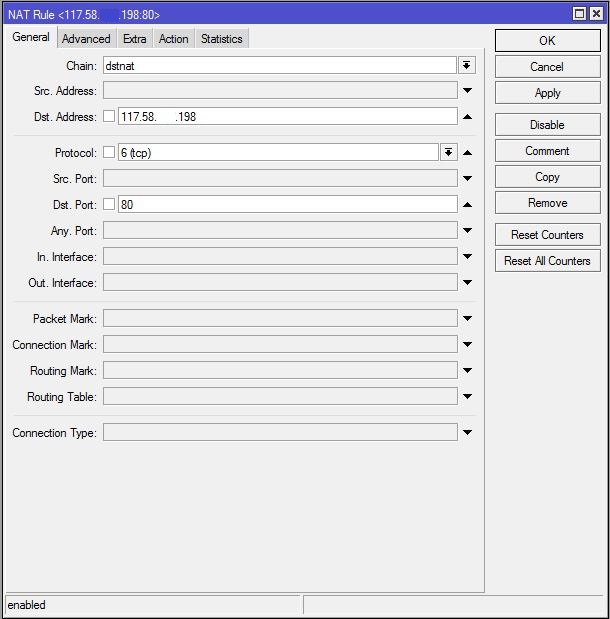
- Go to IP > Firewall menu item and click on NAT tab and then click on PLUS SIGN (+). New NAT Rule window will appear.
- In General tab, choose dstnat from Chain dropdown menu. Put MikroTik WAN IP (117.58.—.198) in Dst. Address input field and choose tcp from Protocol dropdown menu and then put 80 in Dst Port input field because we know Web Server works on TCP port 80.
- Click on Action tab and choose dst-nat option from Action dropdown menu. Put Web Server IP (192.168.10.10) in To Addresses input field and then put 80 in To Ports input field.
- Click Apply and OK button.

Port forwarding configuration to internal Web Server has been completed. Now type MikroTik WAN IP (http://117.58.—.198) in any Web browser from outside of your internal network and you will find your website in your browser successfully.
Note: You must allow HTTP service or TCP Port 80 in your Web Server firewall otherwise you cannot find your website from public network.
Port Forwarding to Internal FTP Server
In the network diagram, there is a FTP Server (IP: 192.168.10.20) and we want to access this server from public network. So, we need to configure MikroTik Port Forwarding and the following steps will show how to configure MikroTik Port Forwarding to access FTP Server from public network.
- Login to MikroTik Router using Winbox with admin privilege credential.
- Go to IP > Firewall menu item and click on NAT tab and then click on PLUS SIGN (+). New NAT Rule window will appear.
- In General tab, choose dstnat from Chain dropdown menu. Put MikroTik WAN IP (117.58.—.198) in Dst. Address input field and choose tcp from Protocol dropdown menu and then put 21 in Dst Port input field because we know FTP Server works on TCP port 21.
- Click on Action tab and choose dst-nat option from Action dropdown menu. Put FTP Server IP (192.168.10.20) in To Addresses input field and then put 21 in To Ports input field.
- Click Apply and OK button.
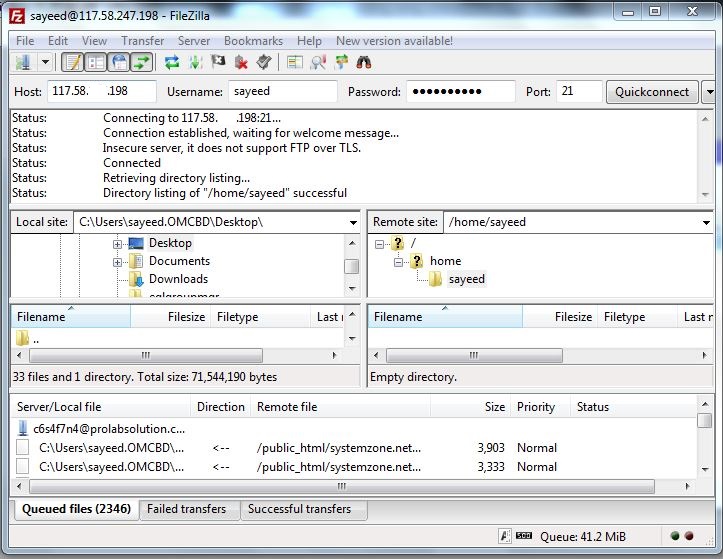
Port forwarding configuration to internal FTP Server has been completed. Now type ftp://mikrotik-wan-ip (ftp://117.58.—.198) in any web browser or use any FTP client (FileZilla) to access your FTP Server from public network. If everything is OK, you will be able to access your FTP Server successfully.

Note: You must allow FTP service or TCP Port 21 in your FTP Server firewall otherwise you cannot communicate with your FTP Server from public network.
Port Forwarding to Internal SSH Server
We also have a SSH Server (IP: 192.168.10.30) in our network diagram and we want to access this server from outside of our internal network. MikroTik Port Forwarding configuration to access this SSH Server from public network is shown in the following steps.
- Login to MikroTik Router using Winbox with admin privilege credential.
- Go to IP > Firewall menu item and click on NAT tab and then click on PLUS SIGN (+). New NAT Rule window will appear.
- In General tab, choose dstnat from Chain dropdown menu. Put MikroTik WAN IP (117.58.—.198) in Dst. Address input field and choose tcp from Protocol dropdown menu and then put 22 in Dst Port input field because we know SSH Server works on TCP port 22.
- Click on Action tab and choose dst-nat option from Action dropdown menu. Put SSH Server IP (192.168.10.30) in To Addresses input field and then put 22 in To Ports input field.
- Click Apply and OK button.
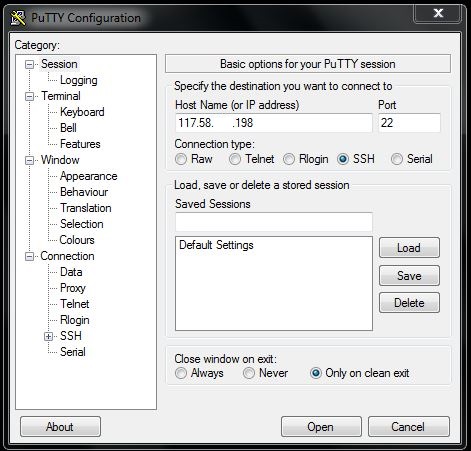
Port forwarding configuration to access internal SSH Server has been completed. Now we will be able to access our SSH Server from public network successfully by using any SSH client (Putty or SSH Secure Shell Client).

Note: You must allow SSH service or TCP Port 22 in your SSH Server firewall otherwise you cannot communicate with your SSH Server from public network.
If you face any confusion to follow above steps properly, watch the following video about Port Forwarding Configuration in MikroTik Router. I hope it will reduce your any confusion.
MikroTik Port Forwarding Configuration to Access Internal Servers has been discussed in this article. I hope you will now be able to configure your required port forwarding configuration in your MikroTik Router successfully. However, if you face any confusion, feel free to discuss in comment or contact with me from Contact page. I will try my best to stay with you.