Рынок беспроводных маршрутизаторов меняется очень быстро. Ещё вчера топовые роутеры становятся устройствами среднего класса, а то и вовсе сходят с орбиты. Но есть класс устройств, которые практически не стареют — это проводные маршрутизаторы, устройства без модуля WiFi. И даже маршрутизаторам 7–8-летней давности найдётся работа и сегодня, причём есть такие ниши, в которых их использование предпочтительнее. Вам нужна локальная сеть в небольшом офисе, но не нужно, чтобы сотрудники подключали к ней свои смартфоны? Организовать виртуальную сеть внутри существующей? Есть необходимость в брандмауэре, который будет работать круглыми сутками и потреблять электричества как пол-лампочки? DLINK DIR-100 идёт к вам на помощь!
Архив рубрики: Публикации
Интернет от «Ростелеком» в частный дом или на дачу
В России лидер по предоставлению интернет-услуг — компания «Ростелеком». Рынок телекоммуникаций требует, чтобы поставщик интернета имел в наличии обширные проводные каналы связи. Из-за больших расстояний между населёнными пунктами невыгодно прокладывать новые линии, а «Ростелеком» использует действующие телефонные линии. Благодаря этому интернет от «Ростелекома» можно провести в каждый частный дом или малонаселённый пункт. По мере развития совершенствуются и технологии подключения интернета к частным домовладениям. В разнообразии способов подключения «Ростелеком» также остаётся лидером.
Как настроить роутер Xiaomi Mi Mini
Роутеры Xiaomi — сравнительно молодое направление данного бренда. Оставаясь в рамках цен ниже среднего, тем не менее, модель Xiaomi Mi Mini Wi-Fi удовлетворит запросы значительного большинства пользователей.
MikroTik Site to Site EoIP Tunnel with IPsec
VPN (Virtual Private Network) is a technology that provides a secure tunnel across a public network. A private network user can send and receive data to any remote private network using VPN Tunnel as if his/her network device was directly connected to that private network.
MikroTik provides EoIP (Ethernet over IP) tunnel that is used to create a site to site VPN. EoIP tunneling is a MikroTik RouterOS protocol that creates an Ethernet tunnel between two MikroTik Routers on top of an IP connection. EoIP adds an outer header mentioning the entry point of the tunnel (SourceIP) and the exit point of the tunnel (DestinationIP) but the inner packet is kept unmodified.

EoIP tunnel only encapsulates IP packets but does not provide authentication and encryption. EoIP tunnel with IPsec ensures IP packet encapsulation as well as authentication and encryption. IPsec usage makes your packets secure but it works slowly because of having extra authentication and encryption process. So, my opinion is that if data security is your concern, use EoIP tunnel with IPsec but if data security is not so headache, use only MikroTik EoIP tunnel because it works so faster.
The goal of this article is to design an EoIP VPN tunnel with IPsec. So, in this article I will show how to create an EoIP tunnel with IPsec to establish a secure site to site VPN tunnel between two MikroTik Routers.
Network Diagram
To configure a site to site EoIP VPN Tunnel (with IPsec) between two MikroTik Routers, I am following a network diagram like below image.
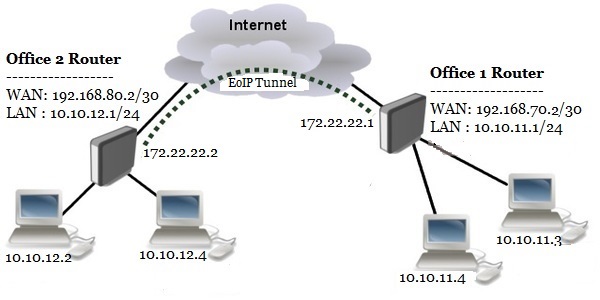
In this network, Office1 Router is connected to internet through ether1 interface having IP address 192.168.70.2/30. In your real network this IP address will be replaced with public IP address provided by your ISP. Office1 Router’s ether2 interface is connected to local network having IP network 10.10.11.0/24. After EoIP tunnel configuration, an EoIP tunnel interface will be created in Office 1 Router whose IP address will be assigned 172.22.22.1/30.
Similarly, Office 2 Router is connected to internet through ether1 interface having IP address 192.168.80.2/30. In your real network this IP address will also be replaced with public IP address. Office 2 Router’s ether2 interface is connected to local network having IP network 10.10.12.0/24. After EoIP tunnel configuration an EoIP tunnel interface will also be created in Office 2 Router whose IP address will be assigned 172.22.22.2/30.
We will configure a site to site EoIP Tunnel between these two MikroTik Routers so that local network of these routers can communicate with each other through this VPN tunnel across public network.
Core Devices and IP Information
To configure a site to site EoIP VPN between two Routers, I am using two MikroTik RouterOS v6.38.1. IP information that I am using for this network configuration are given below.
- Office 1 Router WAN IP: 192.168.70.2/30, LAN IP Block 10.10.11.0/24 and Tunnel interface IP 172.22.22.1/30
- Office 2 Router WAN IP: 192.168.80.2/30, LAN IP Block 10.10.12.0/24 and Tunnel interface IP 172.22.22.2/30
This IP information is just for my RND purpose. Change this information according to your network requirements.
Site to Site EoIP Tunnel Configuration with IPsec
We will now start our site to site EoIP VPN configuration according to the above network diagram. Complete configuration can be divided into four parts.
- MikroTik RouterOS basic configuration
- EoIP tunnel configuration with IPsec
- Assigning IP address on tunnel interface
- Static route configuration
Part 1: MikroTik RouterOS Basic Configuration
Basic RouterOS configuration includes assigning WAN IP, LAN IP, DNS IP and Route, NAT configuration. According to our network diagram, we will now complete these topics in our two MikroTik RouterOS (Office 1 Router and Office 2 Router).
Office 1 Router Basic Configuration
The following steps will guide you how to perform basic configuration in your Office 1 RouterOS.
- Login to Office 1 RouterOS using winbox and go to IP > Addresses. In Address List window, click on PLUS SIGN (+). In New Address window, put WAN IP address (192.168.70.2/30) in Address input field and choose WAN interface (ether1) from Interface dropdown menu and click on Apply and OK button. Click on PLUS SIGN again and put LAN IP (10.10.11.1/24) in Address input field and choose LAN interface (ether2) from Interface dropdown menu and click on Apply and OK button.
- Go to IP > DNS and put DNS servers IP (8.8.8.8 or 8.8.4.4) in Servers input field and click on Apply and OK button.
- Go to IP > Firewall and click on NAT tab and then click on PLUS SIGN (+). Under General tab, choose srcnat from Chain dropdown menu and click on Action tab and then choose masquerade from Action dropdown menu. Click on Apply and OK button.
- Go to IP > Routes and click on PLUS SIGN (+). In New Route window, click on Gateway input field and put WAN Gateway address (192.168.70.1) in Gateway input field and click on Apply and OK button.
Basic RouterOS configuration has been completed in Office 1 Router. Now we will do similar steps in Office 2 RouterOS.
Office 2 Router Basic Configuration
The following steps will guide you how to perform basic configuration in your Office 2 RouterOS.
- Login to Office 2 RouterOS using winbox and go to IP > Addresses. In Address List window, click on PLUS SIGN (+). In New Address window, put WAN IP address (192.168.80.2/30) in Address input field and choose WAN interface (ether1) from Interface dropdown menu and click on Apply and OK button. Click on PLUS SIGN again and put LAN IP (10.10.12.1/24) in Address input field and choose LAN interface (ether2) from Interface dropdown menu and click on Apply and OK button.
- Go to IP > DNS and put DNS servers IP (8.8.8.8 or 8.8.4.4) in Servers input field and click on Apply and OK button.
- Go to IP > Firewall and click on NAT tab and then click on PLUS SIGN (+). Under General tab, choose srcnat from Chain dropdown menu and click on Action tab and then choose masquerade from Action dropdown menu. Click on Apply and OK button.
- Go to IP > Routes and click on PLUS SIGN (+). In New Route window, click on Gateway input field and put WAN Gateway address (192.168.80.1) in Gateway input field and click on Apply and OK button.
Basic RouterOS configuration has been completed in Office 2 Router. Now we are going to start EoIP tunnel configuration.
Part 2: EoIP Tunnel Configuration with IPsec
After MikroTik Router basic configuration, we will now configure EoIP tunnel with IPsec in both MikroTik RouterOS. In EoIP tunnel configuration, we will specify local and remote IP address as well as shared secret for IPsec and Tunnel ID.
EoIP Tunnel Configuration in Office 1 Router
The following steps will show how to configure EoIP tunnel in your Office 1 Router.
- Click on Interfaces menu item from Winbox and click on EoIP Tunnel tab and then click on PLUS SIGN (+). New Interface window will appear.
- Put a meaningful EoIP tunnel interface name (eoip-tunnel-r1) in Name input field.
- Put Office 1 Router’s WAN IP address (192.168.70.2) in Local Address input field.
- Put Office 2 Router’s WAN IP address (192.168.80.2) in Remote Address input field.
- Put a unique ID (for example: 10) in Tunnel ID input field. This ID must be same in both routers.
- Put IPsec shared secret in IPsec Secret input field if your router supports IPsec and you wish to enable IPsec authentication and encryption. You should remember that this IPsec Secret must be same in both routers.
- Also uncheck Allow Fast Path checkbox if it is checked and you want to enable IPsec.
- Click Apply and OK button.
- You will find a new EoIP tunnel interface followed by your given name (eoip-tunnel-r1) has been created in Interface List window.
EoIP tunnel configuration in Office 1 Router has been completed. Now we will do the similar steps in our Office 2 Router to create EoIP tunnel interface.
EoIP Tunnel Configuration in Office 2 Router
The following steps will show how to configure EoIP tunnel in your Office 2 Router.
- Click on Interfaces menu item from Winbox and click on EoIP Tunnel tab and then click on PLUS SIGN (+). New Interface window will appear.
- Put a meaningful EoIP tunnel interface name (eoip-tunnel-r2) in Name input field.
- Put Office 2 Router’s WAN IP address (192.168.80.2) in Local Address input field.
- Put Office 1 Routers WAN IP address (192.168.70.2) in Remote Address input field.
- Put a unique ID (for example: 10) in Tunnel ID input field. This ID must be same in both routers.
- Put IPsec shared secret in IPsec Secret input field if your router supports IPsec and you wish to enable IPsec authentication and encryption. You should remember that this IPsec Secret must be same in both routers.
- Also uncheck Allow Fast Path checkbox if it is checked and you want to enable IPsec.
- Click Apply and OK button.
- You will find a new EoIP tunnel interface followed by your given name (eoip-tunnel-r2) has been created in Interface List window.
EoIP tunnel configuration in Office 2 Router has been completed. Now we will assign IP address in our newly created EoIP tunnel interface in our both RouterOS so that both router can communicate with each other through this VPN tunnel interface.
Part 3: Assigning IP Address in EoIP Tunnel Interface
After EoIP tunnel configuration, a new EoIP tunnel interface has been created in both routers. So, if we assign same block IP in both interfaces, the both router will be able to communicate with each other through this EoIP tunnel. In this part, we will now assign IP address in our newly created tunnel interface.
Assigning IP Address on Office 1 Router’s EoIP Tunnel Interface
The following steps will show how to assign IP address on Office 1 Router’s tunnel interface.
- Go to IP > Address menu item and click on PLUS SIGN (+).
- Put a new private IP Block IP (172.22.22.1/30) in Address input field.
- Choose newly created tunnel interface (eoip-tunnel-r1) from Interface drop down menu.
- Click Apply and OK button.
Assigning IP address on Office 1 Router’s tunnel interface has been completed. Similarly, we will now assign IP address on Office 2 Router’s tunnel interface.
Assigning IP Address on Office 2 Router’s EoIP Tunnel Interface
The following steps will show how to assign IP address in Office 2 Router’s tunnel interface.
- Go to IP > Address menu item and click on PLUS SIGN (+).
- Put a new private IP Block IP (172.22.22.2/30) in Address input field.
- Choose newly created tunnel interface (eoip-tunnel-r2) from Interface drop down menu.
- Click Apply and OK button.
Assigning IP address on Office 2 Router’s tunnel interface has been completed. In this stage both routers are now able to communicate with each other. But both routers’ LAN cannot communicate with each other without configuring static routing. So, in the next part we will configure static routing in our both Office Router.
Part 4: Static Route Configuration
We will now configure static route in our both Office Router so that each router’s LAN can communicate with each other through EoIP tunnel.
Static Route Configuration in Office 1 Router
The following steps will show how to configure static route in Office 1 Router.
- Go to IP > Routes and click on PLUS SIGN (+). New Route window will appear.
- In New Route window, put destination IP Block (10.10.12.0/24) in Dst. Address input field.
- Put the Gateway address (172.22.22.2) in Gateway input field.
- Click Apply and OK button.
Static route configuration in Office 1 Router has been completed. Now we will configure static route in Office 2 Router.
Static Route Configuration in Office 2 Router
The following steps will show how to configure static route in Office 2 Router.
- Go to IP > Routes and click on PLUS SIGN (+). New Route window will appear.
- In New Route window, put destination IP Block (10.10.11.0/24) in Dst. Address input field.
- Put the Gateway address (172.22.22.1) in Gateway input field.
- Click Apply and OK button.
Static route configuration in Office 2 Router has been completed. Now both router as well as its LAN can communicate with each other through EoIP tunnel across public network.
To check your configuration, do a ping request from any router or any local network machine to other local network machine. If everything is OK, your ping request will be success.
If you face any confusion to follow the above steps properly, follow my video about MikroTik Site to Site EoIP Tunnel with IPsec carefully. I hope it will reduce your any confusion.
EoIP VPN Tunnel Configuration with IPsec has been explained in this article. I hope you will be able to configure EoIP tunnel with IPsec between your two office routers. However, if you face any confusion to configure EoIP tunnel in your MikroTik Router, feel free to discuss in comment or contact me from Contact page. I will try my best to stay with you.
2018-03-21T11:08:04
MikroTik Router Tutorials & Guides
Как установить pip на Debian
Мы покажем вам, как установить pip на Debian 9. pip является система управления пакетами, которую вы можете использовать для установки и управления пакетами, написанных на Python. Python — это язык программирования, который позволяет выполнять веб — разработку, разработку программного обеспечения, системное администрирование, научно-цифровой анализ данных и многое другое. Python Package Index (PyPI) принимает тысячи сторонних модулей для Python и вы можете установить любой из этих модулей с помощью менеджера пакетов pip. Установка pip на Debian действительно является легкой задачей, просто следуйте шагам, описанным ниже, и вы должны установить pip на Debian 9 VPS в течение нескольких минут.
1. Подключение через SSH и выполнение обновления системы
Перед тем, как установить pip на сервере Debian 9, подключитесь к серверу через SSH и выполните следующие команды для обновления системного программного обеспечения до последней версии:
sudo apt-get update && sudo apt-get -y upgrade
После того, как пакеты обновлены до даты вы можете переходить к следующему шагу.
2. Убедитесь что pip установлен на сервере Debian 9
Чтобы проверить, установлен ли pip на сервере, выполните следующую команду:
pip -V
Если pip не установлен на вашем Debian 9 VPS, вы должны получить выход, как показано ниже:
# pip -V

-bash: pip: command not found
3. Установка pip на Debian 9
Чтобы установить pip, выполните следующую команду:
sudo apt-get install python-pip
Установка займет несколько секунд, в зависимости от скорости соединения. После его завершения, выполните ту же команду, чтобы убедиться, что pip установлен успешно:
pip -V
Теперь, выход будет аналогичен приведенному ниже:
# pip -V

pip 9.0.1 from /usr/lib/python2.7/dist-packages (python 2.7)
4. Установка pip для версии Python 3.5+
Если вы используете Python 3.5+, вам необходимо установить pip с помощью следующей команды:
sudo apt-get install python3-pip
5. Проверка установки pip
Для того, чтобы убедиться, что установка прошла успешно, выполните следующую команду:
pip3 -V
Вывод должен быть аналогичен приведенному ниже:
# pip3 -V

pip 9.0.1 from /usr/lib/python3/dist-packages (python 3.5)
Поздравляем, теперь вы можете использовать pip для установки и управления пакетами программного обеспечения Python для вашего следующего проекта. Для получения дополнительных сведений о том, как использовать pip, вы можете обратиться к документации pipа (https://pip.pypa.io/en/stable/).
6. Используйте флаг справки для получения дополнительной информации
Вы также можете использовать флаг --help, чтобы получить более подробную информацию о командах, общих параметрах и примерах использования. Для Python 2, выполните следующую команду:
pip --help
Для Python 3 выполните следующую команду:
pip3 --help
Основной синтаксис pip заключается в следующем:
pip command options
Так, например, чтобы перечислить все установленные модули Python вы должны использовать флаг list:
pip list
Для Python 3 команда будет выглядеть так:
pip3 list
Вывод покажет вам, какие модули в настоящее время установлены в вашей системе наряду с правильной версией.
2018-03-20T16:20:38
Установка ПО на Debian
Windows Spectre патчи
Чтобы полностью защитить ПК от Spectre, вам необходимо обновить микрокод процессора Intel. Обычно это обеспечивается производителем вашего ПК через обновление прошивки UEFI, но теперь Microsoft предлагает дополнительный патч с новым микрокодом.
Мы считаем, что большинству людей стоит дождаться, когда производители ПК начнут развертывать это обновление, а не спешить устанавливать исправление Microsoft.
Но, если вас особенно беспокоят атаки Spectre, вы можете получить обновленный микрокод от Microsoft, даже если ваш производитель ПК не планирует его выпускать.
Патч от Microsoft доступен только для Windows 10.
Почему ваш ПК может быть уязвим для Spectre
Spectre и Meltdown были раскрыты в одно и то же время, так что это может быть немного запутанным.
Исходный патч Windows защищен от атаки Meltdown, но для полной защиты от Spectre требуется обновление микрокода процессора от Intel.
Технически обновление микрокода, о котором мы говорим здесь, защищает от Spectre Variant 2, «Branch Target Injection».
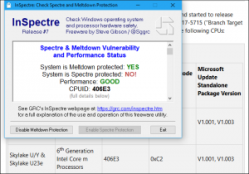
Вы можете проверить, защищен ли ваш ПК от Spectre с помощью инструмента InSpectre от Gibson Research Corporation.
Предполагая, что вы не установили обновление прошивки UEFI у производителя вашего компьютера или производителя материнской платы, если вы создали свой собственный компьютер, вы увидите, что ваш компьютер уязвим для Spectre.
Если у вас уже установлены эти исправления, этот инструмент показывает, насколько патчи влияют на производительность вашего ПК.

Все это звучит здорово, но есть одна проблема: стабильность системы.
Первоначальные обновления микрокода Intel вызвали случайную перезагрузку многих систем.
Новые обновления микрокодов кажутся стабильными, и мы не видели сообщений о распространенных проблемах.
Тем не менее, производитель вашего компьютера может тратить время на проверку того, что обновление не вызовет проблем на вашем ПК, прежде чем они сделают его доступным для вас.
На официальной странице документации Microsoft Microsoft заявляет, что она «не знает о каких-либо проблемах, которые влияют на это обновление в настоящее время», но также вам следует «проконсультироваться с веб-сайтами вашего производителя и Intel по поводу их рекомендаций по микрокодам для вашего устройства перед применением этого обновления к вашему устройство «.
Итак, наша рекомендация заключается в том, что вы сначала проверяете сайт своего производителя ПК на обновление UEFI или BIOS и устанавливаете его, если это возможно.
Если обновление недоступно, и вам неудобно ждать до тех пор, пока он не появится, вы можете захотеть рассмотреть обновление микрокода Microsoft.
Многие из худших опасений по поводу Spectre были устранены другими патчами программного обеспечения, что делает это обновление менее срочным. Например, веб-браузеры выпустили обновления, которые запрещают веб-сайтам использовать Spectre через код JavaScript. Spectre гораздо труднее использовать, чем Meltdown.
Мы еще не видели серьезных эксплойтов Spectre в дикой природе.
Итак, в общем, мы не рекомендуем рисковать этим.
Возможно, сами Microsoft могут захотеть проверить это обновление, прежде чем загружать его всем пользователям Windows автоматически через Центр обновления Windows, хотя мы и не знаем, какие патчи Microsoft планируют для этого обновления.
Однако некоторые типы систем по-прежнему особенно уязвимы.
Системы, которые запускают виртуальные машины, содержащие ненадежный код в облачной службе хостинга, должны почти наверняка установить обновление микрокода в этих системах.
Как установить обновления микрокода от Microsoft
Мы не рекомендуем всем пользователям Windows стремиться устанавливать эти исправления.
Но если вас беспокоит Spectre, и вы хотите обновить микрокод сейчас, вы можете скачать его.
Обратите внимание, что обновления микрокода доступны только для некоторых процессоров, и они доступны только для Windows 10 версии 1709, то есть обновления для разработчиков Fall.
Windows 7, Windows 8 и более ранние версии Windows 10 не поддерживаются. По состоянию на 13 марта 2018 года исправление Microsoft поддерживает процессоры Intel Core 6e поколение (Skylake), 7-го поколения (Kaby Lake) и 8-го поколения (Coffee Lake), а также некоторые процессоры Intel Xeon.
Вы можете проверить, поддерживается ли ваш процессор, используя бесплатный инструмент InSpectre, о котором мы упоминали выше.
Найдите строку «CPUID», а затем посетите страницу обновлений микрокодов Intel на веб-сайте Microsoft.
Убедитесь, что идентификатор CPUID, показанный в InSpectre на вашем компьютере, указан на странице Microsoft. Если это не так, обновление Windows еще не поддерживает ваш процессор с обновлениями микрокода, но может и в будущем.
Если ваш процессор поддерживается и вам требуется обновление, например, если InSpectre говорит, что вы не защищены от Spectre, вы можете загрузить обновление и установить его.
Это обновление не будет установлено автоматическим на вашем ПК, но должно быть загружено вручную через веб-сайт каталога обновлений Microsoft.
Загрузите патч KB4090007 на веб-сайте «Обновление каталога». Доступны как 64-разрядные, так и 32-разрядные версии, поэтому загрузите соответствующую версию для любой версии Windows, которую вы установили: x64 для 64-разрядной Windows или x86 для 32-разрядной Windows.
Запустите загруженный файл установщика, чтобы установить микрокод на свой компьютер.
После этого вам будет предложено перезагрузить компьютер.

После установки обновления снова запустите инструмент InSpectre, и он должен сообщить вам, что ваша система защищена от Spectre.

2018-03-20T14:30:49
Закрытие уязвимостей