Иногда нам нужно настроить на приборной панели в WooCommerce меню своего аккаунта. В этой статье мы поделимся простыми фильтрами WordPress, которые позволяют удалять неиспользуемое меню из приборной панели в соответствии с вашими требованиями.
Смотрите скриншот ниже перед применением фильтров.
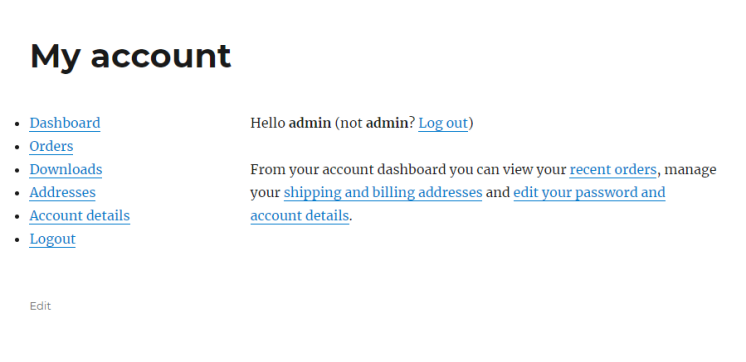
Как удалить из меню аккаунта в панели управления в WooCommerce?
Скопируйте приведенный ниже код и добавьте в конце файла functions.php и сохраните его. Вы можете удалить из меню WooCommerce на своей странице в панели учетной записи.
//Удалить интерфейс из меню приборной панели

add_filter ( 'woocommerce_account_menu_items', 'misha_remove_my_account_links' );

function misha_remove_my_account_links( $menu_links ){


    unset( $menu_links['edit-address'] ); // Адреса

    //unset( $menu_links['dashboard'] ); // Инструментальная панель

    unset( $menu_links['payment-methods'] ); // Способ оплаты

    //unset( $menu_links['orders'] ); // Заказы

    unset( $menu_links['downloads'] ); // Загрузки

    //unset( $menu_links['edit-account'] ); // Детали аккаунта

    //unset( $menu_links['customer-logout'] ); // Выход


    return $menu_links;


}
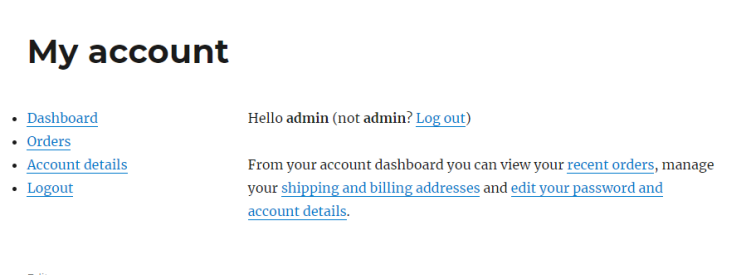
После применения вышеуказанного вставленного фрагмента кода в файле functions.php он удалит адреса, способы оплаты и загружает меню из приборной панели слева в строке меню.
2017-11-15T23:09:53
Лучшие учебники по Wodpress