Sometimes system administrators create firewall rule to block unwanted websites. But VPN apps break these firewall rules and allow access to unwanted websites. For example, if Facebook is blocked with MikroTik Firewall and any expert user installs and enables VPN apps (such as OpenVPN, Hotspot Shield, ProtonVPN, NordVPN, PureVPN etc.), he can easily get access to Facebook. So, system administrators should also block popular VPN apps so that user cannot use those VPN servers. Blocking VPN apps is not so easy. You should be expert enough to block VPN application. In this article, I will discuss a simple trick to block VPN applications with MikroTik Firewall.
Trick to Block VPN Applications (VPN Servers)
When any user installs and enables VPN application, it creates a tunnel between user computer and the VPN server. The user PC is now treated as a PC of the VPN network. So, any firewall rule applied on the user IP, does not work anymore. In a VPN enabled PC, if we find public IP address of our network with any online tools such as whatismyipaddress.com, we will find the VPN server IP instead of our MikroTik public IP. Now if we block that VPN server IP [installing and enabling VPN apps and finding the VPN server IP with the online tools], any user cannot be connected to the VPN server and user cannot break our MikroTik Firewall Rule.
MikroTik Firewall Rule to Block VPN Servers
We will first create a firewall rule that will block those VPN servers which will have in blacklisted servers group. The following steps will show how to block a group of destination servers with MikroTik Firewall Rule.
- Go to IP > Firewall menu item and click on Filter Rules tab and then click on PLUS SIGN (+). New Firewall Rule window will appear.
- Choose forward from Chain dropdown menu.
- Click on Advanced tab and put a group name (such as Blacklisted Servers) in Dst. Address List input box.
- Click on Action tab and choose drop from Action dropdown menu.
- Click Apply and OK button.
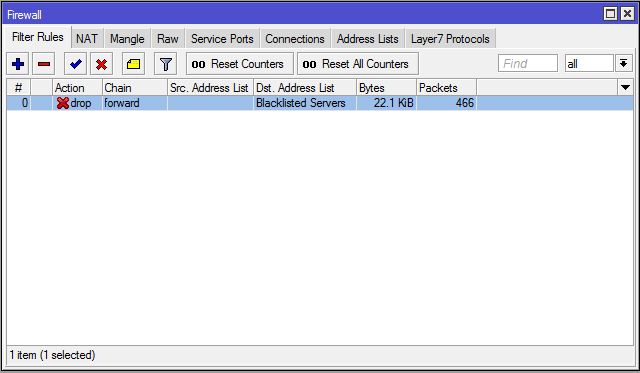
This rule will block those IP addresses which will have in Blacklisted Servers group. Now we will find our targeted VPN server IP and include it in Blacklisted Servers group.
Finding VPN Servers IP Addresses
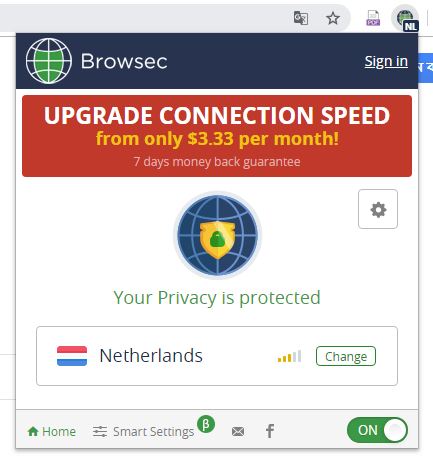
The easiest way to find any VPN server’s IP address is installing and enabling that VPN application and then finding the public IP address with the online tools. For example, we will install and enable browsec VPN extension in our browser and find the IP addresses of the browsec VPN server. Searching browsec VPN in Google, we can easily get the instructions to add this extension in our favourite browser. After installing browsec VPN, you will find a browsec icon in your browser’s top right corner like the below image.
After enabling browsec VPN, visit whatismyipaddress.com and you will find a public IP address which is not your MikroTik public IP address.
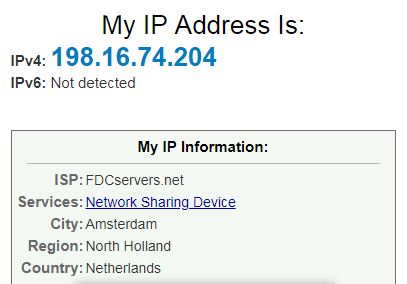
So, this is a browsec VPN Server IP address. Adding this IP address in Blacklisted Servers group, browsec VPN can be blocked now.
Adding VPN Server IP in Blacklisted Servers Group
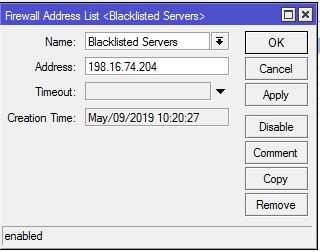
After finding VPN server’s IP address, it is time to add this IP address in Blacklisted Servers group. The following steps will show how to add VPN server IP in Blacklisted Servers group.
- Go to IP > Firewall menu item and click on Address Lists tab and then click on PLUS SIGN (+). New Firewall Address List window will appear.
- Choose your created group name (Blacklisted Servers) from Name dropdown menu.
- Put VPN Servers IP address (198.16.74.204) that you want to add this group in Address input field.
- Click Apply and OK button.
Now browse whatismyipaddress.com again. You may find that after few seconds a new public IP has been assigned because VPN apps are intelligent enough to switch another new available server which is not blocked.
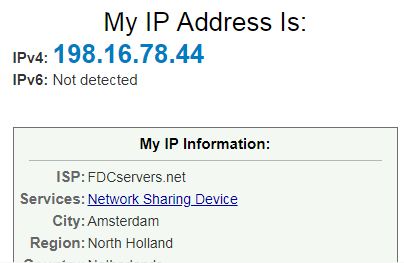
Remember that VPN apps have multiple IP addresses but not unlimited IP addresses. Look carefully to the new assigned IP address where first octet and second octet is the same as the previous IP address and only changing third and four octet. Now we can apply a trick. Rather blocking a single IP address, we can block the whole block (198.16.0.0/16) so that VPN apps cannot assign another new IP address from this block. So,
- Go to IP > Firewall menu item and click on Address Lists tab and then double click on the previous listing.
- Modify single IP address (198.16.74.204) to IP block (198.16.0.0/16) in Address input box.
- Click Apply and OK button.
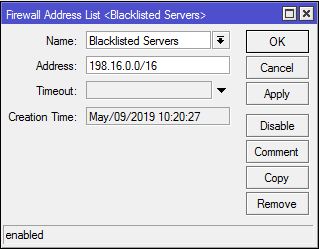
Now your targeted VPN server will be blocked. Accidently, if the VPN application assigned another IP block’s IP address, don’t forget to add that IP block in Blacklisted Servers group following the above steps.
In this article, I have discussed how to block only browsec VPN. Similarly, you can install and enable any other VPN applications such as OpenVPN, Hotspot Shield, ProtonVPN, Hide.me, NordVPN, PureVPN, SlickVPN etc. and can find their VPN Server IP addresses and can block those IP addresses with MikroTik Firewall Rule.
If you face any confusion to follow the above steps properly, watch the following video Blocking VPN Access with MikroTik Router. I hope it will reduce your any confusion.
How to block VPN access with MikroTik Firewall rule has been discussed in this article. I hope you will now be able to block any targeted VPN application following the above steps properly. However, if you face any confusion to block any VPN application with MikroTik Firewall, feel free to discuss in comment or contact with me from Contact page. I will try my best to stay with you.