К Wi-Fi сети может подключиться любое устройство, которое находится в зоне покрытия. Именно поэтому так важно следить за безопасностью. В данном материале мы расскажем о том, как поменять пароль на Wi-Fi на роутере D-Link. Читать
Архив рубрики: Публикации
Как отключить WPS на роутере
WPS или Wi-Fi Protected Setup это технология для быстрого подключения к Wi-Fi сети. Но, несмотря на то, что WPS значительно упрощает процедуру подключения, данной возможностью редко кто пользуется. В данной небольшой статье мы расскажем о том, как отключить WPS на роутере ASUS, TP-LINK и D-Link, если эта функция вам не нужна.
Читать
DHCP Server Configuration in MikroTik Router
Dynamic Host Configuration Protocol (DHCP) is a client/server protocol where a DHCP server automatically provides an Internet Protocol (IP) address and other related information such as subnet mask, default gateway and DNS to DHCP clients. DHCP server and client use UDP port 67 and 68 for communication. In a network, a DHCP client (IP devices such as Desktop, Laptop, Smartphone etc.) requests for an IP lease to DHCP servers and a DHCP server responses allocating IP address and other related IP information for a certain period. So, a DHCP server reduces huge network administration tasks of a system administrator. Every MikroTik Router has a built-in DHCP service. So, system admin can easily turn MikroTik Router into a DHCP server and can easily reduce his network administration task.
MikroTik DHCP Server configuration
Generally, every MikroTik router has a built-in DHCP service. So, if you have a MikroTik router and you want to enable a DHCP server in your network with MikroTik router to reduce your administrator task, keep reading the rest of this article where I will show you how to configure a DHCP server in your MikroTik router.
Before going to start configuring a DHCP server in MikroTik router, I will show you a basic network diagram where a MikroTik router is working as a DHCP server as well as it is working as a network gateway. I hope, your network is almost same like the below network diagram and you want to enable a DHCP server in your MikroTik router.
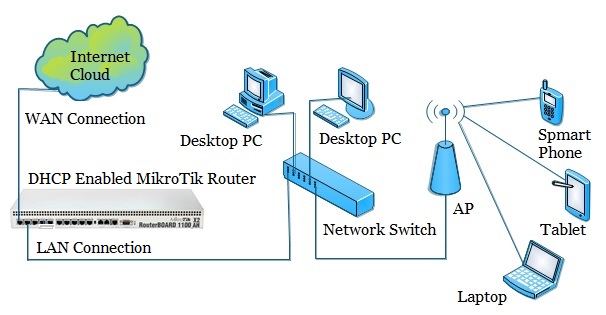
In the above network diagram, the first interface (ether1 port) of MikroTik router is connected to an ISP for accessing internet and this interface is known as WAN port. All the LAN users are connected to second interface (ether2 port) of MikroTik router through a network switch. We will now enable DHCP server in this second interface so that all the LAN users will get network information (IP, Subnet mask, Gateway and DNS) dynamically from this DHCP server to access internet. But before enabling DHCP server in MikroTik router, you have to complete MikroTik router basic configuration. Basic configuration includes WAN and LAN IP assigning, Gateway IP assigning, DNS configuration and NAT rule creation. If you are a new MikroTik user, please spend some time to study my previous article about MikroTik Router Basic Configuration using Winbox and complete the basic configuration of your MikroTik router and then follow my below steps to enable DHCP server in your MikroTik router.
- Go to IP > DHCP Server menu from your winbox. DHCP Server window will appear.
- In DHCP Server window, click on DHCP Setup button and choose the interface (in this article: ether2) in which you want to setup DHCP server from DHCP Server Interface drop-down menu and then click on Next button.
- Now put your LAN network block in DHCP Address Space input box and click Next button. DHCP client/LAN user will get IP from this network.
- Choose gateway address for the given network in Gateway for DHCP Network input box and then click Next button.
- Provide IP range from which your DHCP client/LAN user will get IP in Address to Give Out input box and click Next button.
- Provide preferred DNS server IP and click Next button.
- Now provide IP lease time and click Next button. Default lease time is 3 days.
- DHCP setup is complete now and a successful message will be shown.
- Now connect any IP device (Desktop, Laptop, Smartphone etc.) to your network. Automatically an IP will be allocated for that device from your MikroTik DHCP server. Click Leases tab and observe IP lease status of that DHCP client.
If you follow the above steps carefully, your MikroTik router will turn into a DHCP server and your LAN users will now be able to obtain IP information from your MikroTik DHCP server. However, if you face any problem to enable DHCP server in your MikroTik router, watch my below video about DHCP Server configuration in MikroTik Router. I hope, it will help you to configure your MikroTik DHCP server successfully.
DHCP server configuration in MikroTik Router has been explained step by step in this article. A video tutorial has also been uploaded so that you can configure DHCP server in MikroTik router without any confusion. However, if you face any problem to configure a DHCP server in your MikroTik router, feel free to discuss in comment or contact with me from Contact page. I will try my best stay with you.
2015-10-14T16:35:51
MikroTik DHCP Server Configuration Guides
Что такое: CSS
CSS или каскадные таблицы стилей — это язык таблиц стилей, используемых для определения внешнего вида и форматирования HTML-документов. Темы WordPress с помощью CSS и HTML выводят свои данные, созданных на WordPress. Каждая тема WordPress содержит файл style.css, который имеет правила стиля, чтобы определить форматирование страниц, созданных на WordPress.
CSS очень проста в использовании и легка в освоении. Есть много сайтов, публикации CSS учебники для начинающих, которые могут помочь новому пользователю WordPress чтобы начать работать. Однако, поскольку она очень проста в использовании, многие пользователи WordPress могут понять основы, просто посмотрев на их темы WordPress в файле style.css.
Пример:
body {

font-size:14px;

color: #444;

background-color:#FFFFFF;

}


h1 {

font-size:18px;

text-transform:uppercase;

}


.post-title {

font-size: 16px;

color: #4C0000;

font-weight:normal;

}
Элементы HTML могут быть оформлены непосредственно в CSS. Дизайнеры также используют идентификаторы и классы , чтобы определить различные разделы, которые могут быть оформлены в CSS. Это помогает им использовать разные стили для же элементов HTML на веб-странице, но в разных разделах. Например, Н1 элемент Заголовок блога в разделе заголовка страницы могут быть стилизованы иначе, чем другой Н1 элемент в почтовой области одной и той же страницы.
Пример:
<div id="header">


<h1 class="blog-title">

<a href="<?php bloginfo('url'); ?>" title="<?phpbloginfo('name'); ?>"><?php bloginfo('name'); ?></a>

</h1>


</div>
HTML — код показанный выше содержит идентификатор по имени ‘заголовок’ и класс ‘блог-Заголовок’. Эти разделы могут быть оформлены в CSS.
Пример:
#header {

background-color:#4C0000;

height:120px;

width:100%;

padding:20px;

}


h1.blog-title a {

font-color:#FFFFFF;

font-size:16px;

font-family: Georgia, "Times New Roman", serif;

text-decoration:none;

}
Дополнительное Чтение
2015-10-11T21:29:28
Глоссарий
Как поменять пароль Wi-Fi на роутере TP-LINK
Используя домашнюю Wi-Fi сеть очень важно следить за безопасностью. Ваша Wi-Fi сеть должна быть всегда защищена надежным паролем, который должен время от времени меняться. В данном материале мы расскажем о том, как поменять пароль Wi-Fi на роутере TP-LINK. Читать
Как узнать MAC адрес сетевой карты
MAC адрес это уникальный идентификатор, который есть у всех активных устройств, которые подключены к локальной сети. Необходимость знать MAC адрес может возникать в различных ситуациях. Например, многие интернет провайдеры делают привязку пользователя к MAC адресу его сетевой карты. В этом случае при настройке роутера вам понадобится ваш MAC адрес.
Если вы столкнулись с подобной ситуацией, то наша статья должна вам помочь. Здесь мы расскажем о том, как узнать MAC адрес сетевой карты в таких операционных системах как Windows 10, Windows 7 и Windows XP. Читать